HP Omnibook XE3 Service Manual
Amd cpu version: technology codes ge and gd
Hide thumbs
Also See for HP Omnibook XE3:
- Evaluator manual (188 pages) ,
- Reference manual (151 pages) ,
- Service manual (117 pages)
Table of Contents
Advertisement
Advertisement
Table of Contents
Troubleshooting

Related Manuals for HP HP Omnibook XE3


Summary of Contents for HP HP Omnibook XE3
-
Page 1: Service Manual
HP Omnibook XE3 (AMD CPU Version: Technology Codes GE and GD) Service Manual... - Page 2 TrackPoint™ is a U.S. trademark of International Business Machines. Adobe® and Acrobat® are trademarks of Adobe Systems Incorporated. All certifications may not be completed at product introduction. Check with your HP reseller for certification status. This equipment is subject to FCC rules. It will comply with the appropriate FCC rules before final delivery to the buyer.
-
Page 3: Table Of Contents
Removing the Display Assembly (HP Authorized Service Providers Only)... 2-18 Removing the Top Case (HP Authorized Service Providers Only)... 2-22 Removing the CD Player PCA (selected models) (HP Authorized Service Providers Only) ... 2-24 Removing the Hinge Saddle Set (HP Authorized Service Providers Only) ... 2-25 Removing the Video PCA (HP Authorized Service Providers Only) ... - Page 4 Figure 2-26. Example of Serial Number Label ...2-39 Figure 3-1. Basic Troubleshooting Steps ...3-2 Figure 3-2. e-DiagTools Screens — Basic and Advanced ...3-22 Figure 3-3. Serial and Parallel Loopback Connectors...3-24 Figure 4-1. Exploded View ...4-2 HP Omnibook XE3 (Technology Codes GE and GD)
- Page 5 Table 4-2. Replaceable Parts for Technology Code GD Models ... 4-5 Table 4-3. Accessory Replaceable Parts... 4-7 Table 4-4. Part Number Reference ... 4-8 Table 5-1. XE3 TFT LCD Guidelines (13.3/14.1/15.0-in XGA, 15.0-in SXGA+) ... 5-3 HP Omnibook XE3 (Technology Codes GE and GD)
- Page 6 Introduction This manual provides reference information for servicing HP Omnibook XE3 notebook PCs. It is for use by HP-authorized service personnel while installing, servicing, and repairing these products. The manual is designed as a self-paced guide that will train you to install, configure, and repair XE3 notebooks.
-
Page 7: Product Information
The Omnibook XE3 series is HP’s value all-in-one business notebook computer, targeted at small- to medium-sized businesses (SMBs). It combines affordability, value, ease-of-use, and quality in a convenient package that integrates easily into any SMB environment at a wide range of prices. It also incorporates several new technologies and an enhanced industrial design for greater ease-of-use, quality, and reliability. -
Page 8: Technology Codes
To help solve this problem, HP has added a technology code to the serial number of each of its products. Since the BIOS must be matched to the notebook’s hardware, the same code is used for the BIOS and the hardware. -
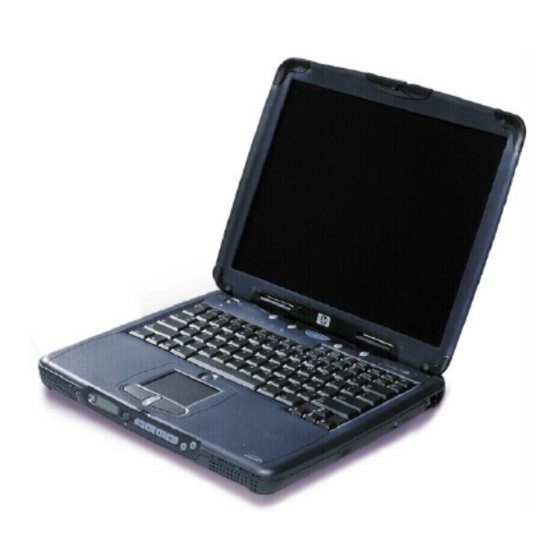
Page 9: Features
(See page 1-7.) 4. Pad Lock touch pad on/off button. 5. Touch pad (pointing device). 6. Scroll up/down toggle. HP Omnibook XE3 (Technology Codes GE and GD) Figure 1-1. Top/Right View 7. Click buttons. 8. CD/DVD drive. 9. Built-in microphone. -
Page 10: Figure 1-2. Front View
Figure 1-3. Rear/Left View 26. Microphone jack. 27. Kensington lock slot (security connector). 28. PC card slots (upper and lower). 29. System-off switch (for resetting notebook). 30. PC card eject buttons. 31. Floppy disk drive. HP Omnibook XE3 (Technology Codes GE and GD) -
Page 11: Figure 1-4. Bottom View
32. Battery. 33. Battery latch. HP Omnibook XE3 (Technology Codes GE and GD) Figure 1-4. Bottom View 34. SDRAM cover. 35. Mini-PCI cover. Product Information... -
Page 12: Operation
–or– Slide the power switch and hold for five seconds (only if the Start menu procedure doesn’t work). HP Omnibook XE3 (Technology Codes GE and GD) To turn on again Press any key or move a pointing device to restore the display (“Instant... -
Page 13: Checking The Notebook's Status
1. Power status. 2. Battery status. 3. Caps lock. 4. Num lock. HP Omnibook XE3 (Technology Codes GE and GD) Figure 1-5. Status Lights 5. Scroll lock. 6. Floppy disk drive activity. 7. Hard disk drive activity. -
Page 14: Table 1-3. Status Lights
In addition, the status panel on the front of the notebook (if present) provides CD playback status and other system information. For details, see the section “Status panel” in the notebook’s Reference Guide. Product Information Table 1-3. Status Lights HP Omnibook XE3 (Technology Codes GE and GD) -
Page 15: Using Fn Hot Keys
Toggles Scroll Lock on and off. Fn+Up arrow Increases sound volume. Fn+Down arrow Decreases sound volume. *The Lock key is in the top row of the keyboard: HP Omnibook XE3 (Technology Codes GE and GD) Table 1-4. Fn Hot Keys Product Information... -
Page 16: Resetting The Notebook
Note To boot from a CD or DVD, insert a bootable CD (such as a Recovery CD) into the drive, then restart. Press Esc when the HP logo appears, then select the CD-ROM/DVD drive as the temporary boot device. 1-10 Product Information Figure 1-6. -
Page 17: Using The Cd/Dvd Player (Selected Models)
2. Previous track button. 3. Play/pause button. 4. Stop button (when notebook is on). Stop/eject (when notebook is off). HP Omnibook XE3 (Technology Codes GE and GD) Figure 1-7. Multimedia Buttons 5. Next track button. 6. Volume control down button. -
Page 18: Specifications
Specifications The following tables list the specifications for the notebook and its accessories. These are subject to change: for the latest versions, see the HP Notebook web site, www.hp.com/notebooks (in Europe: www.europe.hp.com/notebooks). Hardware Specifications Table 1-5. XE3 Series Hardware Specifications... - Page 19 Operating humidity: 20% (10% on some models) to 90% RH (5 to 35 °C). Operating altitude: up to 3050 m (10,000 ft). Storage altitude: up to 12,200 m (40,000 ft). HP Omnibook XE3 (Technology Codes GE and GD) Product Information 1-13...
-
Page 20: Table 1-6. Xe3 Series Accessories
Port Defcon 1 Notebook Security System Other P1534A HP amplified external speakers P1977A USB Compact Flash & IBM Microdrive reader P1978A USB web camera F2100A USB optical mouse 1-14 Product Information Table 1-6. XE3 Series Accessories HP Omnibook XE3 (Technology Codes GE and GD) -
Page 21: Internal Design
PCMCIA PCMCIA cards sockets (2) Floppy disk drive Headphone Hard disk drive HP Omnibook XE3 (Technology Codes GE and GD) Display assembly Video PCA Switchboard PCA Motherboard PCA CD player Keyboard Figure 1-8. Replaceable Module Diagram Mini-PCI CD/DVD drive... -
Page 22: Table 1-7. Functional Structure
Earphone amplifier. Speakers. LED circuitry, keyboard controller. Status LEDs. CD/DVD status display. I/O controller, serial connector. I/O controller, parallel connector. Keyboard controller, PS/2 connector. Bus controller, USB connectors. PCMCIA controller. PCMCIA connectors. HP Omnibook XE3 (Technology Codes GE and GD) -
Page 23: Removal And Replacement
Installing a wrong-size screw can damage the notebook. (The symbol at the left represents an M2.5×5 mm T-head screw.) HP Omnibook XE3 (Technology Codes GE and GD) Removal and Replacement Table 2-1. -
Page 24: Disassembly Flowchart
• Headphone PCA Heatsink assembly (with fan) CPU module Motherboard or bottom case Figure 2-1. Disassembly Flow HP Omnibook XE3 (Technology Codes GE and GD) Switchboard PCA (also remove if removing motherboard or bottom case assembly) CD player PCA PCMCIA doors... -
Page 25: Table 2-2. Required Equipment
5 mm hexagonal socket screwdriver. Electrostatic device (wristband and pad). Screw Thread Size M2.5 (2–11 mm long) M2.5 (12–19 mm long) HP Omnibook XE3 (Technology Codes GE and GD) Table 2-2. Required Equipment Table 2-3. Recommended Screw Torques Torque (cm-kgf) 3.0 – 3.5 2.5 –... -
Page 26: Removing The Battery (User-Replaceable)
Reassembly Notes Insert the front (rounded) end of the battery into the battery compartment, and lower the back end in until it clicks into place. Removal and Replacement Figure 2-2. Removing the Battery HP Omnibook XE3 (Technology Codes GE and GD) -
Page 27: Removing An Sdram Module (User-Replaceable)
1. Unplug the AC adapter, if present, and remove the battery. 2. On the bottom of the notebook, loosen both screws holding the SDRAM cover (the cover retains the screws), and remove the cover. HP Omnibook XE3 (Technology Codes GE and GD) Part Number 1818-8504 1818-8635 Figure 2-3. -
Page 28: Figure 2-4. Removing An Sdram Module
Gently press the SDRAM module into the connector at an angle of about 30°, until it is fully inserted. Then press down on both sides of the module until the latches snap closed. Removal and Replacement Figure 2-4. Removing an SDRAM Module HP Omnibook XE3 (Technology Codes GE and GD) -
Page 29: Removing The Mini-Pci Pca (Selected Models) (User-Replaceable)
PCA has several sticky pads on the side facing the motherboard. 4. Disconnect the cable (modem models only) or cables (modem/LAN models only) from the PCA. 5. Gently pull the PCA out of its connector. HP Omnibook XE3 (Technology Codes GE and GD) Part Number Exchange Part Number... -
Page 30: Figure 2-5. Removing The Mini-Pci Pca
PCA until the latches snap closed. Make sure sticky pads on the underside of the PCA are intact. Replace if needed. Removal and Replacement Figure 2-5. Removing the Mini-PCI PCA HP Omnibook XE3 (Technology Codes GE and GD) -
Page 31: Replacing Small Parts (User-Replaceable)
Insert a small flat-blade screwdriver under the cover and pry it loose. To replace, Covers, screw (on firmly press the adhesive side of the cover into the recess. display bezel) HP Omnibook XE3 (Technology Codes GE and GD) Removal and Replacement... -
Page 32: Removing The Keyboard Cover (Hp Authorized Service Providers Only)
3. Open the notebook’s display so that it lays flat. 4. Use the flat-blade screwdriver to carefully pry up the inside edges of the hinge covers until the cover pops loose, then lift the cover off. 2-10 Removal and Replacement HP Omnibook XE3 (Technology Codes GE and GD) -
Page 33: Figure 2-7. Removing The Keyboard Cover
Make sure these tabs snap back into place when reinstalling the cover. HP Omnibook XE3 (Technology Codes GE and GD) Figure 2-7. Removing the Keyboard Cover... -
Page 34: Removing The Keyboard (Hp Authorized Service Providers Only)
Be careful not to touch the heatsink until it has cooled. It could be hot if the notebook was running recently. 5. Lay the keyboard face down on the top case, forward of its normal position, and disconnect the ribbon cable from the motherboard. 2-12 Removal and Replacement HP Omnibook XE3 (Technology Codes GE and GD) -
Page 35: Figure 2-9. Disconnecting The Keyboard Cable
Lay the keyboard face down on the top case forward of its normal position, then reconnect the ribbon cable. Slip the metal tabs on the bottom of the keyboard into their slots in the top case, then lower the keyboard into place. HP Omnibook XE3 (Technology Codes GE and GD) Removal and Replacement 2-13... -
Page 36: Removing The Hard Disk Drive (Hp Authorized Service Providers Only)
4. Use the strap on the hard drive to carefully pull the drive off of its connector and out of the notebook. 2-14 Removal and Replacement Part Number Exchange Part Number F1664-60902 F1664-69002 F2072-60908 F2072-69108 F1660-60912 F1660-69112 F2072-60913 F2072-69113 F1660-60914 F1660-69114 F2332-60903 F2332-69003 HP Omnibook XE3 (Technology Codes GE and GD) -
Page 37: Figure 2-10. Removing The Hard Disk Drive
5. Loosen all four screws in the underside of the hard drive carrier (the carrier retains the screws), then slide the drive back and up out of the case. Pin connector Figure 2-11. Removing the Hard Disk Carrier HP Omnibook XE3 (Technology Codes GE and GD) Removal and Replacement 2-15... - Page 38 Make sure the tabs on the back of the hard disk carrier fit into their slots on top of the hinge saddle. Be careful not to trap the heatsink, keyboard, or speaker cables beneath the hard drive. 2-16 Removal and Replacement HP Omnibook XE3 (Technology Codes GE and GD)
-
Page 39: Recovering And Reinstalling Software
Recovering and Reinstalling Software You can use the Recovery CDs to recover an original build or reinstall the HP custom software. To recover a specific application, see “To recover an application” in the Reference Guide. The Recovery CDs provide all HP notebook–specific Windows drivers; these drivers are in the following directories: On the hard drive, under c:\hp\drivers. -
Page 40: Removing The Display Assembly (Hp Authorized Service Providers Only)
6. Remove the four flanged screws from the display hinges. This may be easier if you support the display so that it remains approximately flat. 7. Lift the display off of the notebook. 2-18 Removal and Replacement HP Omnibook XE3 (Technology Codes GE and GD) -
Page 41: Figure 2-12. Removing The Display
When installing a new display assembly, follow the procedure given in “Installing a New Display Assembly“ on the following page. HP Omnibook XE3 (Technology Codes GE and GD) Figure 2-12. Removing the Display Removal and Replacement 2-19... -
Page 42: Table 2-8. Motherboard Video Dip Switch Settings For Technology Code Ge Models
UNIPAC 14.1-in TFT XGA LG 13.3-in TFT XGA LG 14.1-in TFT XGA HannStar 15.0-in TFT XGA CPT 15.0-in TFT SXGA+ 2-20 Removal and Replacement for Technology Code GE Models for Technology Code GD Models HP Omnibook XE3 (Technology Codes GE and GD) -
Page 43: Figure 2-13. Video Pca Dip Switches
As an example, the following figure shows the DIP switches set to OFF-ON-ON-ON: Figure 2-13. Video PCA DIP Switches HP Omnibook XE3 (Technology Codes GE and GD) Removal and Replacement 2-21... -
Page 44: Removing The Top Case (Hp Authorized Service Providers Only)
7. Carefully lift the top cover forward and off of the notebook. Be careful not to pull on the CD player PCA ribbon cable beneath the case. 2-22 Removal and Replacement HP Omnibook XE3 (Technology Codes GE and GD) Screws, M2.5x8 mm (4) -
Page 45: Figure 2-15. Removing The Top Case
Make sure the touch pad cable and speaker cable connectors are fully inserted squarely in their sockets. Make sure the tabs along the edges of the case snap shut. HP Omnibook XE3 (Technology Codes GE and GD) Screw, M2.5x8 mm (1) Figure 2-15. -
Page 46: Removing The Cd Player Pca (Selected Models) (Hp Authorized Service Providers Only)
3. Remove both standoff screws (use a 5 mm socket screwdriver), and lift the PCA out of the top case. 2-24 Removal and Replacement Figure 2-16. Removing the CD Player PCA HP Omnibook XE3 (Technology Codes GE and GD) CD player PCA standoff screws, 5 mm (2) -
Page 47: Removing The Hinge Saddle Set (Hp Authorized Service Providers Only)
Display assembly (page 2-18). Top case (page 2-22). 3. Remove the two retaining screws from the bottom case. Figure 2-17. Removing the Hinge Saddle Retaining Screws HP Omnibook XE3 (Technology Codes GE and GD) Screws, M2.5x8 mm (2) Removal and Replacement... -
Page 48: Figure 2-18. Removing The Hinge Saddle
2-26 Removal and Replacement Figure 2-18. Removing the Hinge Saddle HP Omnibook XE3 (Technology Codes GE and GD) Screws, M2.5x8 mm (2) Screws, M2.5x8 mm (2) -
Page 49: Removing The Video Pca (Hp Authorized Service Providers Only)
Keyboard cover (page 2-10). Keyboard (page 2-12). Display assembly (page 2-18). Top case (page 2-22). Hinge saddle set (page 2-25). 3. Note and record the settings of the PCA’s DIP switches. HP Omnibook XE3 (Technology Codes GE and GD) Removal and Replacement 2-27... -
Page 50: Figure 2-19. Removing The Video Pca
Make sure the protective pads on the PCA are intact, and replace if needed. Make sure the PCA is firmly set on its connectors. 2-28 Removal and Replacement Figure 2-19. Removing the Video PCA HP Omnibook XE3 (Technology Codes GE and GD) -
Page 51: Removing The Heatsink Assembly (With Fan) (Hp Authorized Service Providers Only)
Reassembly Notes Make sure the fan cable is not pinned under the assembly. Make sure the thermal pad on the heatsink is not damaged, and replace if necessary. HP Omnibook XE3 (Technology Codes GE and GD) Screws, M2.5x4 mm (2) -
Page 52: Removing The Cpu Module (Hp Authorized Service Providers Only)
Make sure the screwdriver applies pressure to the CPU removal tool, and not to the CPU itself. 2-30 Removal and Replacement Part Number Exchange Part Number 1822-0582 F3930-69101 1822-0259 F2409-69104 1822-0258 F3928-69101 1822-0257 F2409-69103 1822-0580 F3931-69101 1822-0497 F2410-69102 1822-0528 F2410-69101 HP Omnibook XE3 (Technology Codes GE and GD) -
Page 53: Figure 2-21. Removing The Cpu Module
Insert the tip of a flat-blade screwdriver into the notch marked LOCK on the CPU mount bracket, and tilt the screwdriver toward the CPU. Make sure the screwdriver applies pressure to the CPU removal tool, and not to the CPU itself. HP Omnibook XE3 (Technology Codes GE and GD) Removal and Replacement 2-31... -
Page 54: Removing The Floppy Disk Drive (Hp Authorized Service Providers Only)
Hinge saddle set (page 2-25). 2. Release the drive’s ribbon cable from its connector on the motherboard. 3. Remove the two retaining screws. 4. Lift the floppy drive out of the notebook. 2-32 Removal and Replacement HP Omnibook XE3 (Technology Codes GE and GD) -
Page 55: Figure 2-22. Removing The Floppy Disk Drive
Reassembly Notes Make sure the headphone PCA lies under the floppy disk drive bracket. Make sure the headphone PCA cable is not trapped under the floppy disk drive. HP Omnibook XE3 (Technology Codes GE and GD) Screws, M2.5x4 mm (2) -
Page 56: Removing The Cd/Dvd Drive (Hp Authorized Service Providers Only)
Place the drive so that its connector aligns with that on the motherboard, then gently press it to the left and into place. 2-34 Removal and Replacement Figure 2-23. Removing the CD/DVD Drive HP Omnibook XE3 (Technology Codes GE and GD) -
Page 57: Removing The Motherboard Or Bottom Case (Hp Authorized Service Providers Only)
2. Run ESN.EXE from one of these sources: On a factory software installation, change to \hp\drivers\hputils and type – or – Copy \hp\drivers\hputils\ESN.EXE from the Recovery CD, then run it on the notebook. 3. Save the serial number and service ID. Removal Procedure 1. -
Page 58: Figure 2-24. Removing The Motherboard
When reinstalling the bottom case, see “Replacing the Bottom Case“ on page 2-38. 2-36 Removal and Replacement Screw, M2.5x5 mm (1) Figure 2-24. Removing the Motherboard HP Omnibook XE3 (Technology Codes GE and GD) Standoff screws, 5 mm (6) Screw, M2.5x5 mm (1) CD/DVD support... -
Page 59: Reinstalling The Motherboard
If you are prompted for the serial number, type the serial number shown on the bottom of the case. If a serial number has already been stored, you must call an HP support center to change it. HP Omnibook XE3 (Technology Codes GE and GD) at the prompt. -
Page 60: Replacing The Bottom Case
2. Transfer the old serial number label and install a new overlay, or create a new serial number label using the steps below. 3. If you need to install or replace the PCMCIA doors, refer to the figure below. 2-38 Removal and Replacement Figure 2-25. Installing the PCMCIA Doors HP Omnibook XE3 (Technology Codes GE and GD) -
Page 61: Figure 2-26. Example Of Serial Number Label
Partnership web site (see page vi) under Support/Service in Technical Support Information, or from http://www.mcd.hp.com. Store it with other Word templates on a PC connected to a laser printer. The latest version includes fields for warranty period and manufacturing location. -
Page 62: Removing Notebook Components (Hp Authorized Service Providers Only)
(page 2-34). Motherboard (page 2-35). Drive, CD/DVD See page 2-34. See page 2-32. Drive, floppy disk See page 2-29. Heatsink assembly 2-40 Removal and Replacement Additional Steps See the figure on page 2-38. HP Omnibook XE3 (Technology Codes GE and GD) - Page 63 (page 2-18). Top case (page 2-22). Hinge saddle set (page 2-25). HP Omnibook XE3 (Technology Codes GE and GD) Additional Steps Remove the retaining screw from the PCA, disconnect the cable to the motherboard, and lift the PCA out of the notebook.
-
Page 65: Troubleshooting And Diagnostics
Suggestions for troubleshooting (page 3-5). Diagnostic tools e-DiagTools diagnostic program (page 3-22). Power-on self-test (page 3-28). Sycard PCCtest 450 PC Card (page 3-31). Desktop/Windows Management Interface (page 3-32). BIOS Setup utility (page 3-33). HP Omnibook XE3 (Technology Codes GE and GD) Troubleshooting and Diagnostics... -
Page 66: Troubleshooting
Check for customer abuse. Try to duplicate the customer's problem. Troubleshoot the problem using: - Diagnostic tools. - Troubleshooting suggestions. Verify the repair by testing the functionality of the complete unit. HP Omnibook XE3 (Technology Codes GE and GD) -
Page 67: Checking For Customer Abuse
Table 3-2 on page 3-6 includes additional criteria for determining customer abuse to specific parts of the unit. Important Parts damaged by customer abuse are not covered by the warranty. HP Omnibook XE3 (Technology Codes GE and GD) Troubleshooting and Diagnostics... -
Page 68: Troubleshooting The Problem
Run tests that check the repaired function, such as in the e-DiagTools diagnostic program (page 3-22). –and– Run any other tests that failed during troubleshooting. Failed Tests. Troubleshooting and Diagnostics Run the basic test of the e-DiagTools diagnostic program HP Omnibook XE3 (Technology Codes GE and GD) -
Page 69: Suggestions For Troubleshooting
† Use an appropriate external device to exercise the port. See the help text for the tests in the menu. HP Omnibook XE3 (Technology Codes GE and GD) Power-On Sycard DMI/TopTools... -
Page 70: Table 3-2. Troubleshooting Suggestions
SDRAM module. Make sure at least one SDRAM module is installed. Battery or contacts. Motherboard. Floppy drive or contacts. Motherboard. CD/DVD drive. Motherboard. HP Omnibook XE3 (Technology Codes GE and GD) - Page 71 Check for blocked air vents. AC adapter does Try another AC adapter, if not power available. notebook. HP Omnibook XE3 (Technology Codes GE and GD) Repair Center: Repair Center: Likely Causes Comments Hard drive contacts. If notebook boots from floppy drive, check for corrupt files Hard drive.
- Page 72 CD or DVD), the value will probably show too little time remaining. Troubleshooting and Diagnostics Repair Center: Repair Center: Likely Causes Comments Battery. Battery capacity often decreases after a year or Motherboard. more. HP Omnibook XE3 (Technology Codes GE and GD)
- Page 73 (or allowing to enter) standby or hibernate mode. Otherwise, COM port will lock up on resuming, and will not work until notebook restarts. HP Omnibook XE3 (Technology Codes GE and GD) Repair Center: Repair Center: Likely Causes Comments Troubleshooting and Diagnostics...
- Page 74 Declared to be caused by customer abuse. Caused by excessive Declared to be caused by pressure applied to customer abuse. area on screen. External display. Motherboard. HP Omnibook XE3 (Technology Codes GE and GD)
- Page 75 Check settings in BIOS Setup. Drive does not write Make sure floppy disk is not to floppy disks. write-protected. HP Omnibook XE3 (Technology Codes GE and GD) Repair Center: Repair Center: Likely Causes Comments Hard drive or If drive case is damaged, connector.
- Page 76 Advanced on Settings tab, and change settings. 3-12 Troubleshooting and Diagnostics Repair Center: Repair Center: Likely Causes Comments CD/DVD drive. HP warranty does not cover expense of correcting this situation. CD/DVD drive. Motherboard. HP Omnibook XE3 (Technology Codes GE and GD)
- Page 77 Notebook web site for list of approved memory cards. Memory doesn’t Make sure SDRAM modules increase after are installed properly. adding SDRAM. HP Omnibook XE3 (Technology Codes GE and GD) Repair Center: Repair Center: Likely Causes Comments Keyboard. Motherboard. External keyboard.
- Page 78 Check operation using headphones or external Motherboard. speakers. Switchboard PCA. Check operation using external microphone. Top case. Motherboard. Series/parallel/USB Use loop-back connector device. when testing serial or parallel port—see page 3-24. Motherboard. HP Omnibook XE3 (Technology Codes GE and GD)
- Page 79 Try disabling error correction and data compression. Download latest modem driver from technical support area of HP notebook web site (see page vi). HP Omnibook XE3 (Technology Codes GE and GD) Repair Center: Repair Center: Likely Causes Comments Mouse. Motherboard.
- Page 80 If running fax software using fax Class 2, try Class 1. 3-16 Troubleshooting and Diagnostics Repair Center: Repair Center: Likely Causes Comments Mini-PCI PCA. Motherboard. Mini-PCI PCA. Mini-PCI PCA. Motherboard. HP Omnibook XE3 (Technology Codes GE and GD)
- Page 81 Make sure cable or cable adapter is appropriate for printer type. Use print troubleshooter in Windows Help. HP Omnibook XE3 (Technology Codes GE and GD) Repair Center: Repair Center: Likely Causes Comments Mini-PCI PCA. Mini-PCI PCA.
- Page 82 DHCP server, long booting. delay can occur at startup because DHCP is enabled. Contact network administrator for proper TCP/IP configuration. 3-18 Troubleshooting and Diagnostics Repair Center: Repair Center: Likely Causes Comments Mini-PCI PCA. Motherboard. HP Omnibook XE3 (Technology Codes GE and GD)
- Page 83 Performance Clock loses time. Plug in AC adapter for 24 hours to charge CMOS battery. HP Omnibook XE3 (Technology Codes GE and GD) Repair Center: Repair Center: Likely Causes Comments PC card. Using a flashlight, look for bent pins inside PCMCIA PCMCIA socket.
- Page 84 Repair Center: Repair Center: Likely Causes Comments Heatsink. Check heatsink for proper fan operation or damage. Heatsink. If notebook slows after period of continuous activity, check CPU module. heatsink—see previous Motherboard. symptom. HP Omnibook XE3 (Technology Codes GE and GD)
- Page 85 If this fails, insert a straightened paper clip into system-off switch, then press blue standby button to turn notebook back on. HP Omnibook XE3 (Technology Codes GE and GD) Repair Center: Repair Center: Likely Causes Comments Troubleshooting and Diagnostics...
-
Page 86: Diagnostic Tools
The notebook restarts when you exit the program so drivers can be loaded. Updating e-DiagTools You can download the latest version of e-DiagTools from the HP Notebook web site (see page vi). Follow the instructions included with the new version. - Page 87 Running e-DiagTools 1. Restart the notebook. 2. When the HP logo appears, press F10 to start the diagnostic test. 3. When the menu appears, press Enter to run e-DiagTools. 4. The first time you run the program, you are prompted to select the language for the program.
-
Page 88: Figure 3-3. Serial And Parallel Loopback Connectors
Note that the serial and parallel port tests are more thorough if you connect a loop-back connector to the port before running the test for that port. See the wiring diagrams below. Figure 3-3. Serial and Parallel Loopback Connectors 3-24 Troubleshooting and Diagnostics HP Omnibook XE3 (Technology Codes GE and GD) -
Page 89: Table 3-3. E-Diagtools Error Codes
Run BIOS Setup and check the hard disk type. Check the hard disk connection. Replace the hard disk. Replace the motherboard. 0208h – Repeat the test. 0209h HP Omnibook XE3 (Technology Codes GE and GD) Code Suggestions 020Ah – Repeat the test. Run Windows disk-checking 0211h tools. - Page 90 Insert an audio CD and repeat the test. 0A11h Replace the drive. 0A12h Insert a different multisession CD and repeat the test. Replace the drive. SMBUS Tests 0E00h – Replace the motherboard. 0E20h HP Omnibook XE3 (Technology Codes GE and GD)
- Page 91 If the fan is already running, you may not hear a change. Check the heatsink connection. Replace the heatsink. Replace the motherboard. 9002h Reset the notebook. Replace the motherboard. HP Omnibook XE3 (Technology Codes GE and GD) Code Suggestions Microphone Tests 9003h Replace the top case. Replace the motherboard.
-
Page 92: Power-On Self-Test
ROM checksum failure. 1 long-5 short Display DIP switches and EEPROM settings do not match (check DIP switch settings). * Up to four groups of short beeps, except as noted. 3-28 Troubleshooting and Diagnostics HP Omnibook XE3 (Technology Codes GE and GD) -
Page 93: Table 3-5. Post Messages
02F0: CPU ID: CPU socket number for Multi-Processor error. 02F4: EISA CMOS not writeable ServerBIOS2 test error: Cannot write to EISA CMOS. HP Omnibook XE3 (Technology Codes GE and GD) Table 3-5. POST Messages Troubleshooting and Diagnostics 3-29... - Page 94 Displays the address nnnn of the upper limit of Upper Memory Blocks, indicating released segments of the BIOS that can be reclaimed by a virtual memory manager. Video BIOS shadowed Video BIOS was copied to shadow RAM. 3-30 Troubleshooting and Diagnostics HP Omnibook XE3 (Technology Codes GE and GD)
-
Page 95: Sycard Pcctest 450/460 Cardbus Card (Optional)
Slot Upper XE3/N5000 (technology codes Lower GE and GD) HP Omnibook XE3 (Technology Codes GE and GD) PCMCIA PC Card (16-bit) test (PC Card configuration header) PCT450 -1 -v -b75 PCT450 -0 -v -b75 Troubleshooting and Diagnostics CardBus (32-bit) test... -
Page 96: Desktop And Windows Management Interfaces (Dmi/Wmi)
1. Insert Recovery CD disk 1 into the CD/DVD drive, or insert floppy disk #1 into the floppy drive. 2. Select and run the SETUP program from the dmi\disk1 directory on the CD (under \hp\drivers), or from floppy disk #1. -
Page 97: Bios Setup Utility
Running the BIOS Setup Utility 1. Restart the computer. 2. When the HP logo appears, press F2 to enter the BIOS Setup utility. 3. The pointing devices are not active in BIOS Setup, so you will need to use the keyboard to navigate: Press the LEFT and RIGHT arrow keys to move among menus. - Page 98 Setup. Does not affect security, date, or time changes. Save Changes Saves Setup changes to CMOS, and remains in Setup. Security settings are saved when changed. 3-34 Troubleshooting and Diagnostics HP Omnibook XE3 (Technology Codes GE and GD) Default Auto Enabled Both Enabled Enabled...
- Page 99 7. When the process is completed, reset the system: insert a pin or straightened paper clip into the recess on the left side of the computer, underneath the PC card eject buttons. BIOS updates are also available from the HP Customer Care web site (www.hp.com/go/support). HP Omnibook XE3 (Technology Codes GE and GD)
-
Page 101: Replaceable Parts
This chapter contains an exploded view of the notebook, and the following lists of parts: Replaceable parts for technology code GE (page 4-3) and technology code GD (page 4-5). Accessory replaceable parts (page 4-7). Part number reference (page 4-8). HP Omnibook XE3 (Technology Codes GE and GD) Replaceable Parts... -
Page 102: Figure 4-1. Exploded View
Figure 4-1. Exploded View Replaceable Parts HP Omnibook XE3 (Technology Codes GE and GD) -
Page 103: Table 4-1. Replaceable Parts For Technology Code Ge Models
Module, CPU (AMD Duron, 900 MHz) Kit, hard disk drive carrier (includes bracket, strap, connector, mounting screws) Kit, LCD screw covers (includes covers for all display sizes) HP Omnibook XE3 (Technology Codes GE and GD) Part Number Exchange Part Number F3925-60902... - Page 104 (see above kit) (see above kit) (see above kit) (see above kit) (see above kit) 1818-8504 1818-8635 F2111-60946 F2409-60907 F2409-60908 F2409-60909 F2409-60910 F3925-60950 F3925-69050 F3925-60967 F3925-69067 F2111-60941 F2330-60911 F2409-60912 F2330-60910 F2111-60951 F2111-60960 HP Omnibook XE3 (Technology Codes GE and GD) User- Repl.
-
Page 105: Table 4-2. Replaceable Parts For Technology Code Gd Models
Module, CPU (AMD Athlon, 900 MHz) Module, CPU (AMD Duron, 850 MHz) Module, CPU (AMD Duron, 800 MHz) Kit, hard disk drive carrier (includes bracket, strap, connector, mounting screws) HP Omnibook XE3 (Technology Codes GE and GD) Part Number Exchange Part Number F2111-60901... - Page 106 (see above kit) (see above kit) (see above kit) 1818-8504 1818-8635 F2111-60946 F2330-60925 F2330-60926 F2330-60927 F2409-60907 F2409-60908 F2409-60909 F2409-60910 F2409-60903 F2409-69003 F2409-60904 F2409-69004 F2409-60905 F2409-69005 F2409-60906 F2409-69006 F2111-60941 F2330-60911 F2330-60910 F2111-60951 F2111-60960 HP Omnibook XE3 (Technology Codes GE and GD) User- Repl.
-
Page 107: Table 4-3. Accessory Replaceable Parts
Power cord, replacement (Hong Kong, Singapore, U.K.) Module, SDRAM, 128 MB, PC133 SODIMM Module, SDRAM, 256 MB, PC133 SODIMM Ultraslim AC adapter (60-watt, 19-V output) HP Omnibook XE3 (Technology Codes GE and GD) Part Number Exchange Part Number F2297-80001 F1469-80001... -
Page 108: Table 4-4. Part Number Reference
Drive, hard disk (20 GB, 9.5 mm, Hitachi) Battery, Li-Ion (9-cell) Display, 14.1-in (cole gray) Display, 15-in (cole gray) Kit, LCD screw covers (includes covers for all display sizes) Keyboard, U.S. English Keyboard, U.K. English Keyboard, French HP Omnibook XE3 (Technology Codes GE and GD) User Repl. - Page 109 F2332-69003 F2409-60903 (GD) F2409-69003 F2409-60904 (GD) F2409-69004 F2409-60905 (GD) F2409-69005 F2409-60906 (GD) F2409-69006 HP Omnibook XE3 (Technology Codes GE and GD) Description Keyboard, Spanish Keyboard, Japanese Cover, keyboard PCA, switchboard PCA, CD player Case, top (full-featured) Heatsink assembly (with fan)
- Page 110 PCA, motherboard (defeatured) Kit, LCD screw covers (includes covers for all display sizes) Kit, screws (includes all screws needed to replace all notebook FRUs) HP Omnibook XE3 (Technology Codes GE and GD) User Repl.
-
Page 111: Reference Information
The statement can be a fax copy of the document. The fact that the notebook is in the hands of an HP representative on behalf of the customer is not evidence of ownership. In addition, HP will not remove the password of a notebook for any non-owner, even if it is requested by law enforcement agencies. -
Page 112: Hewlett-Packard Display Quality Statement
These cosmetic imperfections may be visible to the customer under varying display conditions, and can appear as bright, dim, or dark spots. This issue is common across all vendors supplying TFT displays in their products and is not specific to the HP notebook display. -
Page 113: Table 5-1. Xe3 Tft Lcd Guidelines (13.3/14.1/15.0-In Xga, 15.0-In Sxga+)
In contrast, a polarizer scratch is a light line that is visible on a darker background and does not change size. HP Omnibook XE3 (Technology Codes GE and GD) 7 or more single bright dots. 7 or more single dark dots. - Page 116 1. Product Information 2. Removal and Replacement 3. Troubleshooting and Diagnostics 4. Replaceable Parts 5. Reference Information English Printed in Taiwan Part Number (P)F2113-90026 Part Number (P)F2113-90026 Part Number (P)F2113-90026 Part Number (P)F2113-90026...