Pride Mobility Jazzy Select Owner's Manual
Pride mobility jazzy select power chair owner's manual
Hide thumbs
Also See for Jazzy Select:
- Owner's manual (51 pages) ,
- Owner's manual (44 pages) ,
- Owner's manual (44 pages)

Related Manuals for Pride Mobility Jazzy Select


Summary of Contents for Pride Mobility Jazzy Select
- Page 1 Owner’s Manual Unit 106, Heyford Park Camp Road Upper Heyford, Oxfordshire OX25 5HA www.pridemobility.com...
- Page 2 PROHIBITED! These actions are prohibited. These actions should not be performed at any time or in any circumstances. Performing a prohibited action can cause injury to personnel and/or damage to equipment. Copyright © 2006 Pride Mobility Products Corp. INFMANU3244/Rev B/September 2006 www.pridemobility.com Jazzy Select...
-
Page 3: Table Of Contents
This owner’s manual is compiled from the latest specifications and product information available at the time of publication. We reserve the right to make changes as they become necessary. Any changes to our products may cause slight variations between the illustrations and explanations in this manual and the product you have purchased. Jazzy Select www.pridemobility.com... -
Page 4: Introduction
I N T R O D U C T I O N SAFETY WELCOME to Pride Mobility Products Corporation (Pride). The power chair you have purchased combines state-of- the-art components with safety, comfort and styling in mind. We are confident that these design features will provide you with the conveniences you expect during your daily activities. -
Page 5: Safety
Do not lift the mobility vehicle while seated in it. Corrosive chemicals contained in battery. EMI-RFI - This product has been tested and passed at an immunity level of 20 V/m. Explosive conditions exist! Read and follow the information in the owner’s manual. Maximum seating weight. Jazzy Select www.pridemobility.com... - Page 6 Avoid exposure to rain, snow, ice, salt or standing water whenever possible. Maintain and store in a clean and dry condition. Prevent personal injury and product damage! Keep tools and other metal objects away from battery terminals. Do not remove the anti-tip wheels. www.pridemobility.com Jazzy Select...
- Page 7 Pride product and its packaging. Locked and in drive mode. Unlocked and in freewheel mode. Use correct tie-down points for controller harness to prevent the harness from getting caught in the drive tyres or pinched in the seat frame. Jazzy Select www.pridemobility.com...
-
Page 8: Your Power Chair
! Check all controller connections to the power base. Make sure they are secured properly. ! Check the brakes. See VIII. “Care and Maintenance.” ! Check battery charge. See VI. “Batteries and Charging.” NOTE: If you discover a problem, contact your authorised Pride Dealer for assistance. www.pridemobility.com Jazzy Select... - Page 9 WARNING! When on any sort of an incline or decline, never place the power chair in freewheel mode while seated on it or standing next to it. Doing so may result in personal injury and/or damage to your power chair. Jazzy Select www.pridemobility.com...
- Page 10 Obey all local pedestrian traffic rules. Wait until your path is clear of traffic, and then proceed with extreme caution. www.pridemobility.com Jazzy Select...
- Page 11 WARNING! Do not attempt to have your power chair proceed rearwards down any step, kerb or other obstacle. This may cause the power chair to tip and cause personal injury. Figure 2. Correct Kerb Approach Figure 3. Incorrect Kerb Approach Jazzy Select www.pridemobility.com...
- Page 12 ! If you are in the doorway of a lift when the door(s) begin to close, push on the rubber door edge or allow the rubber door edge to contact the power chair and the door will reopen. ! Use care that handbags, packages or power chair accessories do not become caught in lift doors. www.pridemobility.com Jazzy Select...
- Page 13 WARNING! If you anticipate being seated in a stationary position for an extended period of time, turn off the power. This will prevent unexpected motion from inadvertent joystick contact. This will also eliminate the possibility of unintended chair movement from electromagnetic (EM) sources. Failure to do so may result in personal injury. Jazzy Select www.pridemobility.com...
- Page 14 WARNING! Do not operate your power chair while you are under the influence of alcohol, as this may impair your ability to operate your power chair in a safe manner. www.pridemobility.com Jazzy Select...
- Page 15 NOTE: For further information on EMI/RFI, go to the Resource Center on www.pridemobility.com. If unin- tended motion or brake release occurs, turn your power chair off as soon as it is safe to do so. Contact your authorised Pride Dealer to report the incident. Jazzy Select www.pridemobility.com...
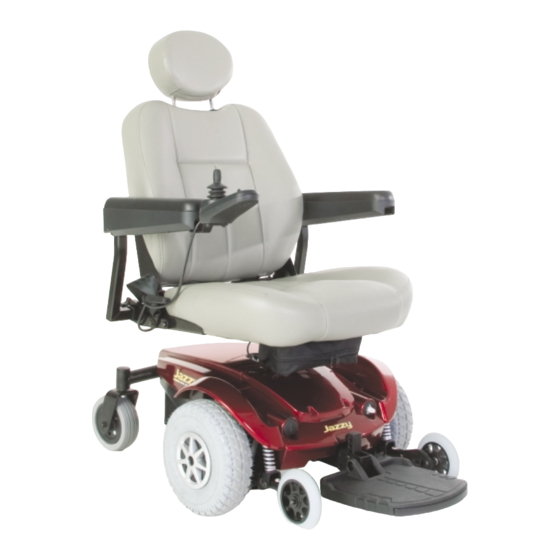
- Page 16 THE JAZZY SELECT The Jazzy Select has two main assemblies: the seat assembly and the power base assembly. See figure 5. Typically, the seat assembly includes the armrests, seatback and seat base. The power base assembly includes two motor/brake assemblies, two drive wheels, two castor wheels, two anti-tip wheels, two batteries and wiring harnesses.
- Page 17 I I I . Y O U R P O W E R C H A I R JAZZY SELECT SPECIFICATIONS Suspension: Active-Trac Drive Wheels: 25 cm (10 in.) pneumatic (solid optional) Anti-Tip Wheels: 12.7 cm (5 in.) solid (front-mounted) Rear Castor Wheels: 15.25 cm (6 in.) solid (rear-mounted)
- Page 18 JOYSTICK MODULE CONNECTOR OFF-BOARD CHARGER PORT Figure 6. The Jazzy Select Power Base ELECTRICAL COMPONENTS The electrical components are located either on or inside the power base. The main circuit breaker and off-board charger port are located on the front of the power base. The power module is located under the front cover. See figures 6 and 7.
- Page 19 Y O U R P O W E R C H A I R MOTOR CONNECTORS JOYSTICK MODULE CONNECTOR BATTERY CONNECTOR BATTERY CONNECTORS MAIN CIRCUIT BREAKER BATTERY CONNECTORS OFF-BOARD CHARGER PORT Figure 7. Jazzy Select Electrical Components Jazzy Select www.pridemobility.com...
- Page 20 C H A I R MANUAL FREEWHEEL LEVERS The Jazzy Select has a manual freewheel lever on each motor. Manual freewheel levers enable you to disengage the drive motors from the gearboxes and maneuver the chair manually. WARNING! Do not use the power chair while the drive motors are disengaged! Do not disengage...
-
Page 21: Assembly
Replacement nylon insert lock nuts are available at local hardware stores or through your authorised Pride Dealer. SEAT INSTALLATION ARMREST ADJUSTMENTS JOYSTICK MODULE POSITION ANTI-TIP WHEEL ADJUSTMENT FOOT PLATFORM ADJUSTMENTS Figure 10. Jazzy Select Assembly View Jazzy Select www.pridemobility.com... - Page 22 4. Route the joystick module cable as shown and se- cure with wire ties. See figure 11. WARNING! Prevent controller harness damage! Use correct tie-down points for controller harness. 5. Plug the joystick module cable into the connector on the power base. See figure 6. www.pridemobility.com Jazzy Select...
- Page 23 2. Turn the nut clockwise until it is snug. 3. Rotate the lever until it is in the fully closed position. NOTE: If the lever will not rotate to the fully closed position, then turn the nut anticlockwise one-quarter or one-half turn. Jazzy Select www.pridemobility.com...
-
Page 24: Comfort Adjustments
QUICK the seat. RELEASE 7. Tighten and clamp the quick-release fastener. See FASTENER figure 12. Figure 13. Seat Height Adjustment www.pridemobility.com Jazzy Select... - Page 25 To change the armrest width: 1. Locate the two armrest knobs on each side of the armrest receiver bracket. See figure 15. 2. Loosen the knobs. 3. Slide the armrests in or out to the desired width. 4. Tighten the knobs. Jazzy Select www.pridemobility.com...
- Page 26 To adjust the foot platform depth: 1. Remove the fasteners from the foot platform bracket. See figure 16. 2. Move the foot platform in or out to the desired depth. 3. Reinstall the fasteners into the foot platform bracket and tighten. www.pridemobility.com Jazzy Select...
- Page 27 To adjust the ELR length: 1. Remove the two adjustment screws from the side of each leg rest extension. 2. Slide the leg rest up or down to the desired length. 3. Reinstall the two adjustment screws. Jazzy Select www.pridemobility.com...
- Page 28 3. Raise or lower the anti-tip wheel. Each hole is 1.27 cm (1/2 in.) apart. 4. Reinstall bolt B. 5. Tighten nut A. 6. Raise or lower the other anti-tip wheel so that it is at the same height. Figure 19. Anti-Tip Wheel Adjustment www.pridemobility.com Jazzy Select...
- Page 29 MANDATORY! Prevent personal injury and product damage! Inspect the positioning belt for loose or damaged parts before each use of the power chair. If you discover a problem, contact your authorised Pride Dealer for maintenance and repair. Jazzy Select www.pridemobility.com...
-
Page 30: Batteries And Charging
BATTERIES AND CHARGING The Jazzy Select uses two long-lasting, 12-volt, deep-cycle batteries. These batteries are sealed and maintenance free. Since they are sealed, there is no need to check the electrolyte (fluid) level. Deep-cycle batteries are designed to handle a longer and deeper discharge. - Page 31 Can I use a different battery charger? You should use the charger supplied with the power chair. It is the safest, most efficient tool to charge the batteries. We do not recommend using other types of chargers (e.g., an automotive battery charger). Jazzy Select www.pridemobility.com...
- Page 32 Fresh batteries arrive regularly at Pride and are promptly shipped with a full charge. During shipping, the batteries encoun- ter temperature extremes that may influence initial performance. Heat robs the charge from the battery, and cold slows the power available and extends the time needed to recharge the battery (just as with a car battery). www.pridemobility.com Jazzy Select...
- Page 33 What about shipping? If you wish to use a freight company to ship your power chair to your final destination, repack your power chair in the original shipping container and ship the batteries in separate boxes. Jazzy Select www.pridemobility.com...
-
Page 34: Operation
Figure 21. GC Controller System move. If you do not release the joystick within five seconds, the power chair will not move until you turn the controller off and on again. www.pridemobility.com Jazzy Select... - Page 35 NOTE: The battery gauge will flash the “locked” sequence. 1 LED will flash on and then off. 2 LEDs will flash on and then off. This sequence will continue until all five LEDs flash on and then off. The sequence will continue until the power is turned off or until the controller is unlocked. Jazzy Select www.pridemobility.com...
-
Page 36: Sleep Mode
9 Flashes The park brakes have a bad connection. Check the left and right motor connections and wiring. 10 Flashes An excessive voltage has been applied to Check the battery connections. the control system. www.pridemobility.com Jazzy Select... -
Page 37: Care And Maintenance
M A I N T E N A N C E CARE AND MAINTENANCE Your Jazzy Select is a sophisticated power chair. Like any motorized vehicle, it requires routine maintenance checks. You can perform some of these checks, but others require assistance from your authorised Pride Dealer. Preventive mainte- nance is very important. - Page 38 ! Keep your power chair clean and free of foreign material, such as mud, dirt, hair, food, drink, etc. Yearly Checks Take your power chair to your authorised Pride Dealer for yearly maintenance. This helps ensure that your power chair is functioning properly and helps prevent future complications. www.pridemobility.com Jazzy Select...
- Page 39 8. Remove the acorn nuts that fasten the two rim halves together. See figure 24. 9. Remove the old tube from the pneumatic tyre and replace it with a new tube or replace the entire assembly if it is a solid tyre. 10. Reassemble the two rim halves. Jazzy Select www.pridemobility.com...
- Page 40 DRIVE WHEEL WASHER RIM HALF tyre before attempting repair. Figure 23. Jazzy Select Drive Wheel Figure 24. Tyre Removal 11. Slide the wheel back onto the axle. Make sure that the key is in the axle slot. 12. Reinstall the drive wheel nut and washer onto the axle and tighten. See figure 24.
- Page 41 C A R E A N D M A I N T E N A N C E CORRECT CONNECTION REAR SHROUD INCORRECT CONNECTION YELLOW THUMBSCREWS REAR BATTERY SIDE COVER Figure 25. Battery Installation (Seat Removed for Clarity) Jazzy Select www.pridemobility.com...
- Page 42 Disconnect both batteries before load testing and follow the directions that come with the load tester. If either one of the batteries fails the load test, replace both of them. If your power chair still does not power up, contact your authorised Pride Dealer. www.pridemobility.com Jazzy Select...
- Page 43 Warranty will also be refused if damage is deemed to have been caused through misuse or accident for which Pride Mobility Products Ltd. cannot be deemed responsible. NOTE: Pride Mobility Products Ltd. provides parts only under warranty. Your authorised Pride Dealer is responsible for labour and service. Please contact your authorised Pride Dealer for information about these services and for any applicable charges.
- Page 44 N O T E S www.pridemobility.com Jazzy Select...
- Page 45 N O T E S Jazzy Select www.pridemobility.com...
- Page 46 N O T E S www.pridemobility.com Jazzy Select...
- Page 47 Quality Control - Jazzy Select Thank you for making the Jazzy Select your choice in power chairs. We have thoroughly inspected your power chair. The following checkmarks indicate that it has been test driven and inspected. Quality Control- Model 14 0 0...