Table of Contents
Advertisement
Advertisement
Table of Contents

Related Manuals for Hotpoint DF55


Summary of Contents for Hotpoint DF55
- Page 1 USER & INSTALLATION INSTRUCTIONS for MODELS DF56 DF55...
-
Page 2: Table Of Contents
To minimise risk of injury to children, remove the door, plug and cut mains cable off flush with the appliance, dispose of separately to ensure that the appliance can no longer be plugged into a mains socket. What Can I Wash... 16 Loading your Dishwasher...17-18 Care & Maintenance...19-20 Troubleshooting...21 Important Information... 22 Guarantee... -
Page 3: Electricity Supply / Safety Information
Safety Information... At the time of delivery... All functions of your dishwasher have been thoroughly tested at the factory. A small number of water marks may have been left as a result, they will disappear when the appliance is used for the first time. -
Page 4: Safety
In the event of any damage to the power cord have it replaced by a qualified technician. If the dishwasher is installed on a carpeted or covered floor, ensure that the openings on the underside are not obstructed. -
Page 5: Installation
IMPORTANT NOTES For the correct operation of your dishwasher, it is essential to comply with the following information. Standpipe Ensure that the hose is not pushed too far down the standpipe. -
Page 6: Installation
Installation... CONNECT TO THE WATER SUPPLY... For your machine to operate correctly it requires water pressures in the range of 6-150 psi (100-1000 KPa). Most cold water supplies will be in this range. NOTE: Low water pressure will lead to excessively long fill times or no fill. -
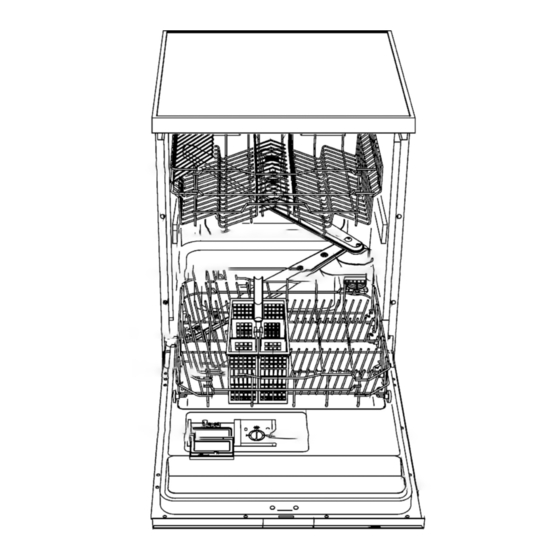
Page 7: Getting To Know Your Appliance
Getting to Know your Appliance... Interior... 1. Upper Basket 2. Upper Spray Arm. 3. Filters. 4. Lower Basket. 5. Cutlery Rack. Detergent Compartment. Rating Plate. Rinse Aid Container. Lower Spray Arm. 10. Salt Container, with level indicator. -
Page 8: The Controls
The Controls... All the controls are grouped on the front panel. Washing programme selector On/Off button Recessed door handle ECONOMY 55˚ button WARNING: CHILDREN SHOULD NOT BE ALLOWED TO PLAY WITH THE APPLIANCE OR TAMPER WITH THE CONTROLS. SUPER button (Model DF56 only) Salt refill warning light (Model DF56 only) Rinse Aid warning light... -
Page 9: Programme Guide And Table
ON/OFF button (2). Turn the wash programme selector to A: Prewash and wait for the dishwasher to start. On completion of the programme, switch off the dishwasher by pressing the ON/OFF button (2). - Page 11 Programme Guide... To save on energy... Always try to run the dishwasher fully loaded. Do not wash the dishes in running water. Use the washing programme that is most appropriate for each type of load. To cut down on detergent consumption...
-
Page 12: Before Using Your Appliance
- Fill the Rinse Aid Container. - Add detergent. ADJUSTING THE WATER SOFTENER... The dishwasher is equipped with a device for the user to adjust the water softening system, according to the hardness of the water supply. The adjustment selector can be found inside the plastic locking ring located on right hand interior wall. -
Page 13: Filling The Special Salt Container
When using the dishwasher for the first time, in addition to the salt it is also necessary to add ONE litre of water to the container. -
Page 14: Filling The Rinse Aid Container
You can use any brand of liquid or powder detergent, as well as tablets, that have specifically designed for use in domestic dishwasher's. DO NOT use normal washing up liquid. There are three types of dishwasher detergent available: 1. those containing phosphates and of a chlorine. -
Page 15: Detergents
We recommend Glist 3 in 1 for use in this (or your new) dishwasher... Brilliant cleaning is guaranteed with Glist 3 in 1. Hotpoint only recommends Glist 3 in 1 Dishwasher tablets to give outstanding cleaning and care. It is important to use detergent specially designed for domestic dishwashers. -
Page 16: What Can I Wash
WARNING: Dishes or cutlery that have been soiled by tobacco ash, wax, lubricating grease or paint, should not be put in the dishwasher. Our recommendation: In future, only purchase table or kitchen- ware that has been confirmed as being... -
Page 17: Loading Your Dishwasher
Loading your Dishwasher... Your dishwasher is designed to take 12 standard place settings. There is no one correct method for loading the dishwasher. The upper and lower baskets are designed to give the maximum flexibility possible to cope with the variety... -
Page 18: Loading Your Dishwasher
Loading your Dishwasher... ADJUSTING THE UPPER BASKET... The upper basket can be adjusted in two positions, according to your needs and to allow for the height of dishes in the lower basket. Pull out version: Pull the basket out fully. -
Page 19: Care & Maintenance
Overall condition of appliance. Clean the outer surfaces and door lining of the dishwasher regularly using a soft cloth moistened with water or with a detergent which is suitable for painted surfaces. Clean he door gaskets with a Avoid the use of acidic damp sponge. -
Page 20: Care & Maintenance
Care and Maintenance... Spray arms. The spray arms can be easily removed for periodic cleaning of the nozzles, to prevent possible blockage. To remove the upper spray arm, unscrew locking ring ‘R’ . To remove the lower spray arm, hold centrally and simply lift it up. -
Page 21: Troubleshooting
Problems..When the appliance is switched on. Appliance does not start: Is the dishwasher plugged in at the electricity socket and switch on? Is there a power failure, check other appliances. Fault with fuse in mains electricity supply. -
Page 22: Important Information
Leave the door open, to prevent any unpleasant odours inside the dishwasher. Before using the dishwasher after a long break, plug in and switch on at the electrical socket. Reconnect the intake hose and turn on the water supply tap. Check there are no... - Page 23 Notes...
- Page 24 Notes...
- Page 25 Notes...
-
Page 26: Guarantee
Dispose of these parts separately to ensure that the appliance can no longer be plugged into a mains socket, and the door cannot be locked shut. Guarantee or visit: www.hotpoint.co.uk... -
Page 27: After Sales Service
“No company is better positioned to offer an after sales service on our appliance than us As part of our commitment to you, all appliances have the added benefit of a fully inclusive parts and labour guarantee for the first 12 months. In addition to this you also have the advantage of free replacement parts for the first 5 years when fitted by our engineer. -
Page 28: Key Contacts
Over 1200 trained specialists, directly employed by us, ensure that you can have complete confidence in both the appliances and services we offer. Repair Service and Information Desk (Open 8 to 8 Mon - Fri, 8 to 6 Sat and 10 to 4 Sun & Bank Holidays) Note: Our operators will require the following information: General Domestic Appliances Limited, Morley Way, Peterborough, PE2 9JB.