Table of Contents
Advertisement
Quick Links
Advertisement
Table of Contents
Troubleshooting

Related Manuals for DeLonghi ECAM 23.420


Summary of Contents for DeLonghi ECAM 23.420
- Page 1 Инструкция Delonghi ECAM 23.420 Перейти в карточку товара 8 800 775 98 98...
-
Page 2: Table Of Contents
CONTENTS MAKING CAPUCCINO AND HOT MILK (NOT FROTHED) ........14 INTRODUCTION ........7 Making hot milk (without froth) .......14 Symbols used in these instructions ....7 Cleaning the cappuccino maker after use..14 Letters in brackets ..........7 HEATING WATER ........14 Troubleshooting and repairs ......7 CLEANING ........15 SAFETY .......... -
Page 3: Introduction
INTRODUCTION SAFETY Thank you for choosing the ECAM 23.420 auto- Fundamental safety warnings matic coffee and cappuccino maker. We hope you enjoy using your new appliance. Danger! Take a few minutes to read these instructions. This is an electrical appliance and may cause This will avoid all risks and damage to the ma- electric shock. -
Page 4: Designated Use
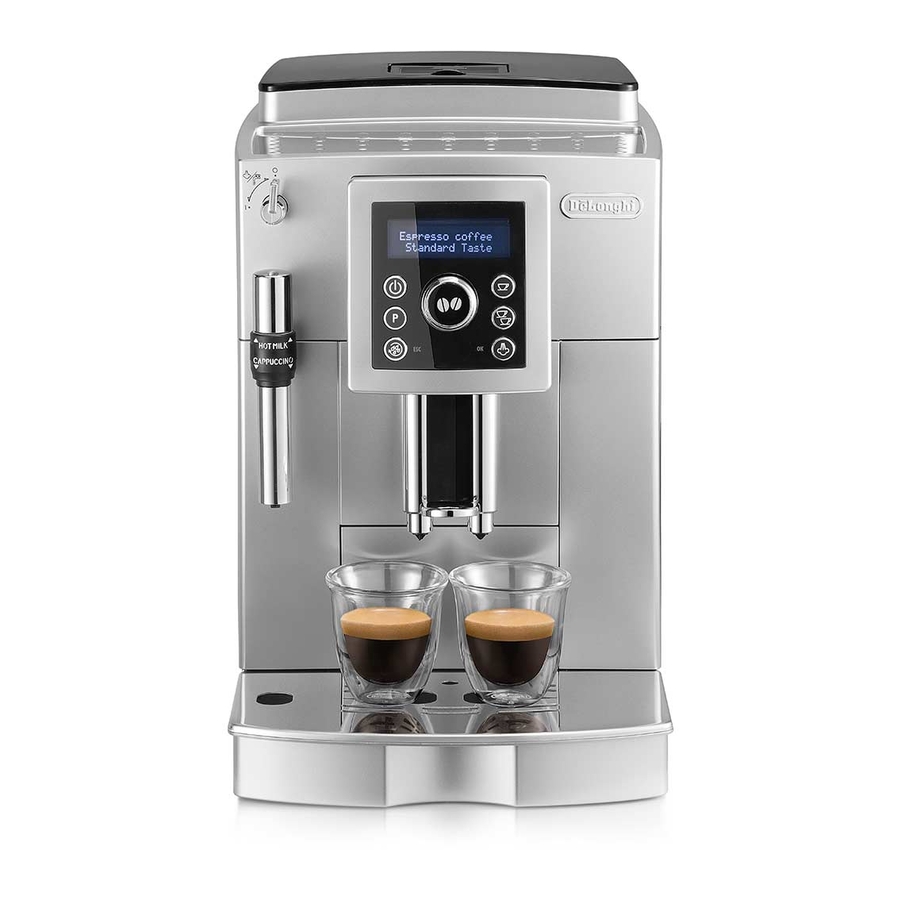
DESIGNATED USE DESCRIPTION This appliance is designed and made to prepare Description of the appliance coffee and heat drinks. All other use is conside- (page 3 - red improper. This appliance is not suitable for A1. Control panel commercial use. The manufacturer is not liable A2. -
Page 5: Description Of The Accessories
Description of the accessories Using the appliance for the first time (page 2 - Please note: C1. Measure C2. Cleaning brush pliance and it is therefore completely normal C3. Descaler bottle for there to be traces of coffee in the mill. The C4. -
Page 6: Turning The Appliance On
TURNING THE APPLIANCE ON main switch (fig. 6) in the 0 position while the appliance is on. Please note: Before turning the appliance on, make sure the MENU SETTINGS main switch on the back of the appliance is in the When you access the programming menu by pressing I position (fig. -
Page 7: Auto-Start
Auto-start ducing energy consumption in compliance with You can set the auto-start time in order to have current European regulations. the appliance ready at a certain time (for example When energy saving mode is active, an asterisk in the morning) so you can make coffee imme- appears below “Energy Saving”... -
Page 8: Default Values (Reset)
the machine each time the button is pressed or Mild taste an accessory is inserted/removed. The beep is Standard taste active by default. Strong taste 1. Press the P button to enter the menu; Extra-strong taste 2. Turn the selection knob (fig. 8) until “Beep” To change the taste, press the button (fig. -
Page 9: Tips For A Hotter Coffee
Please note: Please note: The grinding adjustment knob must only be tur- ned when the coffee mill is in operation. livery can be interrupted at any moment by pressing one of the two coffee buttons ( If the coffee runs off too slow- ly or not at all, turn one click clockwise towards “7”. -
Page 10: Making Capuccino And Hot Milk (Not Frothed)
4. Press the 1 cup coffee button (fig. 12). Important! Danger of burns 5. Preparation begins. The amount of coffee se- Stop steam delivery before removing the lected is displayed together with a progress container with the frothed milk to avoid bar which gradually fills as preparation pro- burns caused by splashes of boiling milk. -
Page 11: Cleaning
1. Place a container under the cappuccino ma- roughly to remove all residues left on the ker (as close as possible to avoid splashes) bottom. This can be done with the spatula on (fig. 17). the brush (C2) provided. 2. Turn the steam knob to the I position (fig. necessary. -
Page 12: Cleaning The Water Tank
2. Remove the residues with a vacuum cleaner 6. Use the brush (C2) to remove any coffee (fig. 25). residues left in the infuser housing, visible through the infuser door. Cleaning the water tank 7. After cleaning, replace the infuser by sliding 1. -
Page 13: Setting Water Hardness
Please note: ce. “Rinsing” is displayed. Use De’Longhi descaler only. Under no circumstances should you use sulpha- ker. mic or acetic based descalers. Their use invalida- 14. When the water tank is completely empty, tes the guarantee. Failure to descale the appliance as described also 15. -
Page 14: Water Softener Filter
The machine is now reprogrammed with the new 16. Turn the steam knob (fig. 4) to the “0” posi- water hardness setting. tion. The appliance returns automatically to the “ready for coffee” state. WATER SOFTENER FILTER The new filter is active and indicated by an aste- Certain models are fitted with a water softener risk displayed under “Install filter”. -
Page 15: Technical Specification
DISPOSAL appliance of its removal as follows: 1. Extract the tank and exhausted filter; Important information for correct di- 2. Press the P button to enter the menu; sposal of the product in accordance 3. Turn the selection knob (fig. 8) until “Install with EC Directive 2002/96/EC. -
Page 16: Displayed Messages
DISPLAYED MESSAGES DISPLAYED MESSAGE POSSIBLE CAUSE REMEDY correctly, pushing it as far as it will go until it clicks into place (fig. 3). drip tray, clean and replace (fig. 23). Important: when removing the drip tray, the grounds container MUST be emptied, even if it contains few grounds. -
Page 17: Troubleshooting
TROUBLESHOOTING Below is a list of some of the possible malfunctions. If the problem cannot be resolved as described, contact Customer Services. PROBLEM POSSIBLE CAUSE REMEDY The coffee is not hot function). 2/3 minutes have elapsed since the last infuser by pressing the button (see coffee was made. - Page 18 Delonghi ECAM 23.420 Описание Характеристики Отзывы...