Table of Contents
Advertisement
Advertisement
Table of Contents

Related Manuals for Honeywell Galaxy 16


Summary of Contents for Honeywell Galaxy 16
-
Page 1: User Guide
Galaxy 16 and 16 plus User Guide Honeywell Security... -
Page 3: Table Of Contents
Table of Contents Introduction ... v QUICK OPERATION GUIDE ... vii GLOSSARY OF TERMS ... ix KEYPAD INFORMATION ... 1 Star ( ) Key Features ... 2 SETTING AND UNSETTING THE SYSTEM ... 3 Setting the System ... 3 Before Setting the System ... 3 Full Setting the System ... - Page 4 Operation of the Test Option ... 11 Option 9 – Log ... 11 Selecting the Log Option ... 11 The Event Log ... 11 Option 10 – Time ... 12 Selecting the Time Option ... 12 Operation of the Time Option ... 12 APPENDIX A —...
-
Page 5: Introduction
The Galaxy 16 and 16 plus control panels are designed to the highest specifications and requirements using the most advanced software and hardware technology. The Galaxy 16 and 16 plus are designed to satisfy the requirements of domestic and smaller commercial installations, yet are flexible enough to provide ease of use and operational versa- tility. -
Page 7: Quick Operation Guide
QUICK OPERATION GUIDE e n t Enter your user code then select ent+B TIME SET (an Unset system) PART SET (Defaults to Parts 1 and 2) 1 key • toggles the Set (ON)/Unset (OFF) status of Part 1 2 key • toggles the Set (ON)/Unset (OFF) status of Part 2 3 key •... - Page 8 viii...
-
Page 9: Glossary Of Terms
GLOSSARY OF TERMS Chime: Zone attribute which gives an audible indication of the activation of a detector or contact. Duress: Applicable when a remote signalling device is fitted. A Duress code entered at the keypad will unset the system but transmit a Duress code to the Alarm Receiving Centre. -
Page 11: Keypad Information
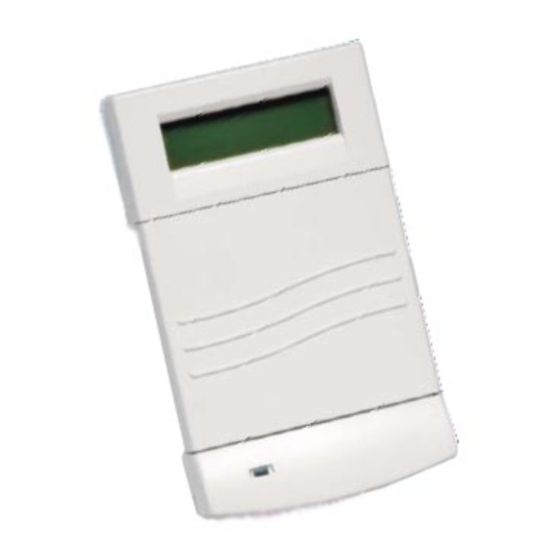
The engineer will advise of these where applicable, see also: Star ( ) Key Features. 2 x 16 CHARACTER LCD DISPLAY GALAXY 16+ V2.7 08:58 TUE 22 NOV Figure 1: Galaxy Mk 7 LCD Keypad. -
Page 12: Star ( ) Key Features
Power LED: The green power LED remains lit whenever the system is connected to the a.c. mains power supply and a charged stand-by battery. A mains power failure is indicated by the LED flashing slowly. A fuse or battery failure is indicated by the LED flashing quickly. Your User Code: is a four digit personal identification number which identifies you to, and allows you to operate, the system. -
Page 13: Setting And Unsetting The System
SETTING AND UNSETTING THE SYSTEM Setting the System Before Setting the System Before the system is Set ensure that: • All doors and windows are secured. • All areas protected by movement detectors are free from obstructions and any animals are excluded from the areas to be protected. -
Page 14: Unsetting The System
The Parts marked ‘ON’ are Set, those marked ‘OFF’ are Unset. To alter the set/unset status of a Part press the number corresponding to that part, that is, pressing the 1 key toggles the set status of Part 1 between set/unset. The equals sign denotes that what is displayed beside the Part number is the current status of the Part, that is, P1=ON denotes that Part 1 is currently set. -
Page 15: Alarm Abort
Alarm Abort Note: If the system is programmed for Alarm Abort a period of 90 seconds after expiry of the Entry Time is provided to enable the user to cancel an alarm caused by exceeding the Entry Time or deviating from the entry route. If the 90 second Alarm Abort time is exceeded then a full alarm may result in the Police being called to the premises and the system requiring an Engineer Reset. -
Page 17: User Menu
USER MENU For access to the menu options enter your user code then press the ent key. The keypad then displays the menu options available to the user. The user menu offers a selection of up to seven options. All users have access to the Chime and Walk options. -
Page 18: Omitting Zones
Omitting Zones When the Omit option is selected, zone 01 is displayed, along with it’s omit eligibility and status (NON OMITTABLE – the zone cannot be omitted; #,xx OMIT – the zone is omittable (where xx is the zone number); OMIT – the zone is currently omitted). If the zone is currently omitted then the box on the top line of the display is filled;... -
Page 19: Option 4 - Codes
On selecting the Walk option zone 01 is displayed. If the zone is to be tested press the # key. Use the A or B keys to scroll through the zones on the system, each one may be selected for inclusion in the test. -
Page 20: Assigning User Attributes
Note: User Code 13 may be assigned as a Duress Code. Entry of this code causes a Duress alarm which will activate the PA outputs and trigger the Remote signalling Device (if fitted); the Horn, Bells and Strobe outputs do not activate. The installation engineer will advise you on the operation of this function where applicable. -
Page 21: Option 5 - Test
Option 5 – Test The Test option allows the Manager Code (User 14) to test the Bell and Strobe outputs on the system. Selecting the Test Option Enter the Manager Code and press the 5 key. Operation of the Test Option On selecting the Test option 5 BELLS is displayed. -
Page 22: Option 10 - Time
To quickly move through the log enter a three digit number between 001 and 250 followed by the # key. The system will jump to the event number entered. To exit from the Log option press the esc key. Option 10 – Time The Time option allows the system manager (User 14) to modify the four time features of the system, these are: •... -
Page 23: Appendix A - Alarm And Help Messages
APPENDIX A — ALARM AND HELP MESSAGES ALARM IS ACTIVE: The system is currently in alarm and must be cancelled by a valid user code. PA RESET REQUIRED: The user code that cancelled the PA alarm does not have the authori- sation to reset the system. -
Page 25: Appendix B - Avoiding False Alarms
APPENDIX B — AVOIDING FALSE ALARMS False alarms are inconvenient and may give rise to Police response being withdrawn from your site which may affect your insurance cover. Here are twelve points to help you avoid false alarms: 1. Ensure that you understand how to operate the alarm system. In your absence the system should be operated by someone thoroughly instructed in its use. -
Page 27: Appendix C - Conformity And Standards
APPENDIX C — CONFORMITY AND STANDARDS Compliance The Galaxy 16 and 16 plus is compatible with the relevant parts of the following standards: • BS 4737 • EN 60950 • CTR 21 • CE Standards (EN 50130-4) • EN41003 Telecoms The equipment has been approved to {Council Decision 98/482/EC} for Pan -European single terminal connection to the Public Switched Telephone Network (PSTN). - Page 30 Honeywell Security 2 Redwood Crescent Peel Park Campus East Kilbride G74 5PA IU1-0016 Rev 3 © Copyright Honeywell Security...