Table of Contents
Advertisement
Advertisement
Table of Contents

Related Manuals for Honda F200


Summary of Contents for Honda F200
- Page 2 Thank you for purchasing a Honda Tiller. If a problem should arise, or if you have any questions about the tiller, consult an authorized Honda dealer. The Honda tiller is designed to give safe and dependable service if operated according to instructions.
- Page 3 IMPORTANT NOTICE This tiller is not equipped with a spark arrester. Operation on forest, bush or grass covered land may be illegal in some states. Check local laws and regulations before operation.
-
Page 4: Table Of Contents
CONTENTS SAFE OPERATION ..COMPONENT IDENTIFICATION OPERATION ....MAINTENANCE ... TRANSPORTING/STORAGE SPECIFICATIONS . -
Page 5: Safe Operation
To ensure safe operation Never permit anyone to operate the tiller with- out proper instruction. Know how to stop the tiller quickly and under- stand the operation of all the controls - READ THIS OWNER’S MANUAL CAREFULLY. Keep children and pets at a safe distance when tilling. -
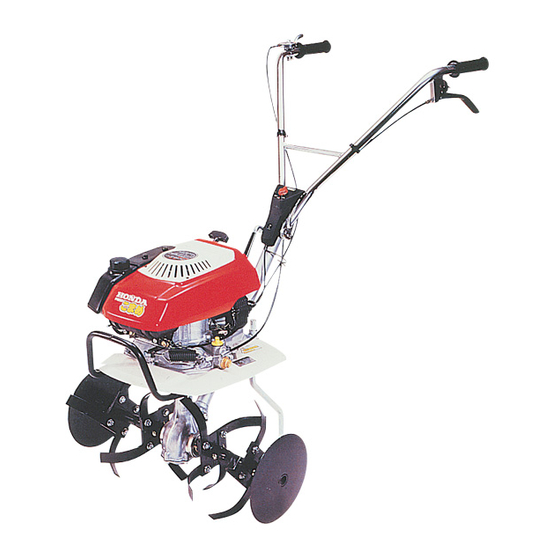
Page 6: Component Identification
COMPONENT IDENTIFICATION 1. Fuel tank cap 2. Fuel valve 3. Air cleaner 4. Muffler 5. Throttle lever 6. Front wheel 7. Engine switch... - Page 7 1. Clutch lever 2. Recoil starter 3. Spark plug 4. Drag bar 5. Mission oil level check bolt 6. Mission oil filler cap 7. Engine oil filler cap 8. Engine oil drain bolt 9. Rotor...
-
Page 8: Operation
(A) Engine oil level (B) Transmission oil level. Air cleaner condition. Fuel level. A. ENGINE OIL LEVEL Engine oil is a major factor affecting CAUTION: performance and service life. Non-detergent engine or vegetable oils are not recommended. using the tiller:... - Page 9 With the tiller on a level surface, remove the oil filler cap and check the oil level. If the level is low, fill to the upper level with the recommended oil.
- Page 10 B. TRANSMISSION OIL LEVEL With the tiller on a level surface remove the oil level check bolt and check if the oil flows out of the bolt hole. If the oil level is low, reffi with the recommended oil till it flows out of the bolt hole.
- Page 11 Refuel in a well venti- lated area with the engine stopped. Do not smoke or allow flames or sparks in the area where the tiller is refueled or stored. Never fill the tank above the level. Gasoline substitutes are not recommend-...
- Page 12 Starting the Engine Exhaust contains poisonous carbon monoxide gas. Never run the engine in a green house or confined area. Be to provide adequate sure ventilation. The muffler becomes very hot during operaton, and it remains hot for a time after the engine is turned of5 Avoid touching a hot muffler.
- Page 13 choke lever to CLOSE, when the out- Move side temperature is low or the engine is cold. (1) Choke lever (2) CLOSE 4. Move the throttle lever about 30 degrees from the extreme right (idle position). Throttle lever...
- Page 14 The clutch is engaged by pulling in the NOTE: clutch lever and disengaged by releasing the lever. 5. Make sure the clutch is disengaged, then pull the starter rope briskly to start the engine. CAUTION : Be sure the clutch is disengaged to prevent sudden uncontrolled movement when the engine starts.
- Page 15 enigne to warm up, then move the Allow choke lever to OPEN. 7. Move the throttle lever to the left as desired to increase engine speed. (1) OPEN...
- Page 16 Stopping the Engine 1. Disengage the clutch (release the lever). 2. Move the throttle lever to the extreme right. 3. Turn the engine switch OFF to stop the engine. 4. Turn the fuel valve OFF. To stop the engine in an emergency, dis- NOTE: engage the clutch and turn the engine switch OFF.
- Page 17 Handlebar Height Adjustment Before adjusting the handlebar, place CAUTION: the tiller on jim level ground to prevent the handle from falling accidentally. To adjust the handlebar height, loosen the adjuster, select the appropriate holes and tighten the adjuster. Tilling depth adjustment...
-
Page 18: Maintenance
MAINTENANCE GUIDE Periodic inspection and adjustment of the Honda Tiller is essential if a high level of performance is to be maintained. Regular maintenance will also insure the longest possible life of your Honda tiller. - Page 19 Engine Oil Change Change the oil when the engine is warm to NOTE: assure rapid and complete draining. 1. Remove the oil drain bolt and the filler cap to drain. 2. Reinstall the drain bolt and fill the crankcase to the upper level with the recommended oil.
- Page 20 Air Cleaner Service A dirty air cleaner will restrict air flow to the carburetor. To prevent carburetor malfunction, service the air cleaner frequently. 1. Remove the screws and air cleaner cover. Remove the elements and separate them. 2. Wash the foam element in liquid detergent and water and flush until water is clear.
- Page 21 CAUTION: The spark plug must be securely tightened. An improperly tightened plug can become vev hot and possibly damage the tiller. Never use a spark plug with an improper heat range. BMR-4A (NGK),...
- Page 22 Throttle Cable Adjustment Loosen the lock nut and turn the throttle cable adjusting bolt until free play at the throttle lever is between 5 - 10 mm (l/4-3/8 in) as shown. Tighten the lock nut securely. (1) Lock nut (2) Throttle cable adjusting bolt...
- Page 23 Clutch Cable 1. Squeeze the clutch lever lightly until resistance is felt (in this position, the clutch starts to engage), and measure the clearance between the handlebar end and the lever tip as illustrated. Clutch lever clearance: 45-50 mm (1.77-l .97 in) 2.
- Page 24 Rotor Assembly Install the tine assemblies and side disks as illustrated below. Side disks can be installed on each side. NOTE: “L” side > “R” side...
-
Page 25: Transporting/Storage
TRANSPORTING/STORAGE Transporting Always turn the fuel valve off when transport- ing the tiller. Keep it level to avoid fuel and oil leakage, and secure it with a suitable strap or rope. (Over 30 days): Preparation For Storage Close the IN. & EX. valves and the contact breaker points. - Page 26 Leave the piston on compression to close the valves and points. Reinstall the spark plug. Cover the tiller and store on a level surface in a dry, dust-free area. Do not place the tiller with the handlebars on the ground.
- Page 27 Check that the spark plug is clean and properly gapped, then reinstall and tighten the Check engine and transmission oil levels. Oil will deteriorate if left in an engine for a long period of time. Change the engine oil if the tiller NOTE: has been stored for several times.
-
Page 28: Specifications
Fuel tank capacity..Spark plug..Clutch..Transmission ... Oil capacity ..F200 .1,250 x 585 x 960 mm (49.2 x 23.0 x 37.8 in) .27.0 kg (59.5 lb) .I ,045 mm (41 .I in) .GlOO Single cylinder, 4-stroke, forced air cooled, side valve, gasoline cm3 (4.6 cu in)/46 x 46 mm (1.81 x 1.81 in) - Page 29 Warranty Service Owner Satisfaction Your satisfaction and goodwill duct will be handled by your dealer’s of all concerned, misunderstandings we suggest you take the following Discuss your problem with a member solved at that level. If the problem owner of the dealership or the General If your problem still has not been resolved to your satisfaction,...
- Page 30 When you write or call, please provide the following information: • Model and serial numbers • Name of the dealer who sold the Honda power equipment to you • Name and address of the dealer who services your equipment •...
Need help?
Do you have a question about the F200 and is the answer not in the manual?
Questions and answers