Table of Contents
Advertisement
Quick Links
Advertisement
Table of Contents

Related Manuals for RocketFish RE-GUV1202


Summary of Contents for RocketFish RE-GUV1202
- Page 1 Wireless Gaming Headset with 3D Sound RF-GUV1202 User Guide...
-
Page 2: Table Of Contents
Contents Important safety instructions ..... 5 Introduction ........6 Features . - Page 3 Connecting to an Xbox 360 ..... 28 TV headphone jack for the audio connection ..28 Identifying jacks and cables .
- Page 4 What Mac versions are supported? ......52 Why does my headset keep shutting off? ..... 52 Specifications .
-
Page 5: Important Safety Instructions
Wireless Gaming Headset with 3D Sound Important safety instructions 1 Read these instructions. 2 Keep these instructions. 3 Heed all warnings. 4 Follow all instructions. 5 Do not use this apparatus near water. 6 Clean only with dry cloth. 7 Do not store near any heat sources such as radiators, heat registers, stoves, or other apparatus (including amplifiers) that produce heat. -
Page 6: Introduction
Introduction Features • Compatible with: • PlayStation®3 (PS3™) • Xbox 360® and Xbox LIVE® • PC running Windows® 7, Windows Vista®, or Windows® XP • Mac® computer running OS X v10.2.8 and above • Stereo audio devices • Incorporates SRS WOW® with SRS®, TruBass®, and FOCUS® technologies to create 3D sound for the exciting, lifelike sound that gamers crave •... -
Page 7: Package Contents
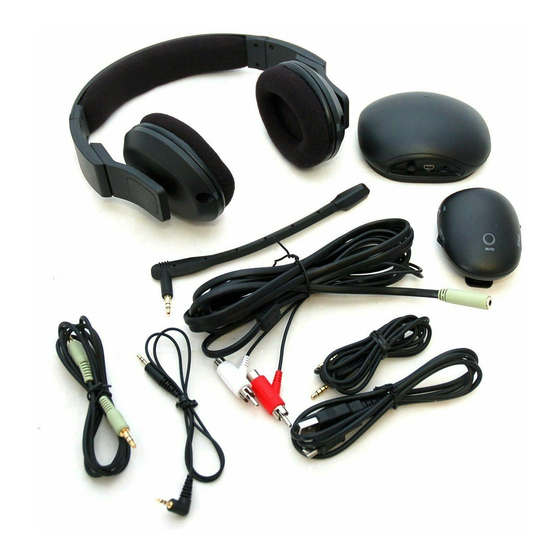
Package contents Headset 3.5mm cable with 3.5mm cable with 2.5mm chat black connector green connector cable connects the headset connects the connects an to the wireless wireless Xbox receiver transmitter to the controller to RCA piggyback the wireless cable receiver Microphone connects to the headset... -
Page 8: Wireless Transmitter
Wireless transmitter Note: When you turn on the wireless transmitter and receiver, they pair automatically. Component Description Press to turn your headset on or off. POWER button Plug the USB cable into this port and into the USB USB port port on your game console. -
Page 9: Wireless Receiver
Wireless receiver Note: When you turn on the wireless transmitter and receiver, they pair automatically. Front Bottom Component Description Rotate to control the chat volume. Chat volume Press to turn the SRS sound feature on and off. When the SRS sound feature is turned on, a blue SRS switch light around the SRS switch turns on. -
Page 10: Headset Jacks And Controls
Headset jacks and controls Right side Left side Component Description Plug the microphone into this jack. Right microphone jack (MIC) Plug the microphone into this jack. Left microphone jack (MIC) Plug the black 3.5mm cable into this jack and into the 3.5mm jack on the wireless transmitter or other LINE IN jack audio device. -
Page 11: Installing The Wireless Receiver Batteries
Installing the wireless receiver batteries To install the wireless receiver batteries: 1 Press the release button on the back of the receiver, then remove the battery compartment cover. 2 Insert three AAA batteries (not included) into the battery compartment. Make sure that the + and – symbols on the batteries align with the + and –... -
Page 12: Connecting The Microphone
Connecting the microphone To connect the microphone: 1 Plug the microphone into the left or right MIC jack on your headset. Twist the microphone tip so that the sound holes face your mouth. Right side Left side Connect the microphone to either the left or right MIC jack. -
Page 13: Using The Wireless Receiver
Using the wireless receiver You can clip the wireless receiver to your belt, pocket, or sleeve for convenient usage. - Page 14 Selecting a connection method Using a TV headphone jack is the easiest way to connect the game and chat audio. Does your TV have a headphone jack? • Yes, go to page 15. • No, go to page 20.
-
Page 15: Connecting To A Ps3
Connecting to a PS3 TV headphone jack for the audio connection Now you need to decide how you want to connect the game video. Identifying jacks and cables Does your TV have: An HDMI jack? HDMI provides the best video. Go to “HDMI cable with a TV headphone jack”... - Page 16 A composite video jack? Composite video provides good video. Go to “PS3 AV cable with a TV headphone jack” on page 19. Note: Most PS3s come with an AV cable that provides a composite video connection. Composite video Yellow Composite video uses one video jack. A composite video On some TVs, this jack is yellow.
-
Page 17: Hdmi Cable With A Tv Headphone Jack
HDMI cable with a TV headphone jack To connect to a PS3 using a TV headphone jack and HDMI cable: Note: The HDMI cable may not be provided with the PS3. You may need to buy this cable separately. 1 Make the connections shown in the following illustration. SOURCE HDMI 2 Press the POWER button on the wireless transmitter, then press... -
Page 18: Component Video Cable With A Tv Headphone Jack
Component video cable with a TV headphone jack To connect to a PS3 using a TV headphone jack and PS3 component video cable: Note: The PS3 component video cable is not provided with the PS3. You’ll need to buy this cable separately. 1 Make the connections shown in the following illustration. -
Page 19: Ps3 Av Cable With A Tv Headphone Jack
PS3 AV cable with a TV headphone jack To connect to a PS3 using a TV headphone jack and PS3 AV cable: 1 Make the connections shown in the following illustration. Yellow (video) SOURCE Red (R) and white (L) (not used) Black 2 Press the POWER button on the wireless transmitter, then press... -
Page 20: Ps3 Cable For The Audio Connection
PS3 cable for the audio connection Now you need to decide how you want to connect the game video. Note: A TV headphone jack is the easiest way to connect the game and chat audio. If your TV has a headphone jack, go to “TV headphone jack for the audio connection”... - Page 21 A composite video jack? Composite video provides good video. Go to “PS3 AV cable for both audio and video” on page 24. Note: Most PS3s come with an AV cable that provides a composite video connection. Composite video Yellow Composite video uses one video jack. On A composite video cable some TVs, this jack is yellow.
-
Page 22: Hdmi Cable With The Ps3 Av Cable
HDMI cable with the PS3 AV cable To connect to the PS3 with an HDMI cable: Note: The HDMI cable may not be provided with the PS3. You may need to buy this cable separately. 1 Make the connections shown in the following illustration. HDMI Yellow (video) (not used) -
Page 23: Component Video With A Ps3 Component Video Cable
Component video with a PS3 component video cable To connect to a PS3 with a PS3 component video cable: Note: The PS3 component video cable is not provided with the PS3. You’ll need to buy this cable separately. 1 Make the connections shown in the following illustration. Green (Y) Blue (P Red (P... -
Page 24: Ps3 Av Cable For Both Audio And Video
PS3 AV cable for both audio and video To connect to a PS3 using a PS3 AV cable: 1 Make the connections shown in the following illustration. Yellow (video) White (L) Red (R) SOURCE Black Piggyback Green 2 Complete the steps in “Setting up the audio (PS3 AV cable)” on page 25. -
Page 25: Setting Up The Audio (Ps3 Av Cable)
Setting up the audio (PS3 AV cable) If you use the PS3 AV cable for your audio connection, you need to set up the audio on your PS3. Note: If you use a TV headphone jack for the audio connection, you do not need to set up the audio! To set up the audio when using the PS3 AV cable: 1 Turn on your PS3, then open the Settings menu. -
Page 26: Setting Up The Chat Function
1 Turn on your PS3, then open the PS3 Settings menu. 2 Select Accessory Settings. 3 Select Audio Device Settings. 4 Set the Input Device and Output Device settings to Rocketfish Wireless Headset. 5 Select OK to save the settings and close the menu. - Page 27 Xbox 360 Selecting a connection method Using a TV headphone jack is the easiest way to connect the game and chat audio. Does your TV have a headphone jack? • Yes, go to page 28. • No, go to page 33.
-
Page 28: Connecting To An Xbox 360
Xbox 360 Connecting to an Xbox 360 TV headphone jack for the audio connection Now you need to decide how you want to connect the game video. Identifying jacks and cables Does your TV have: An HDMI jack? HDMI provides the best video. Go to “HDMI cable with a TV headphone jack”... - Page 29 Xbox 360 A composite video jack? Composite video provides good video. Go to “Xbox 360 AV cable with a TV headphone jack” on page 32. Note: Most Xbox 360s come with an AV cable that provides a composite video connection. Composite video Yellow Composite video uses one video jack.
-
Page 30: Hdmi Cable With A Tv Headphone Jack
Xbox 360 HDMI cable with a TV headphone jack To connect to an Xbox 360 using a TV headphone jack and HDMI cable: Note: The HDMI cable may not be provided with the Xbox 360. You may have to buy this cable separately. 1 Make the connections shown in the following illustration. -
Page 31: Component Video Cable With A Tv Headphone Jack
Xbox 360 Component video cable with a TV headphone jack Note: The Xbox 360 component video cable may not be provided with the Xbox 360. You may need to buy this cable separately. To connect to an Xbox 360 using a TV headphone jack and component video cable: 1 Make the connections shown in the following illustration. -
Page 32: Xbox 360 Av Cable With A Tv Headphone Jack
Xbox 360 Xbox 360 AV cable with a TV headphone jack To connect to an Xbox 360 using a headphone jack and Xbox 360 AV cable: 1 Make the connections shown in the following illustration. Yellow (video) SOURCE Black Red (R) and white (L) (not used) 2 Press the POWER button on the wireless transmitter, then press the POWER button on the wireless receiver. -
Page 33: Xbox 360 Cable For The Audio Connection
Xbox 360 Xbox 360 cable for the audio connection Now you need to decide how you want to connect the game video. Note: A TV headphone jack is the easiest way to connect the game and chat audio. If your TV has a headphone jack, go to “TV headphone jack for the audio connection”... - Page 34 Xbox 360 A composite video jack? Composite video provides good video. Go to “Xbox 360 AV cable for both audio and video” on page 37. Note: Most Xbox 360s come with an AV cable that provides a composite video connection. Composite video Yellow Composite video uses one video jack.
-
Page 35: Hdmi Cable With The Xbox 360 Av Cable
Xbox 360 HDMI cable with the Xbox 360 AV cable To connect to the Xbox 360 using the Xbox 360 AV cable and an HDMI cable: Note: The HDMI cable may not be provided with the Xbox 360. You may have to buy this cable separately. 1 Make the connections shown in the following illustration. -
Page 36: Component Video With An Xbox 360 Component Video Cable
Xbox 360 Component video with an Xbox 360 component video cable Note: The Xbox 360 component video cable may not be provided with the Xbox 360. You may need to buy this cable. separately. To connect to the Xbox 360 with an Xbox 360 component video cable: 1 Make the connections shown in the following illustration. -
Page 37: Xbox 360 Av Cable For Both Audio And Video
Xbox 360 Xbox 360 AV cable for both audio and video To connect to an Xbox 360 using the Xbox 360 AV cable: 1 Make the connections shown in the following illustration. Yellow (video) White SOURCE Piggyback 2 Press the POWER button on the wireless transmitter, then press the POWER button on the wireless receiver. -
Page 38: Connecting To A Computer
Computer Connecting to a computer If your computer has a Windows operating system, go to “Windows 7” on page 38. If your computer has a Mac operating system, go to “Mac OS X v10.2.8 and above” on page 42. Windows 7 To connect to a Windows 7-based computer: 1 Make the connections shown in the following illustration. - Page 39 Windows sounds, you can reset the default devices to their original settings. 5 In the Playback list, select Rocketfish headset, then select Set Default. A green check appears next to Rocketfish headset. 6 Click Properties, then click the Levels tab.
-
Page 40: Windows Xp
Windows sounds, you can reset the default devices to their original settings. 5 Under Sound playback, make sure the Rocketfish Headset is selected as the default device. 6 Click Volume, Options, then click Properties. - Page 41 9 Click the X in the upper right corner of the dialog box to close the box. 10Under Sound recording, make sure the Rocketfish Headset is selected as the default device. 11Click Volume, then slide the Mic Volume slider to the middle setting.
-
Page 42: Mac Os X V10.2.8 And Above
Preferences/Sound. 3 Select the Output tab and make sure that the default audio device is set to Rocketfish Wireless Headset. If not, select Rocketfish Wireless Headset. 4 Set the Output volume slider on the bottom of the screen to the maximum. - Page 43 Computer 6 Set the Input volume slider to 75%. This setting determines the volume of your voice that others hear when you speak into the microphone. 7 Close the open dialog boxes. 8 Press the POWER button on the wireless transmitter, then press the POWER button on the wireless receiver.
-
Page 44: Connecting To A Portable Audio Device
Audio Device Connecting to a portable audio device To connect to a portable audio device: 1 Make the connection shown in the following illustration. Black Black 2 Turn on the audio device. Sound plays through your headset. 3 Adjust the volume using the volume controls on your portable audio device. -
Page 45: Troubleshooting
Troubleshooting Xbox 360 HDMI audio adapter When you connect an HDMI cable on some older models of the Xbox 360, you may not be able to access the red and white audio jacks on the Xbox 360. To use the red and white audio jacks, you need to buy an Xbox 360 HDMI audio adapter cable. -
Page 46: Chat Questions
Chat Questions Why isn't Chat working? • Twist the tip of the microphone so the sound holes face your mouth. • Unplug and plug the microphone back in pressing firmly to assure a good connection. • Press the MUTE button on the wireless receiver to unmute the microphone. -
Page 47: Wireless Questions
• Try testing the microphone by connecting the headset to a smartphone and making a test call or recording a memo. If you can hear yourself, the chat problem could be a game issue, a problem on the recipients end, or some other variable not related to the headset. -
Page 48: How Do I Reset The Wireless Receiver
• The MUTE LED is orange when the Mute button on the wireless receiver has been pressed. • The MUTE LED is red when the mute button (the Rocketfish logo) on the left side of the headset has been pressed. -
Page 49: Audio Questions
The LED on the wireless receiver will light orange when mute is activated. • Press the all mute button (the Rocketfish logo) on the left side of the headset once to make sure that the all mute function is not activated. -
Page 50: Why Isn't My Microphone Working
• Press the all mute button (the Rocketfish logo) on the left side of the headset once to make sure that the all mute function is not activated. The LED on the wireless receiver will light red when all mute is activated. - Page 51 • Make sure that all connections are correct and secure. Sometimes a cable may appear to be connected but it may not be pressed in all the way. • Make sure that the wireless receiver batteries are installed correctly. See “Installing the wireless receiver batteries” on page 11.
-
Page 52: Operating System Questions
Operating System Questions What Windows versions are supported? • Windows® 7, Windows Vista®, or Windows® XP are supported. What Mac versions are supported? • Mac OS X v10.2.8 and above are supported. General Questions Why does my headset keep shutting off? The headset has a sleep/standby mode feature to preserve battery life. -
Page 53: Legal Notices
Legal notices FCC Part 15 This device complies with Part 15 of the FCC Rules. Operation of this product is subject to the following two conditions: (1) this device may not cause harmful interference, and (2) this device must accept any interference received, including interference that may cause undesired operation. -
Page 54: One-Year Limited Warranty
Products and parts replaced under this warranty become the property of Rocketfish and are not returned to you. If service of Products and parts are required after the Warranty Period expires, you must pay all labor and parts charges. -
Page 55: What Does The Warranty Not Cover
• Damage due to incorrect operation or maintenance • Connection to an incorrect voltage supply • Attempted repair by anyone other than a facility authorized by Rocketfish to service the Product • Products sold as is or with all faults •... - Page 56 7601 Penn Avenue South, Richfield, Minnesota, U.S.A. 55423-3645 © 2012 BBY Solutions, Inc. All rights reserved. ROCKETFISH is a trademark of BBY Solutions, Inc. Registered in some countries. All other products and brand names are trademarks of their respective owners.
- Page 57 Distributed by Best Buy Purchasing, LLC 7601 Penn Avenue South, Richfield, MN 55423-3645 USA © 2012 BBY Solutions, Inc. All rights reserved. ROCKETFISH is a trademark of BBY Solutions, Inc. All other products and brand names are trademarks of their respective owners. ENGLISH...