Hitachi NR 90GC2 Instruction And Safety Manual
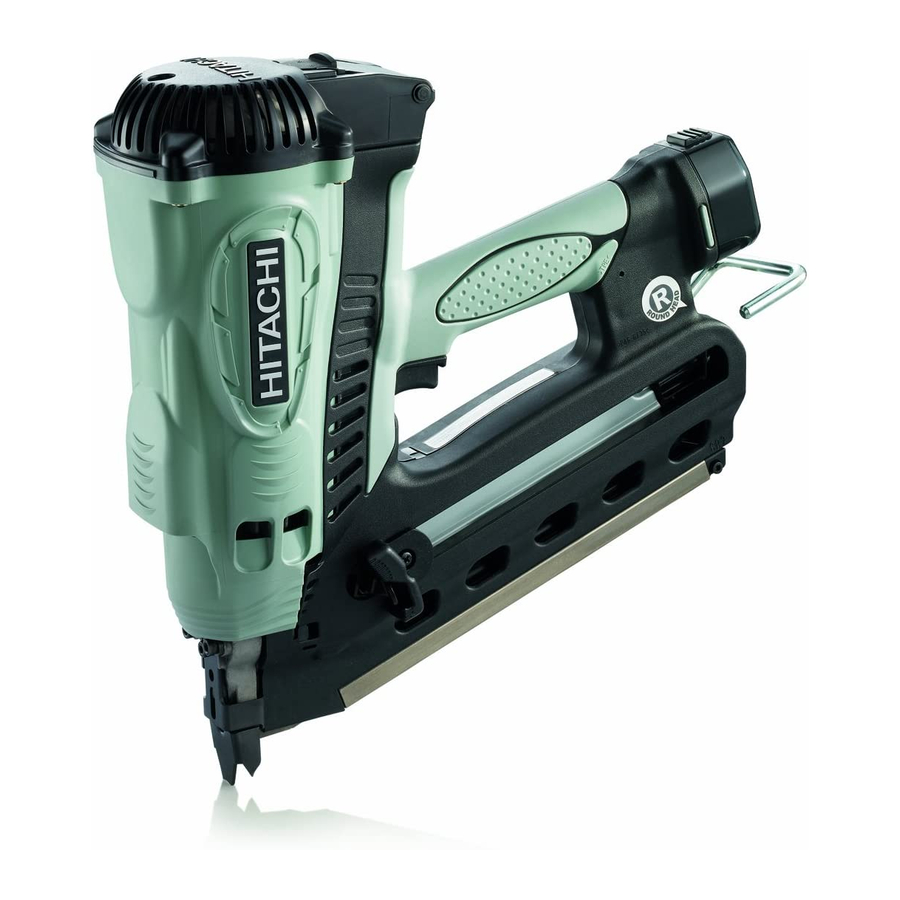
Gas strip nailer
Hide thumbs
Also See for NR 90GC2:
- Handling instructions manual (58 pages) ,
- Handling instructions manual (76 pages) ,
- Handling instructions manual (90 pages)
Table of Contents
Advertisement
Available languages
Available languages
Instruction and safety manual
Manuel d'instructions et de sécurité
Instrucciones y manual de seguridad
Model
NR 90GC2 NR 90GR2
Modèle
Modelo
NR90GC2
Improper use of this Nailer can result in death or serious injury!
This Manual contains important information about product safety.
Read and understand this Manual before operating the Nailer.
Never allow anyone who has not reviewed this manual.
Une utilisation incorrecte et sans respecter la sécurité de ce cloueur risque d'entraîner
la mort ou des blessures graves !
Ce manuel renferme des instructions importantes sur la sécurité de l'outil.
Lire et bien assimiler ce manuel avant d'utiliser le cloueur.
Ne jamais laisser les personnes n'ayant pas étutdié le manuel utiliser l'outil.
¡La utilización inadecuada e insegura de este clavador puede resultar en lesiones serias
o en la muerte!
Este manual contiene información importante sobre la seguridad del producto.
Lea y entienda este manual antes de utilizar el clavador.
No deje manejar esta herramienta a nadie que no haya leído este manual.
Gas Strip Nailer
Cloueuse a bande au gas
Clavadora a gas
DANGER
DANGER
PELIGRO
NR90GR2
Advertisement
Table of Contents

Related Manuals for Hitachi NR 90GC2


Summary of Contents for Hitachi NR 90GC2
- Page 1 Instruction and safety manual Manuel d'instructions et de sécurité Instrucciones y manual de seguridad Model Gas Strip Nailer NR 90GC2 NR 90GR2 Modèle Cloueuse a bande au gas Modelo Clavadora a gas NR90GC2 NR90GR2 DANGER Improper use of this Nailer can result in death or serious injury! This Manual contains important information about product safety.
-
Page 2: Table Of Contents
DEFINITIONS OF SIGNAL WORDS ..........3 OPTIONAL ACCESSORIES ........... 12 EXPLANATION OF THE NAILING ACTION APPLICATIONS ................12 OF THE HITACHI NAILER ............3 REMOVAL AND INSTALLATION METHOD OF BATTERY ..12 CHARGING METHOD ..............12 SAFETY BEFORE OPERATION ..............13 IMPORTANT SAFETY INSTRUCTIONS WORKING ENVIRONMENT .......... -
Page 3: Important Information
NOTE emphasizes essential information. EXPLANATION OF THE NAILING ACTION OF THE HITACHI NAILER This tool has a FULL SEQUENTIAL ACTUATION MECHANISM. First, press the push lever against the workpiece; next, pull the trigger to drive the nail. Follow the same sequence to continue driving nails. -
Page 4: Safety
English SAFETY IMPORTANT SAFETY INSTRUCTIONS FOR USING NAILERS READ ALL INSTRUCTIONS This Nailer is powered by internal combustion device. This Nailer shall only be used with dispensers for combustible gas which are listed in this instruction manual. DANGER 1. OPERATORS AND OTHERS IN WORK AREA MUST WEAR SAFETY GLASSES WITH SIDE SHIELDS. When operating the Nailer, always wear safety glasses with side shields, and make sure others in work area wear safety glasses, too. - Page 5 English SAFETY — Continued WARNING 5. NEVER POINT TOOL AT YOURSELF OR OTHERS Keep the Nailer, fuel cell and battery out of direct sunlight and IN WORK AREA. out of in a vehicle. Always assume the Nailer Keep out of reach of children. contains fasteners.
- Page 6 23. NEVER USE NAILER WHICH IS DEFECTIVE OR Only service personnel trained by Hitachi, distributor or employer shall repair the Nailer. OPERATING ABNORMALLY. If the Nailer appears to be operating unusually, making 31.
-
Page 7: Important Safety Instructions For Fuel Cell
English SAFETY — Continued IMPORTANT SAFETY INSTRUCTIONS FOR FUEL CELL READ ALL INSTRUCTIONS DANGER Fuel cell, fuel and propellant are flammable under pressure. Explosion / Fire Hazard Failure to follow all instructions may result in fire and explosion when handling dispensers for combustible gas for the purpose of storage, transportation, inserting into and taking out of the tool and disposal. -
Page 8: Important Safety Instructions For Battery Charger
6. To reduce risk of damage to electric plug and cord, 13. This battery charger might be attached to HITACHI pull by plug when disconnecting battery charger. battery operated tools as a standard accessory. In 7. -
Page 9: Disposal Of The Exhausted Battery
English SAFETY — Continued Follow these instructions to avoid the risk of injury: DISPOSAL OF THE EXHAUSTED BATTERY WARNING Improper use of the battery or battery charger can WARNING lead to serious injury. To avoid these injuries: Do not dispose of the exhausted battery. The 1. -
Page 10: Operation
Nail feeder (B) Feeder knob Nail feeder (B) Push lever Push lever Firing head (outlet) Firing head (outlet) Battery (EB714S) Terminal hole Latch 2. Battery Charger (UC7SD) Air vent Battery installation hole Cord Pilot lamp Nameplate Hitachi label Plug — 10 —... -
Page 11: Specifications
NOTE: The charging time may vary according to temperature and power source voltage. NAIL SELECTION WARNING Be sure to use only the genuine HITACHI nails for the NR90GC2 or the NR90GR2. The use of any other nails can result in tool malfunction and/or nail breakdown, leading to serious injuries. -
Page 12: Accessories
8 oz. (250 cc) oil feeder (Code No. 885-546) NOTE: Accessories are subject to change without any obligation on the part of HITACHI. Insert the battery into the battery charger. Make sure it contacts the bottom of the battery charger. -
Page 13: Before Operation
English 4. Disconnect battery charger from the receptacle. BEFORE OPERATION CAUTION Read section titled “SAFETY” (pages 4 – 9). Do not pull the plug out of the receptacle by pulling on the cord. Make sure of the followings before operation. Make sure to grasp the plug when removing from receptacle to avoid damaging cord. -
Page 14: Preparing The Fuel Cell
Conduct the tests in the following order. If abnormal operation occurs, stop using the Nailer and contact a Hitachi authorized service center immediately. (2) Press forward (stem side) and downward on the front side of the (1) REMOVE ALL NAILS, FUEL CELL AND BATTERY FROM metering valve. - Page 15 English 2 Insert the fuel cell into nailer. THE PUSH LEVER AND TRIGGER MUST MOVE SMOOTHLY with pulling back the feeder knob. Fuel cell Trigger Push lever 3 Insert the stem of fuel cell into the hole of adaptor. Feeder knob (2) Installing the battery.
-
Page 16: Loading Nails
English (5) Separate the push lever from the workpiece. (3) Pull the nail feeder (B) back to engage the feeder knob Next, point the nailer downward, pull the trigger and to the nail strip. then wait in that position for 5 seconds or longer. THE NAILER MUST NOT OPERATE. -
Page 17: Nailer Operation
English Do not drive nails on the top of other nails or with NAILER OPERATION Nailer at too steep of an angle; nails can ricochet and hurt someone. Read section titled “SAFETY”(pages 4 – 9). Do not drive nails into thin boards or near corners and edges of workpiece. -
Page 18: Adjusting The Nailing Depth
English 4 Stop moving the push lever when a suitable position is reached for a nailing test. 5 Connect the fuel cell and the battery to the Nailer. ALWAYS WEAR SAFETY GLASSES. Perform a nailing test. 6 Remove the fuel cell and the battery from the Nailer. 7 Choose a suitable position for adjusting. -
Page 19: Maintenance Maintenance And Inspection
English 4 Pull magazine away from the firing head, and clear jam. Convex side 5 Connect the fuel cell and the battery to the Nailer. ALWAYS WEAR SAFETY GLASSES. — 19 —... -
Page 20: Service And Repairs
Lubricate it with Hitachi Gas tool lubricant. 3. WARNING LABEL Change the WARNING LABEL if missing or damaged. A new WARNING LABEL is available from a Hitachi authorized service center. Warning label Cloth 4. - Page 21 6. Service parts list CAUTION Repair, modification and inspection of Hitachi Power Tools must be carried out by an Hitachi Authorized Service Center. This Parts List will be helpful if presented with the tool to the Hitachi Authorized Service Center when requesting repair or other maintenance.
- Page 22 The operation of the push lever not Push lever bent? Contact Hitachi for replacement. smooth. Check push lever’s moving track, debris? Contact Hitachi for replacement. Check for returning of piston. Pull the trigger all the way. Fan is working, light indicator shows GREEN yet it doesn’t drive a nail or...
-
Page 23: Français
REMARQUE met en relief les informations essentielles. EXPLICATION DE L’ACTION DE CLOUAGE DU CLOUEUR HITACHI Cet outil dispose d’un MÉCANISME DE DÉCLENCHEMENT SÉQUENTIEL COMPLET. Appuyer tout d’abord le levier-poussoir contre la pièce, puis tirer sur la gâchette pour enfoncer le clou. Procéder de la même façon pour continuer à... -
Page 24: Securite
Français SECURITE CONSIGNES DE SECURITE IMPORTANTES POUR L’UTILISATION DU CLOUEUR LIRE TOUTES CES INSTRUCTIONS Ce cloueur est alimenté par un dispositif à combustion interne. Il ne doit être utilisé qu’avec les distributeurs de gaz combustible mentionnés dans le présent mode d’emploi. DANGER 1. - Page 25 Français SECURITE — suite AVERTISSEMENT 10. RANGER LE CLOUEUR CORRECTEMENT, AVEC 5. NE JAMAIS DIRIGER L’OUTIL VERS SOI NI VERS LA PILE À COMBUSTIBLE ET LA PILE SORTIES. QUELQU’UN D’AUTRE DANS L’AIRE DE Lorsqu’ils ne servent pas, ranger TRAVAIL. le cloueur, la pile à combustible 120°F MAX Toujours supposer que le cloueur et la pile dans une boîte à...
- Page 26 Si le cloueur semble ne pas fonctionner comme d’habitude, qu’il fait des bruits bizarres ou qu’il semble défectueux, cesser immédiatement de l’utiliser et le faire réparer par un service après-vente Hitachi agréé. 24. SORTIR LA PILE À COMBUSTIBLE ET LA PILE DU CLOUEUR QUAND: 1) on entretient ou inspecte le cloueur ;...
-
Page 27: Consignes De Sécurité Importantesà L'égard De La Pile À Combustible
Français SECURITE — suite CONSIGNES DE SÉCURITÉ IMPORTANTES À L’ÉGARD DE LA PILE À COMBUSTIBLE LIRE TOUTES CES INSTRUCTIONS DANGER La pile à combustible, le combustible et le propulseur sont inflammables sous pression. Danger d’explosion / d’incendie Un non-respect de toutes les instructions peut occasionner un incendie et une explosion lorsqu’on manipule des distributeurs de gaz combustible en vue de les stocker, de les transporter, de les insérer dans l’outil, de les en sortir et de les éliminer. -
Page 28: Consignes De Sécurité Importantes Pour Le Chargeur De Batterie
Dans ce cas, vérifier le mode pieds dedans, ni l’endommager ou le soumettre à d’emploi de l’outil HITACHI alimenté sur batterie des contraintes. avant d’utiliser le chargeur de batterie. -
Page 29: Mise Au Rebut D'une Batterie Usée
Français SECURITE — suite Pour éviter tout risque de blessure, observer les consignes MISE AU REBUT D’UNE BATTERIE suivantes: USÉE AVERTISSEMENT AVERTISSEMENT Une utilisation incorrecte de la batterie ou du chargeur de batterie risque de provoquer des Ne pas jeter la batterie usée aux ordures blessures. - Page 30 Français SECURITE — suite CONSERVER CES INSTRUCTIONS LES METTRE A LA DISPOSITION DES AUTRES UTILISATEURS PROPRIETAIRES DE CET OUTIL! — 30 —...
-
Page 31: Utilisation
(B) d’alimentation Tête de Tête de clouage (sortie) clouage (sortie) Batterie (EB714S) Orifice de prise Taquet 2. Chargeur de batterie (UC7SD) Event d’air Orifice d’installation de la batterie Cordon Lampe témoin Plaque Etiquette Hitachi Fiche signalétique — 31 —... -
Page 32: Specifications
REMARQUE: La durée de recharge peut varier en fonction de la température et de la tension de la source d’alimentation. SELECTION DES CLOUS AVERTISSEMENT Bien utiliser exclusivement les clous HITACHI d’origine avec le NR90GC2 ou le NR90GR2. L’utilisation d’autres clous risque de provoquer un mauvais fonctionnement de l’outil et/ou une... -
Page 33: Accessoires
REMARQUE: Les accessoires sont sujets à modification sans préavis et sans aucune obligation de la part de HITACHI. APPLICATIONS Brancher la fiche du chargeur de batterie dans la prise. Ossature de plancher et mur. -
Page 34: Avant L'utilisation
Français 4. Débrancher le chargeur de batterie de la prise. AVANT L’UTILISATION ATTENTION Lire la section intitulée “SECURITE” (pages 24 – 30). Ne pas débrancher la fiche de la prise en tirant sur le cordon. Bien vérifier les points suivants avant de travailler. Pour éviter tout dommage lorsqu’on débranche la fiche de la prise, bien tenir la fiche proprement ENVIRONNEMENT DE TRAVAIL... -
Page 35: Préparation De La Pile À Combustible
Avant de commencer le travail proprement dit, faire un essai de clouage en vérifiant les points ci-dessous. Effectuer les essais dans l’ordre indiqué. S’il se produit un fonctionnement anormal, cesser immédiatement d’utiliser le cloueur et contacter un service après-vente agréé Hitachi. — 35 —... - Page 36 Français (1) SORTIR TOUS LES CLOUS, LA PILE À COMBUSTIBLE (3) INSÉRER LA PILE À COMBUSTIBLE DANS LE ET LA PILE DU CLOUEUR. CLOUEUR. 1 Tirer le taquet et ouvrir le couvercle de pile TOUTES LES VIS DOIVENT ETRE SERREES A combustible.
-
Page 37: Chargement Des Clous
Français (4) Retirer le doigt de la détente et presser le bras de Approvisionnement en deux pas! contact contre la pièce à usiner en tirant le bouton (1) Insérer la recharge de clous dans le dos du magasin. d’alimentation vers l’arrière. LE CLOUEUR NE DOIT PAS FONCTIONNER. -
Page 38: Utilisation Du Cloueur
Français 3 Extraire les clous de l’arrière du magasin. AVERTISSEMENT NE JAMAIS diriger l’outil vers soi ni vers quelqu’un d’autre dans l’aire de travail. Toujours ÉLOIGNER le doigt de la gâchette quand on n’effectue pas de clouage afin d’éviter Bouton d’alimentation tout risque de Alimenteur de clous (B) déclenchement... -
Page 39: Méthodes D'utilisation
Français ATTENTION 2 Desserrer le boulon avec une clé. Prendre soin de ne pas cogner le bout du bras de contact contre du bois tandis que le bras ne peut pas être soulevé. MÉTHODES D’UTILISATION ATTENTION 3 Si les clous sont enfoncés trop profondément, déplacer Bien presser la détente pour enfoncer un clou;... - Page 40 Français 3 Détacher les boulons avec une clé. 4 Écarter le magasin de la tête de clouage et éliminer le blocage. Côté convexe 5 Brancher la pile à combustible et la batterie dans le cloueur. TOUJOURS PORTER DES LUNETTES DE PROTECTION. —...
-
Page 41: Entretien Et Inspection
Lorsqu’ils ne servent pas, ranger le cloueur, la pile à dans le magasin. combustible et la batterie dans un endroit chaud et sec. Lubrifier avec le lubrifiant pour outils à gaz Hitachi. Ranger hors de portée des enfants. 3. ETIQUETTE D’AVERTISSEMENT Remplacer l’ETIQUETTE D’AVERTISSEMENT si elle... -
Page 42: Entretien Et Reparations
6. Liste des pièces de rechange ATTENTION Les réparations, modifications et inspections des outils électriques Hitachi doivent être confiées à un service après-vente Hitachi agréé. Il sera utile de présenter cette liste de pièces au service après-vente Hitachi agréé lorsqu’on apporte un outil nécessitant des réparations ou tout autre entretien. - Page 43 Charger des clous dans le magasin. pression du bras de contact. Noter la couleur du témoin. Si rouge: charger la pile. Si vert: Contacter Hitachi pour obtenir un remplacement. Impossible de charger la batterie. Vérifier le cordon électrique. — 43 —...
-
Page 44: Español
NOTA enfatiza información esencial. EXPLICACIÓN LA ACCIÓN DE CLAVADO DEL CLAVADOR HITACHI Esta herramienta es un MECANISMO DE ACTUACIÓN SECUENCIAL COMPLETO. En primer lugar, presione la palanca de empuje contra la pieza de trabajo y, a continuación, jale el gatillo para introducir el clavo. -
Page 45: Seguridad
Español SEGURIDAD INSTRUCCIONES IMPORTANTES DE SEGURIDAD PARA LA UTILIZACIÓN DEL CLAVADOR LEA TODAS LAS INSTRUCCIONES Esta Clavadora funciona con un dispositivo de combustión interno. La clavadora sólo deberá utilizarse con lo dispensadores de gas combustible enumerados en este manual de instrucciones. PELIGRO 1. - Page 46 Español SEGURIDAD — Continuación ADVERTENCIA 5. NO DIRIJA NUNCA LA HERRAMIENTA HACIA SÍ 10. GUARDE LA CLAVADORA CORRECTAMENTE: MISMO O HACIA OTRAS PERSONAS DEL ÁREA RETIRE LA CÉLULA DE COMBUSTIBLE Y LA DE TRABAJO. BATERÍA. Piense siempre que el clavador Mientras no la utilice, guarde la 120°F MAX puede tener clavos cargados.
- Page 47 Mantenga en todo momento un buen equilibrio. anular la garantía y provocar el mal funcionamiento, lo que podría resultar en lesiones. 23. NO UTILICE NUNCA UN CLAVADOR El clavador solamente deberá ser reparado por Hitachi, un distribuidor, o el empresario. DEFECTUOSO O QUE FUNCIONE INCORRECTAMENTE.
-
Page 48: Intrucciones De Seguridad Importantes Para La Célula De Combustible
Español SEGURIDAD — Continuación INTRUCCIONES DE SEGURIDAD IMPORTANTES PARA LA CÉLULA DE COMBUSTIBLE LEA TODAS LAS INSTRUCCIONES PELIGRO La célula de combustible, el combustible y el propelente son inflamables bajo presión. Peligro de fuego o explosión El incumplimiento de las instrucciones puede provocar un incendio o explosión al manejar los dispensadores de gas combustible para su almacenamiento, transporte, inserción y extracción de la herramienta y para deshacerse de éstos. -
Page 49: Instrucciones Importantes De Seguridad Para El Cargador De Baterías
11. No desarme el cargador de baterías. Cuando 3. Para reducir el riesgo de lesiones, cargue baterías necesite reparación, llévelo a un técnico cualificado. recargables HITACHI EB714S. Otros tipos de El reensamblaje incorrecto podría resultar en el baterías podrían explotar causando lesiones y riesgo de incendios o descargas eléctricas. -
Page 50: Eliminación De Las Baterías Agotadas
Español SEGURIDAD — Continuación ELIMINACIÓN DE LAS BATERÍAS Para evitar el riesgo de lesiones, siga las instrucciones AGOTADAS ofrecidas a continuación: ADVERTENCIA ADVERTENCIA La utilización inadecuada de la batería o del No tire las baterías agotadas. Las baterías pueden cargador de baterías puede conducir a lesiones explotar si se incineran. - Page 51 Español SEGURIDAD — Continuación ¡GUARDE ESTAS INSTRUCCIONES PÓNGALAS A DISPOSICIÓN DE OTROS USUARIOS PROPIETARIOS DE ESTA HERRAMIENTA! — 51 —...
-
Page 52: Operación
Cabezal disparador (salida) Cabezal disparador (salida) Batería (EB714S) Pomo alimentador Seguro 2. Cargador de la batería (UC7SD) Rejillas de ventilación Orificio de instalación de la batería Cable Lámpara piloto Placa de Etiqueta de Hitachi Clavija características — 52 —... -
Page 53: Especificaciones
SELECCIÓN DE CLAVOS ADVERTENCIA Asegúrese de usar únicamente clavos legítimos Hitachi para el NR90GC2 o el NR90GR2. El uso de otros clavos puede producir un fallo de funcionamiento de la herramienta y/o la rotura del clavo, lo que provocaría a su vez lesiones de gravedad. -
Page 54: Accesorios
Aceitera de 8 oz. (250 cc) (Nº de código 885-546) NOTA: Los accesorios están sujetos a cambios sin ninguna Introduzca la batería en el cargador. Asegúrese de que obligación por parte de HITACHI. entra en contacto con la parte inferior del cargador. APLICACIONES Construcción de pisos y paredes. -
Page 55: Antes De La Operación
Lea la sección titulada “SEGURIDAD” (páginas 45 – 51). y póngase en contacto con el CENTRO DE SERVICIO AUTORIZADO DE HITACHI. Antes de la utilización, cerciórese de lo siguiente. 4. Desconecte el cargador de baterías del tomacorriente. -
Page 56: Preparación De La Célula De Combustible
Antes de comenzar el trabajo, pruebe el clavador utilizando la lista de comprobaciones siguiente. Realice las comprobaciones en el orden indicado. Si se produce alguna operación anormal, deje de utilizar el clavador y póngase inmediatamente en contacto con un centro de reparaciones autorizado por Hitachi. — 56 —... - Page 57 Español (1) RETIRE LOS CLAVOS, LA CÉLULA DE COMBUSTIBLE Y (3) CÓMO INSERTAR LA CÉLULA DE COMBUSTIBLE EN LA BATERÍA DE LA CLAVADORA. LA CLAVADORA. 1 Tire del seguro y abra la cubierta de la célula. TODOS LOS TORNILLOS DEBERÁN ESTAR Seguro APRETADOS.
-
Page 58: Carga De Clavos
Español (4) Retire el dedo del gatillo y pulse la palanca de empuje 2 Acción de alimentación de clavos! contra la pieza de trabajo, al tiempo que tira hacia (1) Inserte la tira de clavos en la parte trasera del atrás del pomo de alimentación. -
Page 59: Operación Del Clavador
Español Extraiga los clavos: OPERACIÓN DEL CLAVADOR 1 Tire del pomo de alimentación hacia atrás. 2 Vuelva a echar hacia delante el pomo de alimentación Lea la sección titulada “SEGURIDAD” (páginas 45 – 51). con cuidado al tiempo que empuja el alimentador de clavos (B). -
Page 60: Métodos De Operación
Español MÉTODOS DE OPERACIÓN No utilice el cable de alimentación si está dañado. PRECAUCIÓN Llévelo a reparar de Apriete el gatillo para disparar el clavo, de lo inmediato. contrario puede que el pistón no retroceda No coloque lo rostro, las correctamente. -
Page 61: Uso Del Gancho
Español 3 Si los clavos penetran demasiado, mueva la palanca 3 Retire los pernos con la llave inglesa. de empuje hacia delante. Palanca de empuje Si los clavos quedan en superficie, mueva la palanca de empuje hacia atrás. 4 Retire el almacén del cabezal de disparo y desatasque la unidad. -
Page 62: Mantenimiento
Lubrique la herramienta con un lubricante Manténgase fuera del alcance de los niños. para herramientas de gas de Hitachi. Paño — 62 —... -
Page 63: Servicio Y Reparaciones
PRECAUCIÓN La reparación, modificación e inspección de las herramientas eléctricas Hitachi deben ser realizadas por un Centro de Servicio Autorizado de Hitachi. Esta lista de repuestos será de utilidad si es presentada junto con la heramienta al Centro de Servicio Autorizado de Hitachi para solicitar la reparación o cualquier otro tipo de mantenimiento. - Page 64 Verifique que no haya grasa ni restos Póngase en contacto con Hitachi para de suciedad en el chispero. reemplazarla. Compruebe que el filtro no esté atascado. Póngase en contacto con Hitachi para reemplazarla. E ventilador no funciona al pulsar la El almacén está vacío.
-
Page 65: Parts List
NR90GC2 — 65 —... - Page 66 Item Item Part Name Q’TY Part Name Q’TY HEX. SOCKET HD. BOLT (W/FLANGE) M5×12 INSULATOR SHEET TOP COVER HITACHI LABEL FILTER HOUSING ASS'Y MOTOR NYLON NUT M4 RUBBER WASHER HEX. SOCKET HD. BOLT M5×15 ROLL PIN D2.5×25 SLEEVE MOTOR MOUNT TAPPING SCREW (W/FLANGE) D4×20...
- Page 67 NR90GR2 — 67 —...
- Page 68 NR90GR2 Item Item Part Name Q’TY Part Name Q’TY HEX. SOCKET HD. BOLT (W/FLANGE) M5×12 HITACHI LABEL TOP COVER HOUSING ASS'Y FILTER NYLON NUT M4 MOTOR HEX. SOCKET HD. BOLT M5×15 RUBBER WASHER SLEEVE ROLL PIN D2.5×25 TAPPING SCREW (W/FLANGE) D4×20...
- Page 69 — 69 —...
- Page 70 — 70 —...
- Page 71 — 71 —...
- Page 72 Please contact HITACHI KOKI U.S.A. LTD. at 1-800-59-TOOLS (toll free), or HITACHI AUTHORIZED POWER TOOL SERVICE CENTER recarding COLLECTION. Pour le RAMASSAGE, contacter HITACHI KOKI U.S.A. LTD. au 1-800-59-TOOLS (appel gratuit), ou UN SERVICE APRES-VENTE D’OUTILS ELECTRIQUE AGREE PAR HITACHI.