Table of Contents
Advertisement
Available languages
Available languages
Advertisement
Chapters
Table of Contents

Related Manuals for GE RM24911


Summary of Contents for GE RM24911
- Page 1 Universal Remote Instruction Manual RM24911 rev. 1/07...
-
Page 2: Table Of Contents
With the RM24911, juggling multiple remote controls is a thing of the past! Your RM24911 controls up to three devices, including the most popular brands of TV, VCR, DVD, CBL, and SAT. -
Page 3: Setup
Setup Battery Installation 1. On the back of the remote, push down on the tab and lift the cover off. 2. Match the batteries to the + and - marks inside the battery case, then insert 2 AAA Alkaline batteries. 3. -
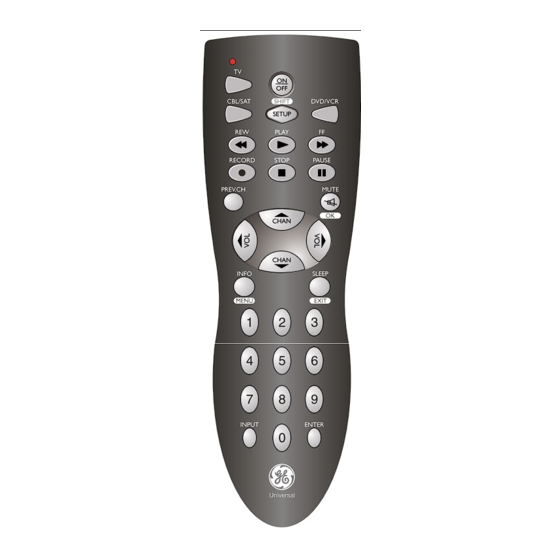
Page 4: Button Functions
Button Functions Some buttons on the remote might have functions that are referred to by different names on the device you are controlling. E.G. PREV.CH may be called RECALL, or ENTER may be called DISPLAY. These differences depend on the brand and model of your product. Also, this remote can only operate features that exist on your product. - Page 5 Button Functions, cont. SETUP Used to setup the remote, and for code search function. SHIFT Press and release to access buttons labeled in reverse print (OK, MENU, EXIT). See “Using SHIFT for Menu and Navigation” description on Page 9 ON•OFF Turns for more information. product On or Off.
-
Page 6: Direct Code Entry
Direct Code Entry 1. Press and hold the SETUP button until the red indicator stays on, then release the SETUP button. 2. Press and release the desired device button (TV, VCR, etc.). The red indicator blinks, then stays lit. 3. Enter the 4 digit code from the code tables (on separate sheet). -
Page 7: Code Search
Code Search If your device does not respond after you have tried all the codes for your brand, or if your brand is not listed, try searching for your code by following these steps. 1. Manually turn on the device (TV, VCR, etc.) to be controlled. -
Page 8: Using Your Remote
Using Your Remote Code Identification The Code Identification Feature allows you to identify the four digit library code stored under your device button. For example, if you want to find out what four digit code is stored under your TV device button, follow the six steps below: 1. Press and hold the SETUP button until the red indicator stays on. Release the SETUP button. -
Page 9: Using Shift
Using Your Remote, cont. Using SHIFT for Menu and Navigation The SHIFT button allows access to more than one function for certain buttons. Use the SHIFT/SETUP button prior to accessing the MENU, OK, EXIT and Navigation functions e.g.: For MENU, press and release SHIFT/SETUP then MENU/INFO. -
Page 10: Sleep Function
Using Your Remote, cont. Sleep Function The Sleep button enables the remote to turn off your TV after a period of 1 to 99 minutes as shown below. The remote must be in TV mode to set a Sleep Timer. This feature works even if your TV does not have a sleep feature. -
Page 11: Controlling Combo Devices
Using Your Remote, cont. Controlling Devices with Separate Power On and Off Buttons Some GE, RCA and ProScan models require you to press the device button for more than one second to turn the device on and the ON•OFF button to turn the device off. Controlling Combo Devices Some Combo devices (e.g. -
Page 12: Volume/Mute Control And Punch-Through
Using Your Remote, cont. Volume/Mute Control and Punch- Through This remote lets you select which device Mode controls your Volume/Mute buttons. The remote is initially set for all device Modes to use their own Volume/Mute control if present. If the programmed code has no Volume/Mute operation of its own then those buttons will punch-through control to the TV Mode device without needing to change to TV Mode. - Page 13 Using Your Remote, cont. Setting any Mode to use its own Volume/Mute Control This routine can set any Mode to use only its own Volume/Mute control. Note - If your chosen Mode has no Volume/Mute functions of its own then the Volume/Mute buttons will do nothing. 1.
-
Page 14: Troubleshooting
Troubleshooting Remote does not operate your product. • Press the device button of the product you want to control. • Program the remote with a new code. • Install new batteries. (You might have to reprogram your remote after installing new batteries.) •... - Page 15 90 Day Limited Warranty Jasco Products Company warrants this product to be free from manufacturing defects for a period of ninety days from the original date of consumer purchase. This warranty is limited to the repair or replacement of this product only and does not extend to consequential or incidental damage to other products that may be used with this unit.
- Page 16 RM24911 Control Remoto Universal Manual de Instrucciones Jasco Products Company 311 N.W. 122nd Oklahoma City, OK 73114...
- Page 17 El RM24911 controla hasta tres aparatos, incluyendo las marcas más populares de televisores, videograbadoras, DVD, cable y satélite. El RM24911 es fácil de usar, fácil de programar y le da a usted control total... ¡con la punta de sus dedos! Nota: Puede que este control remoto no ejecute algunas funciones de su control remoto original.
-
Page 18: Configuración
Configuración Instalación de las Baterías 1. Presione hacia abajo la lengüeta en la parte posterior del control remoto y retire la tapa. 2. Inserte dos baterías alcalinas tamaño AAA de manera que correspondan con las marcas + y – del compartimiento. -
Page 19: Funciones De Los Botones
Funciones de los Botones Algunos botones del control remoto podrían tener funciones que corresponden a nombres diferentes en el aparato que está controlando. Por ejemplo, puede que PREV.CH se llame RECALL, o ENTER se llame DIS- PLAY. Tales diferencias dependen de la marca y el mod- elo de su producto. - Page 20 Funciones de los botones, continuación SETUP Se usa para configurar el control remoto y para la función de búsqueda de códigos. SHIFT Presione y suelte para acceder a los botones con nombres en impresión invertida (OK, MENU, EXIT). ON-OFF Enciende y MUTE Silencia el apaga el producto. sonido del televi- sor dejando sólo la imagen.
-
Page 21: Entrada Directa De Códigos
Entrada Directa de Códigos 1. Mantenga presionado el botón SETUP hasta que el indicador rojo permanezca encendido y luego suelte el botón SETUP. 2. Presione y suelte el botón del aparato deseado (TV, VCR, etc.). El indicador rojo parpadeará y después permanecerá encendido. 3. -
Page 22: Búsqueda De Códigos
Búsqueda de Códigos Si el aparato no responde después de haber intentado todos los códigos para la marca o si la marca no aparece en la lista, busque el código siguiendo estos pasos. 1. Encienda manualmente el aparato (TV, VCR, etc.) que va a controlar. 2. -
Page 23: Identificación De Códigos
Cómo utilizar el Control Identificación de Códigos La función de identificación de códigos permite identificar el código de biblioteca de quattro dígitos almacenado en el botón de cada aparato. Por ejemplo, si usted quiere saber qué código de quattro dígitos está almacenado en el botón de TV, siga estos seis pasos: 1. Mantenga presionado el botón SETUP hasta que el indicador rojo permanezca encendido. - Page 24 Cómo utilizar el Control Remoto cont. Identificación de Códigos Uso de SHIFT para menú y navegación. El botón SHIFT permite el acceso a más de una función de ciertos botones. Use el botón SHIFT/SETUP antes de acceder a las funciones MENU, OK, EXIT y a las de navegación. Por ejemplo.
-
Page 25: Función Sleep
Cómo utilizar el Control Remoto cont. Función Sleep La función Sleep permite que el control remoto apague su televisor después de un periodo entre 1 y 99 minutos como se muestra enseguida. Para configurar el temporizador de Sleep el control remoto debe estar en modo TV. La función Sleep se ejecuta aun cuando su televisor no cuente con esta característica. -
Page 26: Control De Aparatos Con Botones De Encendido/Apagado Independientes
Cómo utilizar el Control Remoto cont. Control de Aparatos con Botones de Encendido/apagado Independientes En algunos modelos GE, RCA y ProScan es necesario presionar el botón de aparato durante más de un segundo para encender el aparato y el botón ON-OFF para apagarlo. Control de Aparatos Combinados Para algunos aparatos combinados (por ejemplo, TV/VCR, TV/DVD, DVD/VCR, etc.) se necesitará... -
Page 27: Control Y Cambio De Control De Volumen/Mute
Cómo utilizar el Control Remoto cont Control y Cambio de Control de Volumen/Mute Este control remoto le permite seleccionar el modo del aparato controlará los botones Volume/Mute. El control remoto está configurado inicialmente para que todos los aparatos utilicen su propio control de Volumen/ Mute, si lo tienen. Si el código programado no tiene operación Volumen/Mute propia, entonces esos botones cambiarán el control al modo TV sin necesidad de cambiar a modo TV. -
Page 28: Configuración Para Que Cualquier Modo
Cómo utilizar el Control Remoto cont. Configuración para que cualquier modo use su propio control de Volume/ Mute El control remoto puede configurarse para que cualquier modo use solamente su propio control de Volumen/Mute. Nota: si el modo escogido no tiene su propia función de Volumen/Mute, los botones de Volume/Mute no harán nada. 1. -
Page 29: Solución De Problemas
Solución de Problemas El control remoto no opera el producto. • Presione el botón de aparato del producto que quiere controlar. • Programe el control remoto con un nuevo código. • Instale baterías nuevas. (Puede que necesite volver a programar el control remoto después de instalar las baterías nuevas). - Page 30 Garantía Limitada de 90 Días Jasco Products Company garantiza que este producto está libre de defectos de fabricación durante un periodo de noventa días a partir de la fecha original de compra por parte del consumidor. Esta garantía se limita a la reparación o reemplazo de este producto solamente y no se extiende a daños derivados o accidentales...