Yamaha NU1 Owner's Manual
Hybrid piano
Hide thumbs
Also See for NU1:
- Reference (6 pages) ,
- Operations (14 pages) ,
- Maintenance handbook (45 pages)
Table of Contents
Advertisement
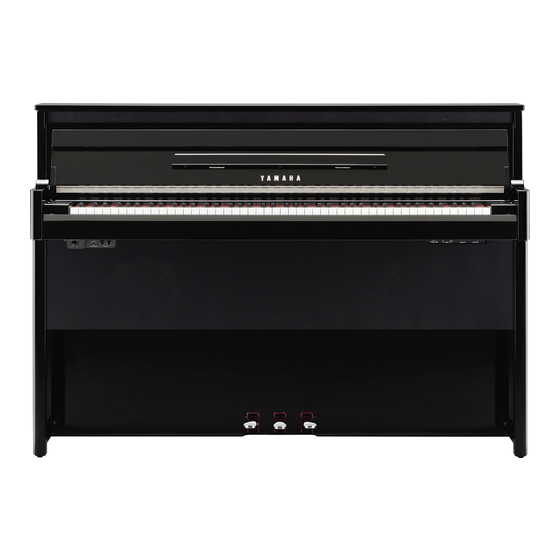
Hybrid Piano
NU1
Owner's Manual
Bedienungsanleitung
Mode d'emploi
Manual de instrucciones
Before using this instrument, be sure to read
"PRECAUTIONS" on pages 6 – 7.
Achten Sie darauf, vor Einsatz dieses Instruments die
„VORSICHTSMASSNAHMEN" auf Seiten 6-7 durchzulesen.
Avant d'utiliser cet instrument, lisez attentivement la section
« PRÉCAUTIONS D'USAGE » aux pages 6-7.
Antes de utilizar el instrumento, lea la sección
"PRECAUCIONES", en las páginas 6-7.
EN
DE
FR
ES
Advertisement
Table of Contents

Related Manuals for Yamaha NU1


Summary of Contents for Yamaha NU1
- Page 1 Hybrid Piano Before using this instrument, be sure to read “PRECAUTIONS” on pages 6 – 7. Owner’s Manual Achten Sie darauf, vor Einsatz dieses Instruments die „VORSICHTSMASSNAHMEN“ auf Seiten 6-7 durchzulesen. Bedienungsanleitung Avant d'utiliser cet instrument, lisez attentivement la section Mode d'emploi «...
- Page 2 SPECIFICATIONS SUBJECT TO CHANGE: The information contained in this manual is believed to be cor- rect at the time of printing. However, Yamaha reserves the Model right to change or modify any of the specifications without notice or obligation to update existing units.
-
Page 3: Important Safety Instructions
The above statements apply ONLY to those products distrib- tronic devices. Compliance with FCC regulations does not uted by Yamaha Corporation of America or its subsidiaries. * This applies only to products distributed by YAMAHA CORPORATION OF AMERICA. (class B) COMPLIANCE INFORMATION STATEMENT... -
Page 4: Main Features
Sophisticated sampling using the latest technology was used to capture the luxurious sounds of Yamaha’s flagship CFX, a full-sized concert grand piano. The powerful bass and bright, penetrating midrange sound of the original CFX are reproduced faithfully, and give a particularly natural and well- balanced overall piano sound. -
Page 5: Table Of Contents
Computer-related Operations Includes instructions on connecting this instrument to a computer, and operations related to transferring song data. To obtain these manuals, access the Yamaha Manual Library, enter “NU1” or “MIDI Basics” to the Model Name box, then click [SEARCH]. -
Page 6: Precautions
AC • Only use the voltage specified as correct for the instrument. The required voltage outlet. Then have the instrument inspected by qualified Yamaha service personnel. is printed on the name plate of the instrument. - Page 7 • This product incorporates and bundles computer programs and contents in which Yamaha owns copyrights or with respect to which it has license to use others' copyrights. Such copyrighted materials include, without limitation, all computer software, style files, MIDI files, WAVE data, musical scores and sound recordings.
-
Page 8: Introduction
Introduction Panel Controls and Terminals Overview Music Rest (pages 9 and 10) Power switch (page 10) Control panel (see below) Fallboard (pages 9 and 10) [MASTER VOLUME] control (page 10) Front surface Terminals (page 27) [USB TO DEVICE] terminal (page 23) [PHONES] jacks (page 12) Rear surface... -
Page 9: Playing The Keyboard
• Use only the AC power cord supplied with the instrument. If the supplied power cord is lost or damaged and needs to be replaced, contact your Yamaha dealer. The use of an inappropriate replacement can pose a fire and shock haz- ard! •... - Page 10 Playing the Keyboard On the right of the keyboard, press the [ ] switch to turn on the power. The lamp located as shown below lights up, the display (page 8) indicates “ ” for a while, then the instru- ment starts up.
-
Page 11: Using The Pedals
Playing the Keyboard Using the Pedals The instrument has three pedals that produce a range of expressive effects similar to those produced by the pedals on an acoustic piano. Damper Pedal (Right) Pressing this pedal will sustain notes longer. Releasing this pedal immediately stops (damps) any sustained notes. -
Page 12: Using Headphones (Optional)
Playing the Keyboard Using Headphones (Optional) Since this instrument is equipped with two [PHONES] jacks, you can connect two sets of standard stereo head- MASTER VOLUME phones. If you are using only one set of headphones, USB TO DEVICE PHONES insert a plug into either jack, shutting off the speakers. -
Page 13: Basic Operations And More
Concerto a cembalo obbligato, 2 violini, d. 0 5 Harpsichord J. S. Bach viola e continuo No.7, BWV.1058 d. 0 1 d. 0 5 Songs are re-arranged excerpts from the original compositions. The other Demo Songs are Yamaha’s original pieces (©2012 Yamaha Corporation). Owner’s Manual... -
Page 14: Using The Metronome
Basic Operations and More Using the Metronome The metronome feature is convenient for practicing with an accurate tempo. Press [METRONOME] to start the metronome. While the metronome sounds, a dot at the right side of the LED display and the lamp of the metronome button flash on and off to the tempo. -
Page 15: Changing The Touch Sensitivity
Basic Operations and More Changing the Touch Sensitivity You can specify the Touch Sensitivity (how the sound responds to the way you play the keys). While holding down [PIANO/VOICE], press one of the A6–C7 keys. The selected Touch Sensitivity is shown on the display while both controls are held. Default setting: 2 (Medium) Display Touch Sensitivity... -
Page 16: Transposing The Pitch In Semitones
Basic Operations and More Transposing the Pitch in semitones You can shift the pitch of the entire keyboard up or down in semitones to facilitate playing in difficult key signatures and match the pitch of the keyboard to the range of a singer or other instruments. For example, if “+5” is selected, playing the key C produces a pitch of F, letting you play a song of F major as though it were in C major. -
Page 17: Setting The Scale Tuning
Basic Operations and More Setting the Scale Tuning You can select various scales for the instrument. Equal Temperament is the most common contemporary piano tuning scale. However, history has known numerous other scales, many of which serve as the basis for certain genres of music. -
Page 18: Playing Back Songs
Playing Back Songs This instrument can play back Songs contained in internal memory or USB memory connected to the [USB TO DEVICE] terminal. There are two kinds of Songs that can be played back: MIDI Songs and Audio Songs. MIDI Songs and Audio Songs A MIDI Song contains data of your keyboard performance (such as which keys you played and how hard you played them), and is not a recording of the actual sound itself. -
Page 19: Playing Back Songs
Playing Back Songs Playing back Songs To play back a Song on a USB flash memory: Read “Connecting USB flash memory” (page 23), then connect the USB flash memory to the [USB TO DEVICE] ter- minal, and follow the instructions below. While holding down [DEMO/SONG], press [+] or [-] until the NOTE Song indications such as “... - Page 20 Playing Back Songs Press [PLAY/STOP] again to stop playback. If a specific Song number is selected in Step 2, playback stops automatically by reaching the end of the Song. Setting the Character Code Setting range: JA (Japanese) / Int (Interna- If the Song cannot be called up, you may need to select the appropriate Character tional) Code from the following two settings.
-
Page 21: Recording Your Performance
Recording Your Performance This instrument allows you to record your performance by using one of the following two methods. The recorded performance can be played back as a User Song. MIDI recording With this method, your keyboard performances are recorded and saved to the instrument or USB flash memory as a MIDI Song (via the SMF format 0). - Page 22 Recording Your Performance Press [RECORD] to engage the Record mode. If memory space is running low: An “ ” message will appear in the dis- The [RECORD] lamp lights up, and the [PLAY/STOP] lamp flashes according to play after pressing [RECORD]. You can start recording, but the memory may the current tempo.
-
Page 23: Using Usb Flash Memory
Formatting USB flash memory The instrument does not necessarily support all com- When accessing USB flash memory, a message may mercially available USB flash memories. Yamaha can- appear prompting you to format the device/media. If not guarantee operation of USB flash memories that so, execute the Format operation (page 24). -
Page 24: Formatting Usb Flash Memory
Using USB Flash Memory Formatting USB flash memory NOTICE Executing the Format operation will delete all data in the USB flash memory. Before formatting, save important data to a com- puter or another storage device. Connect the USB flash memory to the [USB TO DEVICE] terminal. While holding [FUNCTION] and [PLAY/STOP], press [RECORD]. -
Page 25: Deleting A Song File
Using USB Flash Memory Deleting a Song file A User Song can be deleted. If necessary, connect the USB flash memory to the [USB TO NOTE Song Playback is not available after execut- DEVICE] terminal. ing Step 3. Make sure to confirm the to-be- deleted Song before executing Step 3. -
Page 26: Backup Data And Initializing
Backup data and Initializing Backup data in internal memory The following data, referred to as Backup data, as well as User Song data and External Song data will be maintained even if the power is turned off. • Character Code ........page 20 •... -
Page 27: Connections
Connections CAUTION Before connecting the instrument to other electronic components, turn off the power to all the components. Before turning the power on or off to all components, set all volume levels to minimum (0). Otherwise, electrical shock or damage to the components may result. - Page 28 Connections Minimizing noise of the input sound via Noise Gate Default setting: ON By default, this instrument cuts unwanted noise from the input sound. However, this may result in wanted sounds also being cut, such as the soft decay sound of the piano.
-
Page 29: About Midi
About MIDI MIDI (Musical Instrument Digital Interface) is a global format standard NOTE You need a dedicated MIDI cable (optional) to make a MIDI con- for performance data transmission and reception between electronic musi- nection. cal instruments. Connecting musical instruments that support MIDI via NOTE MIDI cables enables you to transfer performance and setting data The handled MIDI messages differ depending on the MIDI... -
Page 30: Appendix
(page 24) and connect to the instrument again. A malfunction has occurred in the instrument. Contact your nearest Yamaha dealer or authorized dis- tributor. A malfunction has occurred in the instrument. Contact your nearest Yamaha dealer or authorized dis- tributor. -
Page 31: Troubleshooting
• The USB flash memory is not compatible with the instrument. Only use the USB hung up (stopped). flash memory whose compatibility has been confirmed by Yamaha (page 23). Mechanical noise is heard The keyboard mechanism of this instrument simulates the keyboard mechanism of an during performance. -
Page 32: Maintenance
Unlike an acoustic piano, this instrument does not need to be tuned by an expert (although the pitch can be user- adjusted to match other instruments). This is because the pitch of digital instruments is always maintained perfectly. However, if you feel there is something abnormal concerning the keyboard touch, contact your Yamaha dealer. Owner’s Manual... -
Page 33: Specifications
50 greats for the Piano (Music Book) * Specifications and descriptions in this owner’s manual are for information purposes only. Yamaha Corp. reserves the right to change or modify products or specifications at any time without prior notice. Since specifications, equipment or options may not be the same in every locale, please check with your Yamaha dealer. -
Page 34: Index
Index Accessories ........5 Local Control on/off ....29 Scale ........... 17 Audio recording ......21 Song ..........18 Audio Song Song Category .........18 ......18 AUX IN ........27 Specifications ......33 Maintenance .......32 AUX OUT ........28 Master Volume ......10 Mean-Tone ........17 Message List Tempo .......30 ........ - Page 36 Information for Users on Collection and Disposal of Old Equipment This symbol on the products, packaging, and/or accompanying documents means that used electrical and electronic products should not be mixed with general household waste. For proper treatment, recovery and recycling of old products, please take them to applicable collection points, in accordance with your national legislation and the Directives 2002/96/EC.
- Page 37 Das Typenschild dieses Produkts befindet sich an der The name plate of this product may be found on the bottom of Unterseite des Geräts. Die Seriennummer dieses Produkts the unit. The serial number of this product may be found on or befindet sich auf dem Typenschild oder in der Nähe davon.
- Page 39 Niederlassung und bei Yamaha Vertragshändlern in den jeweiligen Bestimmungsländern erhältlich. Pour plus de détails sur les produits, veuillez-vous adresser à Yamaha ou au distributeur le plus proche de vous figurant dans la liste suivante. Para detalles sobre productos, contacte su tienda Yamaha más cercana o el distribuidor autorizado que se lista debajo.
- Page 40 Yamaha Global Site http://www.yamaha.com/ Yamaha Manual Library http://www.yamaha.co.jp/manual/ U.R.G., Digital Musical Instruments Division © 2011 Yamaha Corporation 112POAP*.*-01A0 Printed in China WZ13580...