Husqvarna DM 230 Operator's Manual
Drilling machine
Hide thumbs
Also See for DM 230:
- Operator's manual (100 pages) ,
- Workshop manual (20 pages) ,
- Safety instructions (4 pages)
Table of Contents
Advertisement
Available languages
Available languages
Quick Links
Download this manual
See also:
Operator's Manual
Operator's manual
US
Please read the operator's manual carefully and make sure you
understand the instructions before using the machine.
Manuel
FR
d'utilisation
Lire attentivement et bien assimiler le manuel d'utilisation
avant d'utiliser la machine.
Manual de
ES
instrucciones
Lea detenidamente el manual de instrucciones y asegúrese de
entender su contenido antes de utilizar la máquina.
DM 230
U U U U S S S S F F F F R R R R E E E E S S S S
Advertisement
Chapters
Table of Contents

Related Manuals for Husqvarna DM 230


Summary of Contents for Husqvarna DM 230
- Page 1 Operator’s manual Please read the operator’s manual carefully and make sure you understand the instructions before using the machine. Manuel DM 230 d’utilisation Lire attentivement et bien assimiler le manuel d’utilisation avant d’utiliser la machine. Manual de instrucciones U U U U S S S S F F F F R R R R E E E E S S S S Lea detenidamente el manual de instrucciones y asegúrese de...
-
Page 2: Key To Symbols
KEY TO SYMBOLS Symbols on the machine: Symbols in the operator’s manual: WARNING! The machine can be a Inspection and/or maintenance should dangerous tool if used incorrectly or be carried out with the motor switched carelessly, which can cause serious or fatal off and the plug disconnected. -
Page 3: Table Of Contents
SAFETY INSTRUCTIONS General safety warnings ..........General working instructions ........Machine′s safety equipment ........Checking, maintaining and servicing the machine′s safety equipment ............PRESENTATION DM 230 ................ STARTING AND STOPPING Before starting ............. Starting ................ Stopping ............... MAINTENANCE General ................ -
Page 4: What Is What
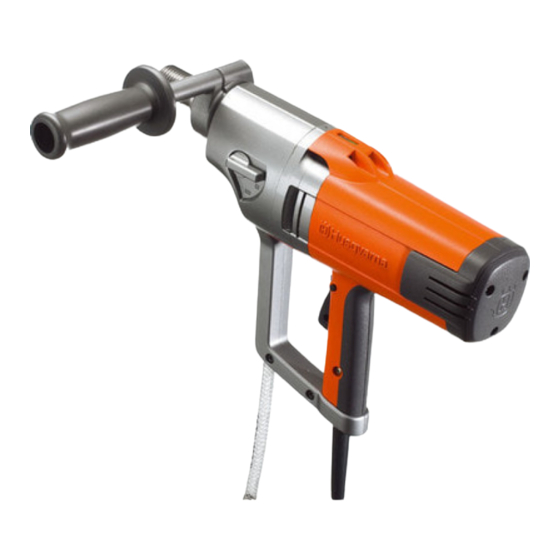
WHAT IS WHAT? What is what on the drilling machine? 1 Drill spindle 9 Gear knob 2 Water connector 10 Leakage hole (if water or oil trickles out from the leakage hole contact your dealer to replace the seals) 3 Gearbox and motor module 11 Stiffener 4 Smart Start®... -
Page 5: Safety Instructions
• Heavy-duty, firm grip gloves. your machine both efficiently and safely. Let your Husqvarna dealer check the drilling machine regularly and make essential adjustments and repairs. Husqvarna Construction Products has a policy of continuous product development. Husqvarna reserves the right to modify the design and appearance of products without prior notice •... -
Page 6: Safety Instructions
SAFETY INSTRUCTIONS General safety warnings • If operating a power tool in a damp location is unaviodable, use a ground fault circuit interrupter (GFCI) protected supply. Use of an GFCI reduces the risk of electric shock. WARNING! Read all safety warnings and all instructions. -
Page 7: General Working Instructions
SAFETY INSTRUCTIONS • Never work alone, always ensure there is another person • Do not overload the machine. Overloading can damage close at hand. Apart from being able to receive help to the machine. assemble the machine, you can also get help if an •... -
Page 8: Machine's Safety Equipment
SAFETY INSTRUCTIONS Machine′ ′ ′ ′ s safety equipment Stand drilling • Always use a drilling stand if drilling is to be performed This section describes the machine′s safety equipment, its from a ladder or scaffold. purpose, and how checks and maintenance should be carried out to ensure that it operates correctly. -
Page 9: Checking, Maintaining And Servicing The Machine's Safety Equipment
SAFETY INSTRUCTIONS Ground fault circuit interrupter Check the ground fault circuit interrupter Ground fault circuit interrupters are for protection in case an Connect the machine to the socket. Push the RESET button electrical fault should occur. (green) and the red LED lights up. The LED indicates that the ground fault circuit interrupter is on and that the machine can be switched on. -
Page 10: Presentation
The machine is equipped with spirit levels to facilitate drilling and a swivel handle with an integrated adapter for The soft rear section on the DM 230 has a large contact area support pins to make the work more comfortable. -
Page 11: Starting And Stopping
STARTING AND STOPPING Before starting 2 Turn on the water cooling (wet drilling) or switch on the vacuum cleaner (dry drilling). WARNING! Note the following before starting: The machine should be connected to an earthed outlet socket. Check that the mains voltage corresponds 3 Hold the machine steady. -
Page 12: Maintenance
MAINTENANCE General • In order for the machine to always be cooled sufficiently the cooling air openings must be kept clear and clean. Blow down the machine regularly with compressed air. WARNING! Inspection and/or maintenance should be carried out with the motor switched off and the plug disconnected. -
Page 13: Replacing The Carbon Brushes
MAINTENANCE 3 Unscrew the six screws holding the motor - gearbox 4 Pull the carbon brush out from the holder. modules together. 4 Carefully disassemble the machine. 5 Clean the brush holder with compressed air or a brush. 5 Empty the gearbox oil into the container. Replace the brush if worn. -
Page 14: Technical Data
TECHNICAL DATA DM 230 Electric motor Single-phase Rated voltage, V 230/100-120 Rated output, W 1850 Rated current, A 230 V 100-120 V 15 A Weight, kg Diameter drill bit, mm Max. diameter of the drill bit, with stand 150 mm (5,9”) Max. -
Page 15: Us Warranty Statement
EQUIPMENT Equipment manufactured by Husqvarna is warranted to be free from manufacturing defects in normal service for a period of two (2) years from date of purchase by the original consumer purchaser. Component manufacturers offer separate warranty periods. -
Page 16: Wiring Diagram
WIRING DIAGRAM 16 – English... -
Page 17: Explication Des Symboles Symboles Sur La Machine
EXPLICATION DES SYMBOLES Symboles sur la machine: Symboles dans le manuel: AVERTISSEMENT! La machine utilisée de Les contrôles et/ou les entretiens manière imprudente ou inadéquate peut doivent être effectués avec le moteur à devenir un outil dangereux, pouvant causer l’arrêt et la prise électrique des blessures graves voire mortelles à... -
Page 18: Sommaire
Méthodes de travail ............Équipement de sécurité de la machine ......Contrôle, maintenance et entretien des équipements de sécurité de la machine ..........PRÉSENTATION DM 230 ................ DÉMARRAGE ET ARRÊT Avant de démarrer la machine ........Démarrage ..............Arrêt ................ -
Page 19: Quels Sont Les Composants
QUELS SONT LES COMPOSANTS? Quels sont les composants de la perceuse? 1 Broche 10 Orifice d’évacuation (en cas de fuite d’eau ou d’huile par l’orifice d’évacuation, contactez le revendeur pour 2 Raccord de l’eau remplacer le joint) 3 Moteur et boîte de vitesses 11 Protection arrière 4 Smart Start®... -
Page 20: Instructions De Sécurité
à votre disposition et vous conseillerons avec plaisir pour vous aider à utiliser votre machine en toute sécurité et de façon efficace. Laissez au revendeur Husqvarna le soin de contrôler • Gants solides permettant une prise sûre. régulièrement la perceuse et d’effectuer les réglages et les réparations nécessaires. -
Page 21: Instructions De Sécurité
INSTRUCTIONS DE SÉCURITÉ Consignes générales de sécurité • Contrôler que le câble et la rallonge sont entiers et en bon état. Ne pas utiliser la machine si le câble est endommagé, la confier à un atelier d’entretien agréé pour AVERTISSEMENT! Lire toutes les consignes réparation. -
Page 22: Méthodes De Travail
INSTRUCTIONS DE SÉCURITÉ • Ne laissez jamais la machine sans surveillance avec le • Maintenir les outils tranchants aiguisés et propres. Des moteur en marche. Lorsqu’il tourne, le trépan augmente le outils tranchants correctement entretenus avec des bords risque de blessures. aiguisés sont moins susceptibles de se coincer et sont plus faciles à... -
Page 23: Équipement De Sécurité De La Machine
INSTRUCTIONS DE SÉCURITÉ Perçage manuel Perçage à l’extérieur • Utilisez toujours des câbles de raccordement agréés pour une utilisation à l’extérieur. AVERTISSEMENT! Ne tenez pas la machine dans la main en première vitesse car la machine a alors un couple élevé qui peut En cas de perçage dans un toit ou élément entraîner des blessures si le foret se bloque. -
Page 24: Contrôle, Maintenance Et Entretien Des Équipements De Sécurité De La Machine
INSTRUCTIONS DE SÉCURITÉ Blocage de l’interrupteur Contrôle de l’interrupteur Le blocage de l’interrupteur a pour fonction d’empêcher toute Démarrez la machine, relâchez l’interrupteur et contrôlez que activation involontaire de l’interrupteur. Quand le bouton de le moteur et le trépan s’arrêtent. blocage ((A)) est enfoncé, l’interrupteur (B) est libéré. -
Page 25: Présentation
La machine comporte une boîte de vitesses refroidie par eau avec un conducteur qui traverse l’arbre de la broche. • DM 230 peut en outre être raccordé à un aspirateur à l’aide d’un adaptateur, utilisé pour le perçage à sec et fixé sur la broche. -
Page 26: Démarrage Et Arrêt
DÉMARRAGE ET ARRÊT Avant de démarrer la machine 2 Activez le refroidissement par eau (perçage à l’eau) ou mettez l’aspirateur sous tension (perçage à sec). AVERTISSEMENT! Contrôler les points suivants avant la mise en marche: La machine doit être branchée à une prise de terre. -
Page 27: Entretien
ENTRETIEN Généralités • La poignée doit être sèche et ne présenter aucune trace de graisse ni d’huile. • Pour que le refroidissement de la machine fonctionne correctement, les ouvertures de l’air de refroidissement doivent être propres et ne pas être bouchées. Nettoyer régulièrement la machine à... -
Page 28: Remplacement Des Balais De Charbon
ENTRETIEN 3 Dévissez les six vis qui maintiennent le moteur et la boîte 2 Dévissez la vis. de vitesses. 3 Retirez le raccord du charbon. 4 Retirez le charbon du boîtier. 4 Démontez doucement la machine. 5 Videz l’huile de la boîte de vitesse dans le récipient. 6 Si nécessaire, contactez le revendeur pour le nettoyage de la boîte de vitesses. -
Page 29: Caractéristiques Techniques
CARACTÉRISTIQUES TECHNIQUES DM 230 Moteur électrique Monophasé Tension nominale, V 230/100-120 Puissance nominale, W 1850 Courant nominal, A 230 V 100-120 V 15 A Poids, kg Diamètre du trépan, mm Diamètre maximal du trépan, avec support 150 mm (5,9”) Diamètre maximal de couronne de forage, manuelle 75 mm (3”) -
Page 30: Declaration De Garantie Etats-Unis
Exceptions : Moteurs de forage - 3 mois, Scies murales - 1 an, Découpeuses - 3 mois, DM 230 - 1 an, DM 225 - 3 mois, Système Gyro - 1 an, Système CD 40 - 1 an, DS 160 C - 1 an, Smart box - 1 an, CS 2515 - 1 an, PP 455 E - 1 an, PP 345 E - 1 an, HP 40 - 1 an. -
Page 31: Schéma Électrique
SCHÉMA ÉLECTRIQUE – 31 French... -
Page 32: Aclaracion De Los Simbolos
ACLARACION DE LOS SIMBOLOS Símbolos en la máquina: Símbolos en el manual de instrucciones: ¡ATENCION! La máquina, si se utiliza de forma errónea o descuidada, puede ser una El control y/o mantenimiento de la herramienta peligrosa que puede causar máquina debe hacerse con el motor daños graves e incluso la muerte al usuario parado y el enchufe desenchufado. -
Page 33: Índice
Instrucciones generales de trabajo ......Equipo de seguridad de la máquina ......Control, mantenimiento y servicio del equipo de seguridad de la máquina ..........PRESENTACIÓN DM 230 ................ ARRANQUE Y PARADA Antes de arrancar ............Arranque ..............Parada ................. MANTENIMIENTO Generalidades .............. -
Page 34: Que Es Que
¿QUE ES QUE? Componentes de la taladradora 1 Husillo de taladradora 9 Manija de cambio 2 Conexión de agua 10 Orificio de fugas (si sale agua o aceite por el orificio de fugas, acudir al distribuidor para cambiar la junta) 3 Módulo de caja de cambios y motor 11 Cubierta posterior 4 Smart Start®... -
Page 35: Instrucciones De Seguridad
Estaremos encantados de poder aconsejarle y ayudarle a utilizar la máquina de manera eficaz y segura. Encarcar al distribuidor de Husqvarna la revisión regular de la taladradora y la realización de los ajustes y reparaciones necesarios. -
Page 36: Instrucciones De Seguridad
INSTRUCCIONES DE SEGURIDAD Instrucciones generales de • Maneje el cable con cuidado. No lo utilice nunca para transportar, tirar o desenchufar la herramienta eléctrica. seguridad Manténgalo alejado de fuentes de calor, aceite, aristas vivas o piezas móviles. Los cables dañados o enredados incrementan el riesgo de descarga eléctrica. - Page 37 INSTRUCCIONES DE SEGURIDAD • Utilice la ropa adecuada. No utilice nunca ropa amplia ni • Desconecte el enchufe de la fuente de alimentación y/o la joyas. Mantenga el pelo, la ropa y los guantes alejados de batería de la herramienta eléctrica antes de realizar las piezas móviles.
-
Page 38: Instrucciones Generales De Trabajo
INSTRUCCIONES DE SEGURIDAD Instrucciones generales de trabajo Perforación con soporte • Usar siempre el soporte para perforar desde una escalera o un andamio. ¡ATENCION! Este capítulo trata las reglas de seguridad básicas para trabajar con la taladradora. La información no puede sustituir nunca a los conocimientos, formación y experiencia práctica de un profesional. -
Page 39: Equipo De Seguridad De La Máquina
INSTRUCCIONES DE SEGURIDAD Equipo de seguridad de la máquina Interruptor de circuito de pérdida a tierra Los interruptores de circuito de pérdida a tierra aportan En este capítulo se describen los componentes de seguridad protección en caso de que se produzca un fallo eléctrico. de la máquina, su función y el modo de efectuar el control y el mantenimiento para garantizar un funcionamiento óptimo. - Page 40 INSTRUCCIONES DE SEGURIDAD Control del bloqueador del interruptor Presionar el interruptor y comprobar que el interruptor esté bloqueado y que el bloqueador esté en la posición inicial. Presionar el interruptor y comprobar que retorna a su posición inicial al soltarlo. Comprobar que el interruptor y el bloqueador del mismo funcionan con facilidad.
-
Page 41: Presentación
La máquina tiene niveles para facilitar la perforación y una empuñadura girable con adaptador integrado para varilla La cubierta trasera blanda de la DM 230 tiene una superficie de apoyo que hace confortable el trabajo. de presión grande que mejora el contacto de la máquina con el cuerpo del usuario. -
Page 42: Arranque Y Parada
ARRANQUE Y PARADA Antes de arrancar 2 Activar la refrigeración por agua (perforación húmeda) o la aspiradora (perforación en seco). ¡ATENCION! Antes de arrancar, observe lo siguiente: La máquina se debe enchufar a un enchufe con masa. Compruebe que la tensión de red concuerda 3 Sujetar la máquina con firmeza. -
Page 43: Mantenimiento
MANTENIMIENTO Generalidades • Para que la máquina tenga siempre una buena refrigeración, las aberturas de paso del aire refrigerante deben mantenerse libres y limpias. Limpie regularmente la máquina con aire comprimido. ¡ATENCION! El control y/o mantenimiento de la máquina debe hacerse con el motor parado y el enchufe desenchufado. -
Page 44: Cambio De Escobillas De Carbón
MANTENIMIENTO 3 Quitar los seis tornillos que fijan el motor en el módulo de 4 Sacar la escobilla del portaescobilla. caja de cambios. 4 Desmontar la máquina con cuidado. 5 Limpie el portaescobillas con aire comprimido o con un 5 Vaciar el aceite de la caja de cambios en el recipiente. cepillo. -
Page 45: Datos Tecnicos
DATOS TECNICOS DM 230 Motor eléctrico Monofásico Tensión nominal, V 230/100-120 Potencia nominal, W 1850 Amperaje nominal, A 230 V 100-120 V 15 A Peso, kg Diámetro de broca, mm Diámetro máximo de broca, con soporte 150 mm (5,9”) Diámetro máximo de broca, de mano 75 mm (3”) -
Page 46: Declaración De Garantía Para Ee. Uu
Excepciones: Perforadoras: 3 meses. Sierras de pared: 1 año. Cortadoras: 3 meses. DM 230: 1 año. DM 225: 3 meses. Sistemas Gyro: 1 año. Sistema CD 40: 1 año. DS 160 C: 1 año. Smart box: 1 año. CS 2515: 1 año. pp 455 E: 1 año. PP 345 E: 1 año. HP 40: 1 año. -
Page 47: Esquema De Conexiones Elécricas
ESQUEMA DE CONEXIONES ELÉCRICAS – 47 Spanish... - Page 48 WARNING! Cutting, especially when DRY cutting, generates dust that comes from the material being cut, which frequently contains silica. Silica is a basic component of sand, quartz, brick clay, granite and numerous other minerals and rocks. Exposure to excessive amount of such dust can cause: Respiratory disease (affecting your ability to breath), including chronic bronchitis,...