
Related Manuals for Yamaha BANSHEE YFZ350N


Summary of Contents for Yamaha BANSHEE YFZ350N
- Page 1 READ THIS MANUAL CAREFULLY! It contains important safety information. OWNER’S MANUAL YFZ350N This ATV should not be ridden by anyone under 16 years of age. LIT-11626-14-08 5FK-28199-13...
- Page 2 Yamaha experience in the production of fine sporting, touring, and pacesetting racing machines. With the purchase of this Yamaha, you can now appreciate the high degree of crafts- manship and reliability that have made Yamaha a leader in these fields.
- Page 3 EBU00010 IMPORTANT MANUAL INFORMATION FAILURE TO FOLLOW THE WARNINGS CONTAINED IN THIS MANUAL CAN RESULT IN SERIOUS INJURY OR DEATH. Particularly important information is distinguished in this manual by the following notations: The Safety Alert Symbol means ATTENTION! BECOME ALERT! YOUR SAFE- TY IS INVOLVED! Failure to follow WARNING instructions could result in severe injury or death to the machine operator, a bystander or a person inspecting or repairing the...
- Page 4 Please check your local riding laws and regulations before operating this machine. EBU00711 YFZ350N OWNER’S MANUAL ©2000 by Yamaha Motor Corporation, AFFIX DEALER U.S.A. LABEL HERE 1st Edition, April 2000 All rights reserved. Any reprinting or...
-
Page 5: Table Of Contents
EBU00014 Indicates a potential hazard that could result in serious injury or death. CONTENTS CONTROL FUNCTIONS.......4-1 LOCATION OF THE WARNING AND SPECIFICATION LABELS ....1-1 Main switch ........4-1 Handlebar switches ......4-2 Throttle lever ........4-3 Throttle OverRide System ....4-4 SAFETY INFORMATION ......2-1 Speed limiter ........4-4 Clutch lever ........4-6 Front brake lever........4-6... - Page 6 Seat ..........4-12 OPERATION .........6-1 Front shock absorber Starting a cold engine......6-1 adjustment........4-13 Starting a warm engine .....6-3 Rear shock absorber Warming up ........6-3 adjustment........4-14 Shifting ..........6-4 To start out and accelerate....6-5 To decelerate........6-6 PRE-OPERATION CHECKS ....5-1 Engine break-in .........6-7 Front and rear brakes ......5-3 Parking ..........6-8 Fuel ...........5-5 Parking on a slope......6-9...
- Page 7 Crossing a slope ......7-32 Inspecting the brake fluid level ..8-29 Crossing through shallow water ..7-34 Brake fluid replacement....8-30 Riding over rough terrain ....7-36 Front brake lever free play Sliding and skidding ......7-38 adjustment........8-31 What to do if........7-40 Rear brake adjustment ....8-32 What to do...
- Page 8 Troubleshooting chart......8-44 No spark..........8-47 CLEANING AND STORAGE ....9-1 A. Cleaning........9-1 B. Storage .........9-3 SPECIFICATIONS ......10-1 NOISE REGULATION......11-1 MAINTENANCE RECORD ....12-1 ATV LIMITED WARRANTY....13-1...
-
Page 9: Location Of The Warning And Specification Labels
Read and understand all of the labels on your machine. They contain important information for safe and proper operation of your ATV. Never remove any labels from your ATV. If a label becomes difficult to read or comes off, a replacement label is available from your Yamaha dealer. - Page 10 WARNING NEVER ride as a passenger. Passengers can cause a loss of control, resulting in SEVERE INJURY or DEATH. 5FE-2151H-01 5FE-2151H-40 5FK-21696-01 5FE-21568-01...
- Page 11 5FE-21697-01...
-
Page 12: Safety Information
EBU00026 SAFETY INFORMATION AN ATV IS NOT A TOY AND CAN BE HAZARDOUS TO OPERATE. An ATV handles differently from other vehicles including motorcycles and cars. A collision or rollover can occur quickly, even during routine maneuvers such as turning and riding on hills or over obstacles, if you fail to take proper precautions. - Page 13 8 Always avoid operating an ATV on any paved surfaces, including sidewalks, driveways, parking lots and streets. 8 Never operate an ATV on any public street, road or highway, even a dirt or gravel one. 8 Never operate an ATV without wearing an approved motorcycle helmet that fits properly. You should also wear eye protection (goggles or face shield), gloves, boots, long-sleeved shirt or jacket, and long pants.
- Page 14 8 Never operate on excessively rough, slippery or loose terrain until you have learned and prac- ticed the skills necessary to control the ATV on such terrain. Always be especially cautious on these kinds of terrain. 8 Always follow proper procedures for turning as described in this manual. Practice turning at low speeds before attempting to turn at faster speeds.
- Page 15 8 Always use proper procedures if you stall or roll backwards when climbing a hill. To avoid stalling, use proper gear and maintain a steady speed when climbing a hill. If you stall or roll backwards, follow the special procedure for braking described in this manual. Dismount on the uphill side or to a side if pointed straight uphill.
- Page 16 8 Never exceed the stated load capacity for an ATV. Cargo should be properly distributed and securely attached. Reduce speed and follow instructions in this manual for carrying cargo or pulling a trailer. Allow greater distance for braking. FOR MORE INFORMATION ABOUT ATV SAFETY, call the Consumer Products Safety Commission at 1-800-638-2772, or the ATV Distributor’s Safety Hotline at 1-800-852-5344.
- Page 17 q WARNING When transporting the machine in another vehicle, be sure it is kept POTENTIAL HAZARD upright and that the fuel cock is in the Improper handling of gasoline. “OFF” position. Otherwise, fuel may WHAT CAN HAPPEN leak out of the carburetor or fuel tank. Gasoline can catch fire and you could WHAT CAN HAPPEN be burned.
- Page 18 q WARNING POTENTIAL HAZARD Starting or running the engine in a closed area. WHAT CAN HAPPEN Exhaust fumes are poisonous and may cause loss of consciousness and death within a short time. HOW TO AVOID THE HAZARD Always operate your machine in an area with adequate ventilation.
-
Page 19: Description And Machine Identification
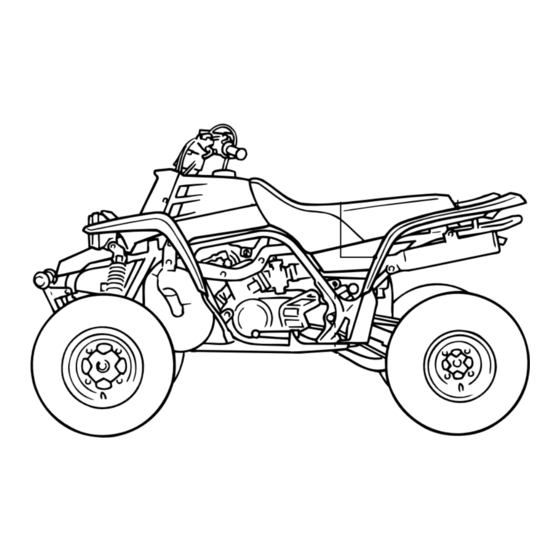
EBU00032 DESCRIPTION AND MACHINE IDENTIFICATION 1. Seat 11. Spark arrester 2. Kick starter 12. Rear wheel 3. Fuel tank cap 13. Starter (choke) 4. Headlight 14. Shift pedal !6 5 5. Brake pedal 15. Clutch lever 6. Front wheel 16. Parking brake 7. -
Page 20: Identification Number Records
This number can be used for ordering a new when ordering spare parts from a Yamaha key. dealer or for reference in case the vehicle is stolen. -
Page 21: Vehicle Identification Number
Record the information on this label in the space provided. This information will be need- NOTE: ed to order spare parts from your Yamaha The vehicle identification number is used to dealer. identify your machine. 1. Model label... -
Page 22: Control Functions
EBU00039 CONTROL FUNCTIONS Indicates a potential hazard that could result in serious injury or death. EBU00041 Main switch Functions of the respective switch positions are as follows: Engine can be started only at this position and the headlight and taillight come on when the light switch is on. -
Page 23: Handlebar Switches
EBU00053 EBU00736 Handlebar switches Light switch “LIGHTS” Turn the switch to the “LO” position to switch on the low beam and the taillight. Turn the switch to the “HI” position to switch on the high beam and the taillight. Turn the switch to the “OFF” position to switch off the headlight and the taillight. -
Page 24: Throttle Lever
Check the operation of the throttle lever before you start the engine. If it does not work smoothly, check for the cause. Correct the problem before riding the 1. Throttle lever ATV. Consult a Yamaha dealer if you can’t find or solve the problem yourself. -
Page 25: Throttle Override System
1. Locknut 2. Adjuster a. 12 mm (0.47 in) HOW TO AVOID THE HAZARD Make sure that the cause of the malfunc- tion is corrected before restarting the engine . You should have the ATV inspected by a Yamaha dealer. - Page 26 q WARNING POTENTIAL HAZARD Improper adjustment of the speed limiter and throttle. WHAT CAN HAPPEN The throttle cable could be damaged. Improper throttle operation could result. You could lose control, have an accident or be injured. HOW TO AVOID THE HAZARD Do not turn the speed adjuster out more than 12 mm (0.47 in).
-
Page 27: Clutch Lever
EBU00068 EBU00070 Clutch lever Front brake lever The clutch lever is located on the left handle- The front brake lever is located on the right bar. handlebar. Pull it toward the handlebar to Pull the clutch lever to the handlebar to disen- apply the front brake. -
Page 28: Rear Brake Pedal
EBU00071 EBU00080 Rear brake pedal Parking brake The brake pedal is located on the right side of Use the parking brake when you have to start the machine. Push down on the pedal to apply the engine or park the machine, especially on the rear brake. - Page 29 q WARNING POTENTIAL HAZARD Improper use of the parking brake. WHAT CAN HAPPEN The ATV could start moving unexpected- ly if the parking brake is not applied before starting the engine. This could cause loss of control or a collision. 1.
-
Page 30: Shift Pedal
EBU00082 EBU00089 Shift pedal Kick starter This machine is equipped with a constant- Rotate the kick starter away from the engine. mesh 6-speed transmission. The shift pedal is Push the starter down lightly with your foot located on the left side of the engine and is until the gears engage, then kick smoothly used in combination with the clutch when and forcefully to start the engine. -
Page 31: Fuel Tank Cap
EBU00092 EBU00093 Fuel tank cap Fuel cock Remove the fuel tank cap by turning it coun- The fuel cock supplies fuel from the fuel tank terclockwise. to the carburetor. The fuel cock has three positions. OFF: With the lever in this position fuel will not flow. -
Page 32: Starter (Choke)
EBU00094 Starter (choke) Starting a cold engine requires a richer air- fuel mixture. A separate starter circuit supplies this mixture. a to turn on the starter Move in direction (choke). Move in direction b to turn off the starter (choke). Refer to “Starting a cold engine”... -
Page 33: Seat
EBU00566 Seat To install the seat, insert the projection on the To remove the seat, pull the seat lock lever front of the seat into the seat holder and push upward and pull up the seat at the rear. down on the seat at the rear. NOTE: Make sure that the seat is securely fitted. -
Page 34: Front Shock Absorber Adjustment
EBU00635 Front shock absorber adjustment Standard position: C The spring preload can be adjusted to suit the A - Minimum (Soft) rider’s weight and riding conditions. E - Maximum (Hard) Adjust the spring preload as follows: To increase the spring preload, turn the q WARNING adjuster in direction a. -
Page 35: Rear Shock Absorber Adjustment
8 Do not dispose of a damaged or absorber can be adjusted to suit the rider’s worn out shock absorber yourself. weight and the riding conditions. Take the unit to a Yamaha dealer. q WARNING Adjust the spring preload as follows. POTENTIAL HAZARD 1. - Page 36 3. The length of the spring (installed) 4. Tighten the locknut to the specified changes 1 mm (0.04 in) per turn of the torque. adjuster. Tightening torque: Installed length: Measurement “A” 54 Nm (5.4 m•kg, 39 ft•lb) Minimum (hard): 213.5 mm (8.4 in) Standard: 220.5 mm (8.7 in) Maximum (soft):...
- Page 37 Adjust the rebound damping force as fol- From the fully turned-in position lows. Minimum (soft): 20 clicks out Turn the rebound damping adjuster in direc- Standard: 10 clicks out tion a to increase the rebound damping force Maximum (hard): 0 clicks out and in direction b to decrease the rebound damping force.
- Page 38 From the fully turned-out position Minimum (soft): 0 clicks in Never turn an adjusting mechanism beyond Standard : 10 clicks in the minimum and maximum settings. Maximum (hard): 20 clicks in q WARNING POTENTIAL HAZARD Suspension components become hot during operation. WHAT CAN HAPPEN You could be burned.
-
Page 39: Pre-Operation Checks
PRE-OPERATION CHECKS Before using this machine, check the following points: ITEM ROUTINE PAGE 9 Check operation, free play, fluid level and fluid leakage. 5-3 ~ 5-4 Brakes 9 Fill with DOT 4 (or DOT 3) brake fluid if necessary. 8-28 ~ 8-32 9 Check operation, condition and lever free play. - Page 40 q WARNING POTENTIAL HAZARD Failure to inspect the ATV before operat- ing. Failure to properly maintain the ATV. WHAT CAN HAPPEN Increases the possibility of an accident or equipment damage. HOW TO AVOID THE HAZARD Always inspect your ATV each time you use it to make sure the ATV is in safe operating condition.
-
Page 41: Front And Rear Brakes
Check for correct rear brake pedal height. If the pedal height is incor- 3. Brake fluid leakage rect, have a Yamaha dealer adjust it. Check to see if any brake fluid is leaking out of the pipe joints or master cylinders. - Page 42 Always check the brakes at the start of every ride. Do not ride the ATV if you find any problem with the brakes. If a problem cannot be corrected by the adjustment procedures provided in this manual, have the ATV inspected by a Yamaha dealer.
-
Page 43: Fuel
EBU00129 Fuel Your Yamaha engine has been designed to Make sure there is sufficient gasoline in the use premium unleaded gasoline with a pump tank. octane number ([R+M]/2) of 90 or higher, or research octane number of 95 or higher. If... -
Page 44: Engine Mixing Oil
EBU00132 q WARNING Engine mixing oil POTENTIAL HAZARD Recommended oil: Improper care when refueling. Yamalube “R” (Yamalube Racing 2-cycle oil) WHAT CAN HAPPEN Mixing ratio: 24:1 Fuel can spill, which can cause a fire and severe injury. If Yamalube “R” oil is not available, select an Fuel expands when it heats up. -
Page 45: Transmission Oil
Take the machine anti-friction modifiers. Passenger car motor oils (often labeled “Energy Conserving”) to a Yamaha dealer or refer to the Service contain anti-friction additives which will Manual for correct tightening torque. cause clutch and/or starter clutch slippage, resulting in reduced component life and poor engine performance. -
Page 46: Lights
EBU00153 Lights Check the headlight and taillight to make sure they are in working condition. Repair as nec- essary for proper operation. EBU00155 Switches Check the operation of the headlight switch, engine stop switch and any other switches. Repair as necessary for proper operation. -
Page 47: Tires
1. The tires listed below have been Rear 27 kPa (0.27 kgf/cm , 3.9 psi) approved by Yamaha Motor Co., Ltd. 4. Use no more than the following pres- for this model. Other tire combina- sures when seating the tire beads. -
Page 48: How To Measure Tire Pressure
EBU00159 How to measure tire pressure Set pressure with tires cold. Use the low-pressure tire gauge. Set tire pressures to the following specifica- tions: NOTE: Recommended Minimum Maximum The low-pressure tire gauge is included as pressure standard equipment. Make two measure- 30 kPa 27 kPa 33 kPa... -
Page 49: Tire Wear Limit
EBU00160 Tire wear limit When the tire groove decreases to 3 mm (0.12 in) due to wear, replace the tire. a. 3 mm (0.12 in) 5-11... -
Page 50: Operation
2. Turn the fuel cock to “ON”. there is a control or function you do not 3. Turn the main switch to “ON” and the understand, ask your Yamaha dealer. engine stop switch to “RUN”. 4. Shift the transmission into neutral. - Page 51 1: Cold engine start- Position 6. Completely close the throttle lever and ambient temperature below 5°C start the engine by kicking the kick starter. (40°F). 7. If the engine is started with the starter Position 2: Cold engine start- (choke) in position 1, the starter (choke) ambient temperature at 0°C should be returned to position 2 to warm (30°F) ~ 30°C (90°F) and warm-...
-
Page 52: Starting A Warm Engine
EBU00180 EBU00538 Starting a warm engine Warming up To start a warm engine, refer to the “Starting a To get maximum engine life, always warm up cold engine” section. The star ter (choke) the engine before starting off. Never acceler- should not be used. -
Page 53: Shifting
EBU00198 Shifting This model has a 6-speed forward transmis- 1. Do not coast for long periods with the sion. The transmission allows you to control engine off, and do not tow the machine the amount of power you have available at a a long distance. -
Page 54: To Start Out And Accelerate
EBU00203 To start out and accelerate 7. Open the throttle part way and gradually 1. Release the throttle lever. release the clutch lever. 8. Follow the same procedure when shifting to the next higher gear. Always close the throttle while shifting q WARNING gears. -
Page 55: To Decelerate
EBU00207 q WARNING To decelerate When slowing down or stopping, release the POTENTIAL HAZARD throttle and apply the brakes smoothly and Engaging a lower gear when the engine evenly. As you slow down, shift to a lower speed is too high. gear. -
Page 56: Engine Break-In
EBU00209 If any abnormality is noticed during this peri- Engine break-in od, consult a Yamaha dealer. There is never a more important period in the 1. 0 ~ 10 hours: life of your machine than the period between Avoid continuous operation above half zero and 20 hours. -
Page 57: Parking
EBU00212 Parking When parking, stop the engine and shift into low gear. Turn the fuel cock to “OFF” and apply the parking brake. -
Page 58: Parking On A Slope
EBU00213 Parking on a slope 1. Bring the machine to a stop by applying the brakes in low gear. q WARNING 2. Stop the engine and release the clutch lever. POTENTIAL HAZARD 3. With the front and rear brakes applied, Parking on a hill or other incline. -
Page 59: Accessories And Loading
8 Choose only accessories designed for your dlebars which could make steering difficult, ATV. Your Yamaha dealer has a variety of an accessory that limits your ability to move genuine Yamaha accessories. Other acces- around on the seat, or one that limits your sories may also be available on the market. -
Page 60: Loading
EBU00584 8 Tie down cargo securely to the carriers. Loading As originally equipped, this ATV is not Make sure cargo in the trailer cannot move designed to carry cargo or tow a trailer. If you around. A shifting load can cause an acci- choose to add accessories so that you can dent. - Page 61 q WARNING POTENTIAL HAZARD Overloading this ATV or carrying or tow- ing cargo improperly. WHAT CAN HAPPEN Could cause changes in vehicle han- dling which could lead to an accident. HOW TO AVOID THE HAZARD Never exceed the stated load capacity for this ATV.
-
Page 62: Riding Your Atv
Riding Your 1 7-1... -
Page 64: Getting To Know Your Atv
Indicates a potential hazard that could result in serious injury or death. GETTING TO KNOW YOUR ATV yourself with the operation of the ATV to This ATV is intended for recreational use by achieve the skill necessary to enjoy riding experienced operators only. -
Page 65: Ride With Care And Good Judgement
Beginning and inexperienced operators Get training if you are inexperienced. should complete the certified training Beginners should get training from a certified course offered by Yamaha. They should instructor. then regularly practice the skills learned Become familiar with this ATV at slow speeds in the course and the operating tech- first, even if you are an experienced operator. - Page 66 Not recommended for children under 16 years of age. q WARNING POTENTIAL HAZARD Failure to follow the age recommenda- tions for this ATV. WHAT CAN HAPPEN Use by children of ATVs that are not rec- ommended for their age can lead to severe injury or death of the child.
- Page 67 This machine is designed to carry operator only - passengers prohibited. q WARNING POTENTIAL HAZARD Carrying a passenger on this ATV. WHAT CAN HAPPEN Greatly reduces your ability to balance and control this ATV. Could cause an accident, resulting in harm to you and/or your passenger.
- Page 68 Apparel Operating without protective clothing q WARNING increases your chances of severe injury in the event of an accident. POTENTIAL HAZARD HOW TO AVOID THE HAZARD Operating this ATV without wearing an Always wear an approved motorcycle approved motorcycle helmet, eye protec- helmet that fits properly.
- Page 69 Do not operate after consuming alcohol or q WARNING drugs. POTENTIAL HAZARD Operator’s performance capability is re-duced by the influence of alcohol or drugs. Operating this ATV after consuming alcohol or drugs. WHAT CAN HAPPEN Could seriously affect your judgment. Could cause you to react more slowly.
- Page 70 Pre-operation checks q WARNING Always perform the pre-operation checks list- POTENTIAL HAZARD ed on page 5-1 before riding for safety and proper care of the machine. Operating this ATV with improper tires, or with improper or uneven tire pres- q WARNING sure.
- Page 71 Speed limiter For riders inexperienced with this model, this Indicates a potential hazard that could model is equipped with a speed limiter in the result in serious injury or death. throttle lever housing. The speed limiter limits the power and top speed of the machine. Turning the screw in decreases top speed, Do not operate at speeds too fast for your and turning it out increases top speed.
- Page 72 Loading and accessories q WARNING Use extra caution when riding the machine POTENTIAL HAZARD with additional loads, such as accessories or cargo. The machine’s handling may be Overloading this ATV or carrying or tow- adversely affected. Reduce your speed when ing cargo improperly.
- Page 73 During operation q WARNING Always keep your feet on the footboards dur- POTENTIAL HAZARD ing operation. Otherwise your feet may con- tact the rear wheels. Removing hands from handlebars or feet from footboards during operation. WHAT CAN HAPPEN Removing even one hand or foot can reduce your ability to control the ATV or could cause you to lose your balance and fall off of the ATV.
- Page 74 Avoid wheelies and jumping. You may lose control of the machine or overturn. q WARNING POTENTIAL HAZARD Attempting wheelies, jumps, and other stunts. WHAT CAN HAPPEN Increases the chance of an accident, including an overturn. HOW TO AVOID THE HAZARD Never attempt stunts, such as wheelies or jumps.
- Page 75 Never modify this ATV through improper installation or use of accessories. All parts and accessories added to this vehi- cle should be genuine Yamaha or equiva- lent components designed for use on this ATV and should be installed and used according to instructions.
- Page 76 Exhaust system The exhaust system on the machine is very hot during and following operation. To prevent burns, avoid touching the exhaust system. Park the machine in a place where pedestri- ans or children are not likely to touch it. q WARNING POTENTIAL HAZARD Hot exhaust system.
-
Page 77: Be Careful Where You Ride
BE CAREFUL WHERE YOU RIDE This machine is designed for off-road use only. Riding on paved surfaces can cause loss of control. q WARNING POTENTIAL HAZARD Operating this ATV on paved surfaces. WHAT CAN HAPPEN ATVs are designed for off-road use only. Paved surfaces may seriously affect handling and control of the ATV, and may cause the vehicle to go out of con-... - Page 78 Do not ride on any public road, street, or high- way. Riding on public roads can result in collisions with other vehicles. q WARNING POTENTIAL HAZARD Operating this ATV on public streets, roads or highways. WHAT CAN HAPPEN You can collide with another vehicle. HOW TO AVOID THE HAZARD Never operate this ATV on any public street, road or highway, even a dirt or...
- Page 79 Know the terrain where you ride. Ride cau- tiously in unfamiliar areas. Stay alert for holes, rocks, or roots in the terrain, and other hidden hazards which may cause the machine to upset. q WARNING POTENTIAL HAZARD Failure to use extra care when operating this ATV on unfamiliar terrain.
- Page 80 q WARNING POTENTIAL HAZARD Failure to use extra care when operating on excessively rough, slippery or loose terrain. WHAT CAN HAPPEN Could cause loss of traction or vehicle control, which could result in an acci- dent, including an overturn. HOW TO AVOID THE HAZARD Do not operate on excessively rough, slippery or loose terrain until you have learned and practiced the skills neces-...
- Page 81 When riding in an area where you might not WHAT CAN HAPPEN easily be seen, such as desert terrain, mount You could be in a collision. You could be a caution flag on the machine. DO NOT use injured. the flag pole bracket as a trailer hitch. HOW TO AVOID THE HAZARD Always mount a caution flag on the machine to make you more visible .
- Page 82 Select a large, flat area off-road to become disengage the clutch and shift into 1st gear, familiar with your ATV. Make sure that this area and then release the parking brake. Open the is free of obstacles and other riders. You should throttle gradually, and at the same time, practice control of the throttle, brakes, shifting release the clutch lever slowly.
- Page 83 q WARNING evenly. As you slow down, shift to a lower gear. Be sure that the engine has sufficiently POTENTIAL HAZARD slowed before engaging a lower gear. Opening the throttle abruptly or releas- Improper use of the brakes or shifting can ing the clutch lever too quickly.
-
Page 84: Turning Your Atv
TURNING YOUR ATV HOW TO AVOID THE HAZARD To achieve maximum traction while riding off- Always follow proper procedures for road, the two rear wheels are mounted solidly turning as described in this Owner’s on one axle and turn together at the same Manual. - Page 85 learned this technique you should be able to perform it at higher speeds or in tighter curves. Lean towards inside of turn. Support your weight on the Improper riding procedures such as abrupt outer footboard. throttle changes, excessive braking, incorrect body movements, or too much speed for the sharpness of the turn may cause the ATV to tip.
-
Page 86: Climbing Uphill
CLIMBING UPHILL HOW TO AVOID THE HAZARD Use proper riding techniques to avoid vehicle Never operate the ATV on hills too steep over turns on hills. Be sure that you can for the ATV or for your abilities. maneuver your ATV well on flat ground before Practice on smaller hills before attempt- attempting any incline and then practice riding ing large hills. - Page 87 q WARNING Never go over the top of any hill at high speed. POTENTIAL HAZARD An obstacle, a sharp drop, or another Climbing hills improperly. vehicle or person could be on the other WHAT CAN HAPPEN side of the hill. Could cause loss of control or cause the ATV to overturn.
- Page 88 If you are climbing a hill and you find that you When crossing the side of a hill: have not properly judged your ability to make Always follow proper procedures as it to the top, you should turn the ATV around described in the Owner’s Manual.
- Page 89 q WARNING If your ATV has stalled or stopped and you believe you can continue up the hill, restart POTENTIAL HAZARD carefully to make sure you do not lift the front Stalling, rolling backwards or improperly wheels which could cause you to lose control. dismounting while climbing a hill.
- Page 90 When fully stopped, apply rear brake as well, and then lock parking brake. Dismount on uphill side or to a side if pointed straight uphill. Turn the ATV around and remount, following the pro- cedure described in the Owner’s Manual. 7-29...
-
Page 91: Riding Downhill
RIDING DOWNHILL q WARNING When riding your ATV downhill, shift your POTENTIAL HAZARD weight as far to the rear and uphill side of the ATV as possible. Move back on the seat and Going down a hill improperly. sit with your arms straight. Choose a low gear WHAT CAN HAPPEN which will allow the engine compression to do Could cause loss of control or cause the... - Page 92 7-31...
-
Page 93: Crossing A Slope
CROSSING A SLOPE q WARNING Traversing a sloping surface on your ATV POTENTIAL HAZARD requires you to properly position your weight to maintain proper balance. Be sure that you Improperly crossing hills or turning on have learned the basic riding skills on flat hills. - Page 94 Avoid hills with excessively slippery or loose surfaces. Shift your weight to the uphill side of the ATV. 7-33...
-
Page 95: Crossing Through Shallow Water
CROSSING THROUGH SHALLOW WATER HOW TO AVOID THE HAZARD The ATV can be used to cross slow moving, Never operate this ATV in fast flowing shallow water of up to a maximum of 35 cm water or in water deeper than that speci- (14 inches) in depth. - Page 96 Test your brakes after leaving the water. Do not continue to ride your ATV without verifying After riding your ATV in water, be sure to that you have regained proper braking ability. drain the trapped water by removing the check hose at the bottom of the air filter case.
-
Page 97: Riding Over Rough Terrain
RIDING OVER ROUGH TERRAIN q WARNING Riding over rough terrain should be done with POTENTIAL HAZARD caution. Look out for obstacles which could cause damage to the ATV or could lead to an Improperly operating over obstacles. upset or accident. Be sure to keep your feet WHAT CAN HAPPEN firmly mounted on the footboards at all times. - Page 98 7-37...
-
Page 99: Sliding And Skidding
SLIDING AND SKIDDING If the rear wheels of your ATV start to slide Care should be used when riding on loose or sideways, control can usually be regained (if slippery surfaces since the ATV may slide. If there is room to do so) by steering in the unexpected and uncorrected, sliding could direction of the slide. - Page 100 q WARNING With practice, over a period of time, skill at controlled sliding can be developed. The ter- POTENTIAL HAZARD rain should be chosen carefully before Skidding or sliding improperly. attempting such maneuvers, since both stabil- ity and control are reduced. Bear in mind that WHAT CAN HAPPEN sliding maneuvers should always be avoided You may lose control of this ATV.
-
Page 101: What To Do If
WHAT TO DO IF ... 8 If your ATV starts to slide sideways: This section is designed to be a reference Steer in the direction of the slide if you have guide only. Be sure to read each section on the room. - Page 102 8 If your ATV is traversing a sloping surface: Be sure to ride with your weight positioned towards the uphill side of the ATV to main- tain proper balance. If the ATV starts to tip, steer down the hill (if there are no obstacles in your way) to regain balance.
-
Page 103: Periodic Maintenance And Adjustment
Turn off the engine when performing maintenance unless otherwise specified. Periodic inspection, adjustment and lubrica- Have a Yamaha dealer perform service if tion will keep your machine in the safest and you are not familiar with machine service. most efficient condition possible. Safety is an obligation of the machine owner. - Page 104 HOW TO AVOID THE HAZARD during a service operation requiring one, take Never modify this ATV through improper your machine to a Yamaha dealer to check the installation or use of accessories. All torque settings and adjust them as necessary.
-
Page 105: Periodic Maintenance/Lubrication
EBU00261 PERIODIC MAINTENANCE/LUBRICATION INITIAL EVERY ITEM ROUTINE month months months months year 9 Replace oil. Transmission 9 Check coolant leakage. 9 Repair if necessary. Cooling system 9 Replace coolant every 24 months. 9 Check condition. 9 Adjust gap and clean. Spark plug 9 Replace if necessary. - Page 106 9 Check routing and connection. Throttle, control cable 9 Lubricate. Outside nuts and bolts 9 Retighten. 9 Clean and inspect. Frame 9 Inspect. Lighting equipment * It is recommended that these items be serviced by a Yamaha dealer. ** Lithium soap base grease...
- Page 107 NOTE: Brake fluid replacement: 1. When disassembling the master cylinder or caliper cylinder, replace the brake fluid. Normally check the brake fluid level and add the fluid as required. 2. On the inner parts of the master cylinder and caliper cylinder, replace the oil seals every two years.
-
Page 108: Transmission Oil
EBU00768 NOTE: Transmission oil Wait a few minutes until the oil level settles Transmission oil measurement before checking. 1. Place the machine on a level place. 2. Warm up the engine for several minutes 4. Remove the dipstick and inspect the oil and then stop it. - Page 109 Recommended oil: See page 10-2. Oil quantity: Total amount: 1.7 L (1.5 Imp qt, 1.8 US qt) Periodic oil change: 1.5 L (1.3 Imp qt, 1.6 US qt) 1. Drain bolt 8 Be sure to use motor oils that do not 5.
-
Page 110: Cooling System
7. Start the engine and warm up for a few minutes. While warming up, check for oil leakage. If oil leakage is found, stop the engine immediately, and check for the cause. 8. Check the oil level. EBU00764* Cooling system 1. - Page 111 Hard water or salt water is harmful to the engine. You may use soft water if you can’t get distilled water. NOTE: If water is added, have a Yamaha dealer check the antifreeze content of the coolant as 1. Coolant reservoir cover soon as possible.
- Page 112 EBU00765 To change the coolant q WARNING POTENTIAL HAZARD Removing the radiator cap when the engine and radiator are still hot. WHAT CAN HAPPEN You could be burned by hot fluid and steam blown out under pressure. 1. Radiator cover 2.
- Page 113 4. Remove the radiator cap. 6. Disconnect the hose on the coolant reser- voir side and drain the coolant from the coolant reservoir. 1. Radiator cap 5. Remove the coolant reservoir cap. 1. Coolant reservoir hose 2. Coolant reservoir 7. After draining the coolant, thoroughly flush the cooling system with clean tap water.
- Page 114 1.5 L (1.3 Imp qt, 1.6 US qt) Coolant reservoir capacity: NOTE: 0.28 L (0.25 Imp qt, 0.30 US qt) If any leakage is found, ask a Yamaha dealer to inspect the cooling system. 15. Install the radiator cover by installing the bolts.
-
Page 115: Spark Plug Inspection
Do not attempt to diagnose such problems your- self. Instead, take the machine to a Yamaha deal- er. You should periodically remove and inspect the spark plugs because heat and deposits will cause any spark plug to slowly break down and erode. -
Page 116: Air Filter Cleaning
When installing a spark plug, always clean the gasket surface and use a new gasket. Wipe off any grime from the threads and tighten to the specified torque. Tightening torque: Spark plug: 20 Nm (2.0 m•kg, 14 ft•lb) 1. Check hose EBU00288 Air filter cleaning NOTE:... - Page 117 q WARNING POTENTIAL HAZARD Using low flash point solvents or gaso- line to clean the air filter element. WHAT CAN HAPPEN Low flash point solvents or gasoline can catch fire or explode. HOW TO AVOID THE HAZARD Use parts cleaning solvent to clean the air filter element.
- Page 118 7. Apply Yamaha foam air filter oil or other NOTE: quality foam air filter oil to the element. If The air filter element should be cleaned every 20 ~ 40 hours. It should be cleaned and lubri- foam air filter oil is not available, motor oil cated more often if the machine is operated in may be used.
-
Page 119: Spark Arrester Cleaning
EBU00458 2. Remove the tailpipe by pulling it out of the Spark arrester cleaning muffler. Be sure the exhaust pipe and muffler are cool 3. Tap the tailpipe lightly, then use a wire before cleaning the spark arrester. brush to remove any carbon deposits from 1. - Page 120 q WARNING POTENTIAL HAZARD Improper cleaning of the spark arrester. Hot exhaust system WHAT CAN HAPPEN Could injure the eyes. Could cause burns. Could cause carbon monoxide poison- ing, possibly leading to death. Could start a fire. HOW TO AVOID THE HAZARD When cleaning the spark arrester: Always let the exhaust system cool prior to touching exhaust components.
-
Page 121: Carburetor Settings
The carburetors could leak fuel, which Jet needle clip position 3rd groove would be a fire hazard. Pilot air screw 2.0 turns out HOW TO AVOID THE HAZARD Carburetor adjustments should only be performed by a Yamaha dealer. Do not 8-19... -
Page 122: Carburetor Setting Chart
Jet needle clip position 1st groove 3rd ( Standard ) 1. Main jet number Carburetor setting chart Altitude 0 ~ 1,500 m (5,000 ft) Above 1,500 m (5,000 ft) Temperature Main jet Jet needle Pilot air screw Main jet Jet needle Pilot air screw Above 0°C #200... - Page 123 Changing the carburetor settings Disassembly 1. Turn the fuel cock to the "OFF" position. 2. Turn out the drain screw of each carbure- tor and drain the fuel. 3. Remove the seat. 4. Remove the radiator cover and side cover. 7.
- Page 124 8. Remove the securing plate of each carbu- retor. 10. Remove each carburetor cap. 11. Remove the throttle cables from the throt- tle valves and then remove the holder. 1. Carburetor cap securing plate 9. Loosen the joint screws of each carbure- tor.
- Page 125 1. Float 2. Needle valve 3. Main jet 14. Change the main jets and the jet needle clip positions. (See page 8-20.) NOTE: Optional main jets can be obtained at a Yamaha dealer. 1. Float chamber 8-23...
- Page 126 Assembly 1. Reassemble the needle valves, floats and float chambers. 2. Install the carburetors. 3. Reassemble the throttle valves. 4. Install the carburetor caps and tighten them securely to the specified torque. Carburetor cap tightening torque: 1. Securing plate 4 Nm (0.4 m•kg, 2.9 ft•lb) 5.
- Page 127 Throttle cable adjustment 4. If not, loosen the locknuts and turn the After the jet needle clip positions are changed, adjusters until proper position is obtained. throttle cable adjustment may be necessary. 1. Move the throttle lever a few times. 2.
-
Page 128: Idle Speed Adjustment
EBU00302 Idle speed adjustment NOTE: A diagnostic tachometer must be used for this procedure. NOTE: The throttle cables and carburetor synchro- nization must be set properly before adjusting 1. Pilot air screw the idle speed. 2. Remove the seat. 3. Start the engine and warm it up for a few 1. -
Page 129: Throttle Lever Adjustment
EBU00307 Throttle lever adjustment NOTE: Adjust the engine idling speed before adjust- ing the throttle lever free play. 1. Loosen the locknut. 2. Turn the adjusting bolt until the throttle lever free play is 4 ~ 6 mm (0.16 ~ 0.24 in). -
Page 130: Front And Rear Brake Pad Inspection
The indicators allow checking of brake pad wear without disassembling the brake. Apply the brake and inspect the wear indica- tors. If they are ALMOST in contact with the disc plate, ask a Yamaha dealer to replace the pads. Front 1. Wear indicator (×2) a. -
Page 131: Inspecting The Brake Fluid Level
EBU00315 Inspecting the brake fluid level Front Insufficient brake fluid may let air enter the brake system, possibly causing the brakes to become ineffective. Before riding, check that the brake fluid is above the lower level and replenish when nec- essary. -
Page 132: Brake Fluid Replacement
5. Brake fluid may deteriorate painted sur- 8 Replace all hoses every four years. faces or plastic parts. Always clean up spilled fluid immediately. 6. Have a Yamaha dealer check the cause if the brake fluid level goes down. 8-30... -
Page 133: Front Brake Lever Free Play Adjustment
All air must be bled from the brake system. Replacement of brake components requires professional knowledge. These procedures should be performed by a 1. Locknut 2. Adjusting bolt Yamaha dealer. a. 4 ~ 8 mm (0.16 ~ 0.31 in) 8-31... -
Page 134: Rear Brake Adjustment
The top of the brake pedal should be posi- could lead to an accident. tioned 10 mm (0.39 in) below the top of the footrest. If not, ask a Yamaha dealer to adjust HOW TO AVOID THE HAZARD After servicing: 8 Make sure the brakes operate smooth- ly and that the free play is correct. -
Page 135: Parking Brake Adjustment
“A” A. Cable length NOTE: If the cable cannot be adjusted to specifica- tion, consult a Yamaha dealer. 4. Tighten the adjusting bolt locknut on the lever holder. 1. Locknut 2. Adjusting bolt 2. Loosen the adjusting bolt locknut and the adjusting bolt on the rear brake caliper. - Page 136 q WARNING 5. Screw in the adjusting bolt on the brake caliper by hand until it feels tight, then POTENTIAL HAZARD screw it out 1/4 turn. Tighten the adjusting Operating with improperly adjusted bolt locknut to the specified torque. brakes. Tightening torque: WHAT CAN HAPPEN 16 Nm (1.6 m•kg, 11 ft•lb)
-
Page 137: Clutch Adjustment
EBU00539 EBU00350 Clutch adjustment Drive chain slack check The clutch lever free play should be 5 ~ 10 Inspect the drive chain while all tires are mm (0.20 ~ 0.39 in). If the free play is incor- touching the ground. Check the slack at the rect, adjust as follows. -
Page 138: Drive Chain Slack Adjustment
EBU00351 Drive chain slack adjustment 1. Loosen the rear wheel hub bolts. 1. Locknut 2. Adjuster 3. Alignment marks 3. After adjusting, be sure to tighten the lock- 1. Upper wheel hub bolt (×2) nuts and the wheel hub bolts. 2. -
Page 139: Drive Chain Cleaning And Lubrication
HOW TO AVOID THE HAZARD Inspect cables frequently. Replace dam- aged cables. Lubricate the inner cables and the cable ends. If the cables do not operate smoothly, ask a Yamaha dealer to replace them. 1. O-rings 8-37... -
Page 140: Brake And Shift Pedal/Brake And Clutch Lever Lubrication
Recommended lubricant: Yamaha chain and cable lube or SAE 10W30 motor oil EBU00737 Brake and shift pedal/brake and clutch lever lubrication Lubricate the pivoting parts of each lever and pedal. Recommended lubricant: Lithium-soap-based grease (all-purpose grease) EBU00368 Upper arm and lower arm pivot lubrication Lubricate the upper arm pivot and the lower arm pivot. -
Page 141: Rear Arm Pivot Lubrication
EBU00369 Rear arm pivot lubrication Lubricate the rear arm pivots. Recommended lubricant: Lithium soap base grease 8-39... -
Page 142: Wheel Removal
EBU00373 Wheel removal Rear 1. Elevate the wheel by placing a suitable stand under the frame. 2. Remove the nuts from the wheel. 3. Remove the wheel assembly. Front EBU00740 Wheel installation When installing the wheel, reverse the removal procedure. Tighten the wheel nuts to the specified torque. -
Page 143: Replacing The Headlight Bulb
EBU00645 Replacing the headlight bulb If the headlight bulb burns out, replace the bulb as follows: 1. Remove the screws holding the headlight unit assembly to the headlight body. q WARNING POTENTIAL HAZARD The headlight bulb is hot when it is on and immediately after it is turned off. -
Page 144: Headlight Beam Adjustment
3. Put a new bulb into position and secure it Headlight beam adjustment in place with the bulb holder. It is advisable to have a Yamaha dealer make this adjustment. 1. Vertical adjustment: To raise the beam, turn the adjusting screw clockwise. -
Page 145: Troubleshooting
Yamaha dealer. Do not smoke when checking the fuel system. Make sure there are no open The skilled technicians at a Yamaha dealer- flames or sparks in the area, including ship have the tools, experience, and know- pilot lights from water heaters or fur- how to properly service your machine. -
Page 146: Troubleshooting Chart
2. Compression Kick the kick starter There is compresson Compression normal to see if there is compression No compression Ask a Yamaha dealer to inspect Wipe clean with 3. Ignition dry cloth Remove plugs and Spark good Ignition system normal... - Page 147 Wait until the reservoir tank and/or radiator. engine has cooled. Restart the engine. If the engine overheats again, ask a Yamaha dealer to inspect and/or Level is OK. repair the cooling system. NOTE: If it is difficult to get recommended coolant, tap water can be temporarily used, provided that it is changed to the recommended coolant as soon as possible.
- Page 148 q WARNING POTENTIAL HAZARD Removing the radiator cap when the engine and radiator are still hot. WHAT CAN HAPPEN You could be burned by hot fluid and steam blown out under pressure. HOW TO AVOID THE HAZARD Wait for the engine to cool before removing the radiator cap.
-
Page 149: No Spark
EBU00414 No spark HOW TO AVOID THE HAZARD Throttle override system (T.O.R.S.) is incorpo- Have the system checked by a Yamaha rated in the ignition circuit, and if the system dealer. should fail, the spark plug will not spark. Before bypassing T.O.R.S., be sure the... - Page 150 8-48...
-
Page 151: Cleaning And Storage
EDU00415 CLEANING AND STORAGE A. CLEANING Excessive water pressure may cause water Frequent, thorough cleaning of your machine seepage and deterioration of wheel bear- will not only enhance its appearance but will ings, brakes, transmission seals and elec- improve its general performance and extend trical devices. - Page 152 q WARNING 7. Clean the seat with a vinyl upholstery cleaner to keep the cover pliable and POTENTIAL HAZARD glossy. Operation with wet brakes after wash- 8. Automotive type wax may be applied to all ing. painted and chrome plated surfaces. WHAT CAN HAPPEN Avoid combination cleaner-waxes.
-
Page 153: Storage
EBU00529 5. Block up the frame to raise all wheels off B. STORAGE the ground. Long term storage (60 days or more) of your 6. Tie a plastic bag over the exhaust pipe machine will require some preventive proce- outlet to prevent moisture from entering. dures to guard against deterioration. -
Page 154: Specifications
EBU00428 SPECIFICATIONS Model YFZ350 Dimension: Overall length 1,855 mm (73.0 in) Overall width 1,100 mm (43.3 in) Overall height 1,080 mm (42.5 in) Seat height 800 mm (31.5 in) Wheel base 1,280 mm (50.4 in) Minimum ground clearance 135 mm (5.31 in) Minimum turning radius: 3,600 mm (141.7 in) Basic weight:... - Page 155 Model YFZ350 Engine oil (2-cycle): Type Yamalube R, Castrol R30, A545, A747 Mixing ratio See page 5-6. Transmission oil: Type Yamalube 4 (10W30) or SAE 10W30 Recommended engine oil classification: API Service SE, SF, SG type or higher Be sure to use motor oils that do not contain anti-friction modifiers.
- Page 156 Model YFZ350 Fuel: Type Premium unleaded fuel, Premix Tank capacity 12.0 L (2.6 Imp gal, 3.2 US gal) Reserve amount 2.5 L (0.5 Imp gal, 0.7 US gal) Carburetor: Type/quantity VM26SS/2 Manufacturer MIKUNI Spark plug: Type/manufacturer BR8ES/NGK Spark plug gap 0.7 ~ 0.8 mm (0.028 ~ 0.031 in) Clutch type: Wet, multiple-disc...
- Page 157 Model YFZ350 Gear ratio 32/13 (2.461) 29/16 (1.812) 27/18 (1.500) 25/20 (1.250) 23/22 (1.045) 21/24 (0.875) Chassis: Frame type Steel tube frame Caster angle 9° Trail 40 mm (1.57 in) Tire: Type Tubeless AT21 × 7 - 10 Size front AT20 ×...
- Page 158 Model YFZ350 Suspension: Front suspension Double wishbone Rear suspension Swingarm (link suspension) Shock absorber: Front shock absorber Coil spring/Oil damper Rear shock absorber Coil spring/Gas-Oil damper Wheel travel: Front wheel travel 230 mm (9.1 in) Rear wheel travel 220 mm (8.7 in) Electrical: Ignition system C.D.I.
-
Page 159: Noise Regulation
EBU00430 NOISE REGULATION TAMPERING WITH NOISE CONTROL SYSTEM PROHIBITED: Federal law prohibits the following acts or the causing thereof: (1) The removal or rendering inop- erative by any person other than for purposes of maintenance, repair, or replacement of any device or element of design incorporated into any new vehicle for the purpose of noise control prior to its sale or delivery to the ultimate purchaser or while it is in use or (2) the use of the vehi- cle after such device or element of design has been removed or rendered inoperative by any per-... -
Page 160: Maintenance Record
EBU00431 MAINTENANCE RECORD Copies of work orders and/or receipts for parts you purchase and install will be required to docu- ment maintenance done in accordance with the warranty. The chart below is printed only as a reminder to you that the maintenance work is required. It is not acceptable proof of maintenance work. -
Page 161: Atv Limited Warranty
THE PERIOD OF WARRANTY for all YFZ model 1. Operate and maintain the ATV as specified in the INCIDENTAL OR CONSEQUENTIAL DAMAGES, SO Yamaha ATV’s shall be ninety (90) days from the appropriate owner’s manual; THE ABOVE EXCLUSION MAY NOT APPLY TO YOU. - Page 162 Attention: Warranty Department faction at the time of sale, and upon your request at any later date. Each Yamaha ATV dealer is held responsible for his setup, service and war- This will ensure that Yamaha Motor Corporation, U.S.A. has an up-to-date ranty repair work.
- Page 163 EBU00436 Indicates a potential hazard that could result in serious injury or death.
- Page 164 EBU00437 PROTECT YOUR INVESTMENT...
- Page 165 9 with a passenger - passengers affect balance and steering and increase risk of losing control. LOCATE AND READ OWNER’S MANUAL. FOLLOW ALL INSTRUCTIONS AND WARNINGS. (For replacement manual, call 1-800-532-1558) YAMAHA MOTOR CO., LTD. PRINTED IN JAPAN 2000·4–3.5×1 PRINTED ON RECYCLED PAPER...