Table of Contents
Advertisement
Owner's Manual
Bedienungsanleitung
Mode d'emploi
Manuale d'uso
Manual del usuario
Thank you, and congratulations on your choice of the SD-20.
Before using this unit, carefully read the sections entitled: "USING THE UNIT
SAFELY" and "IMPORTANT NOTES" (Owner's manual pp. 3--5). These
sections provide important information concerning the proper operation of the
unit. Additionally, in order to feel assured that you have gained a good grasp
of every feature provided by your new unit, Owner's manualshould be read in
its entirety. The manual should be saved and kept on hand as a convenient
reference.
Copyright © 2002 ROLAND CORPORATION
All rights reserved. No part of this publication may be reproduced in any form without
the written permission of ROLAND CORPORATION.
Advertisement
Table of Contents

Related Manuals for Edirol StudioCanvas SD-20


Summary of Contents for Edirol StudioCanvas SD-20
- Page 1 Mode d’emploi Manuale d’uso Manual del usuario Thank you, and congratulations on your choice of the SD-20. Before using this unit, carefully read the sections entitled: “USING THE UNIT SAFELY” and “IMPORTANT NOTES” (Owner’s manual pp. 3--5). These sections provide important information concerning the proper operation of the unit.
- Page 2 Cet appareil numérique de la classe B respecte toutes les exigences du Règlement sur le matériel brouilleur du Canada. For the USA DECLARATION OF CONFORMITY Compliance Information Statement Model Name : SD-20 Type of Equipment : Sound Module Responsible Party : Edirol Corporation North America...
-
Page 3: Using The Unit Safely
• Do not excessively twist or bend the power to do so). Refer all servicing to your retailer, cord, nor place heavy objects on it. Doing so the nearest EDIROL/Roland Service Center, can damage the cord, producing severed or an authorized EDIROL/Roland elements and short circuits. - Page 4 • DO NOT play a CD-ROM disc on a conven- AC adaptor from the outlet, and request tional audio CD player. The resulting sound servicing by your retailer, the nearest Roland may be of a level that could cause permanent Service Center, or an authorized Roland hearing loss.
-
Page 5: Important Notes
Should you experience such problems, you should • Use a cable from Roland to make the connection. If relocate such wireless devices so they are at a greater using some other make of connection cable, please distance from this unit, or switch them off. -
Page 6: Table Of Contents
USB connection........................43 Serial connection ........................ 50 Troubleshooting..............57 Problems related to the USB driver................. 57 Problems when using the SD-20 ..................62 Deleting the driver......................64 Serial MIDI driver settings ....................66 Uninstalling the serial MIDI driver ................. 69... -
Page 7: Features Of The Sd-20
) and XGlite ( ) are trademarks of YAMAHA Corporation. * GS ( ) is a registered trademark of Roland Corporation. * Microsoft and Windows are registered trademarks of Microsoft Corporation. 206c * Windows® 98 is known officially as: “Microsoft® Windows® 98 operating system.”... -
Page 8: Check The Contents Of The Package
SD-20. You may want to mark the relevant check box as you * The SD-20 package does not include an external amp or speakers, or headphones. confirm the presence of You will need to provide these separately. -
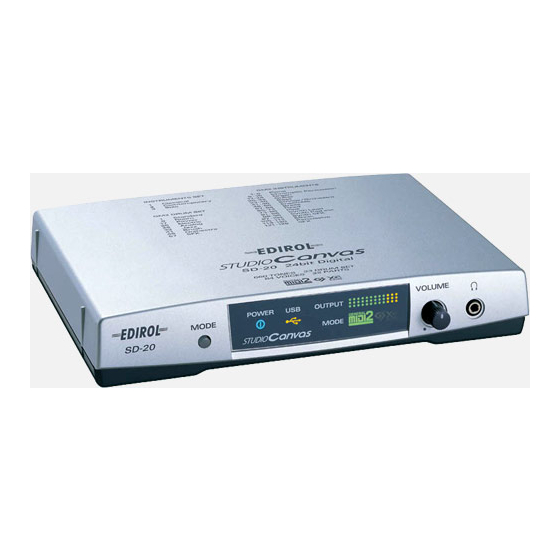
Page 9: Names Of Things And What They Do
Names of things and what they do Front Panel fig.front USB Indicator POWER Indicator OUTPUT Level Indicator MODE Button MODE Indicator Headphone Jack VOLUME Knob A. MODE Button The sound-module mode changes each time you press this button. (->About the sound generator modes (p. -
Page 10: Rear Panel
BUS POWER The SD-20 can be operated on bus power. "Bus power" refers to power that is supplied to the SD-20 from a computer via a USB cable. In this case, it is not necessary to connect the AC adaptor. -
Page 11: Exchanging Midi Data With Your Computer
Set this switch as appropriate for the computer or interface to which the SD-20 is connected. * If you change the setting of the computer switch, the SD-20 must be restarted. Turn the SD-20’s power switch OFF, then ON again. -
Page 12: Basic Connections
Windows machine Audio When cable connecting via a computer cable to a Macintosh Stereo set LINE OUT Optical digital When controlling cable the SD-20 from a MIDI device Computer switch DIGITAL INPUT MIDI cable Powered speaker MIDI OUT MIDI keyboard etc.. -
Page 13: About The Sound Generator Modes
Native mode This mode is unique to the SD-20. It provides three sound sets that can be switched using MIDI bank select messages. The way in which sounds are selected is different than in GM2 mode. For this reason, song data you create in Native mode will not play back correctly on GM2 sound modules other than the SD- Other functions are the same as in GM2 mode. - Page 14 GM scores to be played in the same way as GS music data (music data created in conformity with the GS format). * It is not possible to edit GS mode sound generator parameters from the panel of the SD-20. XGlite mode XG is a sound generator format promoted by Yamaha Corporation, which is based on GM1 (General MIDI 1).
-
Page 15: About Parts And Sounds
About the sound generator modes About parts and sounds The SD-20 is able to produce 32 different sounds at once. A sound generator such as the SD-20 that is able to produce many different sounds simultaneously is called a “multitimbral sound module.”... -
Page 16: Getting Connected And Installing Drivers (Windows)
A “driver” is software that transfers data between the SD-20 and application software running on your computer, when your computer and the SD-20 are connected by a USB cable. The driver sends data from your application to the SD-20, and from the SD-20 to your application. -
Page 17: Usb Connection
(e.g., Administrator). For details With the SD-20 disconnected, start up Windows. on user accounts, please Disconnect all USB cables except for a USB keyboard and USB mouse (if consult the system used). - Page 18 Getting connected and installing drivers (Windows) fig.2-2 Make sure that “What action do you want Windows to take?” is set to “Ignore.” If you changed “What If it is set to “Ignore”, simply click action do you want [OK]. Windows to take?” in If it is not set to “Ignore”, make a step 4, you must restore the previous setting after...
- Page 19 1. Set the computer switch of the installing the driver and SD-20 to USB. making settings. 2. With the SD-20’s power switch turned off, connect it to the AC adaptor. This unit is equipped with 3. Plug the AC adaptor into an AC power outlet.
- Page 20 Getting connected and installing drivers (Windows) fig.2-6 The Found New Hardware wizard will appear. Make sure that the screen indicates “EDIROL SD-20,” select “Install from a list or specific location (Advanced),” and click [Next]. fig.2-7 The screen will indicate “Please choose your search and installation options.”...
- Page 21 "D:\DRIVER\USB_XP2K" and click [OK]. fig.2-11_20 The Found New Hardware wizard will appear. Make sure that the display indicates "EDIROL SD-20," and click [Finish]. Wait until "Found New Hardware" appears near the taskbar. Restart Windows. When driver installation has been completed, the System Setting Change dialog box will appear.
- Page 22 Getting connected and installing drivers (Windows) Windows 2000 users With the SD-20 disconnected, start up Windows. Disconnect all USB cables except for a USB keyboard and USB mouse (if used). Log on to Windows as a user with administrative privileges (such as Administrator).
- Page 23 1. Set the computer switch of the SD-20 to USB. making settings. 2. With the SD-20’s power switch turned off, connect it to the AC adaptor. 3. Plug the AC adaptor into an AC power outlet.
- Page 24 (p. 60)) The Files Needed dialog box will appear. In the "Copy files from" area, type "D:\DRIVER\USB_XP2K" and click [OK]. fig.2-17b_30 The “Found New Hardware Wizard” may be displayed. Verify that “EDIROL SD-20” is displayed, and click [Finish].
- Page 25 Getting connected and installing drivers (Windows) Restart Windows. The System Settings Change dialog box may appear. Click [Yes]. Windows will restart automatically. If you changed “File signature verification” If you changed the “File signature verification” setting in step 5, restore the original setting after Windows restarts.
- Page 26 Getting connected and installing drivers (Windows) Windows Me/98 users With the SD-20 disconnected, start up Windows. Disconnect all USB cables except for a USB keyboard and USB mouse (if used). Exit all currently running software (applications). Also close any open windows. If you are using virus checking or similar software, be sure to exit it as well.
- Page 27 SD-20 with 1. Set the computer switch of the SD-20 to USB. BUS power, please use the 2. With the SD-20’s power switch turned off, connect it to the AC AC adaptor while you are installing the driver and adaptor.
-
Page 28: Serial Connection
Windows XP users XP Professional, you must log on using a user name with an administrative Make sure that the power is turned off for the SD-20, your computer, and all account type (e.g., peripheral devices. Administrator). For details on user accounts, please consult the system Set the computer switch of the SD-20 to PC. - Page 29 Getting connected and installing drivers (Windows) fig.2-1 Open the Driver Signing Options dialog box. Click the Hardware tab, and then click [Driver Signing]. fig.2-2 Make sure that “What action do you want Windows to take?” is set to “Ignore.” If you changed “What If it is set to “Ignore”, simply click action do you want [OK].
- Page 30 Getting connected and installing drivers (Windows) fig.2-22_40 In this manual, the location In the dialog box that appears, of folders and files is given input the following into the in terms of the file path, “Open” field, and click [OK]. using \ as the delimiter.
- Page 31 Getting connected and installing drivers (Windows) The Roland Serial MIDI Driver Settings dialog box will appear. Set the following items. Click [OK]. fig.2-23_30 COM Ports Select the serial port (COM port) to which the SD-20’s serial port is connected. Switches Check “Use multiple ports.”...
- Page 32 Getting connected and installing drivers (Windows) Windows 2000 users Make sure that the power is turned off for the SD-20, your computer, and all peripheral devices. Set the computer switch of the SD-20 to PC. Log on to Windows using...
- Page 33 Getting connected and installing drivers (Windows) fig.2-13_50 Make sure that “File signature verification” is set to “Ignore.” If it is set to “Ignore”, simply click [OK]. If it is not set to “Ignore”, make a note of the current setting (“Warn”...
- Page 34 2. When the “New hardware detection wizard” appears, click [Finish]. 3. Perform the installation as described in the “Troubleshooting” section on Device Manager shows “?”, “!”, or “USB Composite Device” (p. 60). The Roland Serial MIDI Driver Settings dialog box will appear. Set the following items. Click [OK]. fig.2-23b_40...
- Page 35 Getting connected and installing drivers (Windows) When driver installation has been completed, the Restart your computer dialog box will appear. Restart your computer. If you changed “File signature verification” If you changed the “File signature verification” setting in step 5, restore the original setting after Windows restarts.
- Page 36 Getting connected and installing drivers (Windows) Windows Me/98 users Make sure that the power is turned off for the SD-20, your computer, and all peripheral devices. Set the computer switch of the SD-20 to PC. Use the computer cable to connect the serial connector of your computer to the SD-20.
- Page 37 Check the displayed contents, and click [Next]. The Computer Switch Setting dialog box will appear. Make sure that the computer switch on the rear of the SD-20 is set to [PC], and click [Next]. If it is not set to [PC], perform this procedure again from step 1.
-
Page 38: Settings And Checking
[Preferred device] (or in Windows XP, [Default device]), and select the following from the list that appears. For a USB EDIROL SD-20 PART A connection For a serial Roland Serial MIDI Out A connection Click OK to complete the settings. - Page 39 Properties" dialog box. Click the MIDI tab. fig.2-29_30 Set "MIDI output." Select [Single instrument], and choose one of the following from the list that appears. EDIROL SD-20 For a USB connection PART A For a serial Roland Serial MIDI connection Out A Click OK to complete the settings.
- Page 40 Getting connected and installing drivers (Windows) Enabling background services In Windows XP, perform these settings to make MIDI processing occur more smoothly. These settings are unavailable in Windows 2000/Me/98. Click the Windows start button, and from the menu that appears, select Control Panel.
-
Page 41: Checking For Sound Output
Getting connected and installing drivers (Windows) Checking for sound output Now let's play back the sample data to verify that connections, driver installation, and settings were made correctly. Playing back the sample data Use of the song data supplied with this Here we will use standard Windows functionality to play the sample data. - Page 42 Getting connected and installing drivers (Windows) Was the sample data played back? If it was played back correctly, this means that the computer and the SD-20 are connected correctly, and that the drivers have been installed correctly.
-
Page 43: Getting Connected And Installing Drivers (Macintosh)
A “driver” is software that transfers data between the SD-20 and application software running on your computer, when your computer and the SD-20 are connected by a USB cable. The driver sends data from your application to the SD-20, and from the SD-20 to your application. -
Page 44: Usb Connection
* Do not turn on the power of the SD-20 at this time. If the power of the SD-20 is turned on, a message like the following will appear when the Macintosh is started up. Perform the steps described below as appropriate for the message that is displayed. - Page 45 Use the following procedure to install the SD-20 driver. OMS can be found in the The included SD-20 OMS driver is an add-on module for using the SD-20 OMS2.3.8 folder within the with OMS. In order for you to use it, OMS must already be installed on the OMS folder of the CD- hard disk from which you started up.
- Page 46 [OK], click [Cancel] in the next screen. fig.3-7 Choose “Open” from the File menu. From the OMS Settings folder that you copied in step 1, select the SD-20 USB file, and click [Open]. fig.3-8_35 A screen like the one shown here will appear.
- Page 47 Click on the sound generator icons that are encircled in the following illustration. If sound is heard from the SD-20, the settings are correct. If MIDI is not being transmitted, the Macintosh will produce an alert sound.
- Page 48 Getting connected and installing drivers (Macintosh) Does the OUTPUT level indicator of the SD-20 move? If the OUTPUT level meter in the SD-20’s display is moving but you do not hear sound, check whether the volume of the SD-20 or your speaker system has been lowered.
- Page 49 Installing the SD-20 driver (FreeMIDI) Use the following procedure to install the SD-20 driver. The included SD-20 FreeMIDI driver is an add-on module for using the SD-20 with FreeMIDI. In order to use it, FreeMIDI must be installed on the hard disk from which you started up.
- Page 50 If the SD-20 does not produce sound, refer to No If the OUTPUT level meter in the SD-20’s display is moving but you do not sound (p. 62). hear sound, check whether the volume of the SD-20 or your speaker system has been lowered.
-
Page 51: Serial Connection
Macintosh to the SD-20. This unit is equipped with a protection circuit. A brief With the SD-20’s power switch turned off, connect it to the AC adaptor. interval (a few seconds) after power up is required before the unit will operate Plug the AC adaptor into an AC power outlet. - Page 52 Getting connected and installing drivers (Macintosh) Verify the installation location, and click [Install]. fig.3-2_40 If a message like the following is displayed, click [Continue]. The other currently running applications will exit, and installation will continue. A dialog box will indicate Installation completed. Click [Restart] to restart your Macintosh.
- Page 53 PowerBooks, select the “SD-20 Modem Port” file. Opening the SD-20 Printer Port file Opening the SD-20 Modem Port file From the Edit menu, select OMS MIDI Setup. In the OMS MIDI Setup dialog box that appears, check Run MIDI in background, and click [OK].
- Page 54 Macintosh will produce an alert sound. Does the OUTPUT level indicator of the SD-20 move? If the OUTPUT level meter in the SD-20’s display is moving but you do not hear sound, check whether the volume of the SD-20 or your speaker system has been lowered.
- Page 55 From the File menu, choose [Exit]. If the AppleTalk confirmation dialog box sound (p. 62). appears, click [OK] to close the dialog box. This completes connections for the SD-20 and Macintosh, and installation of the MIDI driver. Now, MIDI data can be input and output (recorded and played).
- Page 56 Installing the SD-20 driver (FreeMIDI) Use the following procedure to install the SD-20 driver. The included SD-20 FreeMIDI driver is an add-on module for using the SD-20 with FreeMIDI. In order to use it, FreeMIDI must be installed on the hard disk from which you started up.
- Page 57 Does the OUTPUT level indicator of the SD-20 move? If the OUTPUT level meter in the SD-20’s display is moving but you do not hear sound, check whether the volume of the SD-20 or your speaker system has been lowered. If the OUTPUT level meter does not move, check the connections and OMS settings once again.
-
Page 58: Troubleshooting
• Is the SD-20 connected correctly? Make sure that the USB connector of your computer is connected to the SD-20 by a USB cable. Check this, and if you are using Windows, close the Sound and Multimedia Properties dialog box (Multimedia Properties in Windows 98), re-open the same dialog box once again, and specify the audio and MIDI input/output destinations. - Page 59 USB cable connected, and restart your Macintosh. If it is still not detected, shut down your Macintosh, and then restart it. The SD-20 will not be detected if it is connected to the USB connector on the Macintosh keyboard. Please connect the SD-20 to a USB connector on the Macintosh itself.
- Page 60 ”Found unknown device” appears even though you installed the driver If your computer or USB hub has two or more USB connectors, and you connect the SD-20 to a USB connector to which the SD-20 has never been connected before, the “Unknown device” dialog box may appear even on a computer onto which you have already installed the driver.
- Page 61 [OK]. In the same way, delete all indications of “?Composite USB Device,” “?USB Device,” “USB Device,” and “USB composite device” that you find. 9. If you find EDIROL SD-20 USB Driver with a yellow “!” or a red “?” displayed beside it, delete this in the same way.
- Page 62 Troubleshooting 12. Restart Windows. Then install the driver once again."Getting connected and installing drivers (Windows)" (p. 16). * If the problem still occurs after you have taken the above measures, please refer also to the Readme file for the USB driver. The Readme file is on the CD-ROM. [ Location ] Windows 2000 users: In the CD-ROM,...
-
Page 63: Problems When Using The Sd-20
SD-20. Next, turn the SD-20’s power off, then switch it on again. • Did you reconnect the USB cable or turn the power of the SD-20 off and on? Exit all applications that are using the SD-20, and turn the power of the SD-20 off and then on once again. - Page 64 If the INST level meter is moving but you do not hear sound, check whether the volume of the SD- 20 or your speakers has been lowered. If the INST level meter of the SD-20 is not moving, recheck the connections and "OMS settings" (p. 45), (p. 51) / "FreeMIDI settings" (p. 48), (p. 55).
-
Page 65: Deleting The Driver
2. Log on to Windows as a user with administrative privileges (such as Administrator). 3. After connecting the SD-20 to your computer via a USB cable, turn on the power of the SD-20. 4. Exit all applications before deleting the driver. - Page 66 1. With all USB cables disconnected, start up Windows. (USB keyboard and USB mouse excepted) 2. After connecting the SD-20 to your computer via a USB cable, turn on the power of the SD-20. 3. Exit all applications before deleting the driver.
-
Page 67: Serial Midi Driver Settings
[Roland Serial MIDI Out A]. 4. In the lower right of the dialog box, click [Properties]. 5. In the Roland Serial MIDI Out A Properties dialog box, click [Settings]. 6. The Roland Serial MIDI Driver Settings dialog box will appear. - Page 68 How many MIDI OUT ports can I use? If [Use multiple ports] is checked, you will be able to use the multiple ports of the SD-20 from your computer via the Roland serial MIDI driver.
- Page 69 Setting the computer switch of the sound module Set the computer switch of the SD-20 sound module to [PC], as directed by the comment in the "Driver's Information" area. If you change the setting of the computer switch, you need to switch off the sound module, then turn it on again.
-
Page 70: Uninstalling The Serial Midi Driver
Manager]. 5. Double-click "Sound, video and game controllers." A list of device will appear. 6. Right click "Roland Serial MIDI Driver," and choose Uninstall from the menu that appears. 7. A dialog box will ask you to confirm device removal. - Page 71 If you're running the SD-20 on BUS power, disconnect the USB cable that connects the SD-20 to the Macintosh. 2. Delete the SD-20 Serial Driver from the OMS Folder inside the System folder, or delete SD- 20 Serial from the FreeMIDI Folder.
- Page 72 Appendices Instrument list (GM2 / Native mode) * To select sound sets, you can use either NRPN or exclusive messages. Piano PC LSB Classic Set Voices Contemp Set Voices Solo Set Voices MSB: 96 MSB : 97 MSB : 98 Piano 1 Ac.Piano St.Piano 1...
- Page 73 Appendices Accordion F French Acc St.FrenchAcc Accordion I It Muset St.It Muset Harmonica Harmonica 2 St.Harmonica Bandneon Bandneon 1 St.Bandneon Guitar PC LSB Classic Set Voices Contemp Set Voices Solo Set Voices MSB: 96 MSB : 97 MSB : 98 Nylon Gt Nylon Gt 2 Nylon Gt 3...
- Page 74 Appendices Ensemble PC LSB Classic Set Voices Contemp Set Voices Solo Set Voices MSB: 96 MSB : 97 MSB : 98 Strings Strings 2 St.Strings Orchestra Orchestra 2 St.Orchestra 60’Strings Oct.Strings St.OctStr 1 Slow Strings SlowStrings2 St.Slow Str Syn.Strings1 BriteSyn.Str StackSyn.Str Syn.Strings3 Oct.SynStr 1...
- Page 75 Appendices Shakuhachi Shakuhachi 2 Shaku.vib Whistle Whistle 2 Whistle vib Ocarina Ocarina 2 Ocarina vib Synth lead PC LSB Classic Set Voices Contemp Set Voices Solo Set Voices MSB: 96 MSB : 97 MSB : 98 Square Wave MG Square OB Square Square Fat Square...
- Page 76 Appendices Taisho Koto Taisho Koto2 St.T Koto Kalimba Kalimba 2 St.Kalimba Bag Pipe Bag Pipe 2 St.Bag Pipe Fiddle Fiddle vib Fiddle 2 vib Shanai Shanai 2 St.Shanai Percussive PC LSB Classic Set Voices Contemp Set Voices Solo Set Voices MSB: 96 MSB : 97 MSB : 98...
- Page 77 Appendices Instrument list (GS mode) Piano Guitar Ensemble CC00 GS Set Voices CC00 GS Set Voices CC00 GS Set Voices Piano 1 Nylon Gt. Strings Piano 1w Ukulele Orchestra Piano 1d Nylon Gt.o SlowStrings Nylon Gt.2 Piano 2 SynStrings1 Piano 2w Steel Gt.
- Page 78 Appendices Synth lead Percussive CC00 GS Map Voices CC00 GS Set Voices Square Wave Tinkle Bell Square Agogo Sine Wave Steel Drums Saw Wave Woodblock Castanets Doctor Solo Taiko SynCalliope Concert BD ChifferLead Melo. Tom 1 Charang Melo. Tom 2 Solo Vox Synth Drum 5th Saw...
- Page 79 Appendices Instrument list (XGlite mode) * The instrument names listed here are the proper names for the XGlite sound module mode. Due to the limited number of letters that can be used for the display, the names shown in the display may be slightly different from the instrument names listed here. Piano 70's Percussive Organ 1 Fretless Bass...
- Page 80 Appendices Brass Ethnic, etc Charang Lead Distorted Lead CC00 XG Set Elements CC00 XG Set Elements Voice Lead Trumpet Sitar Warm Trumpet Detuned Sitar Fifths Lead Sitar 2 Big Five Trombone Tamboura Trombone 2 Bass & Lead Banjo Big & Low Tuba Muted Banjo Fat &...
- Page 81 Appendices Drum set list (GM2 / Native mode) Classical Set Contemporary Set Solo Set Standard Set StandardSet2 St.Standard Room Set Room Set 2 St.Room Power Set Power Set 2 St.Power Electric Set Dance Set Rust Set Analog Set Rave Set Analog2 Set Jazz Set Jazz Set 2...
- Page 82 Appendices Classical set drum set (1) <-: Same as the percusion sound of “Standard Set” (PC001) * BANK MSB=104, LSB=0 fig.drum24-87 PC001 PC009 PC017 PC025 PC026 Standard Set Room Set Power Set Erectric Set Analog Set High Q <- <- <- <- Slap...
- Page 83 Appendices Classical set drum set (2) * BANK MSB=104, LSB=0 fig.drum24-87 PC033 PC041 PC049 PC057 Jazz Set Brush Set OrchestraSet SFX Set ClosedHi-hat <- <- Pedal Hi-hat <- <- Open Hi-hat <- <- Ride Cymbal1 <- <- <- <- <- <- <- <-...
- Page 84 Appendices Contemporary set drum set (1) <-: Same as the percusion sound of “StandardSet2” (PC001) * BANK MSB=105, LSB=0 fig.drum24-87 PC001 PC009 PC017 PC025 PC026 StandardSet2 Room Set 2 Power Set 2 Dance Set Rave Set High Q <- <- <- <- Slap...
- Page 85 Appendices Contemporary set drum set (1) * BANK MSB=105, LSB=0 fig.drum24-87 PC033 PC041 PC049 PC057 Jazz Set 2 Brush Set 2 OrchestraSet SFX Set ClosedHi-hat <- <- Pedal Hi-hat <- <- Open Hi-hat <- <- Ride Cymbal1 <- <- <- <- <- <-...
- Page 86 Appendices Solo set drum set (1) <-: Same as the percusion sound of “St.Standard” (PC001) * BANK MSB=106, LSB=0 fig.drum24-87 PC001 PC009 PC017 PC025 PC026 St.Standard St.Room St.Power Rust Set Analog2 Set High Q <- <- <- <- Slap <- <- <- <-...
- Page 87 Appendices Solo set drum set (2) * BANK MSB=106, LSB=0 fig.drum24-87 PC033 PC041 PC049 PC057 St.Jazz St.Brush OrchestraSet SFX Set ClosedHi-hat <- <- Pedal Hi-hat <- <- Open Hi-hat <- <- Ride Cymbal1 <- <- <- <- <- <- <- <- <- <-...
- Page 88 Appendices Drum set list (GS mode) * The instrument names listed here are the proper names for the XGlite soundmodule mode. Due to the limited number of letters that can be used for thedisplay, the names shown in the display may be slightly different from theinstrument names listed here. GS Set STANDARD ROOM...
- Page 89 Appendices GS mode drum set (1) fig.drum25-99 PC 1 / PC 33 PC 9 PC 17 PC 25 PC 26 PC 41 PC 49 STANDARD / JAZZ ROOM POWER ELECTRONIC TR-808 BRUSH ORCHESTRA ---- ---- ---- ---- ---- ---- ---- ---- ---- ----...
- Page 90 Appendices GS mode drum set (2) fig.drum35-108 PC 57 ---- ---- ---- ---- High Q Slap Scratch Push Scratch Pull Sticks Square Click Metronome Click Metronome Bell Guitar Fret Noise Guitar cutting Guitar cutting String slap of double Fl.Key Click Laughing Scream Punch...
- Page 91 Appendices Drum set list (XGlite mode) * The instrument names listed here are the proper names for the XGlite sound module mode. Due to the limited number of letters that can be used for the display, the names shown in the display may be slightly different from the instrument names listed here.
- Page 92 Appendices XGlite mode drum set (1) * BANK MSB=127, LSB=0 fig.drum12-64 PC001 PC002 PC009 PC017 PC025 Standard Kit Standard Kit 2 Room Kit Rock Kit Electro Kit Surdo Mute <- <- <- <- Surdo Open <- <- <- <- Hi Q <- <- <-...
- Page 93 Appendices fig.drum72-84 PC001 PC002 PC009 PC017 PC025 Standard Kit Standard Kit 2 Room Kit Rock Kit Electro Kit Samba Whistle L <- <- <- <- Guiro Short <- <- <- <- Guiro Long <- <- <- <- Claves <- <- <- <- Wood Block H...
- Page 94 Appendices fig.drum53-84 PC001 PC026 PC033 PC041 PC049 Standard Kit Analog Kit Jazz Kit Brush Kit Classic Kit Ride Cymbal Cup <- <- <- <- Tambourine <- <- <- <- Splash Cymbal <- <- <- <- Cowbell Cowbell Analog <- <- <- Crash Cymbal 2 <-...
- Page 95 Appendices XGlite mode drum set (3) * BANK MSB=126, LSB=0 fig.drum36-90 PC001 PC002 SFX Kit 1 SFX Kit 2 Cutting Noise Cutting Noise 2 Door Squeak Door Slam String Slap Scratch Cut Scratch H 3 Wind Chime Telephone Ring 2 Flute Key Click Car Engine Igni- Car Tires Squeal...
-
Page 96: Midi Implementation Chart
STUDIO CANVAS Date : April 1, 2001 Model :SD-20 MIDI Implementation Chart Version : 1.00 (GM2/Native/GS mode) Transmitted Recognized Function... Remarks Basic Default 1–16 Channel Changed 1–16 Default Mode 3 Mode Messages Mode 3, 4 (M = 1) Altered ************** Note 0–127... -
Page 97: Specifications
Specifications Model: Studio Canvas SD-20 (General MIDI2 / GS format / XGlite format) Number of parts Dimensions 203 (W) x 159 (D) x 35 (H) mm 8 (W) x 6-5/16 (D) x 1-7/16 (H) inches Maximum Polyphony Weight 64 voices 0.4 kg... - Page 98 Computer Cable Wiring Diagrams For PC (9-pin) (Sold separately: RS-232C) mini DIN, 8-pin, male 6 7 8 D-sub, 9-pin, female mini DIN, 8-pin, male D-sub, 9-pin, female HSKo 1 HSKi 2 TXD- 3 5 GND GND 4 3 4 5 RXD- 5 2 RXD For Apple Macintosh (Sold separately: RS-422)
- Page 99 Information When you need repair service, call your nearest EDIROL/Roland Service Center or authorized EDIROL/Roland distributor in your country as shown below. IRELAND HONG KONG BARBADOS PERU CYPRUS Roland Ireland Parsons Music Ltd. A&B Music Supplies LTD Audionet Radex Sound Equipment Ltd.