Table of Contents
Advertisement
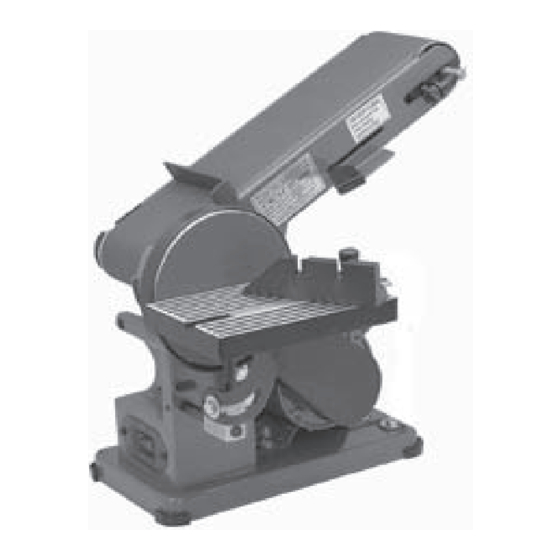
SANDER - 4" BELT & 6" DISC
Model 05154
ASSEMBLY AND OPERATING INSTRUCTIONS
®
3491 Mission Oaks Blvd., Camarillo, CA 93011
Visit our Web site at: http://www.harborfreight.com
©
Copyright 2004 by Harbor Freight Tools
®
. All rights reserved. No portion of this
manual or any artwork contained herein may be reproduced in any shape or form
without the express written consent of Harbor Freight Tools.
For technical questions, please call 1-800-444-3353.
Advertisement
Table of Contents

Related Manuals for Central Machinery 5154


Summary of Contents for Central Machinery 5154
- Page 1 Copyright 2004 by Harbor Freight Tools ® . All rights reserved. No portion of this manual or any artwork contained herein may be reproduced in any shape or form without the express written consent of Harbor Freight Tools. For technical questions, please call 1-800-444-3353.
-
Page 2: Product Specifications
When unpacking, check to make sure all the parts shown on the Parts List on page 19 are included. If any parts are missing or broken, please call Harbor Freight Tools at the number shown on the cover of this manual as soon as possible. -
Page 3: Electrical Safety
Do not use a power tool while tired or under the influ- ence of drugs, alcohol, or medication. A moment of inattention while operat- ing power tools may result in serious personal injury. SKU 05154 ELECTRICAL SAFETY PERSONAL SAFETY... - Page 4 Maintain tools with care. Keep cutting tools sharp and clean. Properly maintained tools with a sharp cutting edge are less likely to bind and are easier to control. Do not use a damaged tool. Tag damaged tools “Do not use” until repaired. SKU 05154 TOOL USE AND CARE PAGE 4...
-
Page 5: Grounded Tools: Tools With Three Prong Plugs
The green wire in the cord must be the only wire connected to the tool’s grounding system and must never be attached to an electrically “live” terminal. (See Figure A.) SKU 05154 SERVICE GROUNDING... -
Page 6: Double Insulated Tools: Tools With Two Prong Plugs
As the distance from the supply outlet increases, you must use a heavier gauge extension cord. Using extension cords with inadequately sized wire causes a SKU 05154 EXTENSION CORDS PAGE 6... - Page 7 5.1 – 7.0 7.1 – 12.0 12.1 – 16.0 16.1 – 20.0 * Based on limiting the line voltage drop to five volts at 150% of the rated amperes. SKU 05154 (120 VOLT) EXTENSION CORD LENGTH Feet Feet FIGURE C...
-
Page 8: Specific Safety Rules
Maintain labels and nameplates on the Sander. These carry important infor- mation. If unreadable or missing, contact Harbor Freight Tools for a replacement. Never plug the Power Cord of this product into an electrical outlet while standing on a wet or damp surface. - Page 9 Before sanding, turn on the Sander and check for excessively loose Sand- ing Disc (12) or Belt (45). If necessary, turn off the Sander and correct the problem before using. Always keep hands and fingers as far away as possible from the moving parts of the Sander.
- Page 10 Allow the Sanding Disc (11) and Sanding Belt (45) to spin up to full speed before feeding a workpiece into them. When turning off the Sander, allow the Sanding Disc and Sanding Belt to slow down and stop on their own. Do not press against the Disc or Belt to stop them.
- Page 11 WARNING! Prior to performing any assembly procedures, make sure the Power Switch (30) is in its “OFF” position and the Power Cord (29) of the Sander is unplugged from its electrical outlet. Push the Handle (36) forward, and slide the Sanding Belt (45) onto the Drive Roller (5) and Idler Roller (41).
- Page 12 WARNING! Prior to performing any assembly procedures, make sure the Power Switch (30) is in its “OFF” position and the Power Cord (29) of the Sander is unplugged from its electrical outlet. Check to make sure the Disc (11) is free of dirt, oil, and other debris.
- Page 13 Observe the gauge on the Miter Guide (21). Move the Miter Guide to the right or left until the desired angle is indicated on the gauge. Then, retighten the Miter Guide Knob (22) to lock the Miter Guide in place. (See Figure I.) FIGURE I SKU 05154 ANGLE PLATE LOCK...
- Page 14 Sanding Belt (45) and against the Work Support (33). (See Figure K.) Apply moderate downward pressure on the workpiece, allowing the Sanding Belt (45) to cut without being forced. (See Figure K.) SKU 05154 BELT FRAME (3) FIGURE J PAGE 14...
- Page 15 Sanding Belt (45) and against the Work Support (33). (See Figure L.) Apply moderate downward pressure on the workpiece, allowing the Sanding Belt (45) to cut without being forced. (See Figure L.) SKU 05154 WORKPIECE POWER SWITCH (30) FIGURE K...
- Page 16 Disc. (See Figure M.) Carefully set the workpiece flat and level upon the spinning Work Table (13) and against the Miter Guide (21). (See Figure M.) SKU 05154 PAGE 16 FIGURE L...
-
Page 17: Inspection, Maintenance, And Cleaning
Power Cord (29) is unplugged from its electrical outlet before performing any inspection, maintenance, or cleaning procedures. Before each use, inspect the general condition of the Sander. Check for dam- aged electrical wiring, loose connections, broken parts, loose Sanding Disc (12) and Sanding Belt (45), and any other condition that may affect its safe operation. -
Page 18: Please Read The Following Carefully
Daily: With a soft brush, vacuum, or compressed air remove all sawdust and debris from the Sander. Do not immerses any part of the Sander in liquid. Then, use a premium quality machine oil to lubricate all moving parts. When storing, make sure to store the Sander in a safe, clean, and dry location. -
Page 19: Parts List
Power Cord Power Switch ----------- ----------------------------------- --------- Plastic Joint NOTE: Some parts are listed and shown for illustration purposes only, and are not available individually as replacement parts. SKU 05154 PARTS LIST Qty. Part # Description Work Support Pull Rod... - Page 20 ASSEMBLY DIAGRAM & WIRING SCHEMATIC SKU 05154 PAGE 20...