Table of Contents
Advertisement
Advertisement
Table of Contents

Related Manuals for Siemens Gigaset C300


Summary of Contents for Siemens Gigaset C300
-
Page 2: Gigaset C300 - Your High-Quality Accessory
Gigaset C300 – your high-quality accessory Gigaset C300 – your high-quality accessory Congratulations on your purchase of this latest generation Gigaset. Your Gigaset can do a lot more than just make calls: Directory for up to 250 entries Save phone numbers and names to the directory (¢ page 28). You can designate important entries as VIPs (Very Important Persons). -
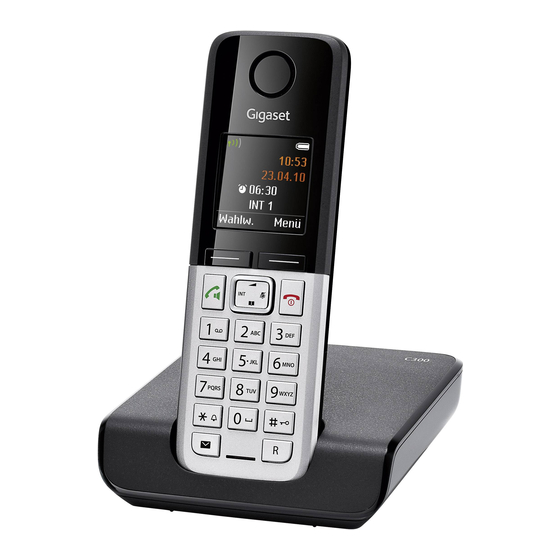
Page 3: Overview
Overview Overview 1 Signal strength (¢ page 16) Colour / Symbol changes when Eco Mode / Eco Mode+ is activated (¢ page 38) 2 Control key (¢ page 18) Mute microphone (¢ page 27) 3 Talk/Handsfree key Flashes: incoming call; Lights up: handsfree mode activated;... -
Page 4: Understanding The Display Icons
Overview Understanding the display icons The following symbols are displayed dependent on the settings and the operating status of your telephone: Signal strength i (¢ page 16) or Eco Mode+ icon ¼ (¢ page 38) Keypad locked (¢ page 20) Ringer switched off (¢... -
Page 5: Using The Display Keys
Using the display keys Other display icons: Connection cannot be established or con- nection interrupted Establishing a connection Connection established External call (¢ page 25) Ø å Ú Internal call (¢ page 40) Ø ì Ú Ø Ü Ú Alarm call (¢ page 39) Information Query ¶... -
Page 6: Table Of Contents
Contents Gigaset C300 – your high-quality accessory ......1 Overview ............2 Understanding the display icons . - Page 7 Contents Sending SMS (text messages) ........32 Writing/sending SMS .
- Page 8 Contents Appendix ............53 Caring for your telephone .
-
Page 9: Following Safety Precautions
Following safety precautions Following safety precautions Warning Be sure to read this user guide and the safety precautions before using your telephone. Explain their content and the potential hazards associated with using the telephone to your children. Use only the power adapter supplied, as indicated on the underside of the base. Use only rechargeable batteries that correspond to the specification provided on page 53, as this could otherwise result in significant health risks and personal injury. -
Page 10: Taking The First Steps
Taking the first steps Taking the first steps Checking the package contents One Gigaset C300 base One power adapter for the base One Gigaset handset Two batteries One battery cover One phone cord One user guide If you have purchased a... -
Page 11: Setting Up The Base And Charging Cradle (If Included)
Taking the first steps Setting up the base and charging cradle (if included) The base and charging cradle are designed for use in dry rooms in a temperature range of +5°C to +45°C. ¤ Set up the base at a central point in the building on a level, non-slip surface or mount the base or charger on the wall (¢... -
Page 12: Connecting The Charging Cradle (If Included)
Taking the first steps Connecting the charging cradle (if included) ¤ Connect the flat plug from the power adapter 1. ¤ Plug the power adapter into the plug socket 2. To disconnect the plug from the charger, press the release button and disconnect the plug 4. -
Page 13: Setting Up The Handset For Use
Taking the first steps Setting up the handset for use The display is protected by a plastic film. Please remove the protective film! Inserting the battery and closing the battery cover Warning Use only rechargeable batteries recommended by Gigaset Communications GmbH (¢... - Page 14 ¤ Charge the handset in the base for 8.5 hours. 8.5 hrs Please note The handset must only be placed in the designated Gigaset C300 base or charg- ing cradle. ¤ After charging, remove the handset from the base and only replace it when the batteries are fully discharged.
-
Page 15: Changing The Display Language
Taking the first steps Changing the display language Change the display language, if you do not understand the language currently set. ¤ Press right on the control key.. ¤ Press the keys Land 4 slowly one after the other. The display for setting languages appears. English English ³... -
Page 16: Setting The Date And Time
Taking the first steps Setting the date and time Set the date and time so that the correct date and time can be assigned to incoming calls, and so that the alarm can be used. Please note Depending on your network provider, the date and time may be displayed automatically. -
Page 17: Battery Charging
Taking the first steps μ Saved The display shows Saved. You will hear a confirmation tone and the handset automatically reverts to idle status, or returns to the "Settings" menu if the setting was made via the menu. Please note If your phone receives the date and time during calling line display (e.g., via your network provider, a router or PABXs), you can specify whether this data should be copied to your phone:... -
Page 18: What Would You Like To Do Next
Taking the first steps What would you like to do next? Now that you have successfully set up your Gigaset, you can immediately start call- ing – or you can adapt it to your personal requirements. Use the following guide to quickly locate the most important functions. -
Page 19: Using The Phone
Using the phone Using the phone Using the control key In the description below, the side of the control key (up, down, right, left) which you have to press in the different operating situ- ations is marked in black, e.g., v for "press the right edge of the control key". -
Page 20: Using The Menus
Using the phone Using the menus Your telephone's functions are accessed via a menu consisting of several levels (menu overview, ¢ page 23). Main menu (first menu level) ¤ With the handset in idle status, press the display key §Menu§ or right on the control key v to open the main menu. -
Page 21: Activating/Deactivating The Handset
Using the phone Activating/deactivating the handset In idle status, press and hold the end call key (confirmation tone). Activating/deactivating keypad lock Keypad lock prevents any inadvertent use of the phone. In idle status, press and hold the hash key (confirmation tone). The keypad lock is switched on or off. -
Page 22: Understanding The Operating Steps
Using the phone Understanding the operating steps The operating steps are shown in abbreviated form, for example: ¤ Settings ¤ Eco Mode (³ = on) §Menu§ ¤ This means you should proceed as follows: ¤ Press the key below §Menu§ on the dis- Redial Menu... - Page 23 Using the phone ... until the Eco Mode menu item Eco Mode ³ appears. ¤ Press the key below Back §OK§ on the display screen to switch the function on or off (³ = on). ¤ Press the key below §Back§...
-
Page 24: Menu Overview
Menu overview Menu overview The menu entries are partially subdivided. The page numbers refer to the rel- evant description in the user guide. §Menu§ To open the main menu: press the display key when the phone is in idle mode. Ë... - Page 25 Menu overview Ï Settings ¢ page 15 Date/Time ¢ page 43 Audio Settings Call Volume ¢ page 43 Ringer Volume ¢ page 43 Advisory Tones ¢ page 43 Battery Low ¢ page 43 Ringtones (Handset) ¢ page 42 Display Screensaver ¢...
-
Page 26: Number (Or Name) Of Caller
Making calls Making calls Using Calling Line Identification When the display backlight is switched off (¢ page 42), pressing any key will activate When you receive a call, the caller's number the backlight. The relevant key function is is displayed on the screen, if the following performed. -
Page 27: Notes On Calling Line Display (Clip)
Making calls Notes on calling line display Have you ordered the calling line display service from your network (CLIP) provider? ¤ Check whether your provider supports By default, the number of the caller is shown calling line display (CLIP) and that the in the display of your Gigaset telephone. -
Page 28: Switching To Mute
Making calls Switching to mute Saving preselection numbers ¤ Settings ¤ Telephony §Menu§ You can deactivate your handset's micro- ¤ Preselection ¤ Preselection Number phone during a call. Enter or change the preselec- Press right on the control key to tion number (call-by-call mute the handset. -
Page 29: Using The Directory And Lists
Using the directory and lists Using the directory and Saving a number in the directory s ¤ ¤ New Entry §Menu§ lists §OK§ Enter the number and press §OK§ Enter the name and press The options are: u Directory Order of directory entries u Redial list u Incoming message list Directory entries are generally sorted alpha-... - Page 30 Using the directory and lists Managing directory entries Using shortcut keys s ¤ s (Select entry) You can assign directory entries to the keys Q and 2– O: §Menu§ Press the display key. s ¤ q (select entry) ¤ ¤ Shortcut §Menu§...
-
Page 31: Using The Redial List
Using the directory and lists Copying the displayed number to Delete Entry Delete selected entry. the directory Delete List You can copy numbers displayed in a list, Delete all entries in the redial list. e.g., the call list or redial list, to the directory. A number is displayed: Opening lists with the ¤... -
Page 32: Using The Incoming Message List
Using the directory and lists The list is displayed with the number of new List entry entries (1) and the number of old, read Example of list entries: entries (2) (example): New Call 1234567890 Calls List: 28.06.10 08:34 02+03 Back Menu Back Select a list with q. -
Page 33: Sending Sms (Text Messages)
Sending SMS (text messages) §OK§ Sending SMS Press the display key. The SMS is sent. (text messages) Please note u If you are interrupted by an external Your phone is delivered ready to send SMS call while writing an SMS, the text is messages immediately. -
Page 34: Receiving An Sms
Sending SMS (text messages) Or delete the SMS with ¤ Delete Entry ¤ §Menu§ §OK§ §OK§ Mute the first ring. Writing/changing an SMS Incoming list ¤ You are reading an SMS in the outgoing list. The incoming list contains: u All received SMS messages, starting with §Menu§... -
Page 35: Setting Sms Centres
Sending SMS (text messages) Reading or deleting SMS messages Copying the number to the directory ¤ Open the incoming list, then: Select SMS. Copying the sender's number ¤ Read SMS ¤ Open the incoming list and select the §Menu§ §OK§ Select and press to read the SMS (¢... -
Page 36: Receiving Sms Messages On A Pabx
Sending SMS (text messages) You have the following options: Activating/deactivating SMS Active Send Srvc. Cent. function If SMS messages are to be sent via this §OK§ SMS centre, press to activate the SMS ³ If you deactivate the SMS function, you can- centre ( = on). -
Page 37: Troubleshooting Sms Problems
Sending SMS (text messages) Troubleshooting SMS The SMS is played back. problems 1. The "display call number" feature is not acti- vated. ¥ Ask your service provider to activate this Error codes when sending function (chargeable). 2. No agreement is in place between your E0 Calling Line Identification permanently mobile phone operator and your fixed line restricted (CLIR) or Calling Line Identification... -
Page 38: Using The Network Mailbox
(¢ page 30). Gigaset C300 base. If you have registered your handset to a different base, such as Please note the Gigaset C300A, please refer to your Enter the network mailbox phone base user guide. -
Page 39: Eco Dect
ECO DECT ECO DECT Status displays Screen icon You are helping to protect the environment Reception strength: with your Gigaset. Ð i Ñ Ò – good to poor Reducing energy consumption (flashes) – no reception Ð white Eco Mode deactivated Your telephone has a power-saving adapter Ð... -
Page 40: Using The Handset As An Alarm Clock
§Menu§ = on) Registering the Gigaset handset After you activate the alarm clock, the menu with the Gigaset C300 for setting the wake up time opens automat- You must manually register the handset on ically. The ¼ icon and wake up time are shown on both the handset (1) and the base (2). -
Page 41: De-Registering Handsets
Using multiple handsets Registering other handsets Changing the base You can manually register other Gigaset If your handset is registered to more than handsets and handsets for other devices one base, you can set it to a particular base with GAP functionality as follows. or to the base that has the best reception (Best Base). -
Page 42: Listening In To An External Call (Conference)
Using multiple handsets The external participant hears Activating/deactivating listening music on hold, if activated (¢ page 45). ¤ Settings ¤ Telephony §Menu§ Select a handset or Call All and ¤ Listening in §OK§ press §OK§ Press to activate/deactivate the function ³... -
Page 43: Handset Settings
Handset settings Handset settings The screensaver is not displayed in cer- tain situations, e.g., during a call or if the handset is de-registered. Your handset is preset, but you can change To show the display in idle status, briefly press end call key a. the settings to suit your individual require- ments. -
Page 44: Changing The Handsfree/Earpiece Volume
Handset settings Changing the handsfree/ Setting the ringer volume earpiece volume The ringer volume is the same for all types of ring. You can set the volume for handsfree mode In idle status: t ¤ Ringer Volume and earpiece mode to five different levels. In idle status: t ¤... -
Page 45: Restoring The Handset Default Settings
Handset settings Settings Activating deactivating advisory Ringer off from: / Ringer off until: tones/battery low tone Enter time in 4-digit format. Your handset uses advisory tones to tell you Please note about different activities and statuses. These During this period, you will con- can be activated and deactivated independ- tinue to receive calls from num- ently of each other:... -
Page 46: Base Station Settings
Base station settings Base station settings After activating or deactivating the repeater, switch your handset off and on again (¢ page 20). The base settings are carried out using a reg- istered Gigaset handset. Please note u Eco Mode / Eco Mode+ (¢ page 38) Changing ringtones and repeater support cancel each u Volume:... -
Page 47: Resetting System Pin
Base station settings Resetting the system PIN If you have forgotten your system PIN, you can reset the base to the original code 0000: Disconnect the power cable from the base. Hold down the registration/paging key on the base while reconnecting the power cable to the base. -
Page 48: Connecting The Base To The Pabx
Connecting the base to the PABX Connecting the base to 0 = 80 ms; 1 = 100 ms; 2 = 120 ms; 3 = 400 ms; 4 = 250 ms; 5 = 300 ms; the PABX 6 = 600 ms; 7 = 800 ms Setting pauses The following settings are only necessary if your PABX requires them;... -
Page 49: Customer Service & Assistance
Customer Service & Assistance You have questions? As a Gigaset customer, you can take advantage of our comprehensive serv- ice offerings. You can find help quickly in this User Manual and in the service pages of our Gigaset online portal. Please register your phone right after purchase on www.gigaset.com/gr/service thus enabling us to provide you even with better service in case of questions or in case of a war- ranty claim. -
Page 50: Questions And Answers
Questions and answers You cannot hear a ringer/dialling tone from the fixed line network. If you have any queries about the use of The phone cord supplied has not been used or has been replaced by a new cord with the wrong your telephone, visit our website at pin connections. -
Page 51: Authorisation
Authorisation You hear an error tone when keying an input. Action has failed/invalid input. ¥ Repeat the process. This device is designed for the analogic tele- phone connection in the greek telephone Watch the display and refer to the user guide if necessary. -
Page 52: Guarantee Certificate
Guarantee Certificate 3.Stock, Modecenterstraße 17, 1110 Vienna, Austria. u Any claims that differ from or extend Without prejudice to any claim the user (cus- tomer) may have in relation to the dealer, the beyond these mentioned in this manu- customer shall be granted a manufacturer's facturer’s warranty shall be excluded, Guarantee under the conditions set out except from cases expressly specified in... -
Page 53: Protecting Our Environment
Protecting our environment Protecting our Ecological energy consumption The use of ECO DECT (¢ page 38) saves environment energy and makes an active contribution towards protecting the environment. Our environmental mission Disposal statement Batteries should not be disposed of in gen- We, Gigaset Communications GmbH, bear eral household waste. -
Page 54: Appendix
Appendix Appendix Specifications Batteries Caring for your telephone Technology: Nickel-metal-hydride (NiMH) Wipe the unit with a damp cloth or an anti- static cloth. Do not use solvents or microfi- Size: AAA (Micro, HR03) bre cloths. Voltage: 1.2 V Never use a dry cloth. This can cause static. Capacity: 550 - 1000 mAh The device is supplied with two approved... -
Page 55: Writing And Editing Text
Appendix Base power consumption Pin connections on the telephone jack C300 C300A In standby mode* approx. approx. 1 unused 0.7 W 0.7 W 2 unused Base in standby mode ** < 0.4 W < 0.4 W During a call approx. approx. - Page 56 Appendix Writing an SMS/names Greek ¤ Enter the individual letters/characters by 1x 2x 3x 4x 5x 6x 7x 8x 9x 10x 11x 12x 13x14x pressing the corresponding key. 1 € £ $ The characters assigned to the key are α β ά 2 a b c shown in a selection line at the bottom left δ...
-
Page 57: Accessories
Accessories Accessories Gigaset handsets Upgrade your Gigaset to a cordless PABX: Gigaset C300H handset u Hear whom the call is for with VIP ringtones u High-quality keypad with illumination u 1.7" CSTN colour display u Directory for up to 250 entries u Talk/standby time of up to 19 h/340 h, standard batteries u Brilliant sound quality in handsfree mode... - Page 58 Accessories Gigaset S79H handset u Brilliant sound quality in handsfree mode u High-quality genuine metal keypad with illumination u Plus/minus key for simple volume control u 1.8" TFT colour display u Mini USB u Directory for up to 500 vCards u Talk/standby time of up to 13 h/180 h, standard batteries u Large font for call lists and directory...
- Page 59 Accessories Gigaset SL78H handset u Real metal frame u Modern keypad with high-quality illumination u 2.2" TFT QVGA colour display u Bluetooth® and mini USB u Directory for up to 500 vCards u Talk/standby time of up to 14 h/200 h u Brilliant sound quality in handsfree mode u Caller pictures, slide show and screensaver (analogue and digital clock)
-
Page 60: Mounting The Base On The Wall
Mounting the base on the wall Mounting the base on the wall 30 mm Approx. 7 mm Mounting the charger on the wall 21.6 mm Approx. 1.3 mm... -
Page 61: Index
Index Index Call waiting ......internal call ......Call-by-call Calling . - Page 62 Index saving entry ......list ........
- Page 63 Index star key ......Number ......
- Page 64 Index Ringer ......changing ......Talk key .