Advertisement
Table of Contents
- 1 Important Safety Information
- 2 General Power Tool Safety Warnings
- 3 Specifications
- 4 Instructions for Putting into Use
- 5 Operating Instructions
- 6 Maintenance and Servicing
- 7 Troubleshooting
- 8 Please Read the Following Carefully
- 9 Parts List
- 10 Assembly Diagram
- 11 Limited 90-Day Warranty
- Download this manual
INSPECTION CAMERA 2.4" lCd
SET uP ANd OPERATINg INSTRuCTIONS
Visit our website at: http://www.harborfreight.com
Read this material before using this product.
Failure to do so can result in serious injury.
SAVE ThIS MANuAl.
©
Copyright
2008 by Harbor Freight Tools
contained herein may be reproduced in any shape or form without the express written consent of
Harbor Freight Tools. Diagrams within this manual may not be drawn proportionally. Due to continuing
improvements, actual product may differ slightly from the product described herein. Tools required for
assembly and service may not be included.
For technical questions or replacement parts, please call 1-800-444-3353.
Revised Manual 09k
66550
®
. All rights reserved. No portion of this manual or any artwork
Advertisement
Table of Contents

Related Manuals for CEN-TECH CEN - TECH 66550


Summary of Contents for CEN-TECH CEN - TECH 66550
- Page 1 Harbor Freight Tools. Diagrams within this manual may not be drawn proportionally. Due to continuing improvements, actual product may differ slightly from the product described herein. Tools required for assembly and service may not be included.
-
Page 2: Important Safety Information
SAVE ThIS MANuAl Keep this manual for the safety warn- ings and precautions, assembly, operat- ing, inspection, maintenance and cleaning procedures. Write the product’s serial number in the back of the manual near the assembly diagram (or month and year of purchase if product has no number). - Page 3 ranges and refrigerators. There is an increased risk of electric shock if your body is grounded. do not expose power tools to rain or wet conditions. Water entering a power tool will increase the risk of electric shock. Personal safety Stay alert, watch what you are do- ing and use common sense when operating a power tool.
- Page 4 Maintain labels and nameplates on the Camera. These carry important safety information. If unreadable or missing, contact Harbor Freight Tools for a replacement. Avoid unintentional starting. Prepare to begin work before turning on the Camera.
- Page 5 cause cancer, and birth defects or other reproductive harm. Wash hands after handling. (California Health & Safety Code § 25249.5, et seq.) The warnings, precautions, and in- structions discussed in this instruction manual cannot cover all possible con- ditions and situations that may occur. It must be understood by the operator that common sense and caution are factors which cannot be built into this...
-
Page 6: Specifications
SPECIFICATIONS CAMERA 704x576 (PAL); Total Pixels 712x486 (NTSC) Modulation Type Bandwidth 18MHz Power Supply 4 AA batteries MONITOR LCD Screen Type 2.36”TFT-LCD Effective Pixels 480x240 Electrical Input 8-24 VDC / 450mA Adapter Input 120 V~ / 60 Hz Operating Temperature +14°F~+122°F Operating Humidity 15~85%RH uNPACKINg... -
Page 7: Operating Instructions
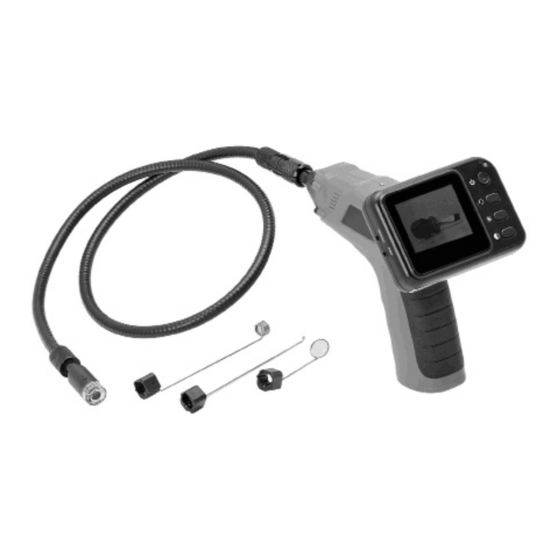
Slide knurled knob on Control Handle up to threaded section on Camera cable and finger tighten to secure Camera cable in place. To attach Hook (4), Magnet (5), or Mirror (6) to Camera (2), open hinged sleeve on accessory and clip in place over indented section near camera. - Page 8 power light on top of Control Handle will be lit. Use this dial to adjust the brightness of LEDs near Camera. Slide ON/OFF switch on right side of Monitor (3) to “ON” position. Press the POWER button on Monitor. Power Light on Monitor will be green and Monitor will display live camera image.
-
Page 9: Maintenance And Servicing
MAINTENANCE ANd SERVICINg Procedures not specifically explained in this manual must be performed only by a qualified technician. TO PREVENT INjuRY FROM ACCIdENTAl OPERATION: Turn the Power Switch of the Monitor to its “OFF” position and unplug the adaptor from its electrical outlet before performing any inspection, maintenance, or cleaning... -
Page 10: Troubleshooting
Problem Possible Causes Tool will not start. Monitor not charged. Batteries need changing. Monitor will not Cable not attached properly. charge. Adapter not connected to power. Image too dark or LEDs near camera need light. adjustment. Monitor display needs adjustment. Follow all safety precautions whenever diagnosing or servicing the tool. -
Page 11: Parts List
Part Record Product’s Serial Number here: Note: If product has no serial number, record month and year of purchase instead. Note: Some parts are listed and shown for illustration purposes only, and are not avail- able individually as replacement parts. SKU 66550 For technical questions, please call 1-800-444-3353. -
Page 12: Limited 90-Day Warranty
90 dAY WARRANTY Harbor Freight Tools Co. makes every effort to assure that its products meet high quality and durability standards, and warrants to the original purchaser that this product is free from defects in materials and workmanship for the period of 90 days from the date of purchase.