Table of Contents
Advertisement
Quick Links
CTN464*B Series
Induction Hob
user manual
This manual is made with 100% recycled paper.
imagine
the possibilities
ENGLISH
Thank you for purchasing this Samsung product.
To receive more complete service, please register
your product at
www.samsung.com/register
CTN464FB01_XSA_DG68-00347A_EN.indd 1
2011-06-07
6:51:54
Advertisement
Table of Contents

Related Manuals for Samsung CTN464 Series


Summary of Contents for Samsung CTN464 Series
- Page 1 CTN464*B Series Induction Hob user manual This manual is made with 100% recycled paper. imagine the possibilities ENGLISH Thank you for purchasing this Samsung product. To receive more complete service, please register your product at www.samsung.com/register CTN464FB01_XSA_DG68-00347A_EN.indd 1 2011-06-07 6:51:54...
-
Page 2: Using This Manual
using this manual Please take the time to read this owner’s manual, paying particular attention to the safety information contained in the following section, before using your appliance. Keep this manual for future reference. If transferring ownership of the appliance, please remember to pass the manual on to the new owner. -
Page 3: Safety Instructions
safety instructions The safety aspects of this appliance comply with all accepted technical and safety standards. However, as manufacturers we also believe it is our responsibility to familiarize you with the following safety instructions. ELECTRICAL SAFETY WARNING Be sure the appliance is properly installed and grounded by a qualified technician. The appliance should be serviced only by qualified service personnel. -
Page 4: Safety During Use
SAFETY DURING USE WARNING This appliance is to be used only for normal cooking and frying in the home. It is not designed for commercial or industrial use. Never use the hob for heating the room. Take care when plugging electrical appliances into mains sockets near the hob. Mains leads must not come into contact with the hob. - Page 5 SEVERE WARNING SIGNS FOR INSTALLATION WARNING The installation of this appliance must be performed by a qualified hob service technician trained by the manufacturer. Please see the section “Installing your Hob”. Plug the power cord into the proper wall socket or higher and use the socket for this appliance only.
- Page 6 Plug the power plug into the wall socket in the right direction so that the cord runs towards the floor. - If you plug the power plug into the socket in the opposite direction, the electric wires within the cable may be damaged and this may result in electric shock or fire. Plug the power plug into the wall socket firmly.
- Page 7 The appliance is not intended for use by persons (including children) with reduced physical, sensory or mental capabilities, or lack of experience and knowledge, unless they have been given supervision or instruction concerning use of the appliance by a person responsible for their safety.
- Page 8 Do not insert fingers, foreign substances or metal objects such as pins or needles into the inlet, outlet, and holes. If foreign substances are inserted into any of these holes, unplug the power plug from the wall socket and contact your product provider or nearest service centre. - Failure to do so may result in electric shock or injury.
- Page 9 Small amounts of food require shorter cooking or heating time. If normal times are allowed they may overheat and burn. Children should be supervised to ensure that they do not play with the appliance. Any spillage should be removed from the lid before opening and the hob surface should be allowed to cool before closing the lid (Model which has lid only).
-
Page 10: Disposal Instructions
CAUTION SIGNS FOR CLEANING WARNING The hob should be cleaned regularly and any food deposits removed. Failure to maintain the hob in a clean condition could lead to deterioration of the surface that could adversely affect the life of the appliance and possibly result in a hazardous situation. Take care not to hurt yourself when cleaning the appliance (external/internal). -
Page 11: Table Of Contents
contents INSTALLING THE HOB Regulations and compliance Safety instructions for the installer Connecting to the mains power supply Installing into the countertop PARTS AND FEATURES Cooking zones Control panel Components Induction heating The key features of your appliance Safety shutoff Residual heat indicator Temperature detection BEFORE YOU BEGIN... -
Page 12: Installing The Hob
installing the hob Be sure the new appliance is installed and grounded only by qualified personnel. Please observe this instruction. The warranty will not cover any damage that may WARNING occur as a result of improper installation. Technical data is provided at the end of this manual. REGULATIONS AND COMPLIANCE This appliance meets the following standards: •... -
Page 13: Connecting To The Mains Power Supply
CONNECTING TO THE MAINS POWER SUPPLY Before connecting, check that the nominal voltage of the appliance, that is, the voltage stated on the rating plate, corresponds to the available supply voltage. The rating plate is located on the lower casing of the hob. Shut off power to circuit before connecting wires to circuit. -
Page 14: Installing Into The Countertop
INSTALLING INTO THE COUNTERTOP Make a note of the serial number on the appliance rating plate prior to installation. This number will be required in the case of requests for service and is no longer accessible after installation, as it is on the original rating plate on the underside of the appliance. - Page 15 90 ° x 4 ø 2 ±1 installing the hob _15 CTN464FB01_XSA_DG68-00347A_EN.indd 15 2011-06-07 6:51:57...
-
Page 16: Parts And Features
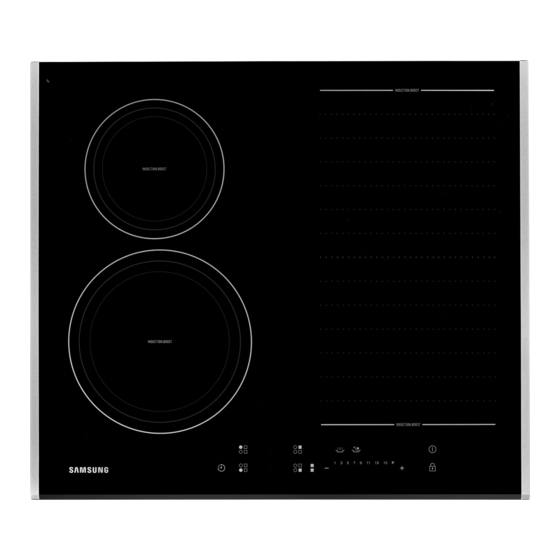
parts and features COOKING ZONES 1. Induction cooking zone 1400 W with Power Boost 2000 W 2. Induction cooking zone 1800 W with Power Boost 2600 W 3. Induction cooking zone 2200 W with Power Boost 3200 W 4. Induction cooking zone 1800 W with Power Boost 2600 W 5. -
Page 17: Components
COMPONENTS Induction hob Installation brackets Screws INDUCTION HEATING • The Principle of Induction Heating: When you place your cookware on a cooking zone and you turn it on, the electronic circuits in your induction hob produce “induced currents” in the bottom of the cookware which instantly raise cookware’s temperature. -
Page 18: The Key Features Of Your Appliance
THE KEY FEATURES OF YOUR APPLIANCE • Ceramic glass cooking surface : The appliance has a ceramic glass cooking surface and four rapid - response cooking zones. • Touch control sensors : Your appliance is operated using touch control sensors. •... -
Page 19: Safety Shutoff
SAFETY SHUTOFF If one of the cooking zones is not switched off or the heat setting is not adjusted after an extended period of time, that particular cooking zone will automatically switch itself off. Any residual warmth will be indicated with (for “hot”) in the digital displays corresponding to the particular cooking zones. -
Page 20: Temperature Detection
TEMPERATURE DETECTION If for any reason the temperatures on any of the cooking zones were to exceed the safety levels, should this happen then the cooking zone will automatically reduce to a lower power level. When you have finished using the hob, the cooling fan will continue to run until the hob’s electronics has cooled down. -
Page 21: Suitability Test
SUITABILITY TEST Cookware is suitable for induction cooking, if a magnet sticks to the bottom of the cookware and cookware is labelled as suitable by the cookware manufacturer. SIZE OF PANS Induction cooking zones adapt automatically to the size of the bottom of the cookware up to a cerain limit. -
Page 22: Using Suitable Cookware
USING SUITABLE COOKWARE Better pans produce better results. • You can recognise good pans by their bases. The base should be as thick and flat as possible. • When buying new pans, pay particular attention to the diameter of the base. Manufacturers often give only the diameter of the upper rim. -
Page 23: Switching The Appliance On
SWITCHING THE APPLIANCE ON 1. Touch the Lock control sensor for approximately 3 seconds. 2. The appliance is switched on using the On/Off approx control 1 sec. sensor. Touch the On/Off control sensor for 1 second. The digital displays will show After the On/Off control sensor has been actuated to switch on your appliance, a heat setting must be selected within approximately 10... -
Page 24: Switching A Cooking Zone Off
SWITCHING A COOKING ZONE OFF To switch off a cooking zone, return the setting to control sensor. by using the control panel’s To switch off more quickly, touch the corresponding cooking zone’s key twice. USING THE CHILD SAFETY LOCK You can use the child safety lock to safeguard against unintentionally turning on a cooking zone and activating the cooking surface. -
Page 25: Timer
TIMER There are two ways to use the timer: Using the timer as a safety shutoff: If a specific time is set for a cooking zone, the cooking zone will shut itself off once this period of time has elapsed. This function can be used for multiple cooking zones simultaneously. -
Page 26: Power Boost Control
Countdown timer For the countdown timer to be used, the appliance must be switched on but all the cooking zones must be switched off. 1. Touch the Timer control sensor. will appear in the timer display. 2. Set the desired period of time using the Timer setting selectors ( The countdown timer function is now activated and the remaining time appears in the timer display. -
Page 27: Water Boiling
WATER BOILING 1. Touch the corresponding cooking zone’s key. 2. Touch the Water boiling sensor. 3. Set the desired power level which will be used after water boiling. After water boiling, the cooking zone will automatically reduce to this power level and an acoustic signal sounds. -
Page 28: Suggested Settings For Cooking Specific Foods
SUGGESTED SETTINGS FOR COOKING SPECIFIC FOODS The figures in the table below are guidelines. The heat settings required for various cooking methods depend on a number of variables, including the quality of the cookware being used and the type and amount of food being cooked. Switch Setting Cookingmethod Examples for Use... -
Page 29: Cleaning And Care
cleaning and care Cleaning agents must not come into contact with a heated ceramic glass surface: All cleaning agents must be removed with adequate amounts of clean water after WARNING cleaning because they can have a caustic effect when the surface becomes hot. Do not use any aggressive cleaners such as grill or oven sprays, scouring pads or abrasive pan cleaners. -
Page 30: Hob Frame (Option)
Problem Dirt 1. Remove burnt-on sugar, melted plastic, aluminium foil or other materials with a glass scraper immediately and while still hot. There is a risk of burning yourself when the glass scraper is used on a hot cooking zone: WARNING 2. -
Page 31: Warranty And Service
warranty and service FAQS AND TROUBLESHOOTING A fault may result from a minor error that you can correct yourself with the help of the following instructions. Do not attempt any further repairs if the following instructions do not help in each specific case. Repairs to the appliance are to be performed only by a qualified service technician. -
Page 32: Service
What should I do if the display is illuminated? Check for the following: • The hob is overheated because of abnormal operation. • After hob is cooled down, press the “On/Off” control sensor for resetting. What should I do if the display is illuminated? Check for the following: •... -
Page 33: Technical Data
technical data TECHNICAL DATA Width 575 mm Depth Appliance dimensions 505 mm Height 56 mm Width 560 mm Depth Worktop cut - out dimensions 490 mm Corner radius 3 mm Connection voltage 220 - 240 V ~ 50 / 60 Hz Maximum connected load power 7.2 kW 11.3 kg... - Page 34 note CTN464FB01_XSA_DG68-00347A_EN.indd 34 2011-06-07 6:52:02...
- Page 35 note CTN464FB01_XSA_DG68-00347A_EN.indd 35 2011-06-07 6:52:02...
- Page 36 QUESTIONS OR COMMENTS COUNTRY CALL OR VISIT US ONLINE AT 1300-362-603 AUSTRALIA NEW ZEALAND 0800-SAMSUNG (0800-726-786) www.samsung.com CHINA 400-810-5858 www.samsung.com/hk HONG KONG (852) 3698-4698 www.samsung.com/hk_en/ 3030-8282 INDIA 1800-3000-8282 0800-112-8888 INDONESIA 021-5699-7777 JAPAN 0120-327-527 MALAYSIA 1800-88-9999 1-800-10-SAMSUNG (726-7864) 1-800-3-SAMSUNG (726-7864) www.samsung.com...