Table of Contents
Advertisement
Advertisement
Table of Contents

Related Manuals for Kompernass LERVIA KH 4000

Summary of Contents for Kompernass LERVIA KH 4000
- Page 1 KH4000 Automatic Free-Arm Sewing Machine Operating instructions...
-
Page 4: Table Of Contents
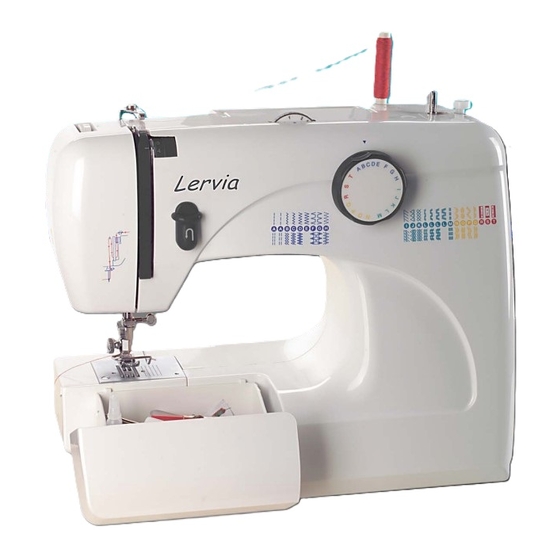
Lervia KH 4000 Lervia Automatic Free-Arm Sewing Machine 1. Intended Use 11. Sewing To place the material 2. Technical data To start a seam 3. Package contents To finish off a seam Guiding the material 4. Operating elements Changing the sewing direction 5. -
Page 5: Lervia Automatic Free-Arm Sewing Machine
Lervia KH 4000 Operating instructions 3. Package contents Lervia Automatic Free-Arm Sewing Machine (see front fold-out page) ● 1 sewing machine 1 blind hem foot 1. Intended Use 1 seam guide 1 zipper foot The sewing machine is intended ... -
Page 6: Safety Instructions
Lervia KH 4000 Safety instructions Warning against injuries and material damages: Like any other electrical device, a sewing machine can cause serious, even life-threatening According to legislation, you as the user of injuries. To avoid this, and in order to work... -
Page 7: Setting Up
Lervia KH 4000 6. Setting up • Place the sewing machine on a stabile table. • Plug the foot switch into the connection socket of the machine and ... • insert the plug into the wall socket. If the worktop is not completely even, you can compensate for slight unevenness as follows: •... -
Page 8: Threading
Lervia KH 4000 8. Threading Warning: Make sure that the sewing mahine is switched off and the plug has been pulled out of the socket when threading in order to avoid injury if the sewing machine should be accidentally switched on. -
Page 9: B) Threading The Lower Thread
Lervia KH 4000 b) Threading the lower thread Turn the handwheel in an anti-clockwise direction to fully raise the needle. • Pull the box compartment off to the side, it is only slid on, not firmly attached. “ • Then open the gripper flap situated behind it. - Page 10 Lervia KH 4000 • Unwind approximately 10 cm of thread from the spool and slide this into the bobbin case so that the spool unwinds anti-clockwise. • Pull the unwound end of the thread through the gap in the side wall of the bobbin case ...
- Page 11 Lervia KH 4000 • Put the bobbin case back on the pin and ... ” • turn the bobbin case until the driver catches in the notch. • Lay the excess thread such that it does not bind anywhere ...
-
Page 12: C) Threading The Upper Thread
Lervia KH 4000 19 a 19 b c) Threading the upper thread To pass in the upper thread, it is not necessary • You can place a felt pad underneath the to open the front of the sewing machine. The spool of thread, so that the bobbin runs illustration is for guidance only. -
Page 13: D) Retrieving The Lower Thread
Lervia KH 4000 d) Retrieving the lower thread • Turn the handwheel in an anti-clockwise direction to fully raise the needle. • Use the foot lever to raise the needle retainer • With the left hand, firmly hold the end of the upper thread that comes through the eye of the needle. -
Page 14: Attaching Accessories
Lervia KH 4000 9. Attaching accessories Warning: Make sure that the sewing machine is switched off and the plug has been pulled out of the sok- ket to prevent accidents caused by un-intentional switching on. a) Changing needles • Turn the handwheel... -
Page 15: C) Changing The Snap-On Foot
Lervia KH 4000 c) Changing the snap-on foot With the sewing machine you are provided with four snap-on-feet, which you can simply use as required: blind hem foot zipper foot buttonhole foot button foot To change the snap-on foot: • Turn the handwheel in an anti-clockwise direction to fully raise the needle. -
Page 16: Settings
Lervia KH 4000 10. Settings The tension of the upper and lower thread is set correctly if the twining of the two threads cannot be seen on the top or bottom sides of the material after sewing. If even one of the two tensions is not set cor- rectly, an unclean seam will result. -
Page 17: C) Setting The Presser Foot Pressure
Lervia KH 4000 c) Setting the presser foot pressure Here you can set the pressure with which the material is pressed onto the stitch plate. • Now set the contact pressure on the selector wheel "0" if no pressure is to be applied, for... -
Page 18: Sewing
Lervia KH 4000 11. Sewing If you have placed the thread and everything is set correctly, as described in the previous - chapters: a) To place the material • Turn the handwheel in an anti-clockwise direction to fully raise the needle. -
Page 19: D) Guiding The Material
Lervia KH 4000 d) Guiding the material • Only guide normal materials as shown in the diagram. Avoid pulling it, as this can cause the needle to bend or break. • Very fine materials pull inward slightly during sewing. To prevent this, lay a thin paper under the material and sew this in with the material. -
Page 20: F) Selecting A Stitch Pattern
Lervia KH 4000 f) Selecting a stitch pattern To select a particular pattern, take the following steps: • Select the stitch pattern with the stitch pattern selector • Select the stitch length by means of the selector wheel. • Select the stitch width by means of the selector wheel •... -
Page 21: I) Stitch Pattern Table
Lervia KH 4000 i) Stitch pattern table Stitch pattern Stitch length Sewing foot Stitch width Straight stitch Zigzag Blind stitch Blind hem Three-step zigzag stitch Slant over edge stitch Single overlock stitch Honeycomb stitch 3-fold zigzag Stretch straight stitch Shell stitch... -
Page 22: J) Blind Hem
Lervia KH 4000 j) Blind hem • Fold the material as shown. Make the fold as wide as you want the finished seam to be: The lower fold should be inset by about 5 mm. • Use the blind hem foot . -
Page 23: K) Material-Thread-Needle Table
Lervia KH 4000 k) Material-Thread-Needle Table Please refer to the details for the various materials. Presser foot Material Thread Needle Stitch length Upper thread tension pressure Straight See p. 16 stitch Stitch length selection Cotton Light Nylon Man-made Cotton fibre... -
Page 24: L) Seam Guide
Lervia KH 4000 l) Seam guide • Use the seam guide for sewing longer hems or seams that should have an even distance to the edge of the material. • Screw the seam guide into the threaded hole on the right of the stitch plate Set the desired seam width, then tighten the knurled screw. -
Page 25: O) Sewing Buttonholes
Lervia KH 4000 o) Sewing buttonholes • Attach the buttonhole foot , as described in Chapter 9. • Refer to the table for: - the required stitch length - the required stitch pattern - the required method for sewing. • When finished, you can cut the buttonhole in the middle, as shown. -
Page 26: Q) Sewing On Buttons
Lervia KH 4000 q) Sewing on buttons • Attach the button foot and ... • place the darning plate on the existing zigzag stitch plate, as described in Chapter 9. • Lay the button between the button foot and the material and lower the button foot down. -
Page 27: T) Sewing A Zipper
Lervia KH 4000 t) Sewing a zipper Using the zipper foot you can sew along the right and left-hand edges of the zipper without damaging the zipper or the needle. The zipper foot is also useful for sewing edges or parallel seams. -
Page 28: U) Sewing With The Twin Needle
Lervia KH 4000 u) Sewing with the twin needle • Insert the twin needle with the flat side toward the back. • Thread the thread as for normal sewing. Both threads are threaded together through the guides – up to the twin needle. -
Page 29: Care
Lervia KH 4000 12. Care After each use, remove any pieces of thread, material, and fluff. Only in this way will you ensure that the sewing machine continues to work correctly and lasts for a long time. Warning: Make sure that the sewing machine is switched off and the plug has been pulled out of the “... -
Page 30: C) Clean The Casing
Lervia KH 4000 c) Clean the casing Danger!: Never open any parts of the machine casing ” other than those described in this manual. There are no operating elements inside. Otherwise there is a risk of injury and potentially life-threatening accidents. -
Page 31: F) Storing
Lervia KH 4000 13. Troubleshooting f) Storing Keep the sewing machine ... at a dry location so that no rust forms on If something is not working, you can use the the metal mechanical parts, table below to try and correct the fault. If you... -
Page 32: Warranty And Service
Lervia KH 4000 The bulb no longer lights? If the bulb is burned out, replace it with an identical one purchsed from a specialised dealer. The designation is "15W - E14". • Use the supplied screwdriver to loosen the screw on the front side of the front cover •... - Page 33 Lervia KH 4000 - 32 -...
- Page 34 ID Nr.: KH4000-05/05-V4 Kompernaß GmbH Burgstrasse 21 · D-44867 Bochum www.kompernass.com...