Advertisement
Quick Links
Congratualtions on choosing an Ariston appliance, which you will find is dependable and easy to use. We recommend
that you read this manual for best performance and to extend the life of your appliance. Thank you.
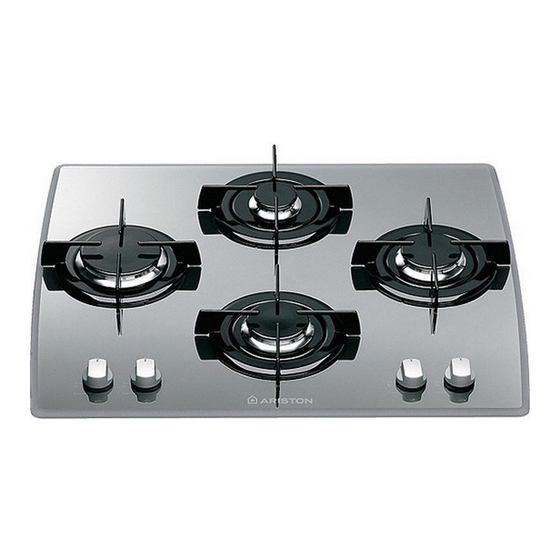
A. Gas Burners
B. Support Grid for Cookware
C. Control Knobs for Gas Burners
D. Ignitor for Gas Burners (only on certain models)
F. Safety Device (only on certain models) - Activates if
the flame accidentally goes out (spills, drafts, etc.),
interrupting the delivery of gas to the burner.
The position of the corresponding gas burner is indicated
on each control knob.
Gas Burners
The burners differ in size and power. Choose the most
appropriate one for the diameter of the cookware being
used.
The burner can be regulated with the corresonding control
knob by using one of the following settings:
• Off
High
Low
To turn on one of the burners, place a lighted match or
lighter near the burner, press the knob all the way in and
turn in the counter-clockwise direction to the "High" setting.
On those models fitted with a safety device (F), the
knob must be pressed in for about 6 seconds until the
device that keeps the flame lighted warms up.
Close-up View
How To Use Your Appliance
2
On those models fitted with an ignitor (D), to light a
burner, simply press the corresponding knob all the way
in and then turn it in the counter-clockwise direction to the
"High" setting, keeping it pressed in until the burner lights.
Caution: If the burner accidently goes out, turn off the
gas with the control knob and try to light it again after
waiting at least 1 minute.
To turn off a burner, turn the knob in the clockwise
direction until it stops (it should be on the "•" setting).
Advertisement

Summary of Contents for Ariston CISTD 640 Series
- Page 1 Congratualtions on choosing an Ariston appliance, which you will find is dependable and easy to use. We recommend that you read this manual for best performance and to extend the life of your appliance. Thank you. Close-up View A. Gas Burners B.
-
Page 2: Practical Advice
How to Keep Your Cooktop in Shape Before cleaning or performing maintenance on your Clean the cooking surface when it is still warm with a appliance, disconnect it from the electrical power supply. suitable cleaning product, then rub with a damp cloth To extend the life of the cooktop, it is absolutely and dry. -
Page 3: Is There A Problem
Is there a problem? It may occur that the cooktop does not function or does The burner does not remain on when set to "Low". not function properly. Before calling customer service for Check to make sure that: assistance, lets see what can be done. •... - Page 4 It is recommended that you follow the guidelines When not in use, disconnect the appliance from the below: power supply and turn off the gas valve (if present); Only use the appliance to cook food, avoiding all other Always check to make sure that the control knobs are uses;...
- Page 5 cooktop; Front c) The cabinets installed next to the hood must be located at a height of at least 420 mm from the top, (as shown in Fig. C). HOOD Min. Clamp Position for H=20mm top Back N.B: Use the clamps contained in the "accessory kit." f) In the event the cooktop is not installed above a built- Fig.
- Page 6 the gas is regulated correctly and your appliance lasts Brown - Live over time, make sure that gas pressure levels comply with As the colours of the wires in the mains lead may not the indications given in Table 1, “Nozzle and Burner correspond with the coloured markings identifying the Specifications”.
-
Page 7: Burners And Nozzle Specifications
The crossed out “wheeled bin” symbol on the product reminds you of your obligation, that when you dispose of the appliance it must be separately collected. Consumers should contact their local authority or retailer for information concerning the correct disposal of their old appliance. CISTD 640... - Page 12 HOOD Min. 555 mm.


