
Related Manuals for Haier HWM60-10


Summary of Contents for Haier HWM60-10
- Page 1 User's manual Fully Automatic Washing Machine User's manual This manual is for HWM60-10 Please read this manual carefully before using. Retain it for future reference.
-
Page 2: Table Of Contents
Contents Specifications...the 2 Names of the parts...1 Safety precautions ...2 Installation and adjustment ...4 Preparation before washing ...8 Put in the laundries ...9 Usage of the detergent ...9 Use the operation buttons ...10 Close the top lid ...13 Finish washing ...13 Disposal after washing ...14 Trouble shooting Answer to question...15 Packing list ...16... -
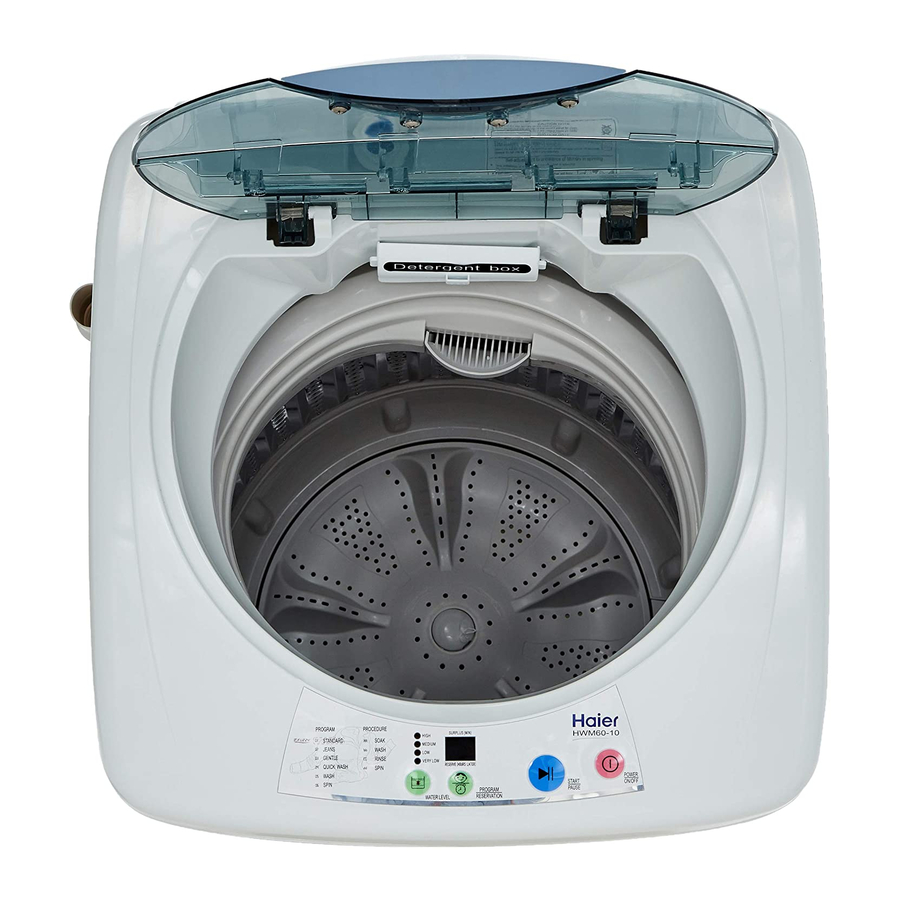
Page 3: Names Of The Parts
Names of the par ts Top lid B Detergent box (Installed by user) Lint filter Control panel Filter cover Inner tub Control panel film Pulsator Cabinet ase frame Meaning and description of the symbols Contents marked with that symbol are related to the safety Warning sign of the product and the personal safety of the users. -
Page 4: Specifications
Safety precautions Please plug the plug on special receptacle with rated voltage. Be sure to use single- phase three pins receptacle. Ensure the earthing prong of the power receptacle is earthed reliably. Use leakage protector if possible. Do not damage the power cord, bend ,extend, twist, bind or alter it by force. Do not press or nip it with weight. - Page 5 Safety precautions Do not stretch hands into the working machine. It is dangerous even if the rotation is slow. Take special care of the children. Do not let the children climb the washing machine. Do not put any hot or heavy items (such as the kettle with hot water ) on the washing machine.
-
Page 6: Installation And Adjustment
Installation and adjustment Please install and adjust the machine according to the requirement of the manual. It is very important to your security and correct operating the machine. Install the lint filter 1.Press downward to assmble. 2.Pull upward to detach. Put up Pull down Adjust the installation position... -
Page 7: Usage Of The Drain Hose
How to change the direction of the drain hose 1.Loosen the fastening screw of the back cover to take off the back cover. Be careful not to do it by force to prevent breaking the claw of the back cover.(as indicated in Figure 1) Back cover Figure 1 2.Take off the drain hose from the cabinet. -
Page 8: Install The Water Inlet Hose
Install the water inlet hose Confirm the water tap Water tap,suitable Outlet end surface It is required that the front end shall be longer than 10mm. The outlet end surface of the tap shall be flat and smooth. If not please file it to avoid leakage. - Page 9 Connection between the water inlet hose and the washing machine 1.Do not take off the water absorption cushion. Please check if the cushion is dropped or damaged before each usage. If it happens please contact our after-sale department immediately. 2.Put the nut of the water inlet hose on the valve jointer.
-
Page 10: Preparation Before Washing
Preparation before washing Pay attention to followings before washing the laundries Confirm Clear the pocket. there's special Take out the requirement for coins , sand, the laundries. hairpins etc. A. Please check if the laundries are applicable for washing. b.Separate those not colorfast from other laundries. C. -
Page 11: Put In The Laundries
Put in the laundries Usage of the detergent Inlet box of the detergent How to use the whitener Fill water to decided level. Dilute the whitener with container. Pour it slowly into the washing tub. Avoid using whitener on laundries with color or pattern as they are prone to lose color. -
Page 12: Use The Operation Buttons
Use the operation buttons a. Description of the function of the buttons To indicate -- during sensing. To indicate remaining min. During program running. To indicate remaining reserved time (hrs) during delay time period. To indicate fault symbols for abnormal conditions (see page 15) Page 15 PROGRAM STATUS... - Page 13 Use the operation buttons b. Operating procedure and explanations for the buttons PROGRAM STATUS PROCEDURE STATUS STANDARD SOAK JEANS WASH GENTLE RINSE QUICK WASH SPIN WASH SPIN 1 Press the "POWER ON/OFF" button to switch on the power supply It has the special power resume function. In the case of power failure or the power plug is loose during washing, the machine can save the running program, and resume the program after the power supply is recovered.
- Page 14 Attention Even there's no water in the tub, the spinning will start after a certain period. Do not use soak process for woolen Wash the laundries that are prone to lose colors separately from other laundries. The pulsator will not rotate unless the water is filled to selected water level.
-
Page 15: Close The Top Lid
3 Press the "WATER LEVEL" button to select suitable water level After switching on the power, press the button "WATER LEVEL" to select a water level according to the load. Please refer to the button " Water level" on page 10. 4 Push the "... -
Page 16: Disposal After Washing
Disposal after washing After using, please clean the lint and foreign materials of the lint filter etc. in time. Otherwise it may influence your using the machine. Please first pull off the power plug from the receptacle before cleaning. When washing, lint filter must be used After using, please clean it in time. -
Page 17: Trouble Shooting Answer To Question
Trouble shooting Answer to question (If there's breakdown, please pull off the power plug before checking) The following phenomena are not breakdowns sometimes. Please confirm again before sending it to repair. If there are real breakdowns, please come to the special maintenance department or after-sale service department of our company. -
Page 18: Packing List
Packing list Name User's manual Guarantee Components of the water inlet hose Lint filter Bottom plate Tapping screws Fulyl automatic washing machine Quantity One piece One piece One piece One piece One piece Five pieces One set...