Table of Contents
Advertisement
Quick Links
Advertisement
Table of Contents

Related Manuals for Grizzly EXTREME G0605X


Summary of Contents for Grizzly EXTREME G0605X
- Page 1 EXTREME SERIES 12" TABLE SAW OWNER'S MANUAL COPYRIGHT © OCTOBER, 2006 BY GRIZZLY INDUSTRIAL, INC. WARNING: NO PORTION OF THIS MANUAL MAY BE REPRODUCED IN ANY SHAPE OR FORM WITHOUT THE WRITTEN APPROVAL OF GRIZZLY INDUSTRIAL, INC. #BL8591 PRINTED IN TAIWAN...
- Page 2 ���� ������ �������� �������� ������ ������������ �� ��� ������ ������ ���������� ����������� ��� ������� �� ���� ������������������ ������� �� ����� ���������� ��� ������ ��� ������������ ����� �� ���� ������ ��� ������ �� ������� �������� ������� ��������� ����������� ������������� �� ������ ���...
-
Page 3: Table Of Contents
Table of Contents INTRODUCTION... 3 Foreword ... 3 Contact Info ... 3 G0605X Data Sheet ... 4 G0606X Data Sheet ... 5 Identification ... 6 SECTION 1: SAFETY... 7 Safety Instructions for Machinery ... 7 Safety Instructions for Machinery ... 7 Safety Instructions for Table Saws ... - Page 4 Blade Alignment ... 53 Adjusting Fence ... 53 Miter Gauge ... 54 Service Log ... 55 G0605X/G0606X Electrical Components ... 56 G0605X Wiring Diagram ... 57 G0606X Electrical Components ... 58 G0606X Wiring Diagram 220V ... 59 G0606X Wiring Diagram 440V ... 60 Cabinet, Motor &...
-
Page 5: Introduction
We are proud to offer the Model G0605X/G0606X Extreme Series 12" Table Saw. This machine is part of a growing Grizzly family of fine wood- working machinery. When used according to the guidelines set forth in this manual, you can expect years of trouble-free, enjoyable operation and proof of Grizzly’s commitment to customer... -
Page 6: G0605X Data Sheet
Customer Service #: (570) 546-9663 • To Order Call: (800) 523-4777 • Fax #: (800) 438-5901 MODEL G0605X 12" EXTREME SERIES TABLE SAW Overall Dimensions: Table Height ... 35 Table Size ... 30 Table Size w/Extension ... 30 Overall Size when Fully Assembled ... 91" W x 93" L x 42 Miter Gauge T-Slot ... -
Page 7: G0606X Data Sheet
... Quick Release Riving Knife ... Quick Release Blade Guard ...Hinged Motor Cover ...4" Dust Port ...Included 12" Blade Specifications, while deemed accurate, are not guaranteed. G0605X/G0606X Extreme Series 12" Table Saw MACHINE DATA SHEET ⁄ " D x 24 ⁄... -
Page 8: Identification
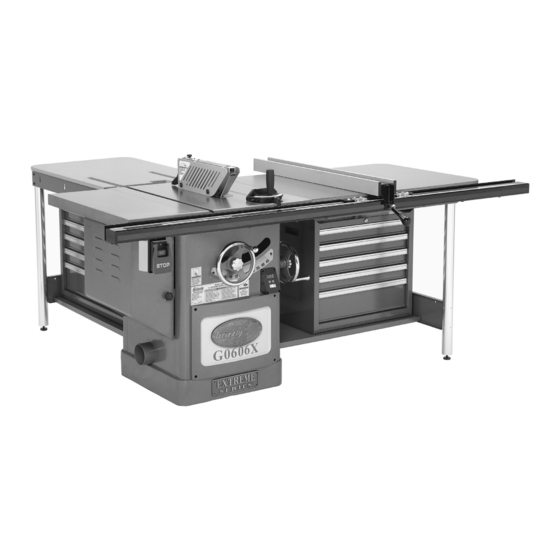
Figure 1. G0606X identification. Tool Chest (Optional) K. Blade Tilt Handwheel & Lock Blade Angle Digital Readout M. Blade Tilt Scale N. Blade Height Handwheel O. Dust Port P. STOP, ON/OFF Switch Q. Motor Cover G0605X/G0606X Extreme Series 12" Table Saw... -
Page 9: Section 1: Safety
ANSI SAFETY GLASSES WHEN OPERATING MACHINERY. Everyday eyeglasses only have impact resistant lenses—they are NOT safety glasses. G0605X/G0606X Extreme Series 12" Table Saw 4. ALWAYS WEAR A NIOSH APPROVED RESPIRATOR MACHINERY THAT PRODUCES DUST. Wood dust can cause severe respiratory illnesses. - Page 10 SERVICING animals, especially fine dust. Be aware of the type of dust you are exposed to and always wear a respirator designed to filter that type of dust. G0605X/G0606X Extreme Series 12" Table Saw ADJUSTING KEYS DAMAGED PARTS MACHINES...
-
Page 11: Safety Instructions For Table Saws
If normal safety precautions are overlooked or ignored, seri- ous personal injury may occur. G0605X/G0606X Extreme Series 12" Table Saw CROSSCUTTING OPERATIONS. Remove the rip fence whenever using the miter gauge to crosscut a workpiece. -
Page 12: Preventing Kickback
If a kickback occurs, the push stick will most likely take the damage that your hand would have received. • Use featherboards or anti-kickback devices to prevent or slow down kickback. G0605X/G0606X Extreme Series 12" Table Saw... -
Page 13: Glossary Of Terms
The following is a list of common definitions, terms and phrases used throughout this manual as they relate to this table saw and woodworking in general. Become familiar with these terms for assembling, adjusting or operating this machine. Your safety is VERY important to us at Grizzly! Arbor: A metal shaft extending from the drive mechanism that is the mounting location for the saw blade. -
Page 14: Section 2: Circuit Requirements
Amperage Draw The motor for your machine may draw the follow- ing amps at maximum load. G0605X @ 220V ... 23 Amps G0606X @ 220V ... 19 Amps G0606X @ 440V* ... 10 Amps Circuit Requirements You MUST connect your machine to a grounded circuit that is rated for the amperage given below. -
Page 15: Grounding
220V Operation Use at least a 10 gauge cord that does not exceed 50 feet in length! 440V Operation Do not use an extension cord with 440V! -13- G0605X/G0606X Extreme Series 12" Table Saw... -
Page 16: Section 3: Set Up
Otherwise, filing a freight claim can be difficult. When you are completely satisfied with the con- dition of your shipment, you should inventory the contents. G0605X/G0606X Extreme Series 12" Table Saw Set Up Unpacking... -
Page 17: Machine Inventory
Machine Inventory The following components are included with each G0605X/G0606X. After all the parts have been removed from their packaging, you should have: Box Contents (Figures 5 & 6): A. Table Saw Unit ... 1 B. Splitter/Guard Assembly ... 1 C. -
Page 18: Extension Table Inventory
NOTICE: Some hardware/fasteners on the inven- tory list may arrive pre-installed on the machine or related components. Check these locations before assuming that any items from the inventory list are missing. G0605X/G0606X Extreme Series 12" Table Saw Inventory ⁄ -16 (Brackets/Legs/Cabinet) ... 2 ⁄... -
Page 19: Hardware Recognition Chart
Hardware Recognition Chart -17- G0605X/G0606X Extreme Series 12" Table Saw... -
Page 20: Clean Up
Lock all entrances to the shop when you are away and DO NOT allow unsupervised children or visitors in your shop at any time! G0605X/G0606X Extreme Series 12" Table Saw ���... -
Page 21: Extension Table
Figure 12. Figure 12. Front rail installed. G0605X/G0606X Extreme Series 12" Table Saw Fasten the rear rail to the table with five cap screws and lock washers as shown in Figure Figure 13. - Page 22 Figure 14. 10. Thread a ⁄ -16 hex nut on each foot and thread the feet into the bottom of the support legs as shown in Figure 18. Figure 18. Foot installed on support leg. G0605X/G0606X Extreme Series 12" Table Saw...
-
Page 23: Outfeed Table
(on the outside) as shown in Figure 21. Note: The flange on the shelf bracket must point up to ensure proper installation. 15. Place the lower shelf on the brackets. G0605X/G0606X Extreme Series 12" Table Saw Shelf Bracket Figure 21. Shelf brackets installed. Outfeed Table Components and Hardware Needed: Outfeed Table ... -
Page 24: Saw Blade
Flange Bolt Figure 24. Correct blade direction. Re-install the arbor flange and the arbor nut, and tighten them against the blade with the wrench included with the saw. DO NOT over- tighten. G0605X/G0606X Extreme Series 12" Table Saw Saw Blade... -
Page 25: Table Insert
Figure 26. Adjusting the table insert. G0605X/G0606X Extreme Series 12" Table Saw Blade Guard and You MUST install the blade guard and splitter before operating the table saw. -
Page 26: Riving Knife
To install the switch: Fasten the switch to the left end of the front rail with two flange bolts, and install the anti- start safety pin as shown in Figure 31. G0605X/G0606X Extreme Series 12" Table Saw Riving Knife Bracket... -
Page 27: Miter Gauge
Slide the miter gauge into the miter gauge slot to the left of the blade; or store it tempo- rarily on the brackets near the blade angle handwheel. G0605X/G0606X Extreme Series 12" Table Saw Fence Components Components and Hardware Needed: Fence Knob ... 1 Stop Paddle Fence Resting Brackets ... -
Page 28: Dust Collection
Test Run Once the assembly is complete, test run your machine to make sure it runs properly. The Model G0605X/G0606X is operated by an ON/OFF push button switch equipped with a STOP paddle and a safety pin for disabling the switch, as shown in Figure 31. - Page 29 Turn to Troubleshooting on Page 45 and correct the problem before operating the machine further. G0605X/G0606X Extreme Series 12" Table Saw —If you cannot easily locate the source of an unusual noise or vibration by yourself, please contact Technical Support at (570) 546-9663.
-
Page 30: Section 4: Operations
OMMEND that you read books, trade maga- zines, or get formal training before begin- ning any projects. Regardless of the con- tent in this section, Grizzly Industrial will not be held liable for accidents caused by lack of training. -28-... -
Page 31: Disabling On/Off Switch
Flat-top ground tooth profile. • Large gullets for large chip removal. ���� ��� ����� Figure 38. Ripping blade. G0605X/G0606X Extreme Series 12" Table Saw Crosscut blade features: • Best for cutting across the grain of the workpiece. • 60-80 teeth. - Page 32 Note: This section on blade selection is by no means comprehensive. Always follow the saw blade manufacturer's recommendations to ensure safe and efficient operation of your table saw. G0605X/G0606X Extreme Series 12" Table Saw...
-
Page 33: Non-Through And Through Cuts
Blade Tilt/Bevel Cuts: Page 33 Dado Cutting: Page 34 Rabbet Cutting: Page 36 Resawing: Page 38 G0605X/G0606X Extreme Series 12" Table Saw Ripping "Ripping" means cutting with the grain of the workpiece. In other materials such as MDF or ply- wood, ripping simply means cutting lengthwise. -
Page 34: Crosscutting
Figure 44. Typical crosscutting operation. Turn OFF the saw and allow the blade to come to a complete stop before removing the cut-off piece. Failure to follow this warn- ing could result in serious personal injury G0605X/G0606X Extreme Series 12" Table Saw... -
Page 35: Miter Cuts
Proceed to make the cut in the same manner as described in the Crosscutting instruc- tions. G0605X/G0606X Extreme Series 12" Table Saw Blade Tilt/Bevel Cuts When the blade tilt stop bolts are properly adjust- ed (Page 49), the blade tilt handwheel allows the operator to tilt the blade to the left, anywhere between 0°... -
Page 36: Dado Cutting
If dadoing across the workpiece, use the miter gauge and carefully line up the desired cut with the dado blade. DO NOT use the fence in combination with the miter gauge. Reconnect the saw to the power source. G0605X/G0606X Extreme Series 12" Table Saw... - Page 37 DO NOT use the fence in combination with the miter gauge. G0605X/G0606X Extreme Series 12" Table Saw If dadoing the length of a workpiece, align the blade to cut one of the dado sides as shown in Figure 48.
-
Page 38: Rabbet Cutting
When the blade has reached full speed, per- form a test cut with a scrap piece of wood. If the cut is satisfactory, repeat the cut with the final workpiece. G0605X/G0606X Extreme Series 12" Table Saw Figure 51. Rabbet cutting. - Page 39 Figure 52. Figure 52. Rabbet cutting with a standard blade. G0605X/G0606X Extreme Series 12" Table Saw Reconnect the saw to the power source and turn the saw ON. When the blade has reached full speed, per- form a test cut with a scrap piece of wood.
-
Page 40: Resawing
Note: Only use furniture grade plywood or kiln dried hardwood to prevent warping. Pre-drill and countersink 8 holes approxi- mately ⁄ " from the bottom of the 7 board. G0605X/G0606X Extreme Series 12" Table Saw ⁄ " ...1 ⁄ " ...1 " x 40 ⁄... -
Page 41: Auxiliary Fence
Pre-drill and countersink four holes 1 the bottom of the board. G0605X/G0606X Extreme Series 12" Table Saw Pull an end cap off of the standard fence, then remove four hex nuts, flat washers, hex bolts and one side of the fence facing from the fence body. - Page 42 11. When finished resawing, remove the resaw barrier and auxiliary fence and re-install the blade guard/splitter or riving knife and stan- dard table insert. G0605X/G0606X Extreme Series 12" Table Saw ⁄ " ��������� ����� �����...
-
Page 43: Section 5: Accessories
ACCESSORIES SECTION 5: ACCESSORIES H8084—Rear Tool Box for G0605X/G0606X H8085—Front Tool Box for G0605X/G0606X Made specially to fit the G0605X/G0606X saws. These heavy-duty tool boxes feature powder coated paint and ball bearing slides. Model H8084, 32"L x 22 "H x 15"D; Model H8085, "H x 15"D. - Page 44 Figure 65. G2370 SHOP FOX ® G0605X/G0606X Extreme Series 12" Table Saw Board Buddies.
- Page 45 Includes a graduated ruler guide and center finder. Figure 67. G3445 Precision Saw Tool. G0605X/G0606X Extreme Series 12" Table Saw H3308—SHOP FOX Push Stick ® Measuring 13 ⁄...
-
Page 46: Section 6: Maintenance
• Check the flat belt for damage or wear. -44- Cleaning the Model G0605X/G0606X is relatively easy. Vacuum excess wood chips and sawdust, and wipe off the remaining dust with a dry cloth. If any resin has built up, use a resin dissolving cleaner to remove it. -
Page 47: Section 7: Service
9. Motor is at fault. 10. Centrifugal switch is at fault (single-phase). 11. Start delay module at fault (3-phase only). G0605X/G0606X Extreme Series 12" Table Saw Troubleshooting Possible Solution 1. Test for good contacts; correct the wiring. 2. Test/replace if faulty. - Page 48 3. Align blade to the table (Page 51). 4. Adjust blade position. 1. Replace blade. 2. Replace blade (Page 22). 3. Make fence parallel to blade (Page 54). 4. Make table parallel to blade (Page 51). G0605X/G0606X Extreme Series 12" Table Saw...
-
Page 49: Replacing Flat Belt
Be careful not to damage the motor, and do not force the arbor down further when it becomes dif- ficult to move the handwheel. G0605X/G0606X Extreme Series 12" Table Saw Wood Block Figure 71. Motor resting on wood block. - Page 50 Flat Belt Note: The belt is tensioned correctly when you can deflect it no more than Tighten the motor mounting hex nuts, lower the motor, and remove the wood block. Close the motor cover. G0605X/G0606X Extreme Series 12" Table Saw ".
-
Page 51: Blade Tilt Stops
Steps 2-3 until the stop bolt contacts the table when the blade is at 0°. G0605X/G0606X Extreme Series 12" Table Saw 90° Stop Bolt & Jam Nut Figure 75. 90° stop bolt and jam nut. -
Page 52: Digital Readout
Figure 77. 45° stop bolt and jam nut. -50- G0605X/G0606X Extreme Series 12" Table Saw... -
Page 53: Miter Slot To Blade
Parallelism Figure 80. Example of adjusting blade to miter slot. G0605X/G0606X Extreme Series 12" Table Saw With the end of the adjustable square just touching the tip, lock the square in place. Now, mark the carbide tip with a marker where you made this measurement. - Page 54 Also, if you ever remove the table in the future, be sure to make note of shim placements and reassemble exactly how it came apart. -52- Figure 82. Shim procedure diagram A. Figure 83. Shim procedure diagram B. G0605X/G0606X Extreme Series 12" Table Saw...
-
Page 55: Blade Alignment
Page 51). Adjust as necessary until the blade does not touch the insert. Adjusting Fence The rip fence included with your Model G0605X/ G0606X Table Saw is designed to provide excel- lent ripping accuracy when properly adjusted. There are three main adjustments to concern yourself with: square, parallelism and clamping pressure. -
Page 56: Miter Gauge
To fit the miter bar tighter in the miter slot, turn the adjustment set screws shown in Figure 87 clockwise in small increments, and test fit between adjustments until the miter gauge fits your expectations. G0605X/G0606X Extreme Series 12" Table Saw... -
Page 57: Service Log
Service Log Date Service Performed Approximate Hours Of Use -55- G0605X/G0606X Extreme Series 12" Table Saw... -
Page 58: G0605X/G0606X Electrical Components
G0605X/G0606X Electrical Components Figure 88. G0605X motor junction box. Figure 91. G0605X/G0606X digital readout and angle sensor. Figure 89. G0605X/G0606X switch. Figure 90. G0606X motor junction box. Figure 92. G0605X magnetic switch. -56- G0605X/G0606X Extreme Series 12" Table Saw... -
Page 59: G0605X Wiring Diagram
���� ��������� ���� ���� ���� ������� ��� ��� ��� �������� ����� �� �� ����� �� �� G0605X/G0606X Extreme Series 12" Table Saw ������ � � �� ��� �� � �� ����� ���� ��� ��� ������������ �� �� �� ����� ��... -
Page 60: G0606X Electrical Components
Note: Thee thermal relay in Figure 93 is set for 22 amp, 220V, 3-phase operation. -58- Figure 94. G0606X magnetic switch converted to 440V, 3-phase. Note: The therrmal relay in Figure 94 is adjusted for 11 amp, 440V, 3-phase operation. G0605X/G0606X Extreme Series 12" Table Saw... -
Page 61: G0606X Wiring Diagram 220V
���� ���� �������� �������� ��� ��� ��� ����� �� �� �� �� �� �� �� �� G0605X/G0606X Extreme Series 12" Table Saw ������ ��� ��� �� ��� ��� �� ��� �� ������ ���� �� ��� ������������ �� �� �� �����������... -
Page 62: G0606X Wiring Diagram 440V
�� �� �� �� �� �� �� �� �� �� �� �� �� �� �� �� �� G0605X/G0606X Extreme Series 12" Table Saw ������� ��� ��� ������ ��������� ����� �� ����� �� ����� �� ��� �� ������ �� ����� ��... -
Page 63: Cabinet, Motor & Main Table Breakdown
�� �� �� ����� �� �� ����� ����� ����� ����� ���� ���� ��� ���� ���� ���� ���� �� G0605X/G0606X Extreme Series 12" Table Saw ����� ����� ����� ����� ����� �� �� �� �� �� �� �� �� ��� ��� ��... -
Page 64: Cabinet, Motor & Main Table Parts List
THERMAL OVERLOAD RELAY (G0606X) 75-5 P0605X075-5 MOTOR CORD 12AWG X 3C 75-5 P0606X075-5 MOTOR CORD 12AWG X 4C 75-6 P0605X075-6 POWER CORD 12AWG X 3C 75-6 P0606X075-6 POWER CORD 12AWG X 4C 75-7 P0606X075-7 TRANSFORMER (G0606X) G0605X/G0606X Extreme Series 12" Table Saw... - Page 65 111-3 P0605X111-3 JUNCTION BOX (G0605X) 111-3 P0606X111-3 JUNCTION BOX (G0606X) 111-4 P0605X111-4 RUN CAPACITOR COVER (G0605X) 111-5 P0605X111-5 R. CAPACITOR 80MFD/ 250VAC (G0605X) 111-6 P0605X111-6 START CAPACITOR COVER (G0605X) 111-7 P0605X111-7 S. CAPACITOR 600MFD/125VAC (G0605X) 111-8 P0605X111-8 CENTRIFUGAL SWITCH (G0605X)
-
Page 66: Blade Guard Assembly Breakdown
P0605X213 P0605X214 P0605X215 PFH43M PFH54M PS22M PRP95M PRP45M PRP07M PS07M PLN02M PW02M P0605X225 G0605X/G0606X Extreme Series 12" Table Saw ��� ��� ��� ��� ��� ��� ��� ��� DESCRIPTION TORSION SPRING RING 6MM PIN 6 X 24 FLAT HD SCR M6-1 X 10 FLAT HD SCR M5-.8 X 20... -
Page 67: Fence Assembly Breakdown
PN01M HEX NUT M6-1 P0605X307 REAR RAIL WHEEL PSB26M CAP SCREW M6-1 X 12 P0605X309 PLATE PN03M HEX NUT M8-1.25 P0605X311 FENCE HANDLE G0605X/G0606X Extreme Series 12" Table Saw ��� ��� ��� ��� ��� ��� ��� ��� ��� ��� ���... -
Page 68: Miter Gauge Assembly Breakdown
��� ��� REF PART # PS04 PSS53M P0605X410 PW01M P0605X412 P0605X413 P0605X414 PFH9M G0605X/G0606X Extreme Series 12" Table Saw ��� ��� ��� ��� ��� ��� ��� DESCRIPTION PHLP HD SCR 1/4-20 X 1/2 SET SCREW M5-.8 X 12 MITER GAUGE HANDLE... -
Page 69: Extension Table Assembly Breakdown
REAR EXTENSION BRACKET P0605X511 LOWER SHELF P0605X512 LOWER SHELF BRACKET P0605X513 SHELF END PLATE P0605X514 SUPPORT LEG PHTEK6M TAP SCREW M4 X 16 G0605X/G0606X Extreme Series 12" Table Saw ��� ��� ��� ��� ��� ��� ��� ��� ��� ��� ���... -
Page 70: Outfeed Table Assembly Breakdown
��� ��� ��� ��� ��� PART # P0605X610 PS14M PW03M PFB16M PN03M PS14M PN08 P0605X626 PN01M G0605X/G0606X Extreme Series 12" Table Saw ��� ��� ��� ��� ��� ��� ��� ��� ��� ��� ��� ��� DESCRIPTION REAR EXTENSION PLATE PHLP HD SCR M6-1 X 12 FLAT WASHER 6MM FLANGE BOLT M8-1.25 X 16... -
Page 71: Warning Label Parts List
MUST maintain the original location and readability of the labels on the machine. If any label is removed or becomes unreadable, REPLACE that label before using the machine again. Contact Grizzly at (800) 523-4777 or www.grizzly.com to order new labels. G0605X/G0606X Extreme Series 12" Table Saw... -
Page 72: Warranty And Returns
WARRANTY AND RETURNS Grizzly Industrial, Inc. warrants every product it sells for a period of 1 year to the original purchaser from the date of purchase. This warranty does not apply to defects due directly or indirectly to misuse, abuse, negligence, accidents, repairs or alterations or lack of maintenance. - Page 73 ���������������������������������������������������������������������������������� � ������������������������������������������������������������������������������������ ����� ����������������������� ������ � ������������������������ ���� ��������������������� ���������������������������� ������ ������������������������ ���������� � ���������������� ���������������������������� ������������������������������� ��������������������������� ��� ��������� ����������� �� ����� �� � ��������� ������ �� ���� �� ���� ��� ��������� �������� �� ���� �� ������� ������ �������� ��� ��������� �� ������� ��� ����������� �� �������� ������������� ���...
- Page 74 ���������������������� ���������������������� ����������������������������������� ����������������������������������� ������������������������������������� �������������������������������������� ������� ����������� ���� ���� ��� ���� ����������� �� ���������� �������������������������������������� ����� ����� ����...
- Page 76 ��� ������ ��� ���� ���� ������� ����� ��� ������� ����� ��� �������� ��� ������� � � � ���� ����� ��� � � �������� ������ ��� � ����� ������ � �� ��� �������� ������� � ������ �������� ������ ������� ������ �� ����� ������...