Table of Contents
Advertisement
Advertisement
Table of Contents

Related Manuals for Great Dane GSRKA1934S


Summary of Contents for Great Dane GSRKA1934S
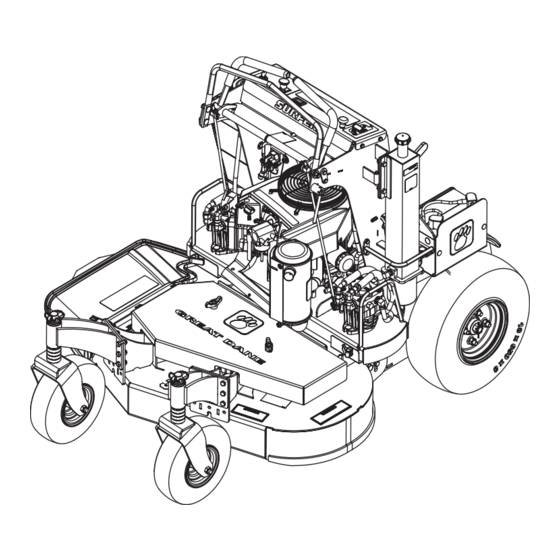
- Page 1 Great Dane ® GSRKA1934S 201018 10/02/2007...
- Page 3 IMPORTANT: Avoid Damage! This text is used to tell the operator of actions or conditions that might result in damage to the machine. Great Dane, Chariot, Brutus, Scamper, Surfer, and Super Surfer are registered trademarks NOTE: General information is given throughout the of Auburn Consolidated Industries, Inc.
-
Page 4: Safety Labels
SAFETY LABELS Safety-Alert Symbol The machine safety labels shown in this section are placed in important areas on your machine to draw attention to potential safety hazards. On your machine safety labels, the words DANGER, WARNING, and CAUTION are used with this safety-alert symbol. - Page 5 SAFETY LABELS WARNING (B) To avoid injury from rotating belts, keep all shields and guards in place. DANGER (C) To avoid injury from rotating blades, stay clear of deck edge. CAUTION: (F) DANGER (D) Before operating read operators manual and safety instruc- To avoid injury from rotating blades and thrown objects, tions.
- Page 6 Protection Agency (EPA) and/or California Air Resources Board (CARB). The emissions warranty applies only to those engines mar- keted by Great Dane that have been certified by the EPA CAUTION (H) and/or CARB; and used in the United States and Canada in Be safe! To avoid a fire hazard remove all leaves, grass...
- Page 7 SAFETY the job. Only use accessories and attachments ap- away. proved by the manufacturer. • Slow down and use caution when making turns and • Wear appropriate clothing including hard hat, safety crossing roads and sidewalks. Stop blades if not mow- glasses and hearing protection.
-
Page 8: Avoid Tipping
SAFETY Parking Safely PROTECT CHILDREN! Stop machine on a level surface, not on a slope. Disengage mower blades. Lock the park brake. Stop the engine. Remove the key. Wait for engine and all moving parts to stop before you leave the operator’s station. Close fuel shut-off valve, if your machine is equipped. - Page 9 SAFETY • Choose a low ground speed so you will not have to 100 hours of operation. stop or shift while on a slope. • Wheel hardware must be tightened to specified torque • Do not mow or operate machine on wet grass. Tires using the proper procedure anytime it is loosened.
-
Page 10: Prevent Fires
SAFETY ommended parts, when necessary. Grass catcher com- clothing, change clothing immediately. If fuel is spilled ponents are subject to wear, damage, and deterioration near machine, do not attempt to start the engine but which could expose moving parts or allow objects to be move the machine away from the area of spillage. -
Page 11: Operator Station Controls
OPERATING Operating Daily Operating Checklist Make sure all necessary guards and shields are safely and securely attached. Check for loose, missing, or damaged parts. Remove mower deck belt shields. Clean grass and debris from belt area. Remove grass and debris from machine and mower deck. -
Page 12: Caster Mounting
OPERATING A-Free-Wheeling Valves CAUTION: Avoid injury! Before adjusting cut- ting height, stop engine and lock the park Mounting and Dismounting Machine Safely brake. Check tire pressure. Inflate front caster wheels to 172- 207 CPA (25-30 psi). Inflate rear tires to 69-83 CPA (10-12 psi). - Page 13 OPERATING IMPORTANT: Do not allow washer (G) to set on caster yoke. It must be on top of height-of-cut spacer bushings (H). NOTE: Adjust caster wheel spacers to keep mower deck tilted slightly down at the front. Adjust caster wheel spacers (F) to compensate front HOC accordingly.
- Page 14 OPERATING do not operate machine. See your authorized dealer for service. Perform these tests in a clear open area. Keep bystanders away. Testing PTO Switch Stand on operator’s platform with motion control levers in the neutral position. Lock park brake. �����...
-
Page 15: Using The Throttle
OPERATING Using the PTO Clear area of bystanders, especially children. Pick up objects which may be thrown by the attachment. Engage PTO: Pull PTO switch up to engage. Stand on operator’s platform with motion control levers Step completely off operator’s platform. in the neutral position. -
Page 16: Using The Hourmeter
OPERATING Using the Hourmeter Neutral Position NOTE: The machine is equipped with an electric start. The hourmeter will continue to run with the key switch in the run position. Picture Note: Motion control levers (A) shown in the neutral position. •... - Page 17 OPERATING Forward: • Push right motion control lever further forward than the left motion control lever Gentle Right Turn: • Push both motion control levers forward at the same time. Reverse: • Push left motion control lever further forward than the right motion control lever.
-
Page 18: Starting Engine
OPERATING Put motion control levers (A) in the NEUTRAL position. Push PTO switch knob (B) down to disengage PTO. Move throttle lever (C) to set engine speed at the 1/2 to 3/4 fast position. Position choke knob (D): • Cold engine: Pull knob up to the CHOKE position. •... -
Page 19: Mowing Tips
OPERATING NOTE: In cold weather or with a new machine, allow engine to reach operating temperature before engaging PTO to prevent engine from stalling. Pull PTO knob (B) up to engage mower deck. Move throttle lever to the fast position (C). NOTE: The travel speed and turn rate will vary with the amount that the motion control levers are moved. -
Page 20: Service Intervals
SERVICE INTERVALS • Use a travel speed that fits the conditions: Servicing Engine • Mow tall or wet grass twice. Cut grass at half desired height – then cut at desired height. See engine manufacturer’s owner’s manual provided with • Travel slow when mowing tall, thick or wet grass. -
Page 21: Service Engine
SERVICE ENGINE Service Lubrication Lubricating Pump Idler Pivot Grease IMPORTANT: Avoid Damage! The recommended grease is effective within an average air temperature range of -29 to 135 degrees C (-20 to 275 degrees F). IMPORTANT: Avoid Damage! Use only NLGI No. 2 lithium based grease. - Page 22 SERVICE ENGINE Service Engine Avoid Fumes CAUTION: Avoid injury! Engine exhaust fumes contain carbon monoxide and can cause seri- � ous illness or death. Move the machine to an outside area before running the engine. Do not run an engine in an enclosed area with- out adequate ventilation.
- Page 23 SERVICE ENGINE two minutes. Check for leaks around filter and drain IMPORTANT: Avoid Damage! Change the oil more often valve. if the machine is used in extreme conditions: 16. Stop engine. Extremely dusty conditions. 17. Check oil level: Frequent slow or low-speed operation. •...
-
Page 24: Service Transmission
SERVICE TRANSMISSION • Do not wash paper element. Replacing Fuel Filter • Do not attempt to clean paper element by tapping against another object. • Do not use pressurized air to clean element. CAUTION: Avoid injury! Fuel vapors are explo- •... -
Page 25: Checking Hydraulic Oil Level
SERVICE TRANSMISSION Service Transmission Changing Hydraulic Oil and Filter Hydraulic Oil Use only 5W-50 or 15W-50 all synthetic oil. CAUTION: Avoid injury! Escaping fluid under Checking Hydraulic Oil Level pressure can penetrate the skin causing serious injury. Avoid the hazard by relieving pressure before disconnecting hydraulic or IMPORTANT: Avoid Damage! Check oil level in reser- other lines. - Page 26 SERVICE TRANSMISSION IMPORTANT: Avoid Damage! Do not add oil beyond Clean hydraulic oil cooling fins on each hydraulic pump FULL mark. Oil capacity after draining may be less than with a rag, brush or compressed air. dry fill capacity. Check oil level before filling complete- Clean area around hydraulic pumps and frame.
- Page 27 SERVICE TRANSMISSION 4 ⅝” - 5” Remove two cap screws (A). Install traction drive belt (E) on drive sheaves (G) as Remove rear shield (B). shown. Ensure that traction drive belt is positioned in front of anchor cap screw (F). CAUTION: Avoid injury! Tensioning spring is Insert 3/8 in.
- Page 28 SERVICE TRANSMISSION brake. If rear wheels rotate when motion control levers are in neutral, a neutral adjustment is required. Stop engine. � Rotate speed control bar (A) to full forward position. With engine off, move motion control levers (B) until they contact the speed control bar (A).
-
Page 29: Service Steering And Brakes
SERVICE STEERING AND BRAKES Checking Transmission Tracking: Check and adjust motion control linkages. See Check- ing and Adjusting Motion Control Linkages in the SER- VICE TRANSMISSION section. Start engine and run until it reaches normal operating temperature. Move machine to an open, level area for operation. Picture Note: Arrow shows direction of speed control bar (A) movement when decreasing forward speed. -
Page 30: Service Mower
SERVICE MOWER Picture Note: Engine removed for picture clarity. Park machine safely. (See Parking Safely in the SAFETY section.) Loosen nuts (A). Adjust neutral switch (B). • If neutral switch sensitivity needs to be increased, adjust switch (B) down in slots. •... -
Page 31: Adjusting Drive Belt Tension
SERVICE MOWER Lift shield (B) and pull forward to disengage from under tabs (C) on the frame. Remove mower deck shield (B). CAUTION: Avoid injury! Help prevent serious personal injury. Do not operate the mower with- out the belt shields installed. Adjusting Drive Belt Tension Park machine safely. - Page 32 IMPORTANT: Avoid Damage! When replacing mower Install both mower deck belt shields. blades, always use genuine Great Dane Service Parts. Install mower deck shield. Adjust mower deck to desired cutting height. NOTE: Only replace blades. Never straighten or weld them.
-
Page 33: Service Electrical
SERVICE ELECTRICAL blade (C). Install replacement blade: • Blade wing must face toward top of mower deck. IMPORTANT: Avoid Damage! When installing the blade: • Make sure the blade is properly seated on the spindle. • Make sure the concave side of the large washer faces towards the blade. - Page 34 SERVICE ELECTRICAL CAUTION: Avoid injury! Battery electrolyte contains sulfuric acid. It is poisonous and can cause serious burns: • Wear eye protection and gloves. • Keep skin protected. • If electrolyte is swallowed, get medical attention immediately. • If electrolyte is splashed into eyes, flush immediately with water for 15-30 minutes and get medical attention.
-
Page 35: Service Miscellaneous
SERVICE MISCELLANEOUS cover (C). Connect negative (-) battery cable (B) and install cover Connect positive (+) booster cable to booster battery (A). (A) positive (+) post (C). Connect the other end of positive (+) booster cable to Cleaning Battery and Terminals the disabled vehicle battery (B) positive (+) post (D). -
Page 36: Filling Fuel Tank
SERVICE MISCELLANEOUS of fuse holder is securely fastened to fuse socket. not use fuel or additives containing methanol as engine damage can occur. Adjusting Operator Presence Switch Always use fresh, clean fuel that is purchased in a quantity that can be used within approximately 30 days, or add fuel stabilizer. - Page 37 SERVICE MISCELLANEOUS Important: Avoid damage! Dirt and water in fuel can cause engine damage: • Clean dirt and debris from the fuel tank opening. • Use clean, fresh, stabilized fuel. • Fill the fuel tank at the end of each day’s operation to keep condensation out of the fuel tank.
-
Page 38: Checking Tire Pressure
SERVICE MISCELLANEOUS CAUTION: Avoid injury! Explosive separation of tire and rim parts is possible when they are serviced incorrectly: • Do not attempt to mount a tire without the proper equipment and experience to perform the job. • Do not inflate the tires above the recom- mended pressure. -
Page 39: Troubleshooting
TROUBLESHOOTING Cleaning and Repairing Metal Surfaces Cleaning: Follow automotive practices to care for your vehicle painted metal surfaces. Use a high-quality automotive wax regu- larly to maintain the factory look of your vehicle’s painted surfaces. Repairing Minor Scratches (surface scratch): Clean area to be repaired thoroughly. -
Page 40: Electrical System
STORAGE • Plugged carburetor air intake Engine Will Not Start • Park brake lever not in the proper filter. Or Is Hard To Start position. • Plugged air intake filter. • OPC switch not depressed. Stand on platform or adjust switch. •... - Page 41 STORAGE Machine Creeps • Neutral switches faulty or not • Needs motion control linkage adjusted properly. See your With Engine adjustment. authorized dealer. Running and Motion Control Levers in a • Key switch or starter faulty. See Neutral Position your • authorized dealer. •...
- Page 42 ASSEMBLY from inside chute and bagger. • Remove belt shields and clean Wash the machine and apply wax to metal and plastic debris from sheaves. surfaces. • Check sheaves for proper Run machine for five minutes to dry belts and pulleys. alignment or damage.
-
Page 43: Specifications
SPECIFICATIONS Check Hydraulic Oil Level NOTE: The stored battery should be recharged every 90 days. Charge the battery. IMPORTANT: Avoid Damage! Prolonged exposure to sunlight could damage the hood surface. Store ma- chine inside or use a cover if stored outside. Store the vehicle in a dry, protected place. - Page 44 Steering and Brakes the latest number. Steering..........Dual Control Levers Steering..............Hydraulic When you order parts, your Great Dane dealer needs your Park Brake.............Tire Contact machine serial number and engine serial number. These are the numbers that you recorded in the Product Identifica- tion section of this manual.
- Page 45 GETTING QUALITY SERVICE Great Dane Quality Continues with Quality Service Great Dane provides a process to handle your questions or problems, should they arise, to ensure that product quality continues with your authorized Great Dane dealer’s parts and service support.
-
Page 46: Wiring Diagram
WIRING DIAGRAM Wiring Diagram - 44... -
Page 47: Hydraulic Schematic
HYDRAULIC SCHEMATIC Hydraulic Schematic - 45... - Page 48 NOTES Notes - 46...
-
Page 49: Main Frame Assembly
MAIN FRAME ASSEMBLY 181148 963001 201019 Battery 964040 964003 D28159 968087 03H1832 201356 963019 201012 967115 960001 960022 TCU21265 964040 960601 M68342 964016 201005 960601 963019 960022 201095 201204 960044 251907 200658 201194 201355 960027 201202 960031 201094 964003 967115 201150 960526 963019... - Page 50 MAIN FRAME ASSEMBLY PART NO DESCRIPTION D28159 STRIP, BATTERY INSULATOR M68342 CLAMP, HOSE (RED) # TCU21265 HOSE, 1/4" ID LOW PERM FUEL 50 03H1832 BOLT, 5/16-18 X 6.00 CRG 2 Y 135139 BOLT, 1/2 X 1.06 X 3/8-16 SLD 5 Y 181148 CABLE, BATTERY STARTER - 48"...
- Page 51 HYDRAULIC AND HANDLE ASSEMBLY 960001 960600 200743 963020 200654 960002 102770 D13028 121080 201358 200116 960500 201359 964048 201197 180842 201354 180640 D24020 960702 M63431 968087 34H60 960000 D13309 200705 TCA15195 TCA15122 960702 M117554 960001 D18023 968087 121080 968087 960046 963053 D24028 D18079...
- Page 52 HYDRAULIC AND HANDLE ASSEMBLY PART NO DESCRIPTION D13028 SWIVEL ADJUSTER D13308 BASE, LOCK LEVER Y D13309 LEVER, LOCK D18023 DECAL, HYDRO OIL SPECS. D18079 GRIP, PVC .250 X 1.00 X 3.63 D18093 GRIP, CONTROL D24020 SCREW, 8-32X .50 PAN PHL Y D24028 FTG, 90 9/16 MOR X 3/8 HOSE GDA10066...
- Page 53 ENGINE, HYDRAULIC AND MAINFRAME ASSEMBLY D14252 960052 960022 403490 960078 150052 960602 964001 191179 D18056 968087 D18071 200665 200666 960702 968087 201143 D18314 111910 967115 D14213 200318 959995 960702 963020 191179 D18145 D14160 967155 960049 TCA15078 TCA15316 GDA10004 968087 959995 960502 D18067 M117554...
- Page 54 ENGINE, HYDRAULIC AND MAINFRAME ASSEMBLY PART NO DESCRIPTION DT5332 HOSE, 3/8 SAE30R7 FUEL & OIL D14160 WASHER, .250 WIDE HEAVY FLAT Y D14213 BOLT, M6 X 1.00 X 10 HEX 8.8 Y D14252 BOLT, 7/16-20X3.00 HEX 5 Y d18038 SWITCH (N.0.) D18056 SPACER, .468 X 1.38 X .375 Y D18067...
-
Page 55: Console Components
FOOT PLATE/CONSOLE COMPONENTS FOOT PLATE COMPONENTS 201136 963074 200619 200767 960001 964048 960701 963019 967115 200693 200655 968087 CONSOLE COMPONENTS 136574 D18427 192296 105684 D24020 TCU16481 TCU14840 D18021 200607 180620 200780 14H846 TCA15051 M63431 Foot Plate/Console Components - 52... - Page 56 FOOT PLATE/CONSOLE COMPONENTS FOOT PLATE COMPONENTS PART NO DESCRIPTION 200619 PLATE, PLATFORM TAB LH 200655 BUMPER, MINER GBR-6 200693 PLATE, PLATFORM TAB 200767 ANCHOR, OPC 201136 PLATFORM 960001 BOLT, 1/4-20 X .750 HEX 5 Y 960701 WASHER, .313 REG FLAT Y 963019 BOLT, 3/8-16 X 1.00 CRG 5 SN Y 963074...
-
Page 57: Deck Assembly
DECK ASSEMBLY 201357 M119352 964022 D24019 964501 959995 D18032 960051 424390 201145 D18076 N242189 968087 D18076 964016 967333 D23058 968087 D18084 201178 D13024 963019 960502 201010 D18209 999538 200262 H141123 M132768 D18055 GDU10231 201350 GDU10230 967348 964016 960046 TCA16387 TCU18744 GDA10103 201174 H122207... - Page 58 DECK ASSEMBLY PART NO DESCRIPTION D13024 SPACER, 1.500X1.000X.510 D18032 PULLEY, FLAT 5.0X.38 W/BRG D18055 WASHER, BLADE D18076 BRG, FLG 1.00X1.25X1.00 D18084 PULLEY, SPLINE SPINDLE OFFSET D18209 PULLEY, V-BELT 5.27X.990 W/SPL D24019 WASHER, .402X2.00X.055 FEND Y D23058 J-BOLT, 3/8-16 X 4.00 Y GDA10103 PIVOT, RETAINER WELD GDU10230...
-
Page 59: Pump Components
WHEEL AND STRUT ASSEMBLY/PUMP COMPONENTS WHEEL AND STRUT ASSEMBLY 161397 959995 D13008 D18076 201172 D18076 164145 201173 963011 191049 200778 964000 PUMP COMPONENTS Wheel and Strut Assembly/Pump Components - 56... - Page 60 WHEEL AND STRUT ASSEMBLY/PUMP COMPONENTS WHEEL AND STRUT ASSEMBLY PART NO DESCRIPTION D13008 BUSHING, 1.03 X 1.50 X .179 Y D18076 BRG, FLG 1.00X1.25X1.00 161397 PIN, LNC .438 X 2.00 Y 164145 C-SPACER, 1.00 X 1.77 X .500 191049 TUBE, RD 1.00X.500X4.76 200778 WHEEL, FRONT 11X4X5 SLV MIST 201172...
-
Page 61: Spindle Assembly
SPINDLE ASSEMBLY Spindle Assembly - 58... - Page 62 SPINDLE ASSEMBLY ITEM PART NO DESCRIPTION 200262 Spindle Assembly - Includes items 2, 3, 4, 5, 6, 14 200046 Ball Bearing 200042 Housing 200044 Spacer - 1.000 x 1.250 x 2.772 200261 Shaft, Spindle 200045 Bolt, 3/8-16 x 1.25 Rib 967333 Nut, Pulley (Special) Pulley, Cutter Housing - See Mower Assembly Pages...
-
Page 63: Decal Locations
DECAL LOCATIONS Decal Locations - 60... - Page 64 DECAL LOCATIONS 1. D18197 4. M117554 BELT ROUTING 6. TCU15907 2. D18372 3. GDU10256 201043 5. 201043 7. M137637 MAY BE COVERED BY ONE 8. M131739 WARNING OR MORE OF THE FOLLOWING PATENT(S): 13. TCU15910 Shield Missing. 5,343,678; 5,507,138; 5,600,944; 5,765,347;...