DirecTV HD DVR User Manual
Dvr receivers directv plus hd dvr
Hide thumbs
Also See for HD DVR:
- User manual (108 pages) ,
- Quick start manual (10 pages) ,
- User manual (104 pages)

Related Manuals for DirecTV HD DVR


Summary of Contents for DirecTV HD DVR
- Page 1 DVR RECEIVERS DVR RECEIVERS USER GUIDE USER GUIDE DIRECTV PLUS HD DVR DIRECTV PLUS HD DVR ® ® DIRECTV PLUS DIRECTV PLUS ® ®...
- Page 2 Your receiver is ENERGY STAR qualified, giving you the benefit of saving energy and helping our environment (This may not apply to older models). When used in conjunction with a DIRECTV subscription, this receiver meets ENERGY STAR criteria without requiring the consumer to take any additional steps.
-
Page 3: Welcome To The Directv Family
If you want a quick overview of your system, read Chapter 1, Quick Start. Detailed information starts in Chapter 2. This user guide applies to the DIRECTV Plus HD DVR (Digital Video Recorder) and DIRECTV Plus DVR. -
Page 4: Table Of Contents
TAB LE OF CO NTE N TS TAB L E OF C ON TE NTS Welcome to the DIRECTV Family ........3 Mini Guide ................20 Interactive Channels ...............21 Product Information ...........8 Channel Banners ..............23 Notes ................9 Main Menu ................23 Safety & Care .............10 DIRECTV Cinema and Pay Per View Events ®... - Page 5 Recorded TV Special Features .........37 Smart Search (HD DVR Receivers) ......57 ™ Bookmarks ................37 Suggested Searches ...............57 Recording from a Computer or Phone........38 Search Results .................58 Movie or Show ..............58 Main Menu - Overview ..........40 Person ...................59 My Playlist ..............43 Channel .................60...
- Page 6 TAB LE OF CO NTE N TS TAB L E OF C ON TE NTS Purchases ................70 CHAPTER 3: CONNECTIONS FOR TV AND AUXILIARY EQUIPMENT Series Manager (Prioritizer) ..........71 Connections ............100 Manual Recording ..............72 Recording Defaults ............... 73 Your Phone Connection ............100 Connections for Auxiliary Equipment........100 Music, Photos &...
- Page 7 CHAPTER 5: WARRANTY & OTHER INFORMATION Limited 90-Day Warranty ........124 DIRECTV Protection Plan .........127 FCC Customer Information ........129 Terms & Conditions for Use of Software ....133 APPENDICES Appendix 1: Receivers Front and Back Panels ..146 Appendix 2: How to Network Your DVR ....154 Appendix 3: About High-Definition ......162 Index ..............168...
-
Page 8: Product Information
Product Information Keep your receipt to obtain warranty parts and service and for proof of acquisition. Attach it here and record the serial and model numbers in case you need them. These numbers are typically behind the card door on the front panel of your receiver.* Model No. -
Page 9: Notes
Notes... -
Page 10: Safety & Care
Safety & Care Your DIRECTV ® Receiver has been designed and manufactured to stringent quality and safety standards. You should, however, be aware of the following important precautions for safe and optimal use of the equipment. Meaning of symbols printed on the rear panel of the product: This symbol indicates that dangerous voltage consisting a risk of electric shock is present within this unit. - Page 11 Safety & Care • Ensure proper ventilation — the vent slots on the DIRECTV Receiver must be left uncovered to allow proper airflow to the unit. ® WARNING: To reduce the risk of fire or Blocking the airflow to the unit could impair performance or damage your receiver and other components. electric shock, do not expose this product •...
- Page 12 DIRECTV PLUS DVR USER GUIDE ®...
-
Page 13: Chapter 1: Quick Start
CHAPTER 1 - QUICK START USING YOUR REMOTE CONTROL ........14 VIEWING LIVE TELEVISION ..........18 RECORDING PROGRAMS..........25... -
Page 14: Using Your Remote Control
Using Your Remote Control This universal remote control is your touch point to the system, so we’ll start here. Turning Equipment On and Off Note: Each time you press a button, a green light at the top of the remote flashes. -
Page 15: Navigation And Destination Buttons
Using Your Remote Control Navigation and Destination Buttons The buttons in the middle of the remote are navigation and destination keys. Press the GUIDE button to go to the program guide screen. Press the ACTIVE button to go to the DIRECTV Interactive services home page. -
Page 16: Dvr Control Buttons
Using Your Remote Control DVR Control Buttons These are the DVR control buttons (Rewind, Fast Forward, etc.). They can also be used along with the mode switch to control a DVD player or other auxiliary equipment. PLAY / SLOW MOTION RECORD Starts the recorded video or paused live TV One press allows you to record programs in the... -
Page 17: The Progress Bar
Using Your Remote Control The Progress Bar When you use the DVR control buttons, this indicator bar appears at the bottom of the screen to show where you are in the program and how far you can go forward or back. For live programs, the progress bar is green and the time shown is the time of day. -
Page 18: Viewing Live Television
Viewing Live Television Program Guide To see what’s showing, press the GUIDE button to display the on-screen program guide. The guide holds up to 14 days of programming information for you. You can navigate in the guide three ways: use the ARROW buttons to move one cell at a time up/down/left/right;... -
Page 19: Hd & Sd Channels
Viewing Live Television HD and SD Channels DIRECTV has a tremendous offering of HD channels and they are spread throughout the guide. To find them, look for HD after the channel call sign (i.e. STZHD or CNNHD) in the channel column of the guide and also look for HD after the program title in the guide. -
Page 20: Guide Banners
Viewing Live Television Mini-guide If you are watching a show and want a quick look at what’s on next, press the BLUE button to display a one-line mini program guide. You can use it for the current channel or you can type in a new channel number to see what’s on there. -
Page 21: Interactive Channels
Viewing Live Television Interactive Channels Interactive channels are unique. In addition to video and audio, they also contain a software application that lets you interact with what you see on screen. When accessing these channels you will have to wait a few seconds for the software to download. - Page 22 Viewing Live Television The GSN Game Lounge™ service contains memory and skill games that you can play on-screen using only your remote. There are free as well as subscription-only games. If you become a top scoring player you will see your name on the leader board. Interactive content, like scores, statistics and other information, is also provided along with some of our special sports and entertainment channels.
-
Page 23: Channel Banners
Press MENU on your remote to display the menu. Press MENU again (or EXIT) to make it go away. Note: The menu options may be slightly different on a Standard-Definition DVR than on an HD DVR. These differences are described in Chapter 2. Quick Start CHAPTER 1 -... -
Page 24: Directv Cinema ® And Pay Per View Events
Viewing Live Television DIRECTV Cinema and Pay Per View Events ™ You don’t have to go out for the best and biggest movies and special events! Recent hits and events like sports, comedy and more are available 24 hours a day on DIRECTV Cinema on Demand, channel 1100. -
Page 25: Recording Programs
Recording Programs Recording a Single Show From Live TV To record a show you are currently watching, simply press RECORD once. The progress bar will appear and turn orange and the circle R icon will appear next to the title to let you know your show is now being recorded. From the Guide You don’t have to be watching a show to record it. - Page 26 Recording Programs Changing a Record Option Some live events and even a few TV shows run past their allotted time slot. Your DVR is very smart, but it sets up all recordings based on the start and stop times the broadcasters give us for the program guide. If you are watching while recording and you think your show might go into the next time slot, press INFO on the remote, then select “More Info”...
-
Page 27: Recording An Entire Series
Recording Programs Recording an Entire Series From Live TV If the show you are currently watching is a series and not a single event (like a movie), simply press the RECORD button twice to automatically record every episode of the series. The RECORD icon is now a repeated circle R to let you know that this is a series and not a single recording. -
Page 28: Watching And Deleting Your Recorded Shows
Recording Programs Watching and Deleting Your Recorded Shows To see your list of recorded shows, press LIST on the remote. Alternatively, you can also press MENU and select “My Playlist.” Use the arrow keys to highlight the desired show, press SELECT, then select “Play” (or “Resume” if you’ve already watched part of the show) to start the show. -
Page 29: Chapter 2: Detailed Information
LIVE TV FEATURES AND OPTIONS ......... RECORDED TV SPECIAL FEATURES........37 MAIN MENU OVERVIEW ...............40 MY PLAYLIST ..............43 DIRECTV ON DEMAND .............54 SMART SEARCH (HD DVR Receivers) ......57 ™ SEARCH FOR SHOWS (SD DVR Receivers) ......65 MANAGE RECORDINGS ..........69 MUSIC, PHOTOS & MORE ..........74 CALLER ID ...............77... -
Page 30: Program Guide Features And Options
Program Guide Features and Options Filtering the Guide There may be times when you want to temporarily trim down the channels that are shown in the guide, filtering them according to the type of program you are looking for. For example, you may want to see just sports or movies or news. -
Page 31: Guide Options
Program Guide Features and Options Guide Options From the program guide, press the YELLOW button to display “Guide Options.” Sort Programs by Category Select “Sort programs by category”, then select a category to see a list of shows in chronological order that match your sort criterion. Jump to a Date &... -
Page 32: Live Tv Features And Options
Live TV Features and Options Live TV Options While watching Live TV you can press the YELLOW button to display a list of options to choose from: View Previous Channels, Closed Captioning, Change Favorites List and Audio Options. View Previous Channels Select “View previous channels”... - Page 33 Live TV Features and Options Change Favorites List “Change Favorites List” allows you to select a custom list of channels that you want to see when channel surfing in live TV. You can toggle between “All Channels” (some of which may not be in your programming package), “Channels I Get”...
-
Page 34: Live Buffer
Live TV Features and Options Live Buffer Your DVR saves programs to the hard drive instantly and continuously, while you watch. This “live buffer” lets you pause, rewind, fast forward or instant replay (jump back 6 seconds). If you start watching a program late, even if it is not set to record, you can back up to the beginning (up to 90 minutes) using REWIND, as long as you haven’t changed channels since the program started. -
Page 35: Doubleplay
™ at the same time without missing a minute of either. Your HD DVR stores up to 90 minutes of live TV on two channels. If you tune to a new channel (a third channel) the saved portion on the original channel is cleared. -
Page 36: Quicktune
Live TV Features and Options QuickTune High -Definition Receivers Use QuickTune to get to your nine “must see” channels fast! While watching live TV, press the UP arrow on your remote control. A display with spots for nine channels will appear on screen. To fill the spots, press the GREEN button on your remote control. -
Page 37: Recorded Tv Special Features
Recorded TV Special Features Bookmarks For shows you have already recorded, press PAUSE and then press the GREEN button to bookmark your favorite scene. You can then press and hold the FAST- FORWARD or REWIND buttons as appropriate to advance or return to that scene. -
Page 38: Recording From A Computer Or Phone
Recorded TV Special Features Recording from a Computer or Phone Have you ever forgotten to set a recording and wish you could do it remotely from work or while on the go? Now you can with DIRECTV’s DVR Scheduler. A brief description of the process is provided below, but go to directv.com/ dvrscheduler for all the details. - Page 39 Recorded TV Special Features From a Mobile Phone To schedule a recording from a mobile phone, use your Internet browser to go to m.directv.com. Sign in with your user name and passcode. (As with the PC, you must be registered as a user on directv.com before you can use remote scheduling.) Use the Search for Shows feature to find your program based on Title &...
-
Page 40: Main Menu - Overview
Main Menu - Overview Overview DIRECTV Plus HD DVR Menu ® High -Definition Receivers Press MENU on the remote to display the main menu. My Playlist - Displays the shows you’ve recorded that are ready for viewing. Music, Photos & More - An optional menu item that appears if you connect your DVR to your home computer network. - Page 41 Main Menu - Overview High -Definition Receivers DIRECTV Plus HD DVR Menu ® Manage Recordings - Prioritize upcoming recordings, view recording history and change recording defaults. Caller ID - Contains a log of the phone calls into your home (assuming you have a connected land line and subscribe to Caller ID service from your telephone provider).
- Page 42 Main Menu - Overview Standard -Definition Receivers DIRECTV Plus DVR Menu ® Press MENU on the remote to display the main menu. My Playlist - Displays the shows you’ve recorded that are ready for viewing. Search for Shows - Finds shows by title, actor, channel, or keyword.
-
Page 43: My Playlist
My Playlist My Playlist The Playlist screen displays all your recorded programs. To get to the Playlist screen directly, press LIST on the remote, or press MENU and select “My Playlist.” Titles that you have not viewed yet are shown in bright, white letters, while titles that you have already viewed (partially or completely), are light blue. -
Page 44: Playlist Options
My Playlist Playlist Options From the Playlist screen, press the YELLOW button to display Playlist Options. Mark Programs to Delete Select “Mark programs to delete” if you want to delete two or more programs at once. Sort Programs by Category Select “Sort Programs by Category”... -
Page 45: Managing My Playlist
My Playlist Open/Close All Series programs are grouped in folders in your Playlist. Select “Open/Close All” to open all of your folders so you can see each episode without having to select each series individually. You can also use this option to close them all. Managing My Playlist Your DVR has lots of recording space but it is possible to fill up the hard drive if you record regularly. - Page 46 My Playlist Keep Highlight the show you want to keep and press the BLUE button on your remote. A blue,circle K icon will appear next to the program title indicating it will be kept until you delete it. You may be tempted to make all of your recordings “Keep Until I Delete”, but if your hard drive ever fills up, new recordings can’t take place.
-
Page 47: Directv ® Whole-Home Dvr Service
Here’s how it works: 1. Network Your Receivers: When your HD DVR and HD Non-DVR receivers are networked, it allows them to share content. This is typically completed by an installer during your installation appointment. To learn more about upgrade and eligibility requirements, go to directv.com/wholehome. - Page 48 My Playlist - DIRECTV Whole-Home DVR Service ® High -Definition Receivers 2. Activate DIRECTV Whole-Home DVR Service: ® Once DIRECTV Whole-Home DVR service is activated on your account, ® press the LIST button on your remote. The message on the right will display, confirming the service has been enabled.
- Page 49 An HD DVR has the option to share its Playlist with other receivers. Let’s say you have an HD DVR in your Den, an HD DVR in your Master Bedroom, and an HD Non-DVR in your Kitchen. If you set Share Playlist to “No”...
-
Page 50: Record Programs
Tip: Adding a second HD DVR to your DIRECTV System ® doubles your recording capacity. Don’t worry about having If you’re in a room with an HD DVR, and you’ve authorized DIRECTV Whole- ® to remember which DVR you recorded your shows on. - Page 51 DVR receiver). In order to check the status of scheduled recordings on the To Do List or to change the priority of a series you’ve scheduled to record, go to the HD DVR and press MENU, select “Manage Recordings” for options.
-
Page 52: Directv On Demand
DIRECTV on DEMAND On Demand The DIRECTV on DEMAND service provides access to thousands of movies, shows, sports and more, that you can download and watch anytime you wish. Many are free, but we also offer a full selection of the best DIRECTV Cinema™... -
Page 53: Channels On Demand
DIRECTV on DEMAND Channels On Demand Home Channel 1000 is the DIRECTV on DEMAND home page from which you can access thousands of movies, shows, sports and more. Browse the listings by category such as, Movies, Kids and Family, TV Series, etc.. You can also choose “High-Def”... -
Page 54: Directv Cinema™ On Demand
DIRECTV on DEMAND DIRECTV Cinema™ on Demand Channel 1100 is the DIRECTV Cinema on Demand home page where you can access all of the biggest and best movies. If your DVR is broadband connected you will have access to the entire DIRECTV Cinema on Demand library. -
Page 55: Downloading On Demand Shows
DIRECTV on DEMAND Downloading On Demand Shows To record DIRECTV on DEMAND programs, browse the home pages to find a title you want to download. Select the title to display the program’s info screen. From here, select “Add to Queue” and the program will be placed in your download queue. -
Page 56: Pausing Your Downloads
DIRECTV on DEMAND Pausing Your Downloads If your home network gets congested, you can pause your downloads by pressing the YELLOW button from the Queue screen. Press the YELLOW button a second time to resume downloading. To get to the Queue screen from Live TV, press MENU, select “Manage Recordings”, then select “Queue.”... -
Page 57: Smart Search (Hd Dvr Receivers)
Smart Search (High-Definition Receivers) Smart Search ™ Finding something to watch or record is fast and easy! Whether you’re looking for a movie, show, person, channel, sport, etc… as soon as you start typing we’ll instantly give you results. Smart Search finds all matching programs within the 14-day program guide as well as, within the DIRECTV on DEMAND library (if you’re connected to your home network). -
Page 58: Search Results
Smart Search (High-Definition Receivers) Search Results: Results appear as soon as you type in the first letter of your search term; but with each character entered, your results become more precise. The label on the right side of each item in the results list that tells you what type of content it is. -
Page 59: Person
Smart Search (High-Definition Receivers) If you select a Person (i.e. Actor, Director or Producer): A list of their upcoming programs displays. You’ll have the option to highlight and select individual programs to record or you can select “Autorecord” to record all programs matching the name of the Person you searched for. Autorecords are persistent. -
Page 60: Channel
Smart Search (High-Definition Receivers) If you select a Channel: A list of all programs available on that channel displays in chronological order. Press select on “Tune Now” to view that channel. You can also highlight a program and press the orange REC (record) button on your remote to schedule it to record or press SELECT on a highlighted program for detailed program info and additional options. -
Page 61: Category
Smart Search (High-Definition Receivers) If you select a Category: Sample categories are: Movies, Science Fiction, Baseball, Basketball, Football, Cooking, Exercise/Fitness, Travel, etc… A list of upcoming programs matching that category displays. Highlight a program and press the orange REC (record) button on your remote to schedule it to record or press SELECT on a highlighted listing for detailed program info and additional options. -
Page 62: Keyword
Smart Search (High-Definition Receivers) Keyword Search A keyword search is an in-depth search that looks for programs by matching a keyword (of your choice), to a program’s title or description. The more specific you can be with your keyword, the better your search results will be. - Page 63 Smart Search (High-Definition Receivers) To perform a Keyword search: Press MENU on your remote and select “Smart Search”. Type in your keyword and press the RED button on your remote. Select a category to narrow your results or if you don’t want to narrow, select “All”.
-
Page 64: Recent Searches
Smart Search (High-Definition Receivers) Recent Searches If you’ve ever used the search feature to find a favorite movie, actor, sports team etc…you can reuse your search (and avoid extra typing). Your receiver displays your 25 most recent searches. Press MENU on your remote and select “Smart Search”. Highlight and select “Recent Searches”... -
Page 65: Search For Shows (Sd Dvr Receivers)
Search for Shows (Standard-Definition Receivers) Search for Shows Use the “Search for Shows” option to find programs based on Title, Person, Channel or Keyword. This powerful tool finds all programs that match your criterion within the 14-day program guide as well as the DIRECTV on DEMAND service (if you are connected to your home network). -
Page 66: Search By Person
Search for Shows (Standard-Definition Receivers) If you select “Person”: Use the on-screen keypad to type in the first 3-4 characters of person’s last name. You’ll see a list of names which include actors, actresses and directors. After you select a name, you’ll be given the option select a category to narrow your search results. -
Page 67: Search By Channel
Search for Shows (Standard-Definition Receivers) If you select “Channel”: Use the on-screen keypad to enter the first few letters of the channel name. For example, type in “BL” to find Bloomberg. Highlight and select the desired channel from the list. A list of programs scheduled on that channel will display. -
Page 68: Search By Keyword
Search for Shows (Standard-Definition Receivers) If you select “Keyword”: A keyword search is an in-depth search that looks for programs by matching a keyword (of your choice), to a program’s title or description. The more specific you can be with your keyword, the better your search results will be. •... -
Page 69: Manage Recordings
Manage Recordings Manage Recordings Once you have scheduled recordings, you can find the status and history of those recordings by pressing MENU and selecting “Manage Recordings” to see the following options: To Do List, Queue, History, Purchases, Series Manager (or Prioritizer), Manual Record (or Manual) and Record Defaults. These features are described on the next few pages. -
Page 70: Queue
Manage Recordings Queue The Queue screen displays DIRECTV on DEMAND titles that are in the queue waiting to be downloaded to the hard drive. See the DIRECTV on DEMAND section earlier in this chapter for details. Programs that have completed downloading are displayed in the Playlist. -
Page 71: Series Manager (Prioritizer)
Manage Recordings Series Manager (or Prioritizer) The Series Manager screen (or Prioritizer screen on Standard-Definition Receivers) displays a prioritized list of all the series you’ve scheduled to record. If there is a series recording conflict and the receiver must choose which show to record, it uses this list to determine the priority. -
Page 72: Manual Recording
Manage Recordings Manual Recordings There may be times when you want to set up a manual recording based on channel, time and date. In this case, select Manual Record (or Manual) and enter all of the options as you wish, including whether you want this to be a one-time or recurring recording (i.e. -
Page 73: Recording Defaults
Manage Recordings Record Defaults The Record Defaults screen lets you set the recording options you want the receiver to use every time it does a recording. The receiver’s default settings work best in the vast majority of cases, but you may want to change them to your personal preferences. -
Page 74: Music, Photos & More
“Music, Photos & More” is an optional menu item, only seen if your DVR is connected to your home network, see explanation below. Compatible models include the DIRECTV Plus HD DVR (models HR20 or later) or DIRECTV Plus ® ®... - Page 75 Music, Photos & More Select “Music” to go to the Music submenu, where you can access music by Artist, Album, Song, Playlists and Channel. Your favorite music will play as you watch TV or view photos from your PC. Once the desired songs are selected from the Music submenu, the song’s information will display on the Progress bar.
- Page 76 Music, Photos & More You can listen to music and display photos at the same time. Press the GREEN button on your remote to toggle between music, photos and video control modes. Pressing the STOP button while in music control mode stops the music from playing and the audio from the current channel is then heard.
-
Page 77: Caller Id
Caller ID Caller ID This feature allows you to configure and review your Caller ID (if you have that phone service and your receiver is connected to the phone line). Note: You must subscribe to caller ID service through your phone company and your receiver must be connected to the phone line. -
Page 78: Tvmail
TVmail TVmail DIRECTV sends messages to you via satellite for important news items or special promotions. We also summarize important software changes or new features that we download to your receiver. When you have new mail, the “envelope” message icon will appear in the channel banner of any program you are watching. -
Page 79: Parental, Fav's & Setup
Parental, Fav’s & Setup - Parental Controls Parental, Fav’s & Setup Selecting “Parental, Fav’s & Setup” in the main menu displays items that lets you customize and adjust your DIRECTV viewing experience. Select “Parental Controls” to limit what ratings your children are allowed to watch, how much they can spend for Pay Per View shows or even what hours they can watch DIRECTV Programming. - Page 80 Parental, Fav’s & Setup - Parental Controls Lock Now After setting the restrictions you want (see below for options), choose “Lock Now” from the left menu. You’ll be asked to create a passcode. You’ll want to make it easy enough to remember, but hard enough so someone can’t guess what it is! This passcode will be your entry to unlocking and adjusting limitations in the future.
- Page 81 Parental, Fav’s & Setup - Parental Controls Unlock Your Receiver When parental controls are locked, a message appears if you try to tune to a restricted program explaining why the program is blocked. To temporarily unlock a particular program select “Unlock Now” and enter your passcode. For more unlock options, press MENU, select “Parental Fav’s &...
- Page 82 Parental, Fav’s & Setup - Parental Controls -Movies Select the button next to the overall rating limit you wish to impose. Brief descriptions of the ratings appear for your guidance. -TV Programs Highlight and select the TV rating limit you desire. In addition to allowing or blocking shows by TV rating (i.e.
- Page 83 Parental, Fav’s & Setup - Parental Controls Adult Channels Hide adult channels in the program guide, Manage Recordings screens, and when channel surfing. Select “Adult Channels” (or “Adult Ch’s” on Standard- Definition Receivers), then highlight and select the box to toggle between “Hide Adult”...
- Page 84 Parental, Fav’s & Setup - Parental Controls Spending Limits Limit the amount that can be spent on each Pay Per View purchase. Select “Spending Limits” (or “Spending” on Standard-Definition Receivers). Then enter your preferred spending dollar limit using the numbers on your remote. Viewing Hours Specify days and times when TV watching is allowed in your household.
-
Page 85: Favorite Channels
Parental, Fav’s & Setup - Favorite Channels Favorite Channels The Favorites feature lets you create lists of your favorite channels. If a favorites list is active, you’ll see only those specific channels listed in the guide as well as, when you’re channel surfing in live TV. You can create up to two custom lists on this receiver. -
Page 86: System Setup
Parental, Fav’s & Setup - System Setup System Setup Go to System Setup to review or change your system settings which include, audio options, video format, tv resolution, network setup, remote control setup and more. Press MENU, select “Parental, Fav’s & Setup,” then “System Setup.” Info &... - Page 87 Parental, Fav’s & Setup - System Setup Display Select “Display” and then select either “Preferences”, “Captioning” or “Clock”. Note: For Standard-Definition Receivers select “Display” and then press the GREEN and RED buttons on your remote to move between the Preferences, TV Ratio and Time Zone screens.
- Page 88 Parental, Fav’s & Setup - System Setup Language: Select your preferred on-screen text language. Scrolling Effects: Turn scrolling effects on or off. This affects the appearance of large text areas when they scroll. Banner Time: Set the channel banner time to determine how quickly the banner disappears after moving to a new channel.
- Page 89 Parental, Fav’s & Setup - System Setup -Clock Select “Clock” (or “Time Zone” on Standard-Definition Receivers) to set your time zone and whether you want the receiver to show Daylight Savings time or not. TV Ratio On Standard-Definition Receivers, select the “TV Ratio” tab to set the “aspect ratio”...
- Page 90 Parental, Fav’s & Setup - System Setup Audio Select “Audio” to make a persistent change to your audio settings. Note: To change your preferred audio language temporarily, use the Audio Options item from the Options menu in Live TV, or press GREEN while watching live TV to cycle through the available audio tracks.
- Page 91 Parental, Fav’s & Setup - System Setup HDTV Select “HDTV” and then select either “Video”, “TV Ratio” or “TV Resolution”. Before you get started, you may want to review Appendix 3, About High-Definition, which describes HD formats and resolutions. -Video Set your preference for the following screen options: Native, Screen Format and Bar Color.
- Page 92 Parental, Fav’s & Setup - System Setup If you’re watching a widescreen movie on a Standard 4:3 TV, you may want to choose “Letterbox” which places bars on the top and bottom of the screen. If your HDTV is 4:3 aspect ratio, you may want to “Crop” or cut off the content at the left and right side of the screen while preserving the proportion of the picture that remains.
- Page 93 Parental, Fav’s & Setup - System Setup Network Setup High -Definition Receivers Select “Network Setup” to setup and test the connection of your DVR to the Internet. See Appendix 2, “How to Network Your DVR” for details. Remote Control When the MODE switch on your remote is in the left-most position, it controls your DIRECTV Receiver.
- Page 94 Parental, Fav’s & Setup - System Setup -IR/RF Setup Certain remote control models feature RF (radio frequency) capability. Refer to the model number printed on the top left corner of your DIRECTV Remote Control. Look for the letter(s) “R” or “RB” are at the end of the model number which indicates that the remote supports radio frequency.
- Page 95 On High-Definition Receivers, the “Antenna Setup” option can be used to display channels received via your off-air antenna in the Guide. You must have an off-air (terrestrial) antenna connected to your HD DVR Receiver. Not all HD DVR’s have a built-in off-air tuner. Whole-Home High -Definition Receivers If you’re using DIRECTV...
- Page 96 Parental, Fav’s & Setup - System Setup Reset The Reset screen lets you restart the receiver, reset to factory defaults, or reset everything. “Restart Receiver” is the same function as pressing the red reset button behind the access card door on the front of the receiver. This option does not affect your settings and scheduled recordings.
- Page 97 Parental, Fav’s & Setup - System Setup Access Card Standard -Definition Receivers Do not select Access Card unless you have a new access card provided by DIRECTV. DIRECTV will provide new access cards and instructions when necessary. Follow the on-screen directions to replace your access card.
-
Page 98: Help Topics And Faqs
Parental, Fav’s & Setup - System Setup Help Topics and FAQs For helpful information about your receiver as well as, frequently asked questions (FAQs), press MENU, select “Parental, Fav’s & Setup” and then select “Help”. Select a folder to open it, and then select a topic of your choice. -
Page 99: Chapter 3: Connections For Tv And Auxiliary Equipment
CHAPTER 3 - CONNECTIONS FOR TV AND AUXILIARY EQUIPMENT CONNECTIONS ..............100 SETUP AND ACTIVATION ..........104... -
Page 100: Connections
Connections For the best user experience and system performance we highly recommend that your system be professionally installed. Call 1-800-531-5000 to schedule an installation. Your Phone Connection Connecting your receiver to a land-based telephone line saves you money because it allows you to purchase DIRECTV Cinema™ movies and Pay-Per-View events without calling DIRECTV to order. -
Page 101: Video Connections
Connections All of the video and audio outputs on your receiver offer good quality. Pick one of each from WARNING: the list below, based on the connectors your TV supports; they are listed in order, with the Do not connect your receiver (or any other equipment such as a TV or VCR) to the AC power highest quality options at the top of each list. - Page 102 This example also shows using a VCR or DVD burner with RCA audio and video connectors. Surround System DIRECTV Plus ® DIRECTV Plus ® Example: TV with Component Video Connectors...
-
Page 103: Connections For Tv And Auxiliary Equipment
This example also shows using a VCR or DVD burner with RCA audio and video connectors. Surround System DIRECTV Plus ® Television Surround System Example: TV with RCA Connectors... -
Page 104: Setup And Activation
DIRECTV Service. Make sure the MODE switch at the top of the remote control is set to DIRECTV, which is the far-left position. Press PWR. The DIRECTV Plus DVR will turn on. (Make sure your TV is also turned on!) ®... -
Page 105: Chapter 4: Troubleshooting
CHAPTER 4 - TROUBLESHOOTING TROUBLESHOOTING TIPS ..........106 DIRECTV RECEIVER OR TV PROBLEMS ......108 ® RECORDED TV TROUBLESHOOTING .........116 REMOTE CONTROL PROBLEMS ........120 RUNNING THE SYSTEM TEST ...........121... -
Page 106: Troubleshooting Tips
- Press the red RESET button behind the access card panel door on the front of the DIRECTV Receiver, then wait for program guide information to be acquired. ® - If the problems persist, try unplugging the power cord of the DIRECTV Plus DVR for 15 ® seconds, then plug it in again. -
Page 107: On-Screen Error Messages
Troubleshooting Tips On-Screen Error Messages There may be times when you see an on-screen message similar to the one on the right. The top line of the message gives a brief description of what causes the on-screen message to display, while the second line displays instructions to follow. -
Page 108: Directv Receiver Or Tv Problems
• Press the INPUT button on the TV remote control to change video source. - If problems persist, turn off all equipment that is connected to your TV, wait a few minutes, then turn the DIRECTV Plus DVR back on. -
Page 109: Troubleshooting
- Make sure the remote control MODE switch is in the left-most position (DIRECTV mode), and press PWR (power key) or press POWER button on the front panel of the receiver. - Verify that the power cord is plugged into the DIRECTV Plus DVR and the wall outlet. - Page 110 DIRECTV Receiver or TV Problems ® Problem: DIRECTV Plus DVR Turns off while playing ® Your receiver turns off unexpectedly. Possible Causes: - Excessive heat may have caused the receiver to go into a standby state. - Electronic protection circuit may have been activated due to a power surge.
- Page 111 ® - You may be tuned to a channel that is not currently broadcasting, or that you don’t subscribe to. Solution: - Check that DIRECTV Plus DVR and TV are both powered on. ® - Read Chapter 3, “Connections for TV and Auxiliary Equipment” for instructions about connecting your receiver.
- Page 112 - Weather issues are usually temporary. Wait for the weather to clear and your signal should return to normal. - If there are no weather problems in your area, reset your DIRECTV Plus DVR using the red RESET button behind the door on the ®...
- Page 113 DIRECTV Receiver or TV Problems ® Problem: Partial programming loss. Channels missing from the Guide. Channel is in the Guide but I can’t tune to it. Your Program Guide is missing channels, or you are unable to use the guide to tune to a channel. Possible Causes: - The channels might be excluded from the Favorites list currently in use.
- Page 114 DIRECTV Receiver or TV Problems ® Problem: My video and audio are out of sync. The audio track does not match the lip movements on the screen. Possible Causes: - Problem with how the program was produced or how it was sent to DIRECTV for broadcast. - Your surround sound system may be out of sync, or may be set up incorrectly.
- Page 115 DIRECTV Receiver or TV Problems ® Solution: - Verify “MUTE” button not activated. - Raise or lower the volume. Did volume meter display on TV? - Test sound on TV by changing the input to another source, such as a DVD player, game box, or antenna. - If connected to stereo, make sure stereo is on and set to the correct mode.
-
Page 116: Recorded Tv Troubleshooting
Problem: I wanted to record a program, but I got an error message saying it conflicted with another scheduled record. What do I do? Your DIRECTV Plus DVR can record up to two programs at once, or it can record one program while you watch another live program. - Page 117 Recorded TV Troubleshooting Solution: - If you tried to record three programs at once, or watch a live TV program with two others recording, you will need to decide which recording to cancel. - If the overlap is a couple of minutes (for example, some networks occasionally start programs at 8:59 instead of 9:00 p.m.), adjust your recording start and end times in the Recording Options.
- Page 118 Recorded TV Troubleshooting Problem: A program I recorded was displayed in the My Playlist screen, but got deleted before I could watch it. Your recording(s) were deleted before you had a chance to view them. Possible Causes: - Someone else manually deleted the program. - The hard drive on your DVR is full.
- Page 119 Recorded TV Troubleshooting Problem: I’ve set up a series recording, but now I get a bunch of reruns and multiple copies of the same program. Your DVR is getting full of duplicate recordings of the same program, or old episodes of the chosen show. Possible Causes: - Your series is set to record both First Run and Repeat episodes.
-
Page 120: Remote Control Problems
- If you’re entering a channel number that is less than four digits long, the receiver might wait two seconds before tuning to the channel. Press ENTER after entering a channel number to tune immediately. - If you are trying to operate a device other than the DIRECTV Plus DVR that you have programmed the remote to control, make sure ®... -
Page 121: Running The System Test
Running the System Test The System Test allows you to run a basic diagnostics check on your DIRECTV Plus DVR. If you are experiencing any trouble with ® your receiver, run the system test. It will also allow you to get your access card and receiver ID numbers or to initiate diagnostic procedures on your digital satellite receiver. - Page 122 DIRECTV PLUS DVR USER GUIDE ®...
- Page 123 CHAPTER 5 - WARRANTY AND OTHER INFORMATION LIMITED 90-DAY WARRANTY ..........124 DIRECTV PROTECTION PLAN ..........127 FCC CUSTOMER INFORMATION .........129 TERMS & CONDITIONS FOR USE OF SOFTWARE ....133...
-
Page 124: Limited 90-Day Warranty
Limited 90-Day Warranty DIRECTV warrants your DIRECTV Plus DVR (Model Number: R16, R22) or DIRECTV Plus HD DVR (Model Number: HR20, HR21, HR22, ® ® HR23, HR24) and any included accessories against defects in material or workmanship for a period of ninety (90) days after the date of acquisition. -
Page 125: Before Requesting Repair Service
Limited 90-Day Warranty What is Excluded? Your warranty does NOT cover: Labor charges for installation or setup of the product. Installation, performance of, or repair of: audio/video cabling, telephone line, or accessory attachments used with the product. Product replacement because of misuse, accident, lightning damage, unauthorized repair, or other cause not within the control of DIRECTV. - Page 126 Limited 90-Day Warranty To Get Warranty Service... Warranty service will be provided by DIRECTV. If you believe you need service for your Receiver, contact DIRECTV at 1-800-DIRECTV. A representative will go through a diagnostic checklist with you. If it is determined that the product needs to be returned for service or exchanged, you will receive a return authorization number.
-
Page 127: Directv Protection Plan
DIRECTV PROTECTION PLAN Safeguard your DIRECTV System with the ultimate in professional technical service. For a low monthly fee, the DIRECTV PROTECTION ® PLAN covers the components of your entire DIRECTV System, giving you affordable peace of mind and comprehensive support to ensure ®... - Page 128 DIRECTV PROTECTION PLAN Sign up today for the DIRECTV PROTECTION PLAN by calling 1-800-DIRECTV The DIRECTV PROTECTION PLAN is offered by AIG Warranty Guard and underwritten by New Hampshire Insurance Company on behalf of DIRECTV where authorized by law. Certain limitations may apply. Pricing, terms and conditions of the DIRECTV PROTECTION PLAN are subject to change.
-
Page 129: Fcc Customer Information
FCC Customer Information This device complies with Part 15 of the FCC Rules. Operation is subject to the following two conditions: (1) this device may not cause harmful interference, and (2) this device must accept any interference received, including interference that may cause undesired operation. - Page 130 FCC Customer Information This equipment generates, uses, and can radiate radio frequency energy and, if not installed and used in accordance with the instructions, may cause harmful interference to radio communications. However there is no guarantee that interference will not occur in a particular installation.
- Page 131 FCC Customer Information If requested, this information must be provided to your telephone company. This equipment uses the following USOC Jack: RJ11C. A plug and jack used to connect this equipment to the premises wiring and telephone network must comply with the applicable FCC Part 68 rules and requirements adopted by ACTA.
- Page 132 FCC Customer Information If trouble is experienced with this unit, for repair or warranty information, please contact DIRECTV Customer Care at the address and phone number listed below. If the equipment is causing harm to the network, the telephone company may request that you disconnect the equipment until the problem is resolved.
-
Page 133: Terms & Conditions For Use Of Software
TERMS AND CONDITIONS FOR USE OF SOFTWARE (“TERMS”) THE DIRECTV Receiver INCORPORATES SOFTWARE WHICH IS OWNED BY DIRECTV, INC. (“DIRECTV”) OR ITS THIRD PARTY ® LICENSORS (the “Software”). BEFORE USING THE RECEIVER PLEASE READ THESE TERMS. IF YOU DO NOT AGREE TO THESE TERMS YOU MAY NOT USE THE RECEIVER AND SHOULD IMMEDIATELY RETURN THE RECEIVER TO DIRECTV OR YOUR SUPPLIER. - Page 134 TERMS AND CONDITIONS FOR USE OF SOFTWARE (“TERMS”) C. Ownership of Software and Reservation of Rights The Software is licensed, not sold, to you for use only under the terms of this license agreement, DIRECTV is NOT transferring title or any ownership rights in the Software to you and DIRECTV and its suppliers reserve all rights not expressly granted to you.
- Page 135 TERMS AND CONDITIONS FOR USE OF SOFTWARE (“TERMS”) F. Third Party Beneficiaries DIRECTV’S LICENSORS AND SUPPLIERS SHALL BE THIRD PARTY BENEFICIARIES OF THESE LICENSE TERMS, AS APPLICABLE. YOUR USE OF THE RECEIVER CONSTITUTES YOUR ACKNOWLEDGEMENT THAT YOU HAVE READ THESE TERMS AND AGREE TO BE BOUND HEREBY.
- Page 136 TERMS AND CONDITIONS FOR USE OF SOFTWARE (“TERMS”) GNU GENERAL PUBLIC LICENSE Version 2, June 1991 Copyright © 1989, 1991 Free Software Foundation, Inc., 51 Franklin Street, Fifth Floor, Boston, MA 02110-1301 USA Everyone is permitted to copy and distribute verbatim copies of this license document, but changing it is not allowed.
- Page 137 TERMS AND CONDITIONS FOR USE OF SOFTWARE (“TERMS”) For example, if you distribute copies of such a program, whether gratis or for a fee, you must give the recipients all the rights that you have. You must make sure that they, too, receive or can get the source code. And you must show them these terms so they know their rights.
- Page 138 TERMS AND CONDITIONS FOR USE OF SOFTWARE (“TERMS”) Activities other than copying, distribution and modification are not covered by this License; they are outside its scope. The act of running the Program is not restricted, and the output from the Program is covered only if its contents constitute a work based on the Program (independent of having been made by running the Program).
- Page 139 TERMS AND CONDITIONS FOR USE OF SOFTWARE (“TERMS”) sections when you distribute them as separate works. But when you distribute the same sections as part of a whole which is a work based on the Program, the distribution of the whole must be on the terms of this License, whose permissions for other licensees extend to the entire whole, and thus to each and every part regardless of who wrote it.
- Page 140 TERMS AND CONDITIONS FOR USE OF SOFTWARE (“TERMS”) operating system on which the executable runs, unless that component itself accompanies the executable. If distribution of executable or object code is made by offering access to copy from a designated place, then offering equivalent access to copy the source code from the same place counts as distribution of the source code, even though third parties are not compelled to copy the source along with the object code.
- Page 141 TERMS AND CONDITIONS FOR USE OF SOFTWARE (“TERMS”) then the only way you could satisfy both it and this License would be to refrain entirely from distribution of the Program. If any portion of this section is held invalid or unenforceable under any particular circumstance, the balance of the section is intended to apply and the section as a whole is intended to apply in other circumstances.
- Page 142 TERMS AND CONDITIONS FOR USE OF SOFTWARE (“TERMS”) Foundation; we sometimes make exceptions for this. Our decision will be guided by the two goals of preserving the free status of all derivatives of our free software and of promoting the sharing and reuse of software generally. NO WARRANTY 11.
- Page 143 TERMS AND CONDITIONS FOR USE OF SOFTWARE (“TERMS”) exclusion of warranty; and each file should have at least the “copyright” line and a pointer to where the full notice is found. <one line to give the program’s name and a brief idea of what it does.> Copyright (C) <year>...
- Page 144 TERMS AND CONDITIONS FOR USE OF SOFTWARE (“TERMS”) This General Public License does not permit incorporating your program into proprietary programs. If your program is a subroutine library, you may consider it more useful to permit linking proprietary applications with the library. If this is what you want to do, use the GNU Lesser General Public License instead of this License.
-
Page 145: Appendices
APPENDICES APPENDIX 1: RECEIVERS FRONT AND BACK PANELS ..146 APPENDIX 2: HOW TO NETWORK YOUR RECEIVER ...154 APPENDIX 3: ABOUT HIGH-DEFINITION ......162... -
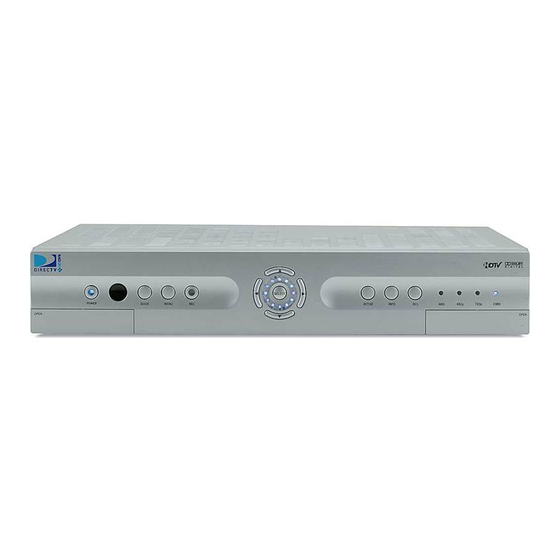
Page 146: Appendix 1: Receivers Front And Back Panels
Appendix 1: Receivers Front and Back Panels DIRECTV Plus HD DVR ® FRONT PANEL: The buttons on the front panel perform the same functions as similarly named buttons on the remote control. You can use the front panel buttons at any time, but they are especially useful if you misplace your remote control or the batteries die. - Page 147 Appendix 1: Receivers Front and Back Panels DOOR PANEL, USB PORT – For future use. USB 2.0 Host(FRONT/REAR EACH 5V = 500mA) POWER – Turns your DIRECTV Receiver on or off. Your DIRECTV Receiver still records and receives messages when powered off. ®...
- Page 148 Appendix 1: Receivers Front and Back Panels BACK PANEL: 11 12 Your equipment may not look exactly like the model illustrated. DIRECTV PLUS DVR USER GUIDE ®...
- Page 149 Appendix 1: Receivers Front and Back Panels SATELLITE IN 1 (SWM-2) – Connect one line from your satellite dish here. A Single Wire Multi-Switch (SWM) connection, if applicable, is made to this satellite in port. SATELLITE IN 2 – Connect the second line from your satellite dish here. S-VIDEO OUT –...
- Page 150 Appendix 1: Receivers Front and Back Panels DIRECTV Plus ® FRONT PANEL: The buttons on the front panel perform the same functions as the remote control. You can use the front panel buttons at any time, but they are there just in case you misplace your remote control or the batteries die.
- Page 151 DOOR PANEL, USB PORT – For future use. USB 2.0 Host(FRONT/REAR EACH 5V = 500mA) POWER – Turns your DIRECTV Plus DVR on or off. Your DIRECTV Plus DVR still records and receives messages when powered ® ® off. The power light flashes when you press a key on the remote to let you know it has received the command.
- Page 152 Appendix 1: Receivers Front and Back Panels BACK PANEL: Your equipment may not look exactly like the model illustrated. DIRECTV PLUS DVR USER GUIDE ®...
- Page 153 Appendix 1: Receivers Front and Back Panels SATELLITE IN 1 (SWM-2) – Connect one line from your satellite dish here. A Single Wire Multi-Switch (SWM) connection, if applicable, is made to this satellite in port. SATELLITE IN 2 – Connect the second line from your satellite dish here. OFF AIR IN –...
-
Page 154: Appendix 2: How To Network Your Dvr
Appendix 2: How to Network Your DVR Network Requirements: To use your DIRECTV Receiver on your home network, you will need: A compatible DIRECTV Receiver, such as the DIRECTV Plus HD DVR (models HR20 or later) or DIRECTV Plus ® ® DVR (model R22) - Page 155 Appendix 2: How to Network Your DVR Wired Step 1 - Connect your DIRECTV DVR Receiver to your router Direct Connection Ethernet Cable Connect one end of your Ethernet cable to the Ethernet port on the back of your router. DVR Receiver Router Connect the other end of the Ethernet cable to the Ethernet port on the back of your...
- Page 156 Appendix 2: How to Network Your DVR Step 2 - Verify that you are connected Figure A To verify you are connected: Press MENU on your DIRECTV Remote Select Parental, Fav’s & Setup Select System Setup Select Network Setup Figure B Choose Connect Now Select...
- Page 157 Appendix 2: How to Network Your DVR Powerline IMPORTANT: Use your home’s existing power lines to connect your DSL/cable router to your DIRECTV DVR Please be advised that your Ethernet Adapters must Receiver via Ethernet Adapters that use HomePlug or a similar power line technology. ®...
- Page 158 Appendix 2: How to Network Your DVR Step 3 - Verify that you are connected Figure A To verify you are connected: Press MENU on Your DIRECTV Remote Select Parental, Fav’s & Setup Select System Setup Select Network Setup Figure B Choose Connect Now Select...
- Page 159 Appendix 2: How to Network Your DVR Wireless Create a wireless connection between your wireless router and your DIRECTV DVR Receiver, so your receiver can access the Internet. Ethernet Cable Along with the Network Requirements at the beginning of Appendix 3 your will need: DVR Receiver Wireless A wireless adapter that uses an Ethernet port to connect to a media device.
-
Page 160: Home Network
Appendix 2: How to Network Your DVR Step 2 - Ensure the wireless adapter is recognized by your home network. Once your router detects the wireless adapter it will prompt you to configure the two devices. Set Up Now. Select Highlight your wireless network and press SELECT to display a blue dot next to your network. - Page 161 Appendix 2: How to Network Your DVR Figure A Step 3 - Verify that you are connected Press MENU on Your DIRECTV Remote Select Parental, Fav’s & Setup Select System Setup Select Network Setup Choose Connect Now Figure B Select Continue after successfully connecting to DIRECTV via the Internet (See figure A.)
-
Page 162: Appendix 3: About High-Definition
Appendix 3: About High-Definition This section applies to HD receivers only. Aspect Ratio In addition to resolution and interlacing, a television picture is also defined by its aspect ratio—referring to the shape of the screen as defined by the ratio of the screen’s width to its height. For analog TV, the aspect ratio is 4 units wide by 3 units high (4:3). - Page 163 Resolution (RES) Key on Receiver Front Panel This key is used to through cycle all available resolutions on your DIRECTV HD DVR. It does not through cycle format settings. If video and audio are not appearing, it may be because the current resolution setting is not supported by your television. By pressing this key, you can check all available resolutions to see if that solves the problem.
- Page 164 Appendix 3: About High-Definition Supported Resolutions The following table shows the resolutions that can be output from each type of connection: Output Connection Available Resolutions HDMI 1080i, 1080p, 720p, 480i, 480p Component Video (YPbPr) 1080i, 720p, 480i, 480p Note: 720p, 1080i and 1080p are HD formats. 480i and 480p S-Video 480i are not.
- Page 165 Appendix 3: About High-Definition - Stretch In the Stretch setting, instead of adding bars to the top and bottom, the 16:9 program image is stretched vertically until it’s tall enough to fill the screen. Your entire screen will be full, but the program images are stretched to compensate. - Crop This format crops (cuts off) the left and right portions of the 16:9 frame so it fits the 4:3 screen.
- Page 166 Appendix 3: About High-Definition 16:9 TVs Showing 4:3 programs For a wide screen 16:9 TV showing a standard 4:3 TV program, the program is too tall to fit the screen. Your choices here include: - Pillar Box Here the 4:3 image is shrunk until the entire height of the program fits on your TV. Since the aspect ratio is maintained, the image is no longer wide enough to fill the screen, so gray or black bars are seen at the left and right edges.
- Page 167 Appendix 3: About High-Definition If your display is a 16:9 format TV or monitor, your format options include these: For 4:3 program signals: Pillar Box Stretch Crop For 16:9 program signals: Fills TV Screen...
-
Page 168: Index
Index Channel Blocks - 83 DVD burner - 102-103 Clock - 89 DVR - 3, 102-103 Access Card - 86, 97, 139, 143 Closed Captioning - 32, 88 DVR Control Buttons - 14 Activation - 106 Component Video Output - 101-103 Advance - 16, back cover Connections - 101-103 Album - 75... - Page 169 Index channel programs list - 32 Mode Switch - 14, back cover customizing - 31 Model Number - 124 Keep - 45, 47, 71, 75 favorite channels - 31 Movie Ratings - 81 Keyword Search - 55 filtering - 30 Music - 3, 40, 74-75 jump to a date and time - 31 Mute - back cover...
- Page 170 Index Power - 10, 11, 14, 101, 106, 139, 141, defaults - 73 143, 145 from Live TV - 25, 27 On Demand - See DIRECTV on Power Surge - 10 from the guide - 25, 27 DEMAND Powerline Connection - 157-158 light - 138, 139 Other Ratings - 81, 82 Press and Hold Buttons - 37...
- Page 171 VCR - 100-103 40, 52 S-video - 101, 103, 149, 153, 164 Video - 100-103 Smart Search (HD DVR) - 54 VOD - 55, 56, 65, inside back cover Serial Number - 8 VOD Queue - 55 Series - 26, 27, 43, 50, 71...
- Page 172 Activate your DIRECTV programming today at 1-800-DIRECTV (1-800-347-3288). ©2010 DIRECTV, Inc., DIRECTV and the Cyclone Design logo, DIRECTV Active, DIRECTV INTERACTIVE, DIRECTV PLUS, HomePlug, GSN Game Lounge™ and the DIRECTV Plus DVR and DIRECTV Plus HD DVR logos are trademarks of DIRECTV, Inc.
- Page 174 Icon Reference Indicate that a show’s start or end time is earlier or later than is visible in the Guide program cell. LEFT and RIGHT arrows on the remote offer special functionality. Arrow Icons Objects are scrollable above or below the visible window. UP and DOWN arrows on the receiver front panel offer special functionality.
- Page 175 Program is currently downloading. Indicates program shown in letterbox format. Denotes an error condition has occurred. Appears when at least one rating or channel is allowed. Appears when at least one rating or channel is blocked. Used to create/enter passcodes in parental controls. On screen color hint indicating a special function activated by pressing the related color button on the remote control.