
Related Manuals for Chauvet DMX-155 Omega I


Summary of Contents for Chauvet DMX-155 Omega I
-
Page 1: User Manual
DMX-155 Omega™ I USER MANUAL CHAUVET, 3000 N 29 Ct, Hollywood, FL 33020 U.S.A (800) 762-1084 – (954) 929-1115 FAX (954) 929-5560 www.chauvetlighting.com... -
Page 2: Table Of Contents
ABLE OF ONTENT BEFORE YOU BEGIN................................3 ....................................3 HAT IS INCLUDED ..................................3 NPACKING NSTRUCTIONS AC P ......................................3 OWER ..................................3 AFETY NSTRUCTIONS INTRODUCTION ................................... 4 ......................................4 EATURES DMX C ..................................4 HANNEL UMMARY .................................... 5 RODUCT VERVIEW SETUP .................................... -
Page 3: Before You Begin
Avoid direct eye exposure to lamp while it is on. lamp source. Caution! There are no user serviceable parts inside the unit. Do not open the housing or attempt any repairs yourself. In the unlikely event your unit may require service, please contact CHAUVET. DMX-155 User Manual 2004-09-23/12:12... -
Page 4: Introduction
NTRODUCTION Features • advanced 4 channel DMX-512 fixture • 14 color/gobo combination plus open • manual focus • pan/tilt invert option • reliable micro-stepping motors • built-in beat activated programs • built-in microphone • automatically enters stand-alone mode when no DMX signal is present •... -
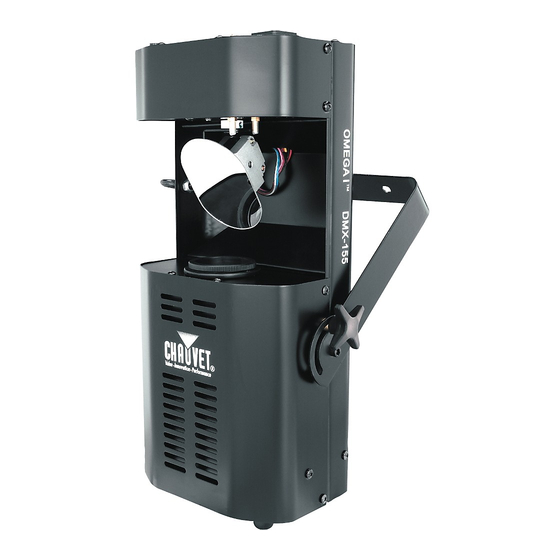
Page 5: Product Overview
Introduction Product Overview Audio Sensitivity (POT) Adjust audio sensitivity to improve fixture response Integrated Mic DMX Input Locking 3-pin XLR male socket DMX Output ¼ Remote 3-pin XLR female socket Controller Input For optional CH-X blackout controller Power Input Fuse Holder Dipswitches Voltage Selector Provided for DMX... -
Page 6: Setup
ETUP Lamp You will need to install a lamp prior to the initial operation of the fixture. An EFR5 150w halogen lamp is included. Warning! When replacing the lamp, please wait 15 minutes after powering down to allow the unit to cool down! Always disconnect from main power prior to lamp replacement. Do not touch the envelope (glass area) of the bulb with bare hands. -
Page 7: Mounting
Setup Mounting ORIENTATION This fixture may be mounted in any position provided there is adequate room for ventilation. R IG G IN G Hanging Clamp It is important never to obstruct the fan or vents pathway. Mount the fixture using, a suitable “C” or “O” type clamp. Adjust the angle of the fixture by loosening both knobs and tilting the fixture. -
Page 8: Operating Instructions
PERATING NSTRUCTIONS Operating Modes The Omega I can be operated in three ways. • A stand-alone mode will listen to sound and run through its diverse range of built in programs. A CH-x wired controller provides remote blackout control. • Master/Slave mode will allow the command of up to as many units you want in a synchronized light show to the sound. -
Page 9: Pan & Tilt Invert
Appendix If this is your first time addressing a fixture using the DMX-512 control protocol then I suggest jumping to the Appendix Section and read the heading “DMX Primer”. It contains very useful information that will help you understand its use. Set the start address using the group of DIP switches located usually on bottom of the fixture. -
Page 10: Appendix
XLR male to female connectors. The shield connection is pin 1, while pin 2 is Data Negative (S-) and pin 3 is Data positive (S+). CHAUVET carries 3-pin XLR DMX compliant cables, DMX-10 (33’), DMX-4.5 (15’) and DMX-1.5 (5’) -
Page 11: Dmx Channel Values
Appendix DMX Channel Values Channel Value Function Color/Gobo Combo Closed Open Combo 01 Combo 02 Combo 03 Combo 04 Combo 05 Combo 06 Combo 07 Combo 08 Combo 09 Combo 10 Combo 11 Combo 12 Combo 13 Combo 14 Combo Wheel Scroll Sound activated mode Strobe/Gobo Strobe Open... -
Page 12: Maintenance
Package must be clearly labeled with a Return Merchandise Authorization Number (RA #). Products returned without an RA # will be refused. Call CHAUVET and request RA # prior to shipping the fixture. Be prepared to provide the model number, serial number and a brief description of the cause for the return. -
Page 13: General Troubleshooting
Remote does not work Make sure connector is firmly connected to device Stand alone mode All CHAUVET lighting fixtures featuring stand-alone functions do not require additional settings, simply power the fixture and it will automatically enter into this mode DMX-155 User Manual... -
Page 14: Technical Specifications
Appendix Technical Specifications WEIGHT & DIMENSIONS Length..........................356 mm (14 in) Width ..........................279 mm (11 in) Height ..........................279 mm (11 in) Weight ........................4.72 Kgs (10.4 lbs) POWER Switch-selectable power setting ..............115V 60 Hz or 230V 50 Hz AC input......................3-prong IEC 60320 C14 LAMPS EFR5 .........................500 hrs, 150W 15V...