Table of Contents
Advertisement
Quick Links
DVD RECORDER
BD-X201M
Thank you for purchasing this product. Before operating this
unit, please read the instructions carefully to ensure the best
possible performance.
For Customer Use :
Enter below the Serial No. which is located on the bottom
of the unit.
Retain this information for future reference.
Model No. BD-X201M
Serial No.
OPERATE
DVD RECORDER BD-X201M
AUDIO
TITLE
CH1
DOLBY DIGITAL
LPCM MPEG
CH2
PHONES
REV
STOP
INSTRUCTIONS
CHAPTER
TOP
PLAY
FWD
PAUSE
REC
MENU
MENU
This instruction book is made from 100 % recycled paper.
BUSY
OPEN/CLOSE
OPTION DV
SET
LLT0073-001A
Advertisement
Table of Contents

Related Manuals for JVC BD-X201M


Summary of Contents for JVC BD-X201M
-
Page 1: Dvd Recorder
DVD RECORDER INSTRUCTIONS BD-X201M BUSY OPEN/CLOSE OPERATE OPTION DV DVD RECORDER BD-X201M AUDIO TITLE CHAPTER DOLBY DIGITAL LPCM MPEG PHONES STOP PLAY PAUSE MENU MENU Thank you for purchasing this product. Before operating this unit, please read the instructions carefully to ensure the best possible performance. -
Page 2: Important Safeguards
IMPORTANT SAFEGUARDS 1. Read all of these instructions. 2. Save these instructions for later use. 3. All warnings on the product and in the operating instructions should be adhered to. 4. Unplug this appliance system from the wall outlet before cleaning. Do not use liquid cleaners or aerosol cleaners. Use a damp cloth for cleaning. -
Page 3: Safety Precautions
*Ces symboles ne sont utilisés qu’aux Etats-Unis. Changes or modifications not approved by JVC could void the user’s REMARQUE: authority to operate the equipment. La plaque d’identification (numéro de série) se trouve sur le panneau arrière de l’appareil. - Page 4 Brussel, Belgium tel: +32(02)529-4211 tel: +30-210-4832855 7. JVC Professional Europe Ltd. Leiden, Nederland JVC Plein, De Heyderweg 2, 2314 XZ Leiden, Nederland tel: +31(071)545-3333 Supplement This apparatus is designed for rack mounting or is used close to other apparatus. In order to keep the best performance and furthermore for electromagnetic compatibility we recommend to use cables...
- Page 5 Beilage Dieses Gerät ist zum Gestelleinbau und zum Betreiben in unmittelbarer Nähe anderer Geräte und Vorrichtungen geeignet. Zur Erzielung einer optimalen Betriebsleistung und zur Einhaltung elektromagnetischer Schutzbestimmungen wird die Verwendung von Kabeln empfohlen, die jeweils die angegebene Länge nicht überschreiten sollten: Anschluss Kabeltyp Länge...
- Page 6 Suplemento Este aparato está diseñado para su montaje en bastidores o para ser utilizado junto a otro aparato. Para lograr un mejor rendimiento y, además, conseguir compatibilidad electromagnética, se recomienda utilizar cables que no excedan las siguientes longitudes: Puerto Cable Longitud AC IN Exclusive Cable...
- Page 7 Mains Supply (AC 230 V ` ) WARNING – THIS APPARATUS MUST BE EARTHED Changes or modifications not approved by JVC could The wires in this mains lead are coloured in accordance void the user’s authority to operate the equipment.
- Page 8 WARNUNG – DIESES GERÄT MUSS Der Hauptschalter befindet sich auf der Rückseite der Einheit. GEERDET WERDEN. Die Drähte der Netzleitung sind mit den folgenden Änderungen oder Modifizierungen die nicht von JVC Farben gekennzeichnet; zugelassen sind können die Gebrauchsvollmacht um GRÜN und GELB : ERDUNG die Anlage zu betreiben ungültig machen.
- Page 9 AVERTISSEMENT – CET APPAREIL DOIT Les changements ou modifications qui ne sont pas ETRE RELIE A TERRE approuvés par JVC peuvent annuler l’autorité de Les fils du câble d’alimentation de cet appareil sont l’utilisateur de faire fonctionner cet équipement. codés avec les couleurs suivantes :...
- Page 10 TENER TOMA DE TIERRA Los conductores del cable principal de este aparato Los cambios o modificaciones no aprobados por JVC tienen un color diferente según el siguiente código: podrían anular la autoridad del usuario de hacer VERDE y AMARILLO : TIERRA funcionar el equipo.
- Page 11 L’interruttore dell’alimentazione elettrica si trova sul retro Per la Gran Bretagna: IMPORTANTE! dell’apparecchio. Alimentazione principale (AC 230 V `) ATTENZIONE! L’UNITÀ DEVE ESSERE Cambiamenti o modifiche non approvate da JVC COLLEGATA ALL’IMPIANTO DI MESSA A possono annullare il diritto dell’utente di mettere in TERRA funzione l’apparecchiatura.
-
Page 12: Table Of Contents
Thank you for purchasing Trademarks & Copyrights this DVD Recorder. ● , Dolby and the Double “D” symbols are trademarks of Dolby Laboratories. These instructions are for the BD-X201ME and BD-X201MU. ● The copying, broadcasting, screening, or rental of copyrighted material without the authorization of the copyright holder is prohibited by law. - Page 13 Settings & Controls for Recording DVD Recording ................................. 26 Preparing a Disc for Recording ............................27 Pre-Recording Settings ..............................29 Specifying the Disc Status Created when the Disc was Finalized ..................30 Setting the Encoding Format for Audio & Video ........................ 31 Adjusting of Audio Recording Levels ..........................
-
Page 14: Introduction
Introduction Overview of Functions Video and audio signals from this DVD recorder’s input terminals can be recorded to DVD-R or DVD-RW (video mode only). ( Page 29) The types of signals that can be used are as follows. Video: Composite video, YC separate, or DV signals (including audio) Audio: Analog audio or DV signals (including video) A wide range of recording methods are supported. -
Page 15: Precautions For Dvd Recorder Use
● Do not place heavy objects such as a monitor on top of the this DVD recorder was purchased or your JVC Authorized DVD recorder. dealer. ● Do not insert foreign objects into the disc tray opening. -
Page 16: Precautions For Disc Usage
Introduction Precautions for Disc Usage Care of Discs to Ensure High-Quality Playback Fingerprints, dust, or any other similar contamination of the surface of a disc can lead to distortion in the playback of recorded video and audio. For this reason, it is good practice to wipe each disc with a soft cloth before use. Looking After Discs Handling Discs ●... -
Page 17: Details Regarding Discs
Recommended manufacturers Once a disc has been finalized, it can be used as a DVD-R : JVC, Maxell 2×, 4×, 8× standard DVD and its recorded audio and video can DVD-RW : JVC 2×, 4× be played on this and other DVD players. -
Page 18: Region Codes
Introduction Details Regarding Discs (continued) DVD Data Configuration Region Codes Generally speaking, the content recorded on a DVD is separated One of six numbers referred to as “region codes” is assigned to into large units referred to as “titles”. A unique number called a DVD content to control the global regions in which this content “title number”... -
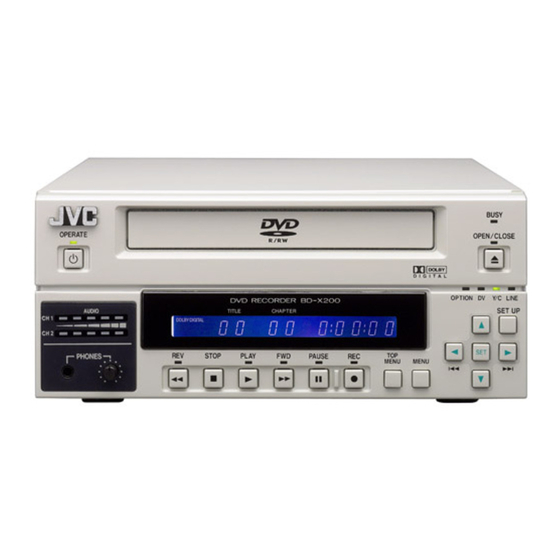
Page 19: Component Names & Functions
Component Names & Functions Front Panel BUSY OPERATE OPEN/CLOSE OPTION DV Y/C LINE DVD RECORDER BD-X201M AUDIO SET UP TITLE CHAPTER DOLBY DIGITAL LPCM MPEG PHONES STOP PLAY PAUSE MENU MENU Note OPERATE button and indicator ● This button is used to make it ready for use. Press again to... - Page 20 Component Names & Functions Front Panel (continued) BUSY OPEN/CLOSE OPERATE OPTION DV Y/C LINE DVD RECORDER BD-X201M SET UP AUDIO TITLE CHAPTER & DOLBY DIGITAL LPCM MPEG ⁄ PHONES STOP PLAY PAUSE MENU MENU ¤ 9 0 ! @ # $ % ^...
- Page 21 & button is pressed while the 8 button is being held, the SET UP button ● This button can be pressed to display the Setup Menu on audio recording level for Channel 1 will decrease. Similarly, if the 7 button is pressed while the t button is being the monitor.
-
Page 22: Rear Panel
Component Names & Functions Rear Panel 3 45 VIDEO MAIN POWER AUDIO LINE INPUT LEVEL + 4dB - 8dB REMOTE FOOT SW DV IN/OUT FOR SERVICE AC IN VIDEO LINE IN terminal (BNC) VIDEO Y/C OUT terminal (4-pin) This terminal allows composite video signals to be input to For output of YC separate video signals. - Page 23 DV(TRIGGER) : The DVD recorder performs recording in response to operation of the trigger button on a camera capable of DV triggering (i.e., a GY-DV5000 from JVC). FOOT SW 1/2 terminal FOOT SW 1 : For controlling the Record/Record Pause functions of this unit by connecting to an external switch (foot switch, etc.).
-
Page 24: Lcd Display And On-Screen Content
LCD Display and On-Screen Content LCD Display The following information and data is presented on the DVD recorder’s LCD display. BUSY OPERATE OPEN/CLOSE OPTION DV Y/C LINE AUDIO SET UP TITLE CHAPTER DOLBY DIGITAL LPCM MPEG PHONES STOP PLAY PAUSE MENU MENU CHAP... - Page 25 BUSY OPEN/CLOSE OPERATE OPTION DV Y/C LINE SET UP AUDIO TITLE CHAPTER DOLBY DIGITAL LPCM MPEG PHONES STOP PLAY PAUSE MENU MENU TITLE CHAP DOLBYDIGITAL LPCM MPEG Description Indication of the current operating mode PLEASE WAIT : The DVD recorder is starting up. OPERATE OFF : The DVD recorder is preparing to shut down.
-
Page 26: On-Screen Content
LCD Display and On-Screen Content On-Screen Content In addition to E-E and playback screens, the monitor connected to the DVD recorder’s VIDEO LINE OUT terminal can display the following. ● Status messages ● Event messages ● Alarm messages ● The Setup Menu ( Page 58) ●... - Page 27 Item Description Use TITLE/CHAPTER / INDEX from the DISPLAY MENU screen to indicate whether or Title number / Chapter number / Index number / not this is to be displayed. : No information is displayed Counter TITLE+CHAPTER: Title no., chapter no. and elapsed time of a title (hr: min: sec) are displayed.
-
Page 28: Event Messages
LCD Display and On-Screen Content Event Messages Event messages are displayed on the DVD recorder’s LCD display and on the monitor when incorrect operations are attempted. These messages will remain on-screen for approximately 3 seconds. Monitor screen 000 min LCD display DOLBYDIGITAL Event messages: LPCM... -
Page 29: Alarm Messages
If the alarm messages continue to appear after replacing the disc, the problem may lie within the DVD recorder, and in such a case, you are recommended to contact either the store where this DVD recorder was purchased or your JVC authorized... -
Page 30: Preparation
Note 5: The standard input level for audio signals input via the AUDIO IN terminals (i.e., +4 dB or –8 dB) can be selected using the AUDIO INPUT LEVEL switch on the rear panel. Note 6: Use the following cable as the DV cable. VC-VDV204 (2m, 4P-4P) from JVC VC-VDV206 (2m, 4P-6P) from JVC... -
Page 31: Power Connections
Power Connections Connect the Power cord (included) to the DVD recorder. Connect the Power cord (included) to the DVD MAIN POWER recorder’s AC IN terminal. MAIN POWER switch Connect the power cord (included) into an electrical outlet. Set the MAIN POWER switch to ON. Power will be supplied to the DVD recorder and the Power cord AC IN... -
Page 32: Inserting & Removing Discs
Preparation Inserting & Removing Discs Disc tray BUSY OPERATE OPEN/CLOSE OPEN/CLOSE indicator OPEN/CLOSE button OPTION DV Y/C LINE SET UP AUDIO TITLE CHAPTER DOLBY DIGITAL LPCM MPEG STOP PLAY PAUSE PHONES MENU MENU Inserting a Disc Removing a Disc Press the OPERATE button to activate Operate On mode. Stop the DVD recorder. -
Page 33: Using A Keyboard
Using a Keyboard Menu settings, the title and chapter settings, and other DVD recorder settings are carried out from setting screens displayed on the TV or monitor. In addition, recording operations can also be carried out from similar screens. Although the DVD recorder’s buttons are used in setting and operation screens, a keyboard can be used as an alternative. Connections Connect a USB keyboard to the USB terminal on the back of the DVD recorder. -
Page 34: Setting & Displaying The Date & Time
Preparation Setting & Displaying the Date & Time Use the following procedure to set the internal clock’s date and time. Even when the DVD recorder’s power is turned off, the clock’s date and time settings are stored using the internal battery. Note that these settings are used to write the current date and time to a disc being recorded. - Page 35 Setting & Displaying the Date & Time (continued) Displaying the Date and Time Use the DISPLAY MENU screen to indicate whether or not the date and time are DISPLAY MENU screen to be displayed on-screen and to set a display style. ( Page 71 for details regarding setting methods.) DISPLAY MENU...
-
Page 36: Dvd Recording
Settings & Controls for Recording DVD Recording DVD recording is carried out using the following procedure. Pre-Recording Settings ● Insert a new DVD-R or DVD-RW (video mode) or alternatively, a similar disc that has Preparation of the DVD-R or DVD- been recorded on using the DVD recorder. -
Page 37: Preparing A Disc For Recording
Preparing a Disc for Recording This DVD recorder is capable of recording to DVD-R and DVD-RW (in video mode). DVD-R : Only discs that conform with DVD-R Standard 2.0 (video mode) can be used. DVD-RW : Discs of Version 1.1 or later can be used. Although Version 1.1 of DVD-RW standards allows the selection of video mode and VR mode for recording, this DVD recorder performs recording in video mode only. - Page 38 Settings & Controls for Recording Erasing All Data From a DVD-RW Disc DISC menu screen Insert the DVD-RW from which data is to be erased. DISC MENU Press the SET UP button to display the Setup Menu. MENU FINALIZE CANCEL Use the 7 and 6 buttons to select DISC item and then press CANCEL DISC FINALIZATION CANCEL...
-
Page 39: Pre-Recording Settings
Pre-Recording Settings Recorder switch settings • ENCODE QUALITY This parameter is used to set the quality for encording (or Use the AUDIO INPUT LEVEL switch on the DVD recorder’s compressing) video data. rear panel to select the reference input level for analog audio •... -
Page 40: Specifying The Disc Status Created When The Disc Was Finalized
Settings & Controls for Recording Specifying the Disc Status Created when the Disc was Finalized It is possible to specify the action when a finalized disc is inserted into this machine or a DVD player, or the operation when playback of a title is finished. Also, it is possible to select whether to create a title menu (TOP MENU) or chapter menu (MENU) when finalizing or closing a title. -
Page 41: Setting The Encoding Format For Audio & Video
Setting the Encoding Format for Audio & Video The setting of encoding formats for audio and video is carried out from the RECORDER MENU (1/2) screen as described below. Setting Encoding Formats BUSY OPEN/CLOSE Stop the DVD recorder. OPTION DV Y/C LINE Open the RECORDER MENU (1/2) screen. -
Page 42: Adjusting Of Audio Recording Levels
Settings & Controls for Recording Adjusting of Audio Recording Levels This DVD recorder’s audio recording levels can be adjusted using two different methods, and AUDIO REC VOLUME MODE from the RECORDER MENU (2/2) screen indicates the method to be used. In addition, it is also possible to return the audio recording levels to their default settings (i.e., unity gain). -
Page 43: Checking The Video Input
Checking the Video Input Use the monitor connected to the VIDEO LINE OUT or Y/C OUT terminal to confirm that the input video signal is as required. The following procedure will allow you to monitor the quality at which the video will be recorded to a DVD. VIDEO LINE OUT terminal VIDEO MAIN... -
Page 44: Title & Chapter Menus
Settings & Controls for Recording Title & Chapter Menus This DVD recorder can automatically create title and chapter menus in response to recording operations and can save these to the disc being recorded. When the disc is subsequently played, these title and chapter menus can be used to access specific sections of stored video and audio. -
Page 45: Selecting Styles For Title & Chapter Menu
Selecting Styles for Title & Chapter Menu Each recorded DVD contains title and chapter menus that provide information relating to its titles and chapters. Whenever recording is carried out, title numbers, chapter numbers, and thumbnails are automatically generated in order to create the title and chapter menus. -
Page 46: Changing Styles For Title & Chapter Menus
Settings & Controls for Recording Changing Styles for Title & Chapter Menus The DVD MENU screen can be used to change the styles used for displaying title and chapter menus. One of eight different types of style can be selected for each of the title and chapter menus. This DVD recorder can also store a total of six different display patterns for title and chapter menus. -
Page 47: Recording
Recording Recording Sequence Use the following sequence as a reference when performing recording. ● Input settings: Page 62. ● Video and audio quality settings: Page 31. ● Navigation settings (i.e., DISC IN ACTION , TITLE END and DVD MENU TYPE): Page 63 REC button + PLAY button Index 1 *4 Start of recording... -
Page 48: Recording With The Front Panel
Recording Recording with the Front Panel This DVD recorder recording operations can be carried out in two different ways — namely, using the buttons provided on the front panel and using the on-screen REC CONTROL panel. In the latter case, furthermore, recording operations can be performed using a keyboard. -
Page 49: Inserting Chapter Marks Manually Or Automatically
Recording with the Front Panel (continued) End recording and remove the disc. Note Depending on how the disc will be used, one of two different procedures is When recording is stopped or a title is implemented at this time. closed, the state of progress will be ●... -
Page 50: Using A Keyboard To Control Recording
Recording Using a Keyboard to Control Recording Recording operations of this DVD recorder can be carried out using the REC CONTROL panel displayed on the monitor. In addition, a keyboard can also be used when working with this panel. VIDEO MAIN POWER AUDIO... -
Page 51: Erasing The Last Title
Erasing the Last Title Only the last title of an unfinalized disc that is recorded using this unit will be erased. Insert the DVD-R/DVD-RW. DISC MENU screen Press the SET UP button to display the Setup Menu. DISC MENU MENU Use the 7 and 6 buttons to select DISC item and then press the FINALIZE CANCEL... -
Page 52: Finalizing (For Playback On Other Dvd Players)
Recording Finalizing (for Playback on Other DVD Players) Finalize a disc recorded using this DVD recorder as described below in order to ensure that it can be played on other DVD players. In the case of DVD-RWs, playback will be possible on DVD players that support video mode. After finalizing a disc;... -
Page 53: Title & Chapter Menu Settings
Title & Chapter Menu Settings Changing Chapter Menus (THUMBNAIL EDIT Screen) This DVD recorder can automatically create title and chapter menus as recording operations are started and stopped. Title and chapter menus are created using the following. ● Chapter thumbnails : The frames at which chapter marks have been inserted are used as thumbnails. -
Page 54: Changing & Naming Thumbnails For Chapter Menus
Title & Chapter Menu Settings Changing & Naming Thumbnails for Chapter Menus The modification of chapter menu thumbnails and the entry of names and comments are carried out as described below using the THUMBNAIL EDIT screen. Changing Thumbnails THUMBNAIL EDIT screen For example, let’s change the thumbnail for the second chapter. - Page 55 Changing & Naming Thumbnails for Chapter Menus (continued) Entering Names and Comments for Chapter Menus Use the following procedure to apply names to the thumbnails used in chapter THUMBNAIL EDIT menus, and also to add comments to be displayed on a chapter menu screen. TITLE CLOSE 1 - 6 Names and comments are entered using a keyboard.
-
Page 56: Changing & Checking Chapter Menu Styles
Title & Chapter Menu Settings Changing & Checking Chapter Menu Styles Although display styles for chapter menus are created using settings from the STYLE item of the DVD MENU screen as described above, the following procedure can be used to modify these styles at the end of title recording. In addition, it will also be possible at this time to confirm that chapter menus are as required. - Page 57 Checking the Chapter Menu Screen Use the following procedure to see how the chapter menu looks when the selected display style is used. Select CHAPTER MENU from the THUMBNAIL EDIT START screen THUMBNAIL EDIT START screen and press the SET button. THUMBNAIL EDIT ●...
-
Page 58: Ending The Editing Of Chapter Menus
Title & Chapter Menu Settings Ending the Editing of Chapter Menus Once all of the necessary changes and checks have been made using the THUMBNAIL EDIT screen, title closing must be carried out. Please ensure that title closing is performed as the last stage of chapter menu editing. Even if the chapter menu is to be left unchanged, title closing must be carried out to leave the THUMBNAIL EDIT screen. -
Page 59: Changing & Checking Title Menu Styles & Names
Changing & Checking Title Menu Styles & Names If EDIT MENU from the DVD MENU screen is set to ENABLE, the TITLE MENU EDIT screen will be displayed upon disc finalizing. Using this screen, it will be possible to change the title menu’s display style, to enter title names, and to confirm that the title and chapter menus are as required. - Page 60 Title & Chapter Menu Settings Changing & Checking Title Menu Styles & Names (continued) Checking the Title Menu Screen TITLE MENU EDIT screen Select TITLE MENU PREVIEW from the TITLE MENU EDIT screen and press the SET button. TITLE MENU ●...
- Page 61 Changing Names for the Title Menu Each title will be automatically assigned with a recording date/time and ENCODE TITLE MENU EDIT screen QUALITY. Use the following procedure to enter manually names for titles in the title menu. TITLE MENU Names and comments are entered using a keyboard. FINALIZE Set KEYBOARD STYLE from the SYSTEM MENU (1/2) screen in accordance PRESET STYLE...
-
Page 62: Finalizing Discs
Title & Chapter Menu Settings Changing & Checking Title Menu Styles & Names (continued) Finalizing Discs TITLE MENU EDIT screen Select FINALIZE from the TITLE MENU EDIT screen and press the SET button. TITLE MENU ● A confirmation window will appear. FINALIZE PRESET STYLE Select YES and then press the SET button. -
Page 63: Playback
Playback Playing Back a Disc It is possible to playback a disc recorded on this DVD recorder. Playback operation may vary according to whether finalization has been performed. Playing Back a Disc before Finalizing Operation BUSY Insert the disc. OPERATE OPEN/CLOSE Play the disc. - Page 64 Playback DISC IN ACTION setting made during recording MENU TITLE The title menu (TOP MENU) will appear Playback starts automatically from the first title. Select the number of the title to be played. Use the t, 8, 7, and 6 buttons to select the title number for playback.
-
Page 65: Fast & Slow Playback
Fast & Slow Playback BUSY OPEN/CLOSE OPERATE OPTION DV Y/C LINE SET UP AUDIO TITLE CHAPTER DOLBY DIGITAL LPCM MPEG PHONES STOP PLAY PAUSE MENU MENU REV button FWD button Fast-Forward & Fast-Reverse Play Slow-Forward & Slow-Reverse Play Fast-forwarding Slow-forwarding ●... -
Page 66: Index Writing And Index Search
Playback Index Writing and Index Search Indexes are used to locate the beginning of specific positions when in the Playback mode. (Index search) Viewing of index information (index no. and counter data) and index search can be performed on the INDEX MANAGER screen. Writing Index Chapter points registered during the Recording mode are used as index values. - Page 67 Index Writing and Index Search (continued) Selecting an index to search or erase. Upon starting up the INDEX MANAGER screen, the title and index of the point for which its screen is called up will be selected. When selecting a title no. q Press the cursor buttons ( ) on the main unit to highlight the title selection buttons ( ) on the...
-
Page 68: Setup Menu
Setup Menu Setting the Setup Menu Settings made in the setup menus are stored in this DVD recorder’s internal memory and will be retained even when the power is turned off. It is also possible to return to default settings whenever so required. In addition to the buttons on the front panel, a keyboard can also be used to perform operations on these menus. -
Page 69: Setup Menu Configuration
Setup Menu Configuration The Setup Menu screen is displayed on both the monitor and LCD display. As shown below, this screen is used to access this DVD recorder’s setup menus. DISC MENU screen ( Page 61) INPUT SELECT MENU screen ( Page 62) DISC MENU MENU... -
Page 70: Setup Menus
Setup Menu Setup Menus The following table identifies and describes the parameters that may be set using the Setup Menus. Top half : Appearance on monitor screen Bottom half : Appearance on LCD display Option Description This button opens a menu that allows settings to be made for finalizing and other similar disc processes. DISC dISC This button opens a menu that allows input audio and video signals to be selected. -
Page 71: Disc Menu Screen
DISC MENU Screen The following table identifies and describes the parameters that may be set using the DISC MENU screen. Top half : Appearance on monitor screen Bottom half : Appearance on LCD display : Default setting Parameter Possible settings Description This parameter indicates whether or not the recorded disc is to be finalized. -
Page 72: Input Select Menu Screen
Setup Menu INPUT SELECT MENU Screen The following table identifies and describes the parameters that may be set using the INPUT SELECT MENU screen. Top half : Appearance on monitor screen Bottom half : Appearance on LCD display : Default setting Parameter Possible settings Description... - Page 73 SYSTEM MENU Screen (continued) Parameter Possible settings Description For selecting whether to set DVD playback actions and display of a title's elapsed PLAY BACK [DVD] &232C TYPE time /index number to the VTR or DVD mode. Actions via RS-232C control will vary accordingly with this setting.
- Page 74 Setup Menu SYSTEM MENU (2/2) screen Parameter Possible settings Description For selecting whether to start up in the Operate ON or OFF mode when the MAIN AC IN MODE [POWER ON] POWER OFF POWER switch at the rear of this unit is turned ON. POWER ON : Start up in Operate ON mode [oN] POWER OFF : Start up in Operate OFF mode...
-
Page 75: Dvd Menu Screen
DVD MENU Screen The following table identifies and describes the parameters that may be set using the DVD MENU screen. Top half : Appearance on monitor screen Bottom half : Appearance on LCD display : Default setting Parameter Possible settings Description This parameter is used to indicate whether or not a screen for editing the title and EDIT MENU... - Page 76 Setup Menu Parameter Possible settings Description Select whether to create a TOP MENU or MENU in a completed disc (finalized disc). DVD MENU TOP+MENU TYPE [TOP] This is set before inserting a disc or when a blank disc is inserted. NONE TOP+MENU : When finalizing a TOP MENU is created.
-
Page 77: Recorder Menu Screen
RECORDER MENU Screen The following table identifies and describes the parameters that may be set using the RECORDER screen. Top half : Appearance on monitor screen Bottom half : Appearance on LCD display : Default setting RECORDER MENU (1/2) screen Parameter Possible settings Description... - Page 78 Setup Menu Parameter Possible settings Description ∆ This button is used to display the RECORDER MENU (2/2) screen. REC2 MENU This button is used to return to the Setup MENU screen. MENU RECORDER MENU (2/2) screen Parameter Possible settings Description [1,2ch †...
-
Page 79: Remote Menu Screen
REMOTE MENU Screen The following table identifies and describes the parameters that may be set using the REMOTE MENU screen. Top half : Appearance on monitor screen Bottom half : Appearance on LCD display : Default setting Parameter Possible settings Description REMOTE SELECT [OFF]... - Page 80 Setup Menu Parameter Possible settings Description Set this item according to the type of controller connected when performing remote 232C [TYPE1] PROTOCOL TYPE TYPE2 control using the RS-232C terminal. TYPE3 TYPE1 : Standard operation mode TYPE2 : For customized use TYPE4 TYPE3 ~ TYPE8 : Spare TYPE5...
-
Page 81: Display Menu Screen
DISPLAY MENU Screen The following table identifies and describes the parameters that may be set using the DISPLAY screen. Top half : Appearance on monitor screen Bottom half : Appearance on LCD display : Default setting Parameter Possible settings Description DISPLAY This parameter is used to indicate whether or not status and alarm information is to [ON]... -
Page 82: Clock Adjust Menu Screen
Setup Menu CLOCK ADJUST MENU Screen The following table identifies and describes the parameters that may be set using the CLOCK ADJUST MENU screen. Top half : Appearance on monitor screen Bottom half : Appearance on LCD display : Default setting Parameter Possible settings Description... -
Page 83: Others
Menu templates created with this application can then be transferred to this DVD recorder using a network cable, thus allowing you to make imaginative and creative DVDs with the minimum of effort. Easymenu can be downloaded from the following web page. Please refer to the software manual for details regarding usage and precautions. http://www.jvc-victor.co.jp/english/pro/prodv/ OPERATE DVD RECORDER BD AUDIO... -
Page 84: Changing The Signal System (Ntsc / Pal)
Others Changing the Signal System (NTSC / PAL) This DVD recorder supports both the NTSC and PAL signal systems. The signal system can be altered at the TV TYPE item on the SYSTEM(2/2) menu screen, or via the following procedure. The signal system can be changed even when the monitor is not connected. -
Page 85: Specifications
: 16 bit Sampling rate : 48 kHz Number of channels: 2 External Dimensions (Unit: mm) SDSP3 SDSP3 BUSY OPERATE OPEN/CLOSE OPTION DV Y/C LINE DVD RECORDER BD-X201M AUDIO SET UP TITLE CHAPTER DOLBY DIGITAL LPCM MPEG PHONES STOP PLAY PAUSE... - Page 86 is a registered trademark owned by Victor Company of Japan, Limited is a registered trademark in Japan, the U.S.A., the U.K. and other countries. Printed in Japan © 2005 Victor Company of Japan, Limited LLT0073-001A...