iOptron SmartStar iEQ45 Instruction Manual
German equatorial mount with go2nova 8407 hand controller
Hide thumbs
Also See for SmartStar iEQ45:
- Instruction manual (46 pages) ,
- Quick setup manual (6 pages) ,
- Step-by-step instructions (5 pages)

Related Manuals for iOptron SmartStar iEQ45


Summary of Contents for iOptron SmartStar iEQ45
- Page 1 ® ® SmartStar iEQ45 With Go2Nova 8407 Hand Controller Instruction Manual Products #8000D/#8000DP...
-
Page 2: Table Of Contents
Table of Content Table of Content ..............................2 1. iEQ45 German Equatorial Mount Overview....................4 2. iEQ45 Mount Assembly ..........................5 2.1. Parts List..............................5 2.2. Assembly Terms ............................6 2.3. iEQ45 Ports ............................. 7 ® 2.4. Go2Nova 8407 Hand Controller ......................8 2.4.1. - Page 3 Looking at or near the Sun will cause instant and irreversible damage to your eye. Children should always have adult supervision while observing. May 2013 Rev.4.0 iOptron reserves the rights to revise this instruction without notice. Actual color/contents/design may differ from those described in this instruction.
-
Page 4: Ieq45 Tm German Equatorial Mount Overview
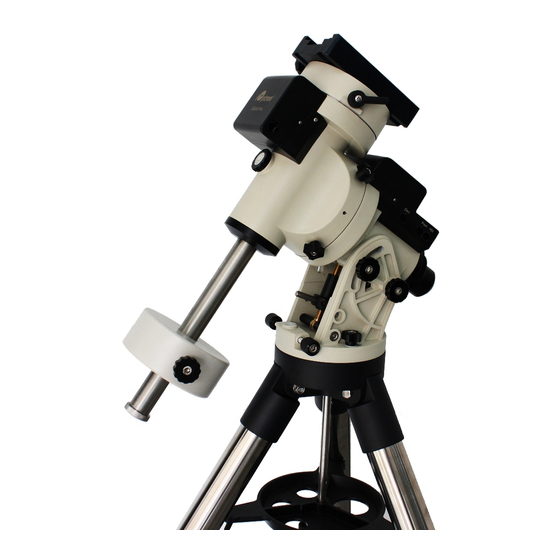
The iEQ45 is one of the new breed of premium astro-imaging equatorial mounts from iOptron. The iEQ45 offers the next generation GOTO technology from iOptron. The mount is made of the highest quality materials to ensure stability and durability. With a payload of 45 lb (20 kg) balanced – it comes standard with a calibrated dark field illumination polar scope and a sturdy 2-inch stainless steel tripod. -
Page 5: Ieq45 Tm Mount Assembly
• RJ9 to RS232 serial cable for hand controller firmware upgrade • RS232 cable • Azimuth locking T-bolts X2 or azimuth screws X3 ONLINE CONTENTS (click under “Support” menu) www.iOptron.com • Quick Start Guide • This manual • Tips for set up •... -
Page 6: Assembly Terms
2.2. Assembly Terms Dovetail Saddle Dovetail Saddle DEC Clutch DEC Clutch DEC Unit DEC Unit Polar Axis Cover Polar Axis Cover R.A. Unit R.A. Unit DEC Axis DEC Axis R.A. Axis Polar Scope Cover Polar Scope Cover CW Shaft CW Shaft Counterweight (CW) Counterweight (CW) CW Locking Screw... -
Page 7: Ieq45 Ports
• Dec: For connecting to DEC driver unit • iOptron port: For connecting to other iOptron accessories, such as an electronic focuser, a laser pointer, or a planetary dome control • HBX (Hand Box): For connecting to the 8407 Hand Controller •... -
Page 8: Go2Nova 8407 Hand Controller
® 2.4. Go2Nova 8407 Hand Controller DEC+ DEC- Serial Port Port Figure 3. Go2Nova 8407 hand controller ® The Go2Nova 8407 hand controller (HC) shown in Figure 3 is the standard controllers that used for the iEQ45 mount. It has an integrated temperature controller that ensures it can be operated below 20ºC (-4ºF). -
Page 9: The Lcd Screen
• Serial port: connect the HC to a Computer via a RS232 to 4-wire RJ-9 cable. The pin out of the serial port is shown in Figure 4. Figure 4. Serial port pin out on an 8407 hand controller 2.4.2. The LCD Screen The 8407 HC has a large 8-line, 21-character per line LCD screen, which displays all the information as shown in Figure 5. - Page 10 9. Mount Status: Display current operation status of the mount. • Stop: mount is not moving; • Slew: mount is moving with an arrow key is pressed; • GoTo: mount is slewing to a celestial object using “Select and Slew”; •...
-
Page 11: Ieq45 Tm Mount Assembly
3. iEQ45 Mount Assembly 3.1. Introduction You have just purchased a telescope mount that is capable of taking you to a new level of astronomy. No matter which telescope or optical tube assembly (OTA) you select to install on the mount, the overall performance will be greatly enhanced. -
Page 12: Step 1. Setup Tripod
3.2.1. STEP 1. Setup Tripod Alignment Peg Expand the tripod legs and install the Tripod Spreader using the Tripod Lock as shown in Figure 6. Tightening the Tripod Lock will expand the tripod legs fully and provide maximum support for the mount and the Optical Tube Assembly (OTA). -
Page 13: Step 3. Set The Latitude
for some models). Level the mount by adjusting individual tripod leg. You may use the build-in Bubble Level Indicator or an external torpedo level to check level. Lat. Locking Screw (4) Azi. Adjust. Knob Alignment Peg Bubble Level Indicator Lat. Mark Window Azi. -
Page 14: Step 4. Attach Counterweight (Cw) Shaft
3.2.4. STEP 4. Attach Counterweight (CW) Shaft Unscrew the CW shaft from the top of the mount as shown in Figure 10(a) and thread it into the opening of the DEC axis as shown in Figure 10(b). Figure 10 3.2.5. STEP 5. Connect Cables Attach one end of an RJ11 cable into the socket on the side of the DEC unit and the other end into the DEC socket located on the main control unit. - Page 15 It is always a good idea to do your home work to get the GPS coordinates before traveling to a new observation site. The site coordinates information can be found internet, or from Support section in iOptron website, under Controller Set-up (http://www.ioptron.com/support.cfm?module=faq#). By entering the city name or address, you can find its latitude and longitude.
-
Page 16: Step 7. Polar Alignment
As explained in the introduction, an equatorial mount must have an accurate polar axis alignment in order to track properly. With the iOptron innovative Polar Scope and Quick Polar Alignment procedure, you can do a fast and accurate polar axis alignment. - Page 17 Initializing the polar scope NOTE: Do not disassemble the Polar Scope to rotate it. It is adjusted at the factory and can be misaligned if you disassemble it. A good Polar alignment is the basis for good GOTO and tracking performance. During initial setup of the iEQ mount, it is likely that the viewing hole on the DEC axis of the polar scope may be blocked by the DEC axle.
-
Page 18: Step 8. Install Counterweight(S)
Figure 13 NOTE: Thread the polar scope eyepiece all the way in after polar alignment, before put the Polar Scope Cover back on. Otherwise, the polar scope eyepiece could be stuck inside the Polar Scope Cover to cause R.A. axis jamming. NOTE: If you are located in southern hemisphere, Sigma Octantis will be chosen for Polar Alignment. -
Page 19: Step 9. Attach And Balance An Ota On The Mount
3.2.9. STEP 9. Attach and Balance an OTA on the Mount After attaching an OTA and accessories to the mount, the mount must be balanced to ensure minimum stress on the mount’s gears and motors. There are four (4) Clutch Screws on R.A. axis and one Clutch Handle on DEC axis. - Page 20 Figure 16. Zero position You can also use the electronic Balance Test function to check the R.A. and DEC balance (please refer to Section 5.12 for more details).
-
Page 21: Getting Started
4. Getting Started In order to experience the full GOTO capability of GOTONOVA technology it is very important to set up the mount correctly before observation. 4.1. Setup the Mount and Polar Alignment Assemble your iEQ45 mount and do a polar alignment, if needed, according to Section 3.2. Mount an OTA and accessories, and carefully balance it in both R.A. -
Page 22: Turn Off The Mount
4.6. Turn Off the Mount When you have finished your observation, just simply turn the mount power off and disassemble the mount and tripod. If the mount is set up on a pier or inside an observatory, it is recommended that you return the mount to Zero Position, or Park Position before powering down. -
Page 23: Complete Functions Of Go2Nova ® Hand Controller
® 5. Complete Functions of Go2Nova Hand Controller 5.1. Slew to an Object Press the MENU button. From the main menu select “Select and Slew.” Select an object that you would like to observe and press the ENTER key. ® The Go2Nova 8407 hand controller has a database of about 358,000 objects. -
Page 24: Asteroids
5.1.6. Asteroids This catalog contains 116 asteroids. 5.1.7. User Objects It can store up to 60 used entered objects. 5.1.8. Enter R.A. DEC Here you can go to a target by entering its R.A. and DEC numbers. 5.2. Sync to Target This operation will match the telescope's current coordinates to Target Right Ascension and Declination. -
Page 25: Meridian Treatment
compensate for backlash by inputting a value which quickly rewinds the motors just enough to eliminate the play between gears. To set the anti-backlash value, scroll down and select “Set Anti-backlash” Set Up Time and Site Set Display and Beep Set Anti-backlash Meridian Treatment Set Eyepiece Light... -
Page 26: Heating Controller
5.3.7. Upgrade RA & DEC Use this operation to upgrade 8407 hand controller R.A. and DEC motor controller firmware. It only needed under a very rare circumstance. Please refer to iOptron online announcement when the event happens. Please refer to iOptron online documents for iEQ45 main control board and 8407 hand controller firmware upgrade details. -
Page 27: Multi-Star Alignment
5.4.4. Multi-Star Alignment With iOptron’s multi-star alignment, you can choose two, three, or as many stars as you want to reduce the mount alignment offset. Press MENU button and select “Align”. Select “Multi-Star Align” in the align menu. A list of alignment stars that are above the horizon is computed based on your local time and location. -
Page 28: Pole Star Position
R.A. anti-backlash 0250 steps Save test value? If you want to save this anti-backlash number, press ENTER. Otherwise press BACK. This will bring the hand controller to DEC backlash testing screen. Follow the on-screen instruction to test the DEC backlash. 5.4.6. -
Page 29: Set Tracking Rate
5.6. Set Tracking Rate You can set up tracking in the main menu by selecting “Set Ttracking Rate”. Then the user can select “Sidereal speed”, “Solar speed”, “Lunar speed”, “King speed” and “User defined speed”. For “User defined speed,” it can be adjusted from 0.9900X to 1.0100X of sidereal speed by pressing the ▲or ▼ button or number buttons. -
Page 30: Guide Options
Press BACK button few times to go back to “Set User Objects”. You may review the records or delete the ones you don’t want it anymore. Press BACK button to finish the operation. Now you can slew to your favorite stars from “User Objects” catalog using “Select and Slew.” To enter a new comet data, select “Set the Comet”... -
Page 31: Set Slewing Rate
5.9. Set Slewing Rate You can select the maximum GOTO speed to be 128X, 256X, 512X, or MAX. The slower the speed, the quieter the motors run. 5.10. Park Scope There are two parking positions: east side or west side. The mount my move to either position depends on which one is closer, when “Park Scope”... - Page 32 <== or ==>: Move counterweight left or right more; <=== or ===>: The R.A. axis is off balance. Move counterweight according to the arrow left or right. Press the ENTER key to test it again, until the < Balance OK!> indicator is displayed. Press BACK button and select “DEC Balance Test”.
-
Page 33: Maintenance And Servicing
Customer Service hours are 9:00 AM to 5:00 PM, Eastern Time, Monday through Friday. In the unlikely event that the iEQ45 requires factory servicing or repairing, write or call iOptron Customer Service Department first to receive an RMA# before returning the mount to the factory. Please provide details as to the nature of the problem as well as your name, address, e-mail address, purchase info and daytime telephone number. -
Page 34: Appendix A. Technical Specifications
Appendix A. Technical Specifications Mount German Equatorial Mount Payload 45 lb (20kg) Mount weight 20 lb (11.4kg) Payload/Mount weight 1.75 Right Ascension worm wheel Φ130mm, 216 teeth aluminum Declination worm wheel Φ115mm, 192 teeth aluminum Right Ascension axis shaft Φ50mm steel Declination axis shaft Φ40mm steel Right Ascension bearing... -
Page 35: Appendix B. Go2Nova ® 8407 Hc Menu Structure
® Appendix B. Go2Nova 8407 HC MENU STRUCTURE MENU Select and Slew Select and Slew Solar System Solar System Mercury Mercury Venus Venus Mars Mars Jupiter Jupiter Saturn Saturn Uranus Uranus Neptune Neptune Moon Moon Deep Sky Objects Deep Sky Objects Named Object Named Object Messier Catalog... - Page 36 Set Up Controller Set Up Controller Set Up Time & Site Set Display and Beep Set Anti-backlash Meridian Treatment Stop Tracking Stop Tracking Telescope Flip Telescope Flip Continue to Track Continue to Track Set Eyepiece Light Heating Controller Set to AZI-ALT Upgrade RA &...
- Page 37 Set User Objects Set User Objects Objects Except Comet Objects Except Comet Add A New Record Add A New Record Add A New Record Browse Records Browse Records Browse Records Delete One Record Delete One Record Delete One Record Delete All Records Delete All Records Delete All Records Set the Comet...
-
Page 38: Appendix C. Firmware Upgrade
The firmware of an 8407 hand controller, as well as the main control board, R.A. and DEC motor control boards can be upgraded by the customer. Please check iOptron’s website, www.iOptron.com, under Support Directory, for the most up to date firmware. - Page 39 Click on Hardware and select Device Manager. Double click on Ports(COM & LPT), find out the COM number and write it down (in the following figure, the USB2COM converter uses a Prolific chipset and the assigned port number is COM1)
- Page 40 2. Download software and firmware from iOptron wbesite: Go to iOptron website, www.iOptron.com, click on Download tab. Locate iEQ45 with 8407 hand controller under Software/Firmware Upgrades catalog on the left part of the screen, and click on it. Download and save Upgrade Utility software, 8407 and/or iEQ45 board software as needed.
- Page 41 (6) Select hand controller firmware 8407_VerXXXXXX and click Open (7) The FileType and Version will be verified and displayed. Click on pull down menu of the COM port and select the COM port number. Here is COM1. (8) Click on Upgrade button to start the process;...
- Page 42 OFF; (2) Connect mount main board to your computer’s RS232 port (or RS232 port of the USB2COM converter) using supplied RS232 cable; (3) Locate download software and click on Upgrade Utility.exe: (4) Click Browse iOptron Upgrade Utility window. Select main...
- Page 43 (9999), then select Upgrade R. A. Board or Upgrade DEC Board; (5) Locate download software and click on Upgrade Utility.exe: (6) Click on Browse in iOptron Upgrade Utility window. Select R.A. or DEC board firmware, such as iEQ45_RA_VerXXXXXX and click Open;...
- Page 44 (7) Click on pull down menu of the COM port and select the COM port number. Here is COM1. Click on Upgrade button. The upgrading process will begin. (8) After the firmware upgrade finished, exit the Upgrade Utility program.
-
Page 45: Appendix D. Computer Control An Ieq45 Mount
1. Download and install ASCOM Platform from http://www.ascom-standards.org/. Make sure you PC meet the software requirement. Refer to the ascom-standards website for details. 2. Download and install latest iOptron Telescope ASCOM.NET Drive (NOT iOptron Telescope ASCOM Driver 2.10) from iOptron website. -
Page 46: Appendix E. Go2Nova ® Star List
® Appendix E. Go2Nova Star List Messier Catalog This table is licensed under the GNU Free Documentation License. It uses material from the Wikipedia article List of Messier objects... - Page 47 Named Star List 001 Acamar 050 Asellus Australis 099 Kaus Media 148 Rastaba 002 Achernar 051 Asellus Borealis 100 Keid 149 Regulus 003 Acrux 052 Aspidiske 101 Kitalpha 150 Rigel 004 Acubens 053 Atik 102 Kochab 151 Rigel Kentaurus 005 Adhafera 054 Atlas 103 Kornephoros 152 Ruchbah...
- Page 48 Modern Constellations Constellation Abbreviation Constellation Abbreviation Andromeda Lacerta Antlia Apus Leo Minor Aquarius Lepus Aquila Libra Lupus Aries Lynx Auriga Lyra Boötes Mensa Caelum Microscopium Camelopardalis Monoceros Cancer Musca Canes Venatici Norma Canis Major Octans Canis Minor Ophiuchus Capricornus Orion Carina Pavo Cassiopeia...
- Page 49 Deep Sky Object List ID No. OBJECT NGC # Messier# A(Abell) U(UGC) ID No. OBJECT NGC # Messier# A(Abell) U(UGC) Andromeda Galaxy Hind's Variable Nebula 1555 Barnards Galaxy 6822 Hubble's Variable Nebula 2261 Beehive Cluster 2632 Integral Sign Galaxy 3697 Blackeye Galaxy 4926 Jewel Box Cluster...
- Page 50 Double Star List No. Object Const Sep. Magitude Comm. Name No. Object Const Sep. Magitude Comm. Name 2.3 / 5.1 37734 Almaak 36 Eta 12.9 3.5 / 7.5 21732 Achird 35.9 4.4 / 8.6 54033 37 Iot 4.7/7.0/8.2 12298 12.8 3.7 / 11 125235 Alshain...
- Page 51 No. Object Const Sep. Magitude Comm. Name No. Object Const Sep. Magitude Comm. Name 71 Bet 34.4 3.1 / 5.1 87301 Albireo 106 Del 3.1 / 8.2 84951 Sarin 72 Omi 1 3.8 / 6.7 49337 107 Mu 3.4 / 9.8 85397 73 52 4.2 / 9.4...
- Page 52 No. Object Const Sep. Magitude Comm. Name No. Object Const Sep. Magitude Comm. Name 141 Eps 2 5.2 / 5.5 67315 Double dbl2 176 Zet 5.6 / 6.5 109739 142 Alp 20.5 5.0 / 10 212472 177 Kap 4.5 / 4.7 174199 143 Zet 4.3 / 10...
-
Page 53: Ioptron Two Year Telescope, Mount, And Controller Warranty
As a condition to the obligation of iOptron to repair or replace such product, the product must be returned to iOptron together with proof-of-purchase satisfactory to iOptron.