Table of Contents
Advertisement
Quick Links
Advertisement
Table of Contents
Troubleshooting

Related Manuals for Yamaha CYGNUS.X NXC125


Summary of Contents for Yamaha CYGNUS.X NXC125
- Page 1 OWNER’S MANUAL NXC125 5ML-F8199-E0...
- Page 3 Welcome to the Yamaha world of motorcycling! As the owner of the CYGNUS X, you are benefiting from Yamaha’s vast experience and newest technology regarding the design and manufacture of high-quality products, which have earned Yamaha a reputation for dependability.
- Page 4 8 This manual should be considered a permanent part of this scooter and should remain with it even if the scooter is subsequently sold. 8 Yamaha continually seeks advancements in product design and quality. Therefore, while this manual contains the most current product information available at the time of printing, there may be minor discrepancies between your scooter and this manual.
- Page 5 IMPORTANT MANUAL INFORMATION EAUT1390 CYGNUS X OWNER’S MANUAL ©2004 by Yamaha Motor Taiwan Co., Ltd. 1st edition, January 2004 All rights reserved. Any reprinting or unauthorized use without the written permission of Yamaha Motor Taiwan Co., Ltd. is expressly prohibited.
-
Page 6: Table Of Contents
EAU10210 TABLE OF CONTENTS SAFETY INFORMATION ..1-1 Sidestand switch operation Engine oil and oil strainer ..6-8 Further safe-riding points ..1-4 check ....... 3-10 Final transmission oil ..6-10 Air filter and V-belt case air filter DESCRIPTION ....... 2-1 PRE-OPERATION CHECKS . - Page 7 TABLE OF CONTENTS Checking and lubricating the SPECIFICATIONS ....8-1 centerstand and sidestand ......6-21 CONSUMER INFORMATION 9-1 Checking the front fork ..6-22 Identification numbers ..9-1 Checking the steering ..6-22 Checking the wheel bearings ......6-23 Battery ........ 6-23 Replacing the fuses ....
-
Page 8: Safety Information
EAU10220 Q SAFETY INFORMATION Q SAFETY INFORMATION 8 Many accidents involve inexperi- EAU10260 Safe riding SCOOTERS ARE SINGLE TRACK VE- 8 Always make pre-operation checks. enced operators. In fact, many op- HICLES. THEIR SAFE USE AND OP- Careful checks may help prevent erators who have been involved in ERATION ARE DEPENDENT UPON an accident. - Page 9 Modifications made to this scooter not other motorists can see you. accidents are the result of head injuries. approved by Yamaha, or the removal of 8 The posture of the operator and The use of a safety helmet is the single...
- Page 10 170 kg this scooter. Since Yamaha cannot test possible and should be kept to (374 lb). When loading within this weight all other accessories that may be avail- a minimum.
-
Page 11: Further Safe-Riding Points
Q SAFETY INFORMATION EAU10371 tric failure could result, which could system may be hot, therefore, Further safe-riding points cause a dangerous loss of lights or park the scooter in a place 8 Be sure to signal clearly when mak- engine power. where pedestrians or children ing turns. - Page 12 Q SAFETY INFORMATION 8 Braking can be extremely difficult on a wet road. Avoid hard braking, because the scooter could slide. Apply the brakes slowly when stop- ping on a wet surface. 8 Slow down as you approach a cor- ner or turn.
- Page 13 Q SAFETY INFORMATION...
-
Page 14: Description
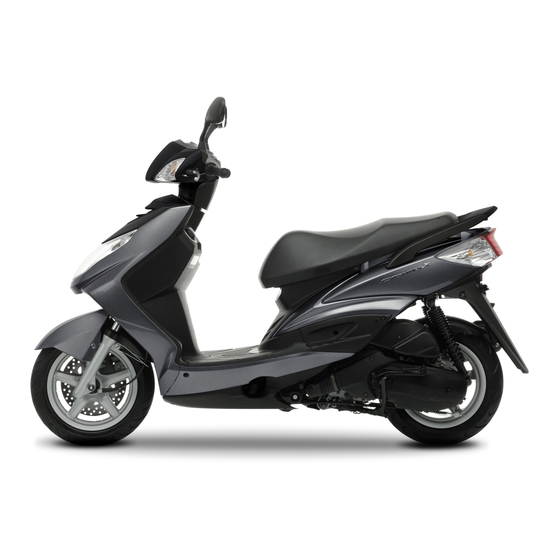
EAU10400 DESCRIPTION DESCRIPTION EAU10410 Left view 1. Luggage hook 2. Battery(Page:6-23) 3. Storage compartment(Page:3-8) 4. Tail/brake light(Page:6-27) 5. Rear turn signal light(Page:6-28) 6. Air filter(Page:6-11) 7. Kickstarter(Page:3-7) 8. V-belt case air filter(Page:6-11) 9. Fuel tank cap(Page:3-5) -
Page 15: Right View
DESCRIPTION EAU10420 Right view 1. Front turn signal light(Page6-28) 2. Main fuse(Page:6-25) 3. Headlight(Page:6-26) 4. Centerstand(Page:6-21) 5. Fuse box(Page:6-25) -
Page 16: Controls And Instruments
DESCRIPTION EAU10430 Controls and instruments 1.Rear brake lever (Page3-4) 2.Left handlebar switches(Page:3-3) 3.Indicator lights(Page:3-2) 4.Speedometer unit(Page:3-3) 5.Fuel gauge(Page:3-3) 6.Right handlebar switches(Page:3-3) 7.Front brake lever(Page:3-4) 8.Main switch(Page:3-1) -
Page 17: Instrument And Control Functions
EAU10442 INSTRUMENT AND CONTROL FUNCTIONS INSTRUMENT AND CONTROL FUNCTIONS EAU10460 EAU10660 To unlock the steering Main switch/steering lock All electrical systems are off. The key can be removed. EAU10680 LOCK The steering is locked, and all electrical systems are off. The key can be re- moved. -
Page 18: Indicator Lights
INSTRUMENT AND CONTROL FUNCTIONS EAU10980 ECA10280 After changing the engine oil, reset the Indicator lights oil change indicator switch by pushing it in. After 1000 km (600 mi) of operation, the engine oil must be changed. ZAUM00** ZAUM00** ZAUM00** 1. High beam indicator light ”&” 2. -
Page 19: Speedometer Unit
INSTRUMENT AND CONTROL FUNCTIONS EAU11620 EAU12150 EAU12343 Speedometer unit Fuel gauge Handlebar switches The fuel gauge indicates the amount of fuel in the fuel tank. The needle moves towards “E” (Empty) as the fuel level decreases. When the needle reaches the red line, refuel as soon as possible. -
Page 20: Front Brake Lever
INSTRUMENT AND CONTROL FUNCTIONS EAU12400 EAU12900 EAU12950 % /& & & & & ” Dimmer switch “% Front brake lever Rear brake lever Set this switch to “&” for the high beam and to “%” for the low beam. EAU12460 4 /6 6 ”... -
Page 21: Fuel Tank Cap
INSTRUMENT AND CONTROL FUNCTIONS EAUT1382 2. Turn the key clockwise to the origi- Fuel tank cap nal position, and then remove it. To remove the fuel tank cap NOTE: Open the lid by pulling the lever up. In- The fuel tank cap cannot be installed sert the key into the fuel tank cap lock unless the key is in the lock. -
Page 22: Fuel
EWA10880 use of leaded gasoline will cause unrepairable damage to the cata- Your Yamaha engine has been designed 8 8 8 8 8 Do not overfill the fuel tank, oth- lytic converter. to use regular unleaded gasoline with a... -
Page 23: Kickstarter
INSTRUMENT AND CONTROL FUNCTIONS EAU13680 EAU13931 NOTE: Kickstarter Seat Make sure that the seat is properly se- To open the seat cured before riding. 1. Place the scooter on the centerstand. 2. Insert the key into the main switch, and then turn it counterclockwise. ZAUM00** 1. -
Page 24: Helmet Holder
INSTRUMENT AND CONTROL FUNCTIONS EAU14300 EAU14510 To release the helmet from the hel- Helmet holder Storage compartment met holder Open the seat, remove the helmet from the helmet holder, and then close the seat. ZAUM00** ZAUM00** 1. Helmet holder 1. Storage compartment The helmet holder is located under the There is a storage compartment under seat. -
Page 25: Luggage Hook
INSTRUMENT AND CONTROL FUNCTIONS 8 Do not leave your scooter unat- EAUT1070 ment. Luggage hook 8 8 8 8 8 Since the storage compartment tended with the seat open. accumulates heat when exposed to the sun, do not store anything susceptible to heat inside it. -
Page 26: Sidestand
INSTRUMENT AND CONTROL FUNCTIONS EAU15300 EAUT1091 have a Yamaha dealer repair it if it Sidestand Sidestand switch operation does not function properly. The sidestand is located on the left side check of the frame. Raise the sidestand or lower Check the operation of the sidestand it with your foot while holding the motor- switch against the information below. - Page 27 INSTRUMENT AND CONTROL FUNCTIONS Turn the key on. Put the sidestand up. Push the start switch while applying either of the brake levers. The engine will start. Put the sidestand down. If the engine stalls: The sidestand switch is OK. 3-11...
-
Page 28: Pre-Operation Checks
EAU15580 PRE-OPERATION CHECKS PRE-OPERATION CHECKS EAU15591 The condition of a vehicle is the owner’s responsibility. Vital components can start to deteriorate quickly and unexpectedly, even if the vehicle remains unused (for example, as a result of exposure to the elements). Any damage, fluid leakage or loss of tire air pressure could have serious consequences. -
Page 29: Pre-Operation Check List
• Make sure that operation is smooth. • Check cable free play. Throttle grip 6-14, 6-21 • If necessary, have Yamaha dealer adjust cable free play and lubricate cable and grip housing. • Check for damage. • Check tire condition and tread depth. - Page 30 • Make sure that all nuts, bolts and screws are properly tightened. Chassis fasteners • Tighten if necessary. Instruments, lights, signals • Check operation. and switches • Correct if necessary. • Check operation of ignition circuit cut-off system. Sidestand switch 3-10 • If system is defective, have Yamaha dealer check vehicle.
-
Page 31: Operation And Important Riding Points
See page 5-3 for engine break-in in- functions before riding. Consult structions prior to operating the ve- a Yamaha dealer regarding any hicle for the first time. control or function that you do not thoroughly understand. -
Page 32: Starting Off
OPERATION AND IMPORTANT RIDING POINTS EAU16760 EAU16780 EAU16791 Starting off Acceleration and deceleration Braking 1. Close the throttle completely. NOTE: 2. Apply both front and rear brakes si- Before starting off, allow the engine to multaneously while gradually in- warm up. creasing the pressure. -
Page 33: Tips For Reducing Fuel Consump- Tion
If any engine trouble should occur After every hour of operation, stop the during the engine break-in period, engine, and then let it cool for five to immediately have a Yamaha dealer ten minutes. check the vehicle. Vary the engine speed from time to time. -
Page 34: Parking
OPERATION AND IMPORTANT RIDING POINTS EAU17211 Parking When parking, stop the engine, and then remove the key from the main switch. EWA10310 8 8 8 8 8 Since the engine and exhaust system can become very hot, park in a place where pedestri- ans or children are not likely to touch them. -
Page 35: Periodic Maintenance And Minor Repair
If you are not familiar with mainte- owner’s tool kit are intended to assist nance work, have a Yamaha dealer do you in the performance of preventive it for you. maintenance and minor repairs. How-... -
Page 36: Periodic Maintenance And Minor Repair
PERIODIC MAINTENANCE AND MINOR REPAIR NOTE: If you do not have the tools or experi- ence required for a particular job, have a Yamaha dealer perform it for you. EWA10350 Modifications not approved by Yamaha may cause loss of perfor- mance and render the vehicle unsafe for use. -
Page 37: Periodic Maintenance And Lubrication Chart
8 From 30000 km, repeat the maintenance intervals starting from 6000 km. 8 Items marked with an asterisk should be performed by a Yamaha dealer as they require special tools, data and technical skills. ODOMETER READING ( 1,000 km) - Page 38 PERIODIC MAINTENANCE AND MINOR REPAIR ODOMETER READING ( 1,000 km) ANNUAL ITEM CHECK OR MAINTENANCE JOB CHECK Wheels • Check runout and for damage. • Check tread depth and for damage. • Replace if necessary. Tires • Check air pressure. •...
- Page 39 PERIODIC MAINTENANCE AND MINOR REPAIR ODOMETER READING ( 1,000 km) ANNUAL ITEM CHECK OR MAINTENANCE JOB CHECK Moving parts and cables • Lubricate. • Check operation and free play. Throttle grip housing • Adjust the throttle cable free play if necessary. and cable •...
-
Page 40: Removing And Installing Panels
PERIODIC MAINTENANCE AND MINOR REPAIR EAU18771 Removing and installing pan- The panels shown above need to be re- 2(×2) moved to perform some of the mainte- nance jobs described in this chapter. Refer to this section each time a panel needs to be removed and installed. -
Page 41: Checking The Spark Plug
Instead, have a 1. Panel B To remove the spark plug Yamaha dealer check the vehicle. 2. Screw 1. Remove panel C. (See page 6-6.) 2. Remove the spark plug cap. To install the panel 2. -
Page 42: Engine Oil And Oil Strainer
PERIODIC MAINTENANCE AND MINOR REPAIR EAUT1350 NOTE: Engine oil and oil strainer If a torque wrench is not available when The engine oil level should be checked installing a spark plug, a good estimate before each ride. In addition, the oil must of the correct torque is 1/4~1/2 turn past be changed and the oil strainer cleaned finger tight. - Page 43 PERIODIC MAINTENANCE AND MINOR REPAIR screwing it in), and then remove it To change the engine oil and clean again to check the oil level. the oil strainer 1. Start the engine, warm it up for sev- NOTE: eral minutes, and then turn it off. The engine oil should be between the 2.
-
Page 44: Final Transmission Oil
8 8 8 8 8 Be sure no foreign material en- If any leakage is found, have a Yamaha Tightening torque: ters the crankcase. dealer check and repair the scooter. In... -
Page 45: Air Filter And V-Belt Case Air Filter Elements
PERIODIC MAINTENANCE AND MINOR REPAIR EAUT1341 Tightening torque: Air filter and V-belt case air fil- Final transmission oil drain bolt: ter elements 23 Nm (2.3 m • kgf, 16.6 ft • lbf) The air filter and V-belt case air filter el- ements should be cleaned at the inter- 6. - Page 46 PERIODIC MAINTENANCE AND MINOR REPAIR then blow the dirt out with com- 6. Install the air filter case cover by pressed air as shown. installing the screws. Cleaning the V-belt case air filter ele- ment 1. Remove the V-belt air filter case cover by removing the screws.
-
Page 47: Adjusting The Carburetor
The carburetor is an important part of the engine and requires very sophisti- cated adjustment. Therefore, all carbu- retor adjustments should be left to a Yamaha dealer, who has the necessary professional knowledge and experience. ZAUM00** 1. V-belt case air filter element 4. -
Page 48: Adjusting The Throttle Cable Free Play
3~5 mm (0.12~0.20 in) at the occurring, the valve clearance must be throttle grip. Periodically check the adjusted by a Yamaha dealer at the in- throttle cable free play and, if necessary, tervals specified in the periodic mainte- adjust it as follows. -
Page 49: Tires
PERIODIC MAINTENANCE AND MINOR REPAIR EAU33600 severe injury. Make sure that the Tire air pressure (measured on cold Tires total weight of rider, passenger, tires): To maximize the performance, durabil- cargo, and accessories does not 0~90 kg (0~198 lb): ity, and safe operation of your vehicle, exceed the specified maximum Front: note the following points regarding the... - Page 50 If the center tread depth reaches EWA10470 the specified limit, if the tire has a nail 8 8 8 8 8 Have a Yamaha dealer replace or glass fragments in it, or if the sidewall is cracked, have a Yamaha dealer re- excessively worn tires.
-
Page 51: Cast Wheels
3~5 mm (0.12~0.2 in) as shown. unbalanced wheel can result in poor Periodically check the brake lever free performance, adverse handling play and, if necessary, have a Yamaha characteristics, and a shortened dealer check the brake system. tire life. -
Page 52: Adjusting The Rear Brake Lever Free Play
EWA10650 ZAUM0108 If proper adjustment cannot be ob- 1. Brake lever free play tained as described, have a Yamaha The brake lever free play should mea- dealer make this adjustment. sure 10~20 mm (0.4~0.8 in) as shown. Periodically check the brake lever free... -
Page 53: Checking The Brake Fluid Level
Yamaha dealer replace Observe these precautions: the brake shoes as a set. 6-19... -
Page 54: Changing The Brake Fluid
EAU23100 Changing the brake fluid Checking and lubricating the mal for the brake fluid level to Have a Yamaha dealer change the brake cables gradually go down. However, if the fluid at the intervals specified in the The operation of all control cables and... -
Page 55: Checking And Lubricating The Throttle Grip And Cable
EWA10740 Recommended lubricant: Lithium-soap-based grease (all-pur- If the centerstand or sidestand does pose grease) not move up and down smoothly, have a Yamaha dealer check or repair Recommended lubricant: Lithium-soap-based grease (all-pur- pose grease) 6-21... -
Page 56: Checking The Front Fork
Check the inner tubes for scratches, a Yamaha dealer check or repair it. damage and excessive oil leakage. 2. Hold the lower ends of the front fork legs and try to move them forward To check the operation and backward. -
Page 57: Checking The Wheel Bearings
ECA10630 have a Yamaha dealer check the wheel bearings. 8 8 8 8 8 Always keep the battery charged. ZAUM00** Storing a discharged battery can cause permanent battery dam- age. - Page 58 DREN. ZAUM00** 1. Bracket To charge the battery Have a Yamaha dealer charge the bat- 3. Pull the battery out from the bat- tery as soon as possible if it seems to tery box, and then disconnect the battery couplers.
-
Page 59: Replacing The Fuses
PERIODIC MAINTENANCE AND MINOR REPAIR EAUT1431 Replacing the fuses The main fuse box is located behind panel B. (See page 6-6.) ZAUM00** ZAUM00** 1. Battery 1. Lid 2. Fuse box To install the battery 3. Carburetor heater fuse ZAUM00** 1. Connect the battery couplers, and 4. -
Page 60: Replacing A Headlight Bulb
ECA10660 and then remove the defective bulb. 4. If the fuse immediately blows again, have a Yamaha dealer check the Do not touch the glass part of the electrical system. headlight bulb to keep it free from oil,... -
Page 61: Replacing The Tail/Brake Light Bulb
6. Install the headlight bulb cover, and wise. then connect the coupler. 7. Install the panel. 8. Have a Yamaha dealer adjust the headlight beam if necessary. ZAUM00** 1. Bulb 3. Insert a new bulb into the socket, push it in, and then turn it clock- wise until it stops. -
Page 62: Replacing A Front Turn Signal Light Bulb
ECA10670 6. Install the socket (together with the electrical circuit or replace the bulb. bulb) by turning it clockwise. It is advisable to have a Yamaha dealer 7. Install the panel. perform this job. 1. Place the scooter on the centerstand. -
Page 63: Troubleshooting
However, should your scooter require any repair, take it to a Yamaha dealer, whose skilled technicians have the necessary tools, experience, and know-how to ser- vice the scooter properly. -
Page 64: Troubleshooting Chart
Remove the spark plug and check the electrodes. The engine does not start. Have a Yamaha dealer check the vehicle. Check the battery. 4. Battery The engine turns over The battery is good. -
Page 65: Scooter Care And Storage
EAU25990 SCOOTER CARE AND STORAGE SCOOTER CARE AND STORAGE EAU26090 ucts onto seals, gaskets and wheel ucts, solvent or thinner, fuel Care axles. Always rinse the dirt and (gasoline), rust removers or in- While the open design of a scooter re- degreaser off with water. - Page 66 SCOOTER CARE AND STORAGE ECA10790 After normal use 5. Touch up minor paint damage Remove dirt with warm water, a mild caused by stones, etc. Do not use warm water since it in- detergent, and a soft, clean sponge, and 6.
-
Page 67: Storage
4. Perform the following steps to pro- NOTE: against dust with a porous cover. tect the cylinder, piston rings, etc. Consult a Yamaha dealer for advice on ECA10820 from corrosion. what products to use. a. Remove the spark plug cap and 8 8 8 8 8 Storing the scooter in a poorly spark plug. - Page 68 SCOOTER CARE AND STORAGE EWA10950 °F) or more than 30 °C (90 °F)]. For more information on storing the To prevent damage or injury from battery, see page 6-23. sparking, make sure to ground the NOTE: spark plug electrodes while turning Make any necessary repairs before stor- the engine over.
-
Page 69: Specifications
EAU26320 SPECIFICATIONS SPECIFICATIONS EAU26335 Engine oil Carburetor Dimensions Type Manufacturer Overall length SAE20W40 Taiwan KEI HIN 1855 mm Recommended engine oil grade Type x quantity Overall width API service SE, SF, SG type or higher CVK24 x 1 685 mm Spark plug(s) -20˚... -
Page 70: Specifications
SPECIFICATIONS Front tire Rear wheel Electrical system Type Wheel type Ignition system Tubeless Cast wheel C.D.I. Size Rim size Charging system 110 / 70-12 12xMT3.00 A.C. magneto Manufacturer/model Front brake Battery CHENG SHIN / C-922N-47L Type Model Rear tire Single disc brake YTX7A-BS Type Operation... - Page 71 SPECIFICATIONS Fuses Main fuse 30.0 A Headlight fuse 15.0 A Signaling system fuse 15.0 A Ignition fuse 7.5 A Carburetor heater fuse 7.5 A...
-
Page 72: Consumer Information
Record the key identification number, vehicle identification number and model label information in the spaces provided below for assistance when ordering spare parts from a Yamaha dealer or for reference in case the vehicle is stolen. KEY IDENTIFICATION NUMBER: ZAUM00** ZAUM00** 1. - Page 73 The model label is affixed to the inside of the storage compartment. (See page 3-8.) Record the information on this la- bel in the space provided. This informa- tion will be needed when ordering spare parts from a Yamaha dealer.
- Page 74 INDEX Spark plug, checking ........ 6-7 Specifications ..........8-1 Acceleration and deceleration ....5-2 Handlebar switches ........3-3 Speedometer unit ........3-3 Air filter and V-belt case air filter Headlight bulb, replacing ......6-26 Start switch ..........3-4 elements ..........6-11 Helmet holder ..........
- Page 76 YAMAHA MOTOR TAIWAN CO.,LTD PRINTED IN TAIWAN 2003 .12 - 0.3 1 !