Honeywell CO60PM Owner's Manual
Portable evaporative air cooler
Hide thumbs
Also See for CO60PM:
- Service manual (22 pages) ,
- Owner's manual (18 pages) ,
- User manual (16 pages)
Table of Contents
Advertisement
Available languages
Available languages
Portable Evaporative Air Cooler
for Outdoor, Indoor & Commercial Use
Enfriador de aire portátil por evaporación
Ideal para Uso Externo, Interno y Comercial
OWNER'S MANUAL
Read and save these instructions before use
MANUAL DEL USUARIO
Lea y guarde estas instrucciones antes de usar
Model: CO60PM
Modelo: CO60PM
Power rating: 220 Watts
Voltage rating: 120 Volt AC, 60Hz
Potencia: 220 Watt
Voltage: 120 Volt AC, 60Hz
For product inquiries or support, visit www.honeywellaircoolers.com
Para consultas sobre productos o soporte técnico visite: www.honeywellaircoolers.com
Customer Support : 1-800-474-2147
Made in P.R.C.
Centro de servicios al cliente: 1-800-474-2147
Fabricado en China
Advertisement
Chapters
Table of Contents

Related Manuals for Honeywell CO60PM


Summary of Contents for Honeywell CO60PM
-
Page 1: Manual Del Usuario
Ideal para Uso Externo, Interno y Comercial OWNER’S MANUAL Read and save these instructions before use MANUAL DEL USUARIO Lea y guarde estas instrucciones antes de usar Model: CO60PM Modelo: CO60PM Power rating: 220 Watts Voltage rating: 120 Volt AC, 60Hz Potencia: 220 Watt Voltage: 120 Volt AC, 60Hz For product inquiries or support, visit www.honeywellaircoolers.com... - Page 2 This page is intentionally left blank...
-
Page 3: Table Of Contents
INDEX Read all instructions carefully before setting up and operating the cooler, and please keep this instruction manual for future reference. This manual is designed to provide you with important information needed to setup, operate, maintain, and troubleshoot your cooler. Failure to follow these instructions may damage and/or impair its operation and void the warranty. -
Page 4: Thank You
THANK YOU Congratulations on your purchase of this versatile Honeywell Evaporative Air Cooler. For optimum cooling from your cooler, fill the water tank to maximum level and load ice inside the ice compartment before you turn on your air cooler. -
Page 5: User Tips
USER TIPS Energy Efficient, No Compressor Honeywell Evaporative Air Coolers are built to maximize energy efficiency and keep costs low. Warm air is drawn into the cooler and enters the Honeycomb Cooling Media. Water pumped from the tank pours over the honeycomb media. As the warm air passes through the media, the water absorbs the heat, naturally cooling and humidifying the air. - Page 6 USER TIPS Indoor Use The recommended maximum relative humidity level is 60% or less, which allows a noticeable temperature decrease. The temperature decrease will be greater in drier climates because higher evaporation occurs when the humidity is low. The evaporative air cooler should not be used in enclosed spaces.
-
Page 7: Safety
SAFETY Read And Save These Instructions: When using electrical appliances, basic safety precautions should always be followed: Your cooler runs on 120 Volt AC, 60 Hz current. Check the • household voltage to ensure it matches the appliance's rate 120V - 60 Hz specification. - Page 8 SAFETY • DO NOT attempt to repair or adjust any electrical or mechan- ical functions of the cooler, as this may void the warranty. • DO NOT cover the air inlet or outlet on the appliance as this may cause motor damage. •...
- Page 9 SAFETY • Use Only on GFCI Protected Receptacles. • Power cords have to be contained. If they must run along the ground, make sure every inch of them is secured so they will not be tripped over. The wiring and connections must be waterproof. Be sure the connections (to the air cooler) •...
-
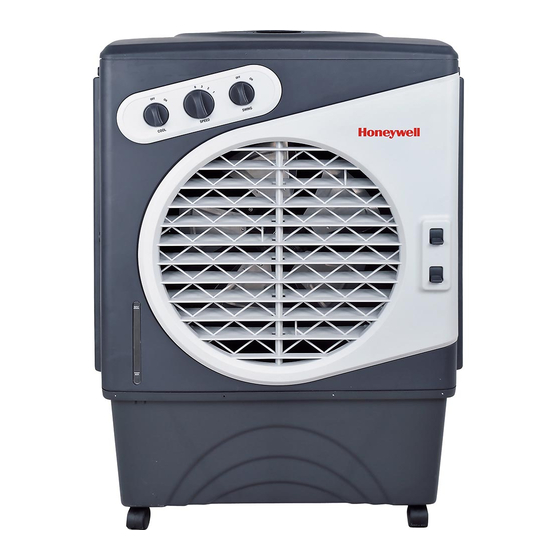
Page 10: Parts Description
PARTS DESCRIPTION 1 Water Inlet and Ice 9 Control Panel Loading Compartment 10 Right Honeycomb Panel 2 Handle 11 Continuous Water Supply Connection 3 Left Honeycomb Panel 12 Drain Plug 4 Lever for Horizontal Louvers 13 Backside Honeycomb Panel 5 Water Tank 14 Power Cord &... -
Page 11: Use & Operation
USE & OPERATION Control Panel OFF ON OFF ON COOL SWING SPEED NOTE: Speed control may be marked as High / Med / Low in certain units. -
Page 12: Control Knobs
USE & OPERATION Control Knobs Speed / On - Off Connect to the power supply and turn the Speed knob. The fan will start. Change the speed from 1 for Low to 2 for Medium to 3 High. To switch OFF the unit turn the Speed know to "0". SPEED Cool To begin cooling the desired area turn the "COOL"... -
Page 13: Fill Water
USE & OPERATION CAUTION Unplug from power when refilling. Filling With Water Water can be filled into the air cooler by: Water Inlet (Manually) Water / Ice can be put into the tank through the top opening. There is a hole for water to flow into the tank. Continuous water supply (Auto Refill) Connect a garden hose to the continuous water supply inlet. - Page 14 USE & OPERATION Filling With Water (Continuous Water Supply Connection) CAUTION Unplug from power source before filling This automated process eliminates the need to manually refill the water tank. • Securely connect the continuous water supply connector (located on the lower left side panel #11 on Page 8) to the water supply.
-
Page 15: Cleaning & Maintenance
CLEANING & MAINTENANCE Important - Please Read! • The cooler is supplied with Honeycomb Cooling Media. • The cleaning frequency for the Honeycomb media depends on local air and water conditions. In areas where the mineral content of water is high, mineral deposits may build up on the Honeycomb Cooling Media and restrict air flow. -
Page 16: Draning/Cleaning Water Tank
CLEANING & MAINTENANCE Draning and Cleaning The Water Tank Turn the power “off” and disconnect the air cooler from the power supply. • Move the unit to a location where it can be drained. • Remove the drain plug and allow the tank to empty(#12 on Page 8). •... -
Page 17: Troubleshooting Guide
TROUBLESHOOTING GUIDE PROBLEM POSSIBLE CAUSE SOLUTION No discharge of air Cord is not plugged in. Make sure power cord is plugged in and the supply switch is on. Power is not on. Turn the unit ON by pressing button on the control panel. Not Cooling / Unit is Pump is not turned ON. -
Page 18: Technical Specifications
TECHNICAL SPECIFICATIONS MODEL NO. CO60PM Voltage 120 V 60 Hz Frequency 220 Watts Wattage Ampere 1.83A Water Tank Capacity 15.8 Gallon Cooling Media Honeycomb Product Dimension (inches) 27.56(L) X 18.35(W) X 40.0(H) 41.5 lbs Net Weight... -
Page 19: Electrical Wiring Diagram
ELECTRICAL WIRING DIAGRAM... -
Page 20: Service And Warranty
SERVICE AND WARRANTY 1-YEAR LIMITED WARRANTY Read all the instructions before attempting to use this product. This 1 year limited warranty applies to repair or replacement product found to be defective in material or workmanship. This warranty does not apply to any damage resulting from commercial, abusive, unreasonable use or supplemental damage. - Page 21 SERVICE AND WARRANTY Please read the Instruction Manual carefully before setting up or using this product. If you believe this product to be suffering from a manufacturing fault, or if you have inquiries about this product, please contact our Customer Support: CUSTOMER SUPPORT JMA North America LLC Ramsey, New Jersey, 07446.
- Page 22 ÍNDICE Lea cuidadosamente todas las instrucciones antes de configurar y operar la unidad, y por favor guarde este manual de instrucciones para futuras consultas. Este manual está diseñado para proporcionarle información importante necesaria para la configuración, operación, mantenimiento, y resolución de problemas de su acondicionador.
-
Page 23: Gracias
¡GRACIAS! ¡GRACIAS! Felicitaciones por su compra de este versátil Enfriador de aire por evaporación Honeywell. Para un óptimo desempeño de su unidad, primero llénela con agua. Si dispone de hielo, eso aumentará su potencia de enfriamiento. Por favor lea estas instrucciones cuidadosamente. -
Page 24: Recomendaciones Para El Usuario
RECOMENDACIONES PARA EL USUARIO FRÍO ~ EFICIENTE ~ NATURAL El enfriamiento de aire por evaporación es la manera más natural de enfriamiento, similar a una brisa que recorre un lago. Esta disminución de la temperatura de esta brisa produce un efecto refrescante y relajante en la personas. - Page 25 RECOMENDACIONES PARA EL USUARIO El nivel máximo recomendado de humedad relativa es del 60%. El descenso de la temperatura del ambiente será mayor en climas secos. Se produce una mayor evaporación cuando la humedad es baja. El enfriador de aire por evaporación no debería serutilizado en espacios cerrados.
-
Page 26: Normas De Seguridad
NORMAS DE SEGURIDAD LEA Y GUARDE ESTAS INSTRUCCIONES: Cuando se utilicen aparatos eléctricos, siempre deberían tomarse precauciones de seguridad básicas: Su enfriador trabaja a una tensión de 120 V AC, 60 Hz. Revise • la tensión de su hogar para asegurarse de que coincide con la 120 Volt AC 60Hz especificación nominal del aparato. - Page 27 NORMAS DE SEGURIDAD • NO intente reparar ni ajustar ninguna parte eléctrica ómecánica del enfriador, ya que esto puede anular la garantía. NO obstruya la entrada ó salida de aire del aparato ya • quepuede causar daños al motor. • NO inserte ni permita que entren objetos a través de ningunaabertura de ventilación ó...
- Page 28 NORMAS DE SEGURIDAD • Use sólo en receptáculos GFCI protegidos. • Los cables eléctricos tienen que estar protegidos. Si van a estar extendidos a lo largo del suelo, asegúrese de que cada centímetro esté en perfecto estado y protegido para evitar tropiezos. El cable y los conectores tiene que ser resistentes al agua.
-
Page 29: Descripción Componentes
DESCRIPCIÓN DE COMPONENTES 1 Entrada De Agua Y Compartimiento De 9 Panel De Control Carga De Hielo 10 Panel Derecho 2 Asa 11 Continuo De Agua Conexión A La Red 3 Panel Izquierdo 12 Tapón De Vacio 4 Palanca Para Deflectores Horizontales 13 Panel Trasero 5 Tanque De Agua 14 Cable De Alimentación Y Enchufe... -
Page 30: Uso Y Funcionamiento
USO Y FUNCIONAMIENTO PANEL DE CONTROL OFF ON OFF ON COOL SWING SPEED NOTA El control de velocidad puede ser High / Med / Low (Alta / Media / Baja) en ciertas unidades. -
Page 31: Mandos De Control
USO Y FUNCIONAMIENTO MANDOS DE CONTROL VELOCIDAD / ENCENDIDO (SPEED / ON - OFF) Conecte a la red de alimentación y gire el mando de velocidad (SPEED). Comenzará a funcionar el ventilador. Cambie la velocidad de 1 (Baja) a 2 (Media) ó a 3 (Alta). Para apagar la unidad, gire el mando de Velocidad hasta “0”. -
Page 32: Llenado Del Tanque
USO Y FUNCIONAMIENTO PRECAUCIÓN Desconecte la unidad de la toma corriente cuando añada líquido. LLENADO DEL TANQUE El equipo puede ser llenado de agua por: Entrada de agua (manualmente) Agua / hielo se puede colocar en el tanque a través de la abertura superior. Hay un agujero para que el agua fluya hacia el tanque. - Page 33 USO Y FUNCIONAMIENTO LLENADO DE AGUA (CONEXIÓN CONTINUA SUMINISTRO DE AGUA) PRECAUCIÓN Desconecte la unidad de la toma corriente antes de añadir agua. Este proceso automatizado elimina la necesidad de rellenar manualmente el depósito de agua. • Conecte firmemente el conector de suministro de agua continuo (situado en el panel lateral inferior izquierda # 11 en la página 27) para el suministro de agua.
-
Page 34: Limpieza Y Mantenimiento
LIMPIEZA Y MANTENIMIENTO IMPORTANTE • El equipo se entrega con el medio de enfriamiento Honeycomb. La frecuencia de limpieza depende de las condiciones locales del aire y el agua. Por • ejemplo, en áreas donde el contenido de minerales del agua es alto, se pueden acumular depósitos en el medio de enfriamiento Honeycomb, restringiendo el caudal de aire. - Page 35 LIMPIEZA Y MANTENIMIENTO LIMPIEZA Y VACIAMIENTO DEL TANQUE DE AGUA • Apagar el equipo y desconectar de la toma corriente. • Desplace la unidad a una ubicación donde pueda vaciarse y quite el tapón del tubo de drenaje (vea el número 12 en la descripción de partes en la página 27).
-
Page 36: Guía De Solución De Problemas
GUIA DE SOLUCION DE PROBLEMAS PROBLEMA POSIBLE CAUSA SOLUCIÓN No hay salida de aire Cable eléctrico no esta Asegúrese que el cable eléctrico conectado este enchufado y el interruptor de alimentación en "ON" La unidad no esta encendida Intente prender la unidad apretando los botones en el panel de control o en el control remoto No enfría / La unidad hace... -
Page 37: Especificaciones Técnicas
ESPECIFICACIONES TÉCNICAS MODELO Nº CO60PM Tensión 120 V 60 Hz Frecuencia 220 Watts Potencia Corriente 1,83A 15,8 Galones Capacidad del tanque de agua Medio de enfriamiento Honeycomb Dimensiones del producto (Inches) 27,56(L) X 18,35(W) X 40,0(H) 41,5 lbs Peso neto... -
Page 38: Servicio Y Garantia
SERVICIO Y GARANTIA GARANTÍA LIMITADA DE 1 AÑO Lea todas las instrucciones antes de intentar utilizar este produto. Esta garantía limitada de un año se aplica a la reparación o sustitución del producto siempre que haya algún defecto de material o de manipulación. La garantía no cubre ningún daño resultante de un uso comercial, abusivo o irracional, ni daños causados intencionadamente. - Page 39 SERVICIO Y GARANTIA Por favor, lea el manual de instrucciones detenidamente antes de configurar o de utilizar este producto. Si considera que este producto sufre un defecto de fabricación, o si tiene dudas sobre el mismo, por favor contacte con nuestro Servicio de Atención al Cliente: CUSTOMER SUPPORT JMA North America LLC Ramsey, New Jersey, 07446.
- Page 40 CO60PM_IM_Eng_Spa_USA(lowes)_8 December 2012 JMA North America © 2012 AirTek International Corporation Limited Ramsey New Jersey 07446 The Honeywell Trademark is used under license from Honeywell International Inc. Customer Support: 1-800-474-2147 Honeywell International Inc. makes no representation or E-mail: info@jmana.us warranties with respect to this product.