Table of Contents
Advertisement
Quick Links
Advertisement
Table of Contents

Related Manuals for Philips Magic 3-2


Summary of Contents for Philips Magic 3-2
- Page 1 Easy Install User Manual...
-
Page 2: Packaging
Easy Install Dear Customer, With the following installation guide, you can quickly and easily start using your fax machine; you can also fi nd more detailed explanations and descriptions regarding your machine in the user manual. Please read this carefully, and always follow the safety instructions. -
Page 3: Loading Paper
Easy Install 2 Place the cordless handset on the rest provided. Be- 3 Close the paper feed fl ap. fore fi rst use, the batteries must be charged for at least 12 hours. Power supply v Never put the cordless telephone without batteries on the rest! Loading paper 1 Insert the paper tray in the slots provided behind the... -
Page 4: Ink Fi Lm
Easy Install Ink film 5 Close the machine by swinging the operation panel forward, until it snaps in. Your fax machine is supplied complete with a free ink fi lm for a few trial pages. A new Plug’n’Print card has to be inserted with each new ink fi... -
Page 5: Answering Machine B
Easy Install Answering machine b Your answering machine is factory-programmed with a recorded outgoing message. Activate or deactivate your answering machine with b ON/OFF. If you have ac- tivated the answering machine, you will see the symbol b on the display and a symbol in the display of the cordless telephone. -
Page 6: Description Of The Machine
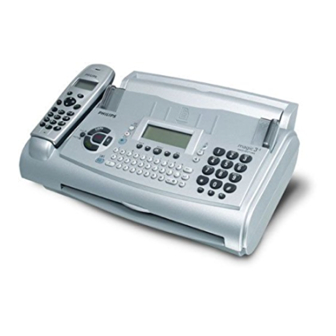
User Manual Description of the machine 8 Printer roller 1 Power supply cable with power plug 9 Scanner lid 2 Paper feed fl ap 10 Holder for Plug’n’Print card 3 Document guide 11 Front ink fi lm compartment 4 Paper tray 12 Rear ink fi... -
Page 7: Key Assignment On The Fax Machine
User Manual Key assignment on the fax machine bON/OFF to activate / HELP/w press twice briefl y: to print operating instructions for the most important deactivate the answering ma- functions (with references to additional help pages); press and hold (for two seconds): chine to start the automatic installation of your fax machine / printout of Easy Install REC press briefl... -
Page 8: Key Assignment On The Cordless Telephone
User Manual Key assignment on the cordless telephone Colour display Battery charge indicator Number with which the cordless tel- ephone is registered with the base station 01/07 20:00 Speaker Mute Display background, can be selected from various colour themes Programmed functions for the but- tons •R and ô... - Page 9 User Manual Menu functions on the cordless telephone Your cordless telephone is equipped with the following menu functions. You can access these functions with the / buttons and confi rm with OK. Use the C button to clear the input or exit the menu. If no button is pressed for some time, the cordless telephone returns to its base state.
-
Page 10: Table Of Contents
User Manual Contents Transmission speed ...............29 Size compression ................29 Fax journal ...................29 Packaging ..................2 Polled reception ................29 Telephone connection ..............2 Send later ..................30 Cordless telephone ................2 Copy ....................30 Loading paper ................3 Power supply .................3 SMS W* ............31 Starting up ..................3 SMS settings ................31 Ink fi... -
Page 11: Safety Instructions
User Manual Safety Disconnect the fax machine from the mains and tele- phone line before cleaning the surface of the machine. Never use liquid or gaseous cleaning agents (sprays, scour- instructions ing agents, polishes etc.). Do not allow any liquid to enter the fax machine, oth- Pease read all warning notices and instructions and follow erwise there is a risk of electric shock or other injury to them precisely. -
Page 12: Installation
User Manual Installation Putting the cordless telephone into operation 1 Insert the three batteries as indicated in the battery Connection compartment. Telephone socket v Never use typical batteries. Connect the telephone cable to the fax machine by insert- Never place the cordless telephone in the charging ing it in the socket identifi... -
Page 13: Ink Film
Charge state of the batteries v For use with PHILIPS ink fi lms only! Th e charge state of the batteries is shown on the display of the cordless telephone. If this is too low, the display lighting is switched off... -
Page 14: Loading Paper
User Manual Loading the ink film 6 Close the machine by swinging the operation panel forward, until it snaps in. 1 Carefully remove the rubber rings from the new ink fi lm. Take care not to damage the ink fi lm. 2 Lay the large roll in the grooves provided in the rear ink fi... -
Page 15: Removing Paper
User Manual 3 Pull the paper feed fl ap fully forward until it stops. In- Additional devices sert several sheets of A4 paper (80 g/m²) up to the end- You can operate other equipment on a single telephone stop in the paper feed mechanism (max. 50 sheets). line in addition to your fax machine, and cordless hand- set, such as other telephones, cordless phones, answering machines, charge counters and modems. -
Page 16: Easy Install
User Manual For all other countries For all other countries You can connect additional devices to the same telephone socket by using the socket labeled EXT on your ma- chine. v Connecting additional devices to the same socket ensures you the optimal functioning of your fax v If you connect additional devices to separate sock- switch (e. -
Page 17: Isdn Connection
User Manual ISDN connection In case your PABX requires R to obtain an outside line but it is still not possible to get through to the Your fax machine is not an ISDN fax (group 4), but an line, your system may not meet the most recent regu- analogue fax machine (group 3). -
Page 18: Basic Settings
User Manual Basic settings Your name 1 Select function 14 by pressing MENU, 14 and If you want to keep a note of the factory settings on your OK on your fax machine. machine for later, we recommend printing out a function 2a For device with SMS functionality: Enter your list before you change any of the settings: Press MENU. -
Page 19: Correction
User Manual 2b For device without SMS function: You can also Display language enter letters using the number keys (a maximum of 32 characters). Press a number key as often as necessary for the fax machine to enter the desired letter, e. g. for C press 2 three 1 Select function 11 by pressing MENU, 11 and times. -
Page 20: Distinctive Ringing
User Manual Distinctive ringing 1 Select function 36 by pressing MENU, 36 and OK on your fax machine. 2 Use </> to select the category that you would like to assign a specifi c ring tone. 3 You can select from the following categories FAMILY FRIENDS SERVICE... -
Page 21: Fax Switch
User Manual Fax switch Set SM mode Display Possible settings Th e built-in fax switch enables you to phone and fax from tAM rings: 0, 1, 2, 3, 4, 5, 6, 7, 5/2 the same telephone connection and use additional devic- fax rings: 0, 1, 2, 3, 4, 5, manual es. -
Page 22: Special Settings
User Manual Special settings Silent fax reception To receive faxes without any ring signals, set the amount of ring signals in FAX RINGS to 0. Completely silent operation $ If, for example, you do not wish to be disturbed by calls or faxes arriving at night, you may set the number of ringing signals (tam rings and fax rings) to 0. -
Page 23: Telephone
User Manual Telephone Call list on the fax machine Making a call Th e list shows the last 50 telephone numbers you have dialled. After 50 entries, the list is automatically printed 1 To place a call, enter the desired telephone number out. -
Page 24: Group
User Manual 2 Enter a name using the keypad. Use > to move the List of numbers cursor one position to the right. Th en press OK. Choose function 44 to print a list of your stored tele- phone book numbers. Press MENU, 44 and OK. 3 Enter the number you would like to save, then press 4 You can assign this entry to a category: DEFAULT, Group... -
Page 25: Hands-Free Operation Z
User Manual Hands-free operation z Easylink You can make a call without using the cordless telephone Using additional telephones or let persons in the same room participate in the con- Your fax machine is equipped with a cordless telephone. versation. To do this, press the button z on the fax ma- You can also connect further telephones to the same chine before dialling or when a call is forwarded from telephone line (see Installation / Additional devices). - Page 26 User Manual Incoming call Cordless handset Fax machine Other telephone You want to accept a Press (/L both for an Press z. Depending on the type of call. external call and for a call telephone. that is forwarded by your fax If you accept a call and hear machine or another cordless the recorded announcement...
-
Page 27: Fax & Copy
User Manual Fax & Copy 3 Move the document guide so that it rests on the docu- ment. Write clearly and legibly. Only use pens with dark ink (black or dark-blue, not yellow, orange or light green). Th e following points are the most common causes of er- rors when sending faxes: v Don’t send ... -
Page 28: Broadcast
User Manual Fax reception without paper If the fax can’t be sent to one of the recipients, the fax If there is no more paper in the feeder or if the ink fi lm is machine will continue with the list and retry sending empty, an incoming fax will be stored in memory (storage the fax again. -
Page 29: Transmission Speed
User Manual Transmission speed Polling with code If your correspondent has entered a code to protect the Your fax machine automatically adjusts its transmission document to be retrieved please follow this procedure: speed to the quality of the telephone line. Especially in case of overseas transmissions this process can take more 1 Press MENU, 22 and OK on your fax machine. -
Page 30: Send Later
User Manual 2 Select the desired resolution with FINE/PHOTO. Send later a To make only one copy of the original, briefl y press If you wish to make use of cheaper telephone rates, or COPY. Th e copying process starts immediately. if your fax correspondent is only available at particular times, you can program automatic transmission of a fax b In order to make more than one copy press COPY... -
Page 31: Sms W
User Manual 2 Use u to choose whether to have incoming mes- SMS W sages automatically printed or not: PRINT SMS: YES, NO (for device with SMS functionality) 3 Press OK to complete your action. (not available in all countries) v If your fax machine is connected to a PABX system You can send and receive SMS (Short Message Service) you may not be able to use SMS services. -
Page 32: Sending Sms Messages
User Manual Sending SMS messages Printing SMS messages 1 Press W on the fax machine. 1 Press W on the fax machine.. 2 Press u to select SEND SMS. 2 Press u to select PRINT SMS. 3 Press OK. 3 Press OK. 4 Th e display shows TEXT:. -
Page 33: Other Sms Functions
User Manual Other SMS functions 1 If you press OK while you are reading an SMS mes- sage you can use u to select one of the following options: print sMS print out the SMS message back return to the SMS list forward sms send the SMS message to someone else... -
Page 34: Answering Machine B
User Manual Answering Duration of recording 1 Select MENU, 51 and OK. machine b 2 Press u to choose between 30, 60, 120 seconds or the AUTO mode (unlimited recording time). Please Th e recording capacity is 30 minutes. note that AUTO mode is not available in all coun- tries. -
Page 35: Forwarding Messages
User Manual Forwarding messages Recording a conversation Your fax machine can automatically forward all incom- You can record a telephone conversation with your fax ing messages to another telephone number. Enter the machine. telephone number to which you wish recorded calls to 1 Press REC during a telephone conversation. -
Page 36: Remote Control On The Fax Machine
User Manual Remote control on the fax Overview of commands 1 Th e message you are just listening to will be repeated. machine 2 All messages will be played back. You can also control the answering machine functions on 3 Move to the next message. your fax from any telephone using tone dialling. -
Page 37: Remote Control On The Cordless Telephone
User Manual Remote control on the cordless telephone You can listen to or delete messages on the fax machine using the cordless telephone. Listening to messages A message blinks on the display of the cordless telephone when a message is ready to be retrieved from the fax ma- chine. -
Page 38: Cordless Telephone
User Manual Cordless Deregistering the cordless telephone If you would like to deregister an additional cordless tel- ephone from your fax machine, the procedure is as fol- telephone lows: 1 On your fax machine, press MENU, 72 and OK. Your fax machine has a modern cordless telephone with which you can place calls, read and send SMS messages 2 On the numeric keypad, enter the cordless telephone and operate the answering machine of the fax machine. -
Page 39: Placing Calls
User Manual Priority Call log With this function you can specify which fax machine All outgoing and incoming calls as well as events are saved should be used for telephone calls if you have registered in this menu. You can also select whether a message should your cordless telephone with multiple fax machines. -
Page 40: Second Call
User Manual 2 You can now place an internal call. Th e external call is Internal telephone calls kept on hold. If you have registered multiple cordless telephones with 3 Press the disconnect button ) to transfer the call. your fax machine, you can place internal calls between two cordless telephones. -
Page 41: Telephone Book
User Manual Assigning an individual ring tone Telephone book 1 Hold the telephone book button m on the cordless You can save up to 40 entries in the telephone book of telephone pressed until the display shows: 001 (for your cordless phone and assign these entries a category example) and the symbol for the telephone book ap- symbol. -
Page 42: Sms
User Manual Call the number of the entry CALL: Change the entry (name, number, category) EDIT: (for machine with SMS function) Search for names/entries SEARCH: You can send, receive and manage SMS (Short Message Assign a special ring tone to the entry (re- RING TONE: Service) messages with your cordless telephone. - Page 43 User Manual CANCEL: to delete the SMS message just created 5 You can reach the start of the SMS message with the button •R You can reach the list of all SMS messages CAPITAL LETTER / SMALL LETTER: to switch by pressing the •R button while at the start of the between the entry of upper / lower case letters SMS message.
-
Page 44: Additional Functions Of The Cordless Telephone
User Manual Additional functions of the Birthday At the specifi ed day and time, the cordless telephone will cordless telephone ring for approx. 15 seconds, and the saved name will ap- Th e cordless telephone of your fax machine has the fol- pear on the display. -
Page 45: Search Function
User Manual Settings Switching on and off Here you can confi gure the following special settings. You can switch your cordless telephone off to save power. To switch off the cordless telephone, press the ) button PROGRAM KEYS Both buttons underneath the display for at least three seconds. -
Page 46: Hints And Tips
5 Close the panel so that it also clicks into place. Delivery service You can order ink fi lms and cleaning accessories at your local dealer or directly from PHILIPS (free delivery) on Freefone 0800 358 08 07 (United Kingdom). Paper jam 6 Insert paper (see Installation / Loading paper). -
Page 47: Service Code
User Manual 4 Carefully remove the document either from the front Code No. 7117 or the back. Th is code erases all your modifi cations to the factory set- tings. Th e fax machine will therefore react in exactly the same way as on fi... -
Page 48: Troubleshooting
User Manual 2 Open the operation panel by lifting in the middle. Cleaning the document feed roller When you hear a soft click, the panel is engaged. … when a black stripe appears at the top of a copy. … when two pages are printed out when copying or send- ing a single page or when the recipient receives two pages. - Page 49 User Manual Problems when faxing or printing Faxes are of poor quality. Change the resolution setting to F or f. Check the document or set a higher contrast with func- tion 47 (see chapter Fax & Copy / Contrast). Test the fax machine by making a copy. If your copy is faultless the correspondent’s fax machine might be defective.
-
Page 50: Appendix
User Manual Appendix Others 41 Call list ..............23 (shows the last 50 dialled numbers) Functions 42 Call waiting ..............25 (activate and deactivate the function call waiting) To print a list of functions, press MENU three times. 44 Dialling list ...............24 Setup (print out of stored names and numbers) 11 Set language ..............19... -
Page 51: Technical Data
User Manual Technical data Power consumption stand by: about 2 W Compatibility ITU Group 3 Connection type outside line (PSTN) telephoning: about 4 W extension (PABX) sending a standard letter < 20 W Flash times outside line (PSTN):100 ms receiving a standard extension (PABX): letter <... -
Page 52: Warranty
At the beginning of April 2002, SAGEM SA bought the instructions for use; or PHILIPS fax business unit. SAGEM SA is now the Euro- pean Number 1 in fax and off ers a complete range of fax – an external cause to the equipment (including but not terminals with Internet access and SMS function, mul- limited to, lightening, fi... -
Page 53: Environment
Please note that only Philips ink fi lms should be used. Your Philips guarantee does not cover damage to your fax BATTERIES... -
Page 54: Index
User Manual Index deleting Fax switch 21 telephone book entries function list 50 Calling line identifi cation set day/night mode 21 Delivery service 46 special settings 22 Call list 23 Activate answering machine Deregistering cordless timer 21 call waiting telephone 38 Feeding documents in 27 accepting a second call Activate call waiting 25... - Page 55 User Manual image quality 28 technical data 51 telephone book on the technical data 51 Ringer Volume cordless telephone 24 Play back volume 34 for the fax machine 20 telephone book on the document jam 46 Polling Ring signal type fax machine 23 paper jam 46 polled reception 29...
-
Page 56: Customer Information
Hereby, SAGEM Communication Austria GmbH, de- nel are highly trained specialists who can ensure that you clares that this PHILIPS PPF 591R/595R is in compli- receive the maximum benefi t from your product. ance with the essential requirements and other relevant provisions of Directive 1999/5/EC.