Table of Contents
Advertisement
Advertisement
Table of Contents

Related Manuals for La Crosse Technology WS-8035


Summary of Contents for La Crosse Technology WS-8035
- Page 1 WS-8035 Wireless 433 MHz Wireless Weather Station Instruction Manual...
-
Page 2: Table Of Contents
TABLE OF CONTENTS Topic Page Inventory of Contents/ Additional Equipment About WWVB Quick Set Up Guide Detailed Set Up Guide Battery Installation Start Up Sequence Explanation of LCD Information Function Key Layout Program Mode Overview of Programming Sequence LCD Contrast Setting Time Zone Setting DST ON/OFF Setting Radio-controlled Time ON/OFF Setting... -
Page 3: Inventory Of Contents/ Additional Equipment
INVENTORY OF CONTENTS 1. WS-8035—indoor weather station 2. TX4U—remote thermo/hygro (temperature/humidity) sensor 3. Instruction manual and warranty card ADDITIONAL EQUIPMENT (not included) 1. Five fresh AA 1.5V alkaline batteries. 2. One wall-mounting screw (optional) ABOUT WWVB (radio-controlled time) The NIST (National Institute of Standards and Technology—Time and Frequency Division) radio station, WWVB, is located in Ft. -
Page 4: Quick Set Up Guide
QUICK SET-UP GUIDE Hint: Use good quality Alkaline Batteries and avoid rechargeable batteries. 1. Have the indoor weather station and remote thermo/hygro sensor 3 to 5 apart. 2. Batteries should be out of both units for 15 minutes. 3. Place the batteries into the remote thermo/hygro sensor first then into the indoor weather station. -
Page 5: Detailed Set Up Guide
DETAILED SET-UP GUIDE Battery Installation Batteries will fit tightly. To avoid start-up problems, make sure that the batteries do not spring free. Also be sure to insert alkaline batteries into the remote thermo/hygro sensor first, then the indoor weather station. Initial set up should be done with the remote thermo/hygro sensor and indoor weather station in the same room. -
Page 6: Start Up Sequence
II. Start Up Sequence A. Initial Start 1. Immediately after the batteries have been installed, the indoor weather station will sound a “beep”, and the LCD will completely light up for a brief moment. 2. All information will then appear in normal mode, with “12:00” as the default time and “TH.1”... -
Page 7: Explanation Of Lcd Information
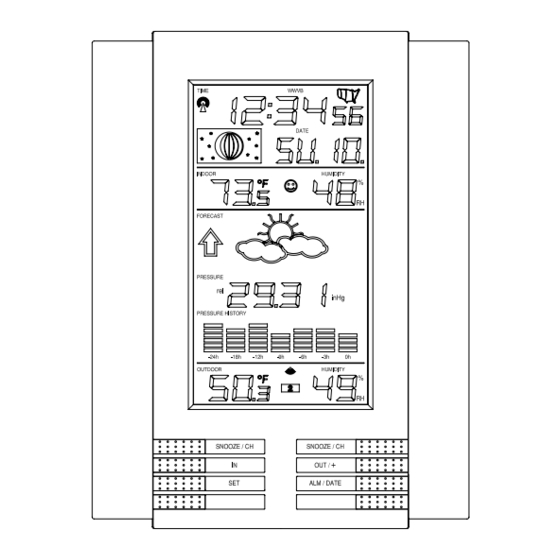
III. Explanation of LCD Information A. The below picture highlights the LCD features. Radio-controlled time WWVB Reception Indicator Moon Phase Display Date Display Comfort Icon Indoor Temperature Humidity Display Forecast Icon Air Pressure Trend Indicator Barometric Air Pressure 24-hour Air Pressure History Outdoor Temperature Humidity Display... -
Page 8: Function Key Layout
IV. Function Key Layout A. The below picture shows the six function keys used in programming and operation of your indoor weather station V. Program Mode The program mode is laid out in a manner that allows you to program each function separately, or you can follow the instructions entirely to program the indoor weather center. -
Page 9: Dst On/Off Setting
5. Press and release the “+” button to select the desired time zone. 6. Press and release the “SET” button to confirm the Time Zone setting and continue to the DST ON/OFF setting. D. DST ON/OFF Setting 1. Press and hold the “SET” button for five seconds. 2. -
Page 10: Hour Time Mode Setting
6. Press and release the “SET” button to confirm the 12/24-hour time mode setting and continue to the Hour setting G. Setting The Hour Manually The WWVB signal will override any manual set time and date information. The time will be based on the time zone selected. 1. -
Page 11: Setting The Time/Date Manually
6. Press and release the “SET” button to confirm the month and continue to the Date setting. K. Setting The Date Manually 1. Press and hold the “SET” button for five seconds. 2. “lcd” will appear at the top of the display and a number will flash next to it. -
Page 12: Forecast Sensitivity Setting
6. Press and release the “SET” button to confirm the relative pressure setting and continue to the Forecast Sensitivity setting. O. Forecast Sensitivity Setting 1. Press and hold the “SET” button for five seconds. 2. “lcd” will appear at the top of the display and a number will flash next to it. -
Page 13: Features And Operation
FEATURES AND OPERATIONS A. Time Alarm Setting and Operation 1. To set the time alarm: Press and hold the ALM/DATE button for 5 seconds. b. The alarm time will begin to flash to the right of the moon phase. Press and release the IN button to adjust the hour. Note: When in the 12-hour mode and setting an alarm for a time between noon and midnight, “PM”... -
Page 14: Moon Phase
B. Moon Phase 1. There are 12 moon phases shown on the indoor weather station; the white portion signifies the portion of the moon visible in the sky. Thus, when the moon icon is all white, it is a full moon. The indoor weather station is programmed with all moon phases from the year 2003 until 2029. -
Page 15: Multiple Remote Temperature/Humidity Sensors
D. Multiple Remote Temperature Sensors The WS-8035 is able to receive signals from 3 different remote sensors. These extra remote sensors can be purchased through the same dealer as this unit. A TX4U will monitor the temperature and humidity, a... -
Page 16: Comfort Icon
F. Weather Forecast Icon and Pressure Trend Indicators The weather forecasting feature is estimated to be 75% accurate, and is based solely upon the change of air pressure over time. The WS-8035 averages past air-pressure readings to provide an accurate forecast—... -
Page 17: Weather Icons
1. Weather Icons There are 3 possible weather icons that will be displayed at various times in the center of the indoor weather station. Sunny—indicates that the weather is expected to improve (not that the weather will be sunny). Sun with Clouds—indicates that the weather is expected to be fair (not that the weather will be sunny with clouds). -
Page 18: Barometric Air Pressure Reading
H. Barometric Air Pressure Reading 1. The actual barometric air pressure is displayed directly under the weather forecast icon 2. The relative air pressure is calibrated by the user through the programming mode. 3. Please Follow the programming instructions in section F of the Detailed Set Up Guide to set this feature. -
Page 19: Mounting
VII. MOUNTING Note: Before permanently mounting, ensure that the indoor weather station is able to receive signals from the sensors and WWVB signal at the desired location. To achieve a true temperature reading, avoid mounting the remote thermo/hygro sensor (or any sensor) where direct sunlight can reach the remote sensor. -
Page 20: Mounting
Firmly press the mounting bracket onto the mounting surface. Fit the mounting post into the receptor of the mounting bracket. B. Mounting the WS-8035 Indoor Weather Station The indoor weather station can be mounted in two ways; free standing or hanging on a wall. -
Page 21: Maintenance And Care
C. Do not submerge in water. D. Immediately remove all low powered batteries to avoid leakage and damage. E. Opening the casings invalidates the warranty. Do not try to repair the unit. Contact La Crosse Technology for repairs. -
Page 22: Troubleshooting Guide
TROUBLESHOOTING Problem: The LCD is faint. Solution: 1) Set the LCD contrast to a higher level. 2) Replace batteries. Problem: No outdoor temperature/humidity is displayed. Solution: 1) Remove all batteries, reinsert into the remote thermo/hygro sensor first, then into the indoor weather station. 2) Place remote thermo/hygro sensor closer to the indoor weather station. -
Page 23: Specifications
SPECIFICATIONS Indoor weather station 32°F to 122°F (0°C to 50°C) recommended operating temperature LCD contrast 8 levels (0-7) Temperature measuring range Indoor 14.2°F to 139.8°F with 0.2°F resolution (-9.9°C to 59.9°C with 0.1°C resolution) (“OFL” displayed if outside this range) Outdoor -21.8°F to 157.8°F with 0.2°F resolution (-29.9°C to 69.9°C with 0.1°C resolution) -
Page 24: Warranty Information
Warranty service can only be performed by a La Crosse Technology, Ltd authorized service center. The original dated bill of sale must be presented upon request as proof of purchase to La Crosse Technology, Ltd or La Crosse Technology, Ltd’s authorized service center. - Page 25 For warranty work, technical support, or information contact: La Crosse Technology 2809 Losey Blvd. S. La Crosse, WI 54601 Phone: 608.782.1610 Fax: 608.796.1020 e-mail: support@lacrossetechnology.com (warranty work) sales@lacrossetechnology.com (information on other products) web: www.lacrossetechnology.com FCC DISCLAIMER This device complies with part 15 of the FCC rules. Operation is subject to the following two conditions: (1) This device may not cause harmful interference.