Boss Audio Systems BV9986BI Manual Del Usuario
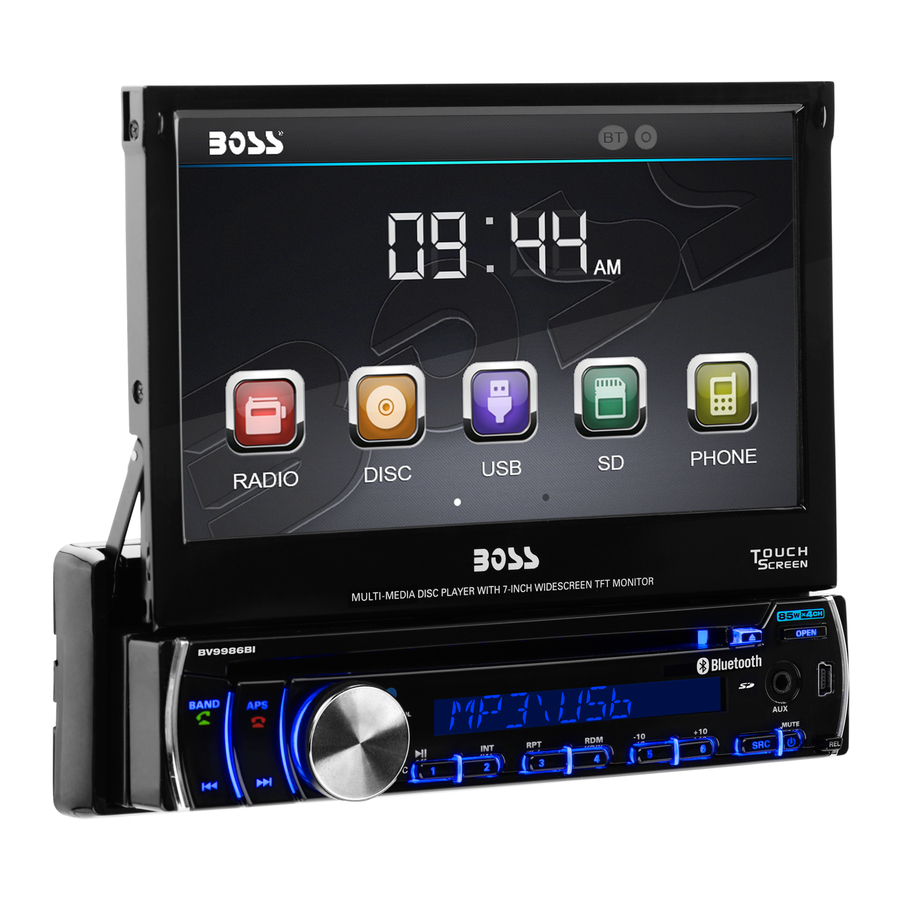
Bluetooth-habilitado - completo control de ipod reproductor de tablero dvd/mp3/cd con pantalla tft 7" (178mm) tactil motorizada y retractil con dos puertos 2 puertos usb (delantero y trasero) puerto de tarjeta de memoria sd y entrada av en panel frontal
Table of Contents
Advertisement
Available languages
Available languages
Advertisement
Chapters
Table of Contents

Related Manuals for Boss Audio Systems BV9986BI


Summary of Contents for Boss Audio Systems BV9986BI
- Page 2 Para garantizar la seguridad al manejar y cumplir con las leyes el conductor no debe ver videos ni operar ningun dispositivo de video PDF created with FinePrint pdfFactory trial version http://www.pdffactory.com...
- Page 3 PRECAUCIÓN PARA PREVENIR INCENDIOS O PRECAUCIÓN RIESGO DE DESCARGA ELÉCTRICA, NO EXPONGA ESTE RIESGO DE DESCARGA ELÉCTRICA NO ABRIR APARATO A LA LLUVIA O HUMEDAD. PRECAUCION: PARA REDUCIR EL RIESGO DE DESCARGA EL ÉCTRICA NO QUITAR LA CUBIERTA (O TAPA). DENTRO DE ESTE APARATO NO HAY PARTES QUE EL USUARIO PUEDA DARLE SERVICIO.
-
Page 4: Table Of Contents
CONTENIDOS 1. Antes Del Uso............................4 1.1. Glosario……………………………………………………….......………………….4 1.2 Precauciones..........................4 1.3. Mantenimiento y Limpieza de los Discos……………......…………………..…5 1.4 Información De La Pila Del Mando A Distancia.................5 1.5 Descripción Del Mando A Distancia..................6 1.6 Localización Y Nombres De Los Controles de la unidad............7 1.7 Descripción diagramas de conexión.... -
Page 5: Antes Del Uso
1. ANTES DEL USO 1.1 Glosario PBC (control reproducción) Es un tipo de señal (menú) grabada en el disco con formato SVCD o VCD 2.0 usado para el control de la reproducción. Para los discos que contienen PBC, pueden reproducir software interactivo con el men ú mostrado en el monitor de la pantalla. -
Page 6: Mantenimiento Y Limpieza De Los Discos
1.3. MANTENIMIENTO Y LIMPIEZA DE LOS DISCOS. Mantenimiento de los Discos Para mantener limpio el disco, no toque la superficie de grabaci ón del mismo. No ponga papel o pegatinas en el disco. Si hay algo en la superficie del disco, l ímpielo con un trapo suave antes de usarlo. -
Page 7: Descripción Del Mando A Distancia
1.5. DESCRIPCIÓN DEL MANDO A DISTANCIA 1. BOTÓN INCLINACIÓN PANTALLA 2. BOTÓN MENU 3. BOTÓN POWER 4. BOTÓN ^ 5. BOTÓN >>| 6. BOTÓN > 7. BOTÓN |<< 8. BOTÓN v 9. BOTÓN SEL 10. BOTÓN PLAY/PAUSE 11. BOTONES NUMÉRICOS (0~10,+10,- 12. -
Page 8: Localización Y Nombres De Los Controles De La Unidad
1.6 LOCALIZACIÓN Y NOMBRES DE LOS CONTROLES DE LA UNIDAD El panel frontal Panel frontal de la unidad después de quitar la carátula 1. BOTÓN OPEN 14. BOTÓN RPT /3 2. BOTÓN POWER/MUTE 15. BOTÓN RDM/4 3. MONITOR 16. BOTÓN -10 /5 4. -
Page 9: Descripción Diagramas De Conexión
1.7. DESCRIPCIÓN DIAGRAMAS DE CONEXIÓN La descripción de la conexión de cables 1. El cable de aparcamiento debe ser conectado. Y el freno de mano debe estar unido en orden al monitor para funcionar. 2. Use el clip situado en el extremo del cable de tierra suministrado por el fabricante para conectar el tornillo de montaje, usando el otro extremo del cable de tierra para conectarlo al polo negativo de alimentación. -
Page 10: Instalación De La Unidad
1.8 INSTALACIÓN DE LA UNIDAD INSTRUCCIONES DE INSTALACIÓN ESTE ES UN MÉTODO DE INSTALACIÓN ANTIRROBO CON LA UNIDAD PRINCIPAL PROTEGIDA POR UNA CAJA METÁLICA DE INSTALACIÓN. POR FAVOR HAGA LA CONEXIÓN DE ALIMENTACIÓN, ALTAVOCES Y ANTENA DE ACUERDO CON LOS REQUERIMIENTOS DEL LIBRO DE INSTRUCCIONES. LUEGO INSTALE LA CAJA METÁLICA DE INSTALACIÓN COMO SE INDICA A CONTINUACIÓN. -
Page 11: Operaciones Normales
2. OPERACIONES NORMALES 1. Para encender/apagar la unidad En el modo apagado, presione brevemente el bot ón POWER para encender la unidad. Bajo el modo encendido, presione y mantenga el botón POWER del panel frontal o presione brevemente el botón POWER en el mando a distancia para apagar la unidad. 2. -
Page 12: Funcionamiento De La Radio
11.Para hacer la instalación Para hacer la instalación, pulse el icono en el Menú principal para ir a la intefaz de INSTALACIÓN como es correcto. En la interfaz, seleccione uno entre GENERAL, TIEMPO , AUDIO, VIDEO, RADIO, STEERING WHEEL CONTROL , CALIBRAR pulsándolos, entonces ajústelos pulsando algunos iconos en el lado derecho como corresponde. - Page 13 2.) Cuando se presione brevemente el bot ón APS cada emisora preseleccionada durante 5 segundos en FM o AM desde M1. Tras concluir un ciclo de búsqueda, reanudará la retransmisión de M1. NOTA: En la banda FM, FM1, FM2, FM3 es comprobada una en un tiempo. En la banda AM, AM1, AM2, es comprobada una en un tiempo .
-
Page 14: Funcionamiento De Ipod
de un programa normal. (Cuando AF se ilumina en el LCD, buscar á la más fuerte emisora RDS. Si AF y TP está iluminados en el LCD, puede únicamente buscar emisoras con información sobre el tráfico). En modo FM, cuando AF esté activado, la función SEEK (SCAN), AUTO-MEMORY puede solo recibir y grabar el programa RDS. -
Page 15: Funcionamiento Del Usb Y Mmc/Sd
: Pulse una de ellas para seleccionar la pista o el cap ítulo en el ipod, después, pulse el botón OK para confirmar y reproducir su selección. : Después de seleccionar, pulsar reproducir su selección 5. FUNCIONAMIENTO DEL DISCO, USB, TARJETA. 5.1. -
Page 16: Pausar Reproducción
: Pulsar para seleccionar la canción de 1-9 y luego seleccioneOK para reproducir su selección. : Durante la reproducción, pulse el botón ZOOM y luego pulse uno de ellos igual que en los botones de dirección del mando a distancia. (Excepto el modo música e imagen.); Durante la reproducción, pulse uno de ellos para cambiar el ángulo de reproducción. -
Page 17: Reproducción Con Velocidad
3. Presione las teclas de dirección para seleccionar el capítulo deseado, finalmente presione OK o PLAY para reproducir el capítulo deseado. Durante la reproducción presionando el botón MENU puede directamente mostrar en pantalla el men ú raíz del título que está reproduciendo. En modo VCD 1. -
Page 18: Repetir A-B
3. En modo de reproducción de MP3/WMA: Presione el botón RPT para seleccionar REPETIR UNO, REPETIR DIR, REPETIR TODO o DESACTIVAR. 5.10.2. Repetir A-B Presione el botón A-B si quiere repetir un segmento específico en un disco que haya definido: 1. -
Page 19: Cambiar El Idioma Del Pie De Foto
5.16 Cambiar Idioma del pie de foto En el estado de reproducción DVD, presione el botón SUBTITLE repetidamente para seleccionar el idioma del pie de foto o desactivarlo. (Depende del archivo reproducido). En modo VCD/MP3/WMA/CD, el botón SUBTITLE está invalidado. 5.17 Cambiar el Idioma del sonido 1. -
Page 20: Reproducir Archivos De Imagen
3. Use las teclas numéricas para introducir la secuencia de números deseada de título/capítulo/pista con las secuencias deseadas. 4. Use la tecla de dirección para mover el cursor hasta el elemento a reproducir, luego presione OK para reproducir los títulos/capítulos/pistas programados en el orden programado; únicamente presionando el botón PLAY también puede reproducir los títulos/capítulos/pistas programados en el orden programado. -
Page 21: Función Esp E Id3
* Las otras funciones son las mismas que en el modo DVD; pero la funci ón RPT es la misma que en modo MP3/WMA. 5.22 ESP y Función ID3 Hay función ESP para todos los formatos de disco. En modo MP3/WMA, durante la reproducción, la información del nombre de archivo, nombre de carpeta, título de canciones, artista y álbum, puede ser mostrado en el display del LCD. - Page 22 Puede configurar una nueva contraseña si lo desea. Seleccione el elemento CONTRASEÑA y luego presione el botón > para introducirla, luego introduzca la contraseña original 0000, y después presione el botón OK para desbloquearlo. Presione el botón > para entrar de nuevo, introduzca una nueva contrase ña que quiera y luego presione el botón OK para hacerla efectiva.
- Page 23 5.23.4. VIDEO SET UP BRIGHTNESS Es para ajustar el brillo de la imagen. CONTRAST Es para ajustar el contraste de la imagen. Es para ajustar el HUE de la imagen SATURATION Es para ajustar la saturación de la imagen. SHARPNESS Es para ajustar la agudeza de la imagen.
-
Page 24: Control Paterno
* Control Paterno Pregunta: ¿Por qué tras insertar un DVD en la ranura DVD, aparece una ventana de diálogo que pide introducir una contraseña de 4 dígitos? Respuesta: Esto es debido a que la película que va a ver está asignada con el control paterno, y el ratio de nivel paterno actual del reproductor DVD es más bajo que el del disco. -
Page 25: Código Regional
* Código regional Pregunta: ¿Por qué la pantalla de la unidad muestra ERROR REGIÓN después de insertar el disco en el compartimiento para disco? Respuesta: Porque el reproductor DVD y el disco tienen respectivamente código regional. Si el código regional de ambos no se aúna, el reproductor DVD no puede reproducir el disco. -
Page 26: Bluetooth Hand Free System
6. SISTEMA BLUE TOOTH MANOS LIBRES 1. Entrar en el modo Bluetooth Cuando se utiliza el botón MODE o modo de menú para entrar en el modo Bluetooth, se mostrará el interfaz de Bluetooth como correcto . En el interfaz de Bluetooth, las descripciones de iconos son las siguientes : : Pulsar este icono puede transferir sonido entre el el sistema de sonido del coche y el teléfono. - Page 27 5. Marcación cuando se está en estado de conexión 5.1 Marcar con el teléfono móvil directamente. 5.2 Marcar con el mando a distancia con los siguientes procedimientos : (1) Introduzca el número de teléfono con los botones numéricos 0-9 * Pulsar brevemente el botón CLEAR para cancelar el número marcado por error si es necesario (2) Para volver a marcar el último número marcado.
-
Page 28: Resolución De Problemas
7. Resolución de Problemas Por favor lea el manual de usuario atentamente antes de usar este reproductor. Si tuviese algunos problemas en el uso de este reproductor, intente resolverlo con las sugerencias mencionadas abajo. Si después no pudiese resolver el problema tras haber usado las sugerencias, por favor contacte con la compa ñía de servicio técnico autorizado por nosotros. -
Page 29: Especificaciones
8. Especificaciones Especificaciones Generales Fuente de alimentación necesaria......................DC 12V Potencia Máxima de salida…................4 x 85 W (medido a DC 14.4 V) Dimensiones (w x h x d)......................7”W x 2”H x 6.3”D Especificaciones DVD Formato......................DVD/VCD/MP4/JPEG/MP3/WMA/CD Sistema de Imagen.... - Page 30 To ensure safety while driving and to comply with laws, drivers should not watch video or operate the video device while driving. PDF created with FinePrint pdfFactory trial version http://www.pdffactory.com...
- Page 31 PRECAUTION WARNING: TO REDUCE THE CAUTION RISK OF FIRE OR ELECTRIC SHOCK, DO NOT EXPOSE RISK OF ELECTRIC SHOCK THIS APPLIANCE TO RAIN OR DO NOT OPEN MOISTURE. CAUTION: TO REDUCE THE RISK OF ELECTRIC SHOCK, DO NOT REMOVE COVER (OR BACK). NO USER SERVICEABLE PARTS INSIDE. REFER SERVICING TO QUALIFIED SERVICE PERSONNEL.
- Page 32 Contents 1. Before Operation...................4 1.1 Glossary....................4 1.2 Precautions....................4 1.3 Maintenance and Cleaning of Discs............5 1.4 Battery Information of Remote Control............5 1.5 Remote Control Description..............6 1.6 Locations and Names of Controls on or in the Unit........7 1.7 Wires Connection Description..............8 1.8 Unit Installation..................9 2.
-
Page 33: Before Operation
1. Before Operation 8. Specification 1.1 Glossary PBC (playback control) General Specification It is a kind of signal(menu) recorded in the disc with SVCD or VCD2.0 format used for the playback control. For the discs containing PBC, It can Power Supply Requirement..........DC 12V playback interactive software with the menu displayed on monitor screen. -
Page 34: Maintenance And Cleaning Of Discs
1.3 Maintenance and Cleaning of Discs 7. Trouble Shooting Disc Maintenance Please read the user ’s manual carefully before using the DVD player. If you have any troubles in using this player, try to solve the problems by the suggestions mentioned below. If you can 1. -
Page 35: Remote Control Description
Remote Control Description 4. In the connection status: the audio of mobile phone transfers to the car audio system 1. ANG BUTTON whenever a dialling takes place or receiving a call. 2. MENU BUTTON 3. POWER BUTTON 5. Dialling when in connection status 4. -
Page 36: Locations And Names Of Controls On Or In The Unit
1.6 Locations and Names of Controls on or in the unit 5. BLUE TOOTH HANDFREE SYSTEM 1. Enter Bluetooth mode When you use MODE button or Mode Menu to enter Bluetooth mode, it will display Bluetooth interface as right. Bluetooth interface In Bluetooth interface, the icons descriptions are as follows: : Tap this icon can transfer audio between the... -
Page 37: Wires Connection Description
1.7 Wires Connection Description Description of Wires Connection Wiring Connecting Socket 1 Fixing Screw Bolt Region Code Q: Why does the unit display REGION ERROR after inserting disc into disc GREEN Radio Antenna jack BLACK PARKING LINE BLACK compartment ? Wiring Connecting Socket 2 BLACK WHITE... -
Page 38: Unit Installation
* Parental Control 1.8 UNIT INSTALLATION Q:Why after inserting DVD disc in the disc slot, a dialogue window appears that asks to input a 4 digits password ? INSTALLATION INSTRUCTIONS A:This is because the movie you are playing is rated with the Parental Control, and THE UNIT IS IN STAL LED TO B E AN ANT I-THEFT ONE. -
Page 39: Common Operation
2. Common Operation 1. To turn on/off the unit 5.23.5 SPEAKER SETUP In power off mode, short press the POWER button to turn on the unit. In power on mode, long press the POWER button on the front panel or short DOWNMIX press the POWER button on the remote control to turn off the unit. -
Page 40: Radio Operation
11.To do setup 5.23.2 LANGUAGE SETUP To do setup, tap the icon in the Main Menu to turn to SETUP interface as right. OSD LANGUAGE In the interface, select one of GENERAL, TIME, AUDIO, This item is for selecting the language of the VIDEO ,RADIO , STEERING WHEEL CONTROL, CALIBRATE by tapping them, then set them by tapping SYSTEM MENU and all operating prompt... - Page 41 2. There are 6 setup pages in all for the System Menu. Press the > or < button to 5. PRESET STATION [ 1-6 ] BUTTONS select an desired setup page. In RADIO mode: 3. Press the ^ or v button to select an setup item in the selected setup page. 1) To memorize the current frequency on the current band, press and hold any one 4.
-
Page 42: Ipod Operation
When you select the IMAGE file sort icon, press the ^ or > button to select the When the AF switching mode is selected, the radio checks the signal strength of the first IMAGE file, then press the v button to select the desired IMAGE file, finally AF all the time. -
Page 43: Disc, Usb And Mmc/Sd Card Operation
3. Display control icons 5.19 Program Playback When displaying i Pod playback, tap icon to turn It allows you to enter the order in which you want some chapters/tracks in to control icons as right. DVD/VCD/MP3/WMA/CD to play. 1 During playback, press the PROG button to enter a program interface as Tapping the direction icon to select the play follows: function such as : PLAYLISTS, ARTISTS,... - Page 44 ZOOMx2,ZOOMx3,ZOOMx4,ZOOMx1/2,ZOOMx1/3,ZOOMx1/4,ZOOM OFF. Press one of the ^/v/>/< buttons to select the area you want to enlarge. : Tap it to pause playback : Tap it to stop playback . 5.16 Change the Caption Language :Tapping one of them can switch on between When playing DVD's ,press the SUBTITLE button repeatedly to the speed levels of fast backward or forward.
-
Page 45: Pause Playback
5.11 Playback in Scan Mode 5.2 Pause Playback 1. When playing VCD(PBC OFF)/CD discs , press the INT button to play the previous 15 seconds part of each track on the disc. Press the INT button When playing DVD/VCD/CD/MP3/WMA , press the PAUSE button on IR again to resume normal playback. -
Page 46: Playback With Slow Speed
During slow forward, press the PLAY button to resume normal playback. Press the direction buttons to select your desired title, and then press the OK The function is only for video. or PLAY button to open the root menu of the selected title. Press the direction buttons to select your desired chapter, finally press the 5.9 Display still frame step by step OK or PLAY button to play the selected chapter.