Table of Contents
Advertisement
Advertisement
Table of Contents

Related Manuals for Garrett Metal Detectors GTAx 550


Summary of Contents for Garrett Metal Detectors GTAx 550
- Page 2 THANK YOU FOR CHOOSING GARRETT METAL DETECTORS! Congratulations! As the proud owner of the Garrett GTAx 550 you have joined an ™ international family of treasure hunters. Men, women and children alike have used their Garrett detectors to find coins, relics and gold nuggets that are valued in the millions of dollars.
- Page 3 target acceptance / rejection, precise discrimination and other key information, you can spend more time digging treasure and less time digging trash! The GTAx 550 is factory preset to begin operation in the COINS mode. Simply press the POWER touchpad on your new GTAx 550 and immediately begin hunting without the troublesome interference from typical trash items or ground minerals.
-
Page 4: Table Of Contents
GTAx 550 Parts Assembly Features Target ID Legend Upper Scale Lower Scale Batt (Battery) Hip Mount Touchpads / Controls Power Pinpoint Set Depth Accept / Reject Set Audio - and + Hunting with the GTAx 550 Pinpointing Coin Depth Measurement Proper Scanning Techniques Junk Targets 6 7 8 11 11 12 12 13 13 15 15 16 16 18 18 20 21 22 24 25 28... - Page 5 Mode A (Zero Discrimination) Mode B (Coins) Setting Discrimination Bench Tests Test Plot Construction Headphone Jack Batteries Searchcoils Recommended Accessories Maintenance Specialized Hunting Service & Repair Recommended Reading RAM Books Order Form Specifications Mind Your Manners! Warning! 31 31 32 36 38 39 40 43 44 45 46 49 51 53 55 57 58...
-
Page 6: Gtax 550
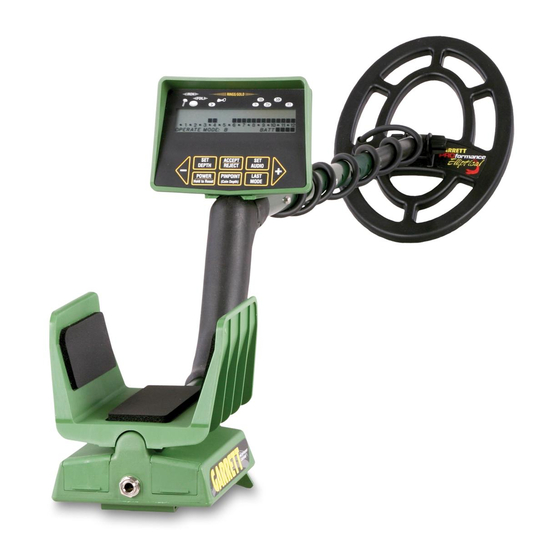
GARRETT GTAx 550™ Lower Stem Control Housing Upper Searchcoil Stem Screen Touchpad Controls Knob Padded Arm Cuff Spring Washer Clip Threaded S-shaped Bolt Ramrod Stem Handle Grip Detector Stand Headphone Jack... -
Page 7: Parts
PARTS Before assembling your GTAx 550 metal detector ensure you have the complete set of parts, which include: • Control Housing w/ S-Ramrod Stem • Upper Stem • Lower Stem with Spring Clip • Two (2) Mounting Washers • One (1) Wing Nut • One (1) Threaded Bolt • Searchcoil with Cable • Instruction Video (not shown below) • Warranty Registration Card If any part is missing, contact your local dealer. -
Page 8: Assembly
GTAx 550 ASSEMBLY No tools are required to assemble the GTAx 550. Hand tighten all necessary parts. 1. Press the two Mounting Washers into the Lower Stem. Figure 1. Figure 1 2. Slide the searchcoil onto the Stem. Figure 2 Figure 2... - Page 9 3. Insert the Threaded Bolt through the holes of the Lower Stem and Searchcoil. Hand-tighten the searchcoil assembly with the remaining Wing Nut. Figure 3. Figure 3 4. Depress the Spring Clip and insert the Control Housing into the Upper Stem. 5. Depress the Spring Clip in the Lower Stem to adjust to the most comfortable operating length.
- Page 10 6.Wrap the Searchcoil cable snugly about the stem with the first turn of the cable over the stem. Figure 5. Figure 5 7. Insert the Cable into the Connector of the Control Housing and hand-tighten. Figure 6. Figure 6...
-
Page 11: Features
FEATURES The GTAx 550 is designed with Garrett's exclusive Graphic Target ID technology, which indicates the probable identity of a target along a horizontal scale that reads from low conductive metals (e.g iron) on the left to high conductive metals (e.g. silver) on the right. 1. Target ID Legend - A Target ID Legend is located directly above the LCD screen and indicates commonly found targets and metals. When a target... -
Page 12: Upper Scale
is detected, the Target ID cursor will appear below the word or symbol that most likely indicates the type of target found, based on its conductivity. 2. Upper Scale - The Upper Scale has four purposes: • Indicates target discovered • Indicates levels of settings • Indicates maximum pinpoint signal • Indicates the cursor's location for changing discrimination notches 3. Lower Scale - The Lower horizontal scale, or Notch Discrimination Scale, indicates the discrimination pattern where the GTAx 550 will or will not produce an audible signal when a target is located. No audible signal will be produced when... -
Page 13: Batt (Battery)
5. BATT (Battery) - Battery condition is reported continuously by the horizontal row of squares on the lower right of the GTA display. Four are visible when fully charged batteries are being used. When only one square remains, battery life is two hours or less. Although it is not necessary to change batteries until this warning flashes, you should always have spares so that you will be ready. When using rechargeable batteries, only three squares will generally be illuminated with fully charged batteries. - Page 14 weighs less than 2 pounds. Yet, all of the controls are still easily accessible and your GTAx 550 display is visible on the control stem of the detector. The removable hip mount pack and built in coiled cable permit easy reassembly for carrying and storage. When reassembling, make certain the coil cored slides into its tube and is not pinched in any way between the armrest and battery compartment.
-
Page 15: Touchpads / Controls
TOUCHPADS / CONTROLS POWER - Press and release the POWER touchpad to turn the detector on and off. Note: After turning the detector off, wait 3 to 5 seconds before turning on again. The POWER touchpad can also be used to reset all settings to factory preset by pressing and holding for 5 to 10 seconds, or until the detectors beeps. -
Page 16: Pinpoint
2. PINPOINT (Coin Depth) - Activates pinpointing function and indicates depth of coin-sized targets on the Lower Scale of the Graphic Display. 3. LAST MODE - Returns the detector to the operating mode previously used. This touchpad can be particularly helpful while scanning because it effectively converts your GTAx 550 into a dual mode detector. NOTE: Pressing and releasing the touchpad makes it easy to alternate between the A and B Modes. 4. SET DEPTH (Sensitivity) - Permits using the + and - touchpads to regulate depth (sensitivity) of the detector. When the Depth touchpad is pressed, the display screen will appear with factory settings at approximately 75%, as indicated on the Upper Scale. You can use the + and - touchpads to adjust the depth (sensitivity) to which your detector will operate effectively. - Page 17 increase depth and sensitivity; press (-) to decrease. A single touch and release adjusts the level in a small increment. A continuous pressing results in a continuous adjustment. When you have made your adjustment, press Depth again to reenter your previous operating mode. Although maximum depth is usually desired, any detector's circuitry may be limited by the type of soils over which you are scanning, electromagnetic or power line interference, etc. Such considerations as ground mineralization will also inhibit the detector's ability to interpret target information. This Depth...
-
Page 18: Accept / Reject
interference and irregular ground mineralization may sometimes require reduced sensitivity which usually results in less detection depth. Do not worry about losing "deep" targets when you reduce this setting. You will not lose any depth since you will always be operating as deeply as soil conditions permit. Attempting to operate above a sensitivity level that permits a quiet and stable audio threshold may actually cause you to miss deep targets you would have found had you not "pushed" the detector. 5. ACCEPT / REJECT - Permits acceptance or rejection of specific target segments shown on the Lower Scale to establish discrimination notches. 6. - Page 19 produced by the GTAx 550 as it scans. Multiple touches and releases are necessary to increase or decrease threshold by one Upper Scale segment at a time. You can search silently or at any level of constant sound. It is recommended that you always operate the instrument at a minimum level of sound. You can hear the audio increase sharply whenever a target is encountered. Also, you will be able to hear even the faint signals that sometimes occur on tiny targets or deeply buried coins. When headphones are used, it will usually be necessary to decrease the threshold level since sound is more audible through headphones.
-
Page 20: And
- AND + - Use these touchpads to adjust levels of threshold and depth and to move the cursor in the Upper Scale when setting the discrimination. -
Page 21: Hunting With The Gtax 550
HUNTING WITH THE GTAx 550 There are no dials to turn and no controls to adjust. Just take the handle of your GTAx 550 and lower the searchcoil to a level of about one foot above the ground. Press and release the POWER touchpad. After you hear two beeps, the GTAx 550 is ready for detecting in Mode B, which is a factory pre-set COINS mode. Whenever the detector has been in use, it will always return to the mode that was being used when it was turned off. -
Page 22: Pinpointing
Target Identification Target identification of the last target over which the searchcoil passed will be indicated on the Upper Scale of the graphic display. In most cases the type of coin can also be determined by using the coin ID guide. Encrustation or patina—and sometimes ground mineralization—may affect conductivity of the coin resulting in improper classification. Recovery Whenever your detector locates a target, you'll want to recover it with the least amount of digging. -
Page 23: Electronic Pinpointing
cannot maintain detection sound with the searchcoil held completely still above your target. This is called manual pinpointing and for many treasure hunters proves completely satisfactory. 2. Electronic Pinpointing Precise pinpointing is an important capability of your GTAx 550. When you press and hold the pinpoint touchpad, the searchcoil can remain steady, directly over your target. Move it around slightly and maximum sound will be heard when the target is directly over your target. This increase will be further reflected in the Upper Scale of your graphic display. Illumination of the Lower Scale's segments from left to right will indicate the depth of your target. For the most effective electronic pinpointing, place the searchcoil on the ground near your target's apparent location. Press and hold the Pinpoint touchpad. Scan back and forth across the target,... -
Page 24: Coin Depth Measurement
You can also watch the Upper Scale illuminate from right to left to indicate signal strength. The maximum reading attained toward the left will indicate exact target location. Coin Depth Measurement When Pinpoint button is held down, the lower scale indicates the target's depth in inches. Pinpoint targets as directed above. After completing the pinpoint operation (maximum reading on the Upper Scale) and while still pressing the Pinpoint touchpad, check the Lower Scale to determine coin depth in inches. You will notice that coin depth always indicates the shallowest (most accurate) reading even though subsequent scans across the target, off center, show greater depth on the Lower... -
Page 25: Proper Scanning Techniques
of digging targets, depending on the grass, soil conditions, etc. Always make as small a hole as possible. It is quicker, requires less work and makes refilling easier. You should always fill your holes. Proper Scanning Techniques Swing the searchcoil back and forth in front of you in a straight line. Keep the searchcoil moving at a rate of about one to two feet per second. Because of the sensitivity of the GTAx 550 and its PROformance™ searchcoil, it is not necessary to operate with the searchcoil touching the ground. The recommended operating method is to hold the coil at a constant height about one or two inches above the ground. - Page 26 The Upper Scale of the graphic display will indicate a detected target. This indication will remain for five seconds or until a new target is detected (whichever comes first). The Target ID Guide located above the Graphic Display will help identify your detected target. When scanning, do not hurry. Walk at a pace that is comfortable. Be methodical. Do not skip any areas. Overlap each sweep at least 25% of the searchcoil's width. Wear headphones for greater sound perception and concentrate on your scanning.
- Page 27 signal as you scan one way and no response when scanning from the other direction. With Experience After you have used the GTAx 550 for only a short time, you will be surprised at how proficient you have become with it. Do not expect to achieve the greatest accuracy and success until you have hunted with this detector for at least 100 hours or more. Don't forget to take Charles Garrett's advice to press only one touchpad and search in the factory preset Coins Mode for at least 10 hours during your...
-
Page 28: Junk Targets
JUNK TARGETS Your GTAx 550, in its factory set B (Coins) detection mode, will not respond audibly to most junk items. Occasionally, you'll encounter targets that cause the detector to respond with a quick, sharp sound, not like the clear, strong signal of a coin. Before you dig up some of the targets that make irregular audio "blips", see how they register on the Upper Scale of the graphic display. Learn to recognize them. Because your GTAx 550, in the factory preset Mode B is set primarily to hunt coins, it will also precisely identify small junk targets. Some larger objects such as aluminum cans may, however, present a "good" audio signal due to their composition. This is normal. -
Page 29: Making Adjustments
MAKING ADJUSTMENTS When you first press the POWER touchpad, your GTAx 550 is ready to hunt, in the B (Coins) operating mode with threshold, depth and discrimination preset at the factory. Any or all of these operating levels can be easily changed. Whenever your detector is on it will return to the detection mode in which it was previously being used. Mode selection will be illuminated on the graphic display. You can change to the other mode simply by pressing the Last Mode touchpad. - Page 30 Relic hunters, prospectors and others may adapt one of these to hunt for specific targets. Any personal preference adjustments you have set in the GTAx 550 with the various operating functions will be retained when the detector is turned off. Because ground and / or atmospheric conditions can vary from place to place, it may be necessary for you to adjust DEPTH (Sensitivity) occasionally. Remember that you can instantly restore the factory-set levels of all its controls. Simply press and hold the POWER touchpad for approximately ten seconds, or until the detector beeps.
-
Page 31: Mode A (Zero Discrimination)
Mode A (Zero Discrimination) You will want to hunt in this detection mode, which is preset with no discrimination, when searching for caches or deep relics. You may also wish to hunt in this mode when hunting in areas with many targets spaced closely together. This will help to identify individual targets and improve recovery of coins and other treasure. Gold hunting will also be carried out in a ZERO discrimination mode. Because no discrimination is programmed in this mode, your detector will give an audible signal announcing every piece of metal it scans over. Remember, you can always return to the alternate discrimination mode to quickly check a target by pressing the LAST... -
Page 32: Setting Discrimination
Setting Discrimination (Selecting Notches) Using only the discrimination of its two factory-set operating modes, the GTAx 550 will more than satisfy the requirements of almost every treasure hunter. Many will never require any other discrimination. Still, this detector offers more; it offers precise controls that enable any treasure hunter to tailor a detection mode to his or her specific requirements by setting accept/reject notches. The Lower Scale of the Graphic Display contains segments. Those that are displayed represent targets that will cause the detector's sound to increase when they are detected. In Mode A for... - Page 33 There are two ways to set discrimination. First method: Press the (+) and (-) touchpads to position the blinking Upper Scale cursor above the Lower Scale segment corresponding to the particular target to be detected or ignored. If the segment is displayed, that particular target will be detected. If you wish to reject that type of target, press the ACCEPT/REJECT touchpad. The segment will disappear, creating a reject notch. If...
- Page 34 Note: Each time the detector is turned off, the accept/reject discrimination selections will be retained in both modes. All selections will be lost when you return your detector to the factory set detection calibrations by pressing and holding the POWER touchpad for 10 seconds or until it beeps. There are reasons why you would want to accept or reject specific targets. For example: You may be looking for only one item, a certain lost...
- Page 35 Special Note on Settings If you are ever unsure about the settings of your detector, simply press and hold the POWER touchpad for 10 seconds, or until the detector beeps, to restore the detector to the factory set B (Coins) mode.
-
Page 36: Bench Tests
BENCH TESTS Bench Tests enable you to test typical trash items and to learn about the discrimination capabilities of the GTAx 550 before taking it into the field or trying to set your own discrimination notches. The following tests should be performed with the searchcoil perpendicular to a bench, floor or other non-metallic surface and several feet away from any metallic object. - Page 37 represents true non-discrimination operation. 2. Use the Last Mode touchpad to select the alternate detection mode with its factory preset B discrimination notches. On your graphic display, Mode B will be illuminated. Bring the same targets across the bottom of the searchcoil and listen for the sound to increase when each item is scanned. Notice the specific cursor(s) in the Upper Scale of the Graphic display that are shown when various target(s) are scanned across the coil.
-
Page 38: Test Plot Construction
TEST PLOT CONSTRUCTION As you operate and use your GTAx 550, you will quickly grow more proficient in its use. It is recommended that you build your own test plot. Bury several items, including a nail, a piece of foil, a pull tab, a bottle cap and several coins at depths ranging from one to four inches. Bury them about 18 inches apart and clearly mark the location of each target. Then scan and study the detection signals. Remember that newly buried objects, especially coins, will be somewhat more difficult to detect than items that have been buried for some time. This is primarily a metallurgical phenomenon. Experiment with various detection modes and pay attention to both audio and... -
Page 39: Headphone Jack
HEADPHONE JACK The headphone jack on the GTAx 550 is located at the rear of the removable battery pack under the armrest. Headphones are a valuable accessory for any metal detector to mask interference from outside noise. They permit you to hear small and deep targets that might be missed when using only audio from the detector speaker. Headphones are particularly essential when you are hunting where noise of people and/or traffic is excessive. -
Page 40: Batteries
BATTERIES The GTAx 550 is equipped with two battery packs, each holding four standard AA batteries. The detector is also designed to use rechargeable batteries (Ni- MH). It is recommended that top quality heavy duty or alkaline batteries be used. All adjustments or settings you have entered into the detector will be replaced by the factory settings when batteries are removed for approximately four minutes or more. Although standard battery packs can be used interchangeably in the detector, it is recommended that both packs being used at the same time always contain the same type of battery. For example, don't mix carbon zinc and alkaline batteries. -
Page 41: Battery Replacement
The GTAx 550 should operate 25 to 35 hours with carbon or alkaline batteries. Rechargeable batteries will offer slightly less time, depending upon the type used. These estimates are for speaker operation. Operating with headphones will extend battery life. Battery Replacement 1. Turn the detector off by pressing the POWER touchpad. 2. Slide the battery case back slightly from its normal position beneath the arm rest. Place both thumbs on the lower sides of the cuff with your fingers on the front of the case. Firm pressure will then disengage the case from below the armrest and allow it to slide backward. 3. Slide the two covers up on the battery panel and remove them completely. 4. Take out the battery holders (which are not connected by wire) by tilting the battery pack. Each of the holders contains four AA batteries. - Page 42 5. Press out the old batteries from the holders. 6. Install the new batteries. Carefully observe polarity of the batteries and place them in the holders. 7. Replace the holders in the detector. It is important that you make certain that the rivet on each battery holder is visible in the center of the battery case. If the holders are replaced incorrectly, it will be difficult to install the battery covers. 8. Press the battery covers down firmly. Remember when the battery pack is removed for more than four minutes, you will lose settings you have made in audio, depth and disc. All settings will automatically return to those set at the factory.
-
Page 43: Searchcoils
It is recommended that you remove the batteries when the detector is not in use, particularly for a period of several weeks. Always take the four batteries out of each holder when storing them. You can then reinsert the empty holders into your detector to prevent their being misplaced. -
Page 44: Recommended Accessories
The 9"x12" PROformance—Use to increase detection depth and scanning width for hunting a broad target range. Part No. 2220700 The 4.5" Super Sniper —Use in trashy locations ™ or in tight places where a larger searchcoil will not reach. Part No. 2218800 When changing searchcoils, only hand tighten the knobs. Never use tools of any kind. RECOMMENDED ACCESSORIES Headphones 10"X14" DD elliptical searchcoil 9"x12" PROformance searchcoil 4.5" Super Sniper searchcoil Carry bag Coin hunter kit (pouch, probe, digging tool) -
Page 45: Maintenance
MAINTENANCE Your GTAx 550 is a sensitive instrument built to withstand rugged treatment in the outdoors. Use your Garrett detector to the fullest extent, yet always protect and handle it with reasonable care. • Avoid extreme temperatures as much as possible, such as storing the detector in an automobile trunk during the summer or winter months. When storing longer than about one month, remove the battery holders and batteries from the detector. • Keep the detector clean. Wipe the housing after use and wash the coil when necessary. Protect the GTAx 550 from dust and sand as much as possible. -
Page 46: Specialized Hunting
SPECIALIZED HUNTING For literature that will explain more about the various types of hunting possible with your GTAx 550 see the RAM Books section (page 53). Although it has universal capabilities, the GTAx 550 has been designed primarily as a coin hunting metal detector. The greater depth and precise discrimination patterns possible with microprocessor controlled circuitry combine with the detector's light weight and ease of handling to make is a superb instrument for finding coins and metallic jewelry. - Page 47 Move your searchcoil across one type of these pieces of trash metal. Watch the target ID cursor for its response and push the ACCEPT/REJECT touchpad. You'll have no more trouble from that type of junk. When you use discrimination segments on your GTAx 550 to determine a proper discrimination pattern, you'll spend less time digging trash and more time digging coins! Some jewelry hunters, however, prefer to hunt with no discrimination, especially on the beach.
- Page 48 Since the 550 is a motion detector, it is capable of finding only somewhat larger nuggets (at least BB size). It must be emphasized that prospectors using the GTAx 550, or any other quality detector, usually prefer to operate in the Zero Discrimination Mode. When prospecting, discrimination may reduce the amount of small nuggets found, but some areas contain so much iron trash that a small amount of discrimination becomes highly desirable, even necessary. A special notch can eliminate a particular...
-
Page 49: Service & Repair
SERVICE AND REPAIR In case of difficulty, read this Owner's Manual thoroughly to make certain your detector is not inoperable due to manual adjustments (Press and hold the POWER button for ten (10) seconds to return to the factory recommended settings). Contact your dealer for additional assistance. - Page 50 You have carefully packed the detector in its original shipping carton or other suitable box. Make certain that proper insulation or packing material is used to secure all parts. Do not ship stems or headphones unless they are part of the problem. Be certain to return all coils. Ship to: Garrett Metal Detectors 1881 West State Street Garland, Texas 75042 Call Garrett's Customer Service Department (800- 527-4011) if you have further questions. Please allow approximately one week for Garrett technicians to examine and repair your detector after they receive it, plus another week for return shipping.
-
Page 51: Recommended Reading
RECOMMENDED READING Since Garrett's GTAx 550 is one of the world's premier coin hunting detectors, you will be especially interested in The New Successful Coin Hunting, by Charles Garrett, filled with "how to" tips and success stories about finding coins. The GTAx 550 is an excellent detector for finding every type of treasure and all of the RAM books are pertinent to its use. Treasure hunters will also appreciate the revised version of Garrett's popular Modern Metal Detectors, a basic text that will help you to understand all types of metal detection equipment and how to use them. - Page 52 Charles Garrett's Ghost Town Treasures. Bob Marx's Buried Treasures You Can Find locates thousands of sites where treasure is known to have existed. This book also includes good information about One-Touch detectors such as the GTAx 550. Hobbyists of all ages will want to read Gold Panning is Easy, but it is especially applicable to those interested in gold prospecting.
-
Page 53: Ram Books Order Form
RAM BOOKS ORDER FORM Please send me the following RAM books: (Please indicate number of copies desired.) ___ New Successful Coin Hunting ...$9.95 ___ Treasure Hunting for Fun and Profit ...$9.95 ___ Treasure Caches Can Be Found...$9.95 ___ Ghost Town Treasures ...$9.95 ...$9.95 You Can Find Gold with a Metal Detector ___ Buried Treasures You Can Find ...$14.95... - Page 54 MAIL-IN ORDER FORM Add $2.00 for first book, and $1.00 for each additional book ordered (maximum $3.00) for handling and shipping charges. Total for books 8.25% Tax (TX/CA residents) Handling Charge TOTAL Payment Options: ___ Enclosed check or money order ___ I prefer to order through: ___ American Express ___ Visa...
-
Page 55: Specifications
SPECIFICATIONS • Detector type: Very Low Frequency (VLF) transmitter / receiver, Graphic Target Analyzer (GTA) with multiple notch discrimination • Controls: Easy access touch panel • Display: High visibility LCD adjacent to the touch panel; data accessible at any angle. • Detection Frequency: 7.0 kHz • Circuitry: Linear transmitter/receiver/filter front end 10-bit data acquisition, Microcomputer with 8 Kbyte memory, Crystal controlled 4 MHz operation, High reliability surface mount printed circuit board construction • Audio Frequency: 275 to 710 Hz • Batteries: 8 AA • Battery Life (approximate): Alkaline - 30 hours Carbon Zinc - 20 hours; Rechargeable—12-15 hours • Humidity:To 95% non-condensing • Temperatures: Operating—0 to 140°F; Storage... - Page 56 control, display and panel. • Convertible hip mount with self storing cord for minimum weight and optimum balance; Hip Mount • Cable Length: 62 inches • Weight: 3 lbs, 4 oz • Shipping weight: 5 lbs...
-
Page 57: Mind Your Manners
MIND YOUR MANNERS! The following is a Code of Ethics that many treasure hunt clubs endorse and hobbyists follow to preserve our exciting hobby of metal detecting. We encourage you to do the same: • I will keep informed on and obey all laws, regulations and rules governing federal, state and local public lands. • I will aid law enforcement officials whenever possible. • I will cause no willful damage to property of a n y kind, including fences, signs and buildings. -
Page 58: Warning
• I will observe the Golden Rule, using good outdoor manners and conducting myself at all times in a manner which will add to the stature and public image of all people engaged in the field of metal detection. WARNING! When searching for treasure with your Garrett detector, observe these precautions: • Never trespass or hunt on private property without permission. - Page 59 • Do not hunt in a military zone where bombs or other explosives may be buried. • Do not disturb any pipeline, particularly if it could be carrying flammable gas or liquid. • Use reasonable caution in digging toward any target, particularly in areas you are uncertain of the ground conditions. • If you are unsure if you can use your metal detector in any area, seek permission from the proper authorities.
- Page 60 1881 W. State Street Garland, Texas 75042 Toll Free: 800.527.4011 Tel: 972.494.6151 Fax: 972.494.1881 Email: sales@garrett.com © 2008 Garrett Electronics, Inc. PN 1525300.D.0608...