Garmin GPSMAP 3005C Owner's Manual
Color chartplotter
Hide thumbs
Also See for GPSMAP 3005C:
- Owner's manual (124 pages) ,
- Quick reference manual (2 pages) ,
- Quick reference (2 pages)
Table of Contents
Advertisement
Quick Links
Advertisement
Table of Contents

Related Manuals for Garmin GPSMAP 3005C


Summary of Contents for Garmin GPSMAP 3005C
- Page 1 Owner’s Manual GPSMAP 3005C ®...
- Page 2 Information in this document is subject to change without notice. Garmin reserves the right to change or improve its products and to make changes in the content without obligation to notify any person or organization of such changes or improvements.
-
Page 3: Installing Your Gpsmap 3005C
The Main Menu section provides detailed explanations about the Main Menu and how to use it to configure your unit. If you have either a Garmin GSD 20, GSD 21 (Serial), or GSD 22 (Ethernet) sounder connected to your GPSMAP 3005C, see the Using Sonar section. -
Page 4: Table Of Contents
Software License Agreement ... v Warning ... iv Caution ... iv Getting Started ... 1 Unit Overview ... 1 Using the GPSMAP 3005C Keypad ... 2 Using Soft Keys ...3 Status Bar ...3 Turning on the GPSMAP 3005C ... 4 Adjusting the Backlight ...4 Initializing the GPS Receiver ... - Page 5 Setting Up DSC ...52 Using the NAV Key ...52 Card Tab ... 53 Messages Tab ... 54 Viewing Detailed Message Information ...54 GPSMAP 3005C Owner’s Manual Alarms Tab ... 55 System Alarms ...55 Nav (Navigation) Alarms ...56 Sonar Alarms* ...56 System Tab ...
- Page 6 WAAS Capability ... 87 Digital Selective Calling (DSC) ... 87 What is DSC? ...87 LORAN TD System ... 89 Caring for the GPSMAP 3005C ... 90 Navigation Terms ... 91 Messages and Alarms ... 93 Optional Accessories ... 95 Limited Warranty ... 96 FCC Compliance ...
-
Page 7: Product Registration
Use this area to record the serial number (8-digit number located on the back of the box) in case your GPSMAP 3005C is lost, stolen, or needs service. Be sure to keep your original sales receipt in a safe place, or attach a photocopy inside the manual. -
Page 8: Warning
Map Data Information: One of the goals of Garmin is to provide customers with the most complete and accurate cartography that is available to us at a reasonable cost. We use a combination of governmental and private data sources, which we identify in product literature and copyright messages displayed to the consumer. Virtually all data sources contain inaccurate or incomplete data to some extent. -
Page 9: Getting Started
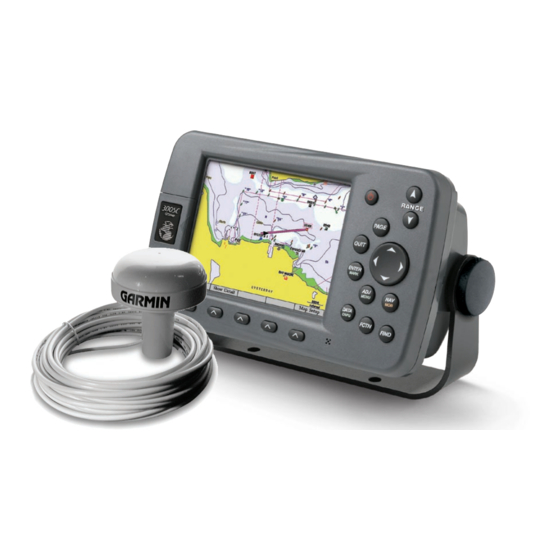
Unit Overview Serial number tag Connection ports GPSMAP 3005C Owner’s Manual ETTING TARTED Data card slot Slide the data card door in the direction of the arrow (to the left) and pull to open it. Soft keys > ETTING TARTED... -
Page 10: Using The Gpsmap 3005C Keypad
GPSMAP 3005C K ETTING TARTED SING THE EYPAD Using the GPSMAP 3005C Keypad POWER Key • Press and hold to turn the unit on or off. • Press and release to adjust backlighting. PAGE Key • Press to cycle through the main pages in sequence. -
Page 11: Using Soft Keys
At the top of each page, the status bar provides current status information for connected devices and several of the MFD functions. As additional devices are added to the MFD or Garmin Marine Network, an icon for each device appears on the status bar. -
Page 12: Turning On The Gpsmap 3005C
URNING ON THE Turning on the GPSMAP 3005C Before you turn on the GPSMAP 3005C, make sure the unit and GPS 17 antenna are correctly installed on your vessel according to the instructions in the GPSMAP 3005C & GPS 17 Installation Instructions. -
Page 13: Initializing The Gps Receiver
When the search is complete, the I Agree button is highlighted. After reading the warning, press ENTER. Next, you see the first of the main pages, the Map Page. The GPSMAP 3005C begins searching for GPS satellites. The first time the unit acquires satellites takes several minutes. -
Page 14: Receiver Status And Accuracy
After the receiver has collected information from at least three satellites, the Status field shows either “Ready for Navigation” or “Ready for Navigation with WAAS.” The GPSMAP 3005C is now ready for use. Press QUIT to return to the Map Page. -
Page 15: Using Simulator Mode
Simulator Mode is great for practicing with the unit if you are indoors where satellite signals are not available. When the GPSMAP 3005C is in Simulator Mode, the GPS receiver is turned off. The unit cannot be used for actual navigation. -
Page 16: Basic Operation
GPSMAP 3005C. Understanding the Features The advanced keypad system on the GPSMAP 3005C is designed to allow qyou to select options and enter data quickly and conveniently. As you progress through this owner’s manual, you are directed to press a specific key or highlight a field on the screen. -
Page 17: Using Additional Map Data
fields, the highlight skips them. Using Additional Map Data The GPSMAP 3005C comes standard with a built-in basemap showing cities, interestates, coastline detail, and U.S. Tide Stations. Optional preprogrammed Garmin data cards and MapSource CD-ROMs enhance the versatility of your GPSMAP 3005C. -
Page 18: Using The Map Pointer
MapSource data, or if waypoints are grouped tightly together due to the Range setting, additional tabs appear on the Review Waypoint Page. Use the ROCKER to highlight the individual tabs to view the information and additional options. Additional information tabs pointer window GPSMAP 3005C Owner’s Manual... -
Page 19: Finding An Item
4. Highlight the notes field, and press ENTER to scroll the text up or down using the ROCKER. 5. Press QUIT to exit. GPSMAP 3005C Owner’s Manual Finding an Item Press FIND to search for items near your current location, including waypoints, anchorages, cities, marine services, navaids, restricted areas, wrecks, celestial information, tides, and currents. -
Page 20: Creating And Using Waypoints
The GPSMAP 3005C stores up to 4,000 alphanumeric waypoints, each with a user-defined icon, comment, depth, and water temperature. NOTE: If you are using an optional Garmin GSD 20, GSD 21, or GSD 22 sounder module, the Depth and Water Temp fields fill in automatically. -
Page 21: Creating Waypoints Using The Map
3. To accept the waypoint with the default information, press ENTER. To change any waypoint information, highlight the appropriate field and press ENTER. After entering your changes, press the OK soft key. For information on editing waypoints, see page 15. GPSMAP 3005C Owner’s Manual > ASIC PERATION To create a new waypoint from a map feature: 1. -
Page 22: Creating Waypoints Manually
Entering coordinates into the GPSMAP 3005C while it is set to a datum different from the datum in which the coordinates were created can result in an incorrect waypoint location. -
Page 23: Reviewing And Editing Waypoints
Depth/water temp Review Waypoint Page GPSMAP 3005C Owner’s Manual To change the waypoint name: 1. Highlight the waypoint name field, and press ENTER. 2. Use the ROCKER to enter a new name, and press ENTER. To change the waypoint symbol: 1. -
Page 24: Moving A Waypoint
The Proximity sub tab also provides a continuously updated proximity waypoint alarm that can be used to define an alarm circle around submerged hazards or shallow waters. GPSMAP 3005C Owner’s Manual... -
Page 25: User Waypoints
From the User sub tab, you can review, edit, rename, or delete individual waypoints, or delete all user waypoints. The number of available and used waypoints are shown at the bottom of the User sub tab. Stored waypoints are arranged in alphanumeric order. GPSMAP 3005C Owner’s Manual > ASIC PERATION To scroll through and review the waypoint list: 1. -
Page 26: Proximity Waypoints
To clear all proximity waypoints, press the Delete All soft key. A confirmation message appears. 3. Press the OK soft key to delete the proximity waypoint. Otherwise, press the Cancel soft key, or press QUIT to cancel. GPSMAP 3005C Owner’s Manual... -
Page 27: Navigating To A Destination
Navigating to a Destination Using the NAV key, the GPSMAP 3005C provides four ways to navigate to a destination: Go To Point, Follow Track, TracBack, and Follow Route. When you are navigating, you see a straight line on the Map Page that always runs from your current location to the destination. -
Page 28: Follow Track And Tracback Navigation
2. Using the ROCKER, highlight the Tracks tab, and then highlight the Active sub tab. 3. Press the Clear soft key. A confirmation message appears. 4. Press the OK soft key to clear the track log. Clear soft key GPSMAP 3005C Owner’s Manual... - Page 29 To review and edit a track: 1. On the Saved sub tab, highlight a track and press ENTER to open the Saved Track Page. 2. Make any changes, and then press QUIT. GPSMAP 3005C Owner’s Manual ASIC PERATION Default track name...
-
Page 30: Tracback Tips
2. Highlight Stop Navigation, and press ENTER. TracBack Tips When a TracBack is active, the GPSMAP 3005C takes the track log stored in memory and divides it into segments called legs. Up to 300 temporary turns (BEGIN, TURN 1, TURN 2,..., TURN X, END) are created to mark the most significant features of the track log to duplicate your exact path as closely as... -
Page 31: Creating And Using Routes
Repeat this step until you finish defining all route waypoints. If you select an area of the map that is not a feature or waypoint, a new waypoint is created for that location. GPSMAP 3005C Owner’s Manual Number of available points To create a new route textually using the Route list: ) with “ADD”... -
Page 32: Navigating A Saved Route
• Re-Evaluate Route—recalculates and reactivates the current route data; and it selects the route leg closest to your current location as the active leg (the active leg defines the current from and to waypoints). GPSMAP 3005C Owner’s Manual... -
Page 33: Creating A Quick Nav Route
Copy soft key. The map window for the new route opens. The copied route uses the same route name with an additional number (starting at 1) at the end of the route name. GPSMAP 3005C Owner’s Manual ASIC PERATION Deleting a Route Use the Route tab on the Main Menu to delete an individual route or delete all routes. - Page 34 1. On the Routes tab, highlight the route you want to edit, and press ENTER. The map window opens, showing the selected route. 2. Move the map pointer to the leg of the route where you want to add the new point. The selected route leg turns yellow. GPSMAP 3005C Owner’s Manual...
- Page 35 4. Use the ROCKER to drag the map pointer to the location where you want to add a route point. 5. Press ENTER to add the point to the route. GPSMAP 3005C Owner’s Manual ASIC PERATION To remove a point from a route: 1.
-
Page 36: Planning Routes
Planning Routes You can enter information such as your speed, departure time, fuel flow, and departure date so your GPSMAP 3005C can estimate information about your trip. To plan your route: 1. Press the Plan soft key on the Route list to open the Plan Route window. -
Page 37: Main
The GPSMAP 3005C has four main pages that are always available: Map Page, Map Split Page, Compass Page, and Highway Page. Press PAGE to cycle through the main pages in order. If you have a GSD 20, GSD 21, or GSD 22 with transducer connected to the GPSMAP 3005C, the Sonar Page is added to the page sequence. -
Page 38: Configuring Main Pages
You can customize each main page to fit your navigational needs, and you can modify digital data fields and add additional secondary functions to each of the main pages. As you add optional hardware to the GPSMAP 3005C or Garmin Marine Network, additional function choices might appear automatically. - Page 39 To change Digital 1 or Digital 2 data fields: 1. Press and hold DATA/CNFG to open the Configuration window. 2. Highlight the data field you want to change, and press ENTER. GPSMAP 3005C Owner’s Manual Digital 2 with small 3. Press up or down on the ROCKER to highlight the type of data you want data fields...
-
Page 40: Using Function Windows
(ADJ key)/soft key options and main page features. You can use options from the adjustment menu or soft keys to access adjustments or features for the highlighted function window. As you add optional hardware to the GPSMAP 3005C or Garmin Marine Network, adjustment menu choices may appear automatically. -
Page 41: Viewing A Main Page In Full-Screen Mode
When using optional BlueChart or MapSource maps, the Map Page shows your boat on a digital chart, complete with geographic names, map items, navaids, and other chart features. You can use your GPSMAP 3005C with the optional preprogrammed BlueChart g2 data cards, to view detailed roads and photographs. -
Page 42: Using The Map Pointer
Pointer mode pans the cartography to keep the map pointer within the display area. The GPSMAP 3005C starts in Position mode, with your location centered on the map. Press up, down, left, or right on the ROCKER to enter Pointer mode. In Pointer mode: •... -
Page 43: Selecting Map Ranges
GPSMAP 3005C Owner’s Manual Cartography The GPSMAP 3005C has a built-in worldwide database, with more detailed coverage available through the use of optional BlueChart or MapSource data. The unit shows cartography as long as there is chart information available for the selected range. -
Page 44: Map Page Options
Page (or Map function window) using the ADJ key and soft key options. The available options are: Measure (Distance), Hide (Show) Detail, and Setup. As you add optional hardware to your GPSMAP 3005C or Garmin Marine Network, additional adjustment menu choices may appear automatically You can customize the Map Page to show other functions and different sizes or types of Digital Data fields. - Page 45 (BlueChart data) Map with Detail Shown Map with Detail Hidden GPSMAP 3005C Owner’s Manual Changing Map Setup Features You can configure your map display preferences, including map detail, map orientation, automatic zoom, and various map items and points. When you select Map Setup, the Main Menu appears with the Map tab selected.
-
Page 46: Map Split Page
Use the Map Split Page to show two different views of the Map Page. Compass Page The GPSMAP 3005C features two different navigation pages: Compass and Highway. Whenever a NAV Go To, Follow Track, TracBack, or Follow Route are activated, the Compass Page guides you to your destination with digital readouts and a compass display, which includes a Bearing Pointer. -
Page 47: Highway Page
Digital Data fields. See “Configuring Main Pages” more information. GPSMAP 3005C Owner’s Manual Highway Page The Highway Page provides 3-D graphic steering guidance to a destination waypoint, placing greater emphasis on the straight-line course, and the distance and direction you are off course. -
Page 48: Changing The Highway Perspective Range
The available ADJ soft key options are Route Details, Edit Active Route, Show (Hide) Carto, and Setup. As you add optional hardware to the GPSMAP 3005C or Garmin Marine Network, adjustment menu choices may appear automatically. You can also customize the Highway Page to show other functions and different sizes or types of digital data fields. -
Page 49: Main Menu
The Main Menu is accessible from any page by pressing ADJ/MENU. As you add optional hardware to the GPSMAP 3005C or Garmin Marine Network, additional Main Menu tabs or sub tabs may appear automatically. For specific instructions on additional adjustments and features, refer to the specific section (or manual) for... -
Page 50: Tide Tab
The bottom of the chart shows the amount of time (in hours and minutes) until the next low tide and high tide. Current tide Local time height bar Low tide curve Night GPSMAP 3005C Owner’s Manual... - Page 51 2. Highlight Map Position, and press ENTER to open the Find Near Current Position Page. GPSMAP 3005C Owner’s Manual 3. Press up or down on the ROCKER to move the map pointer to a map location, and press ENTER. The Find Near Other Position Page shows a list of Tide Stations near the selected map location.
-
Page 52: Current Sub Tab
Current Station in the list, the station is highlighted on the map window. The distance and bearing from your location to the highlighted station are shown at the bottom of the list. GPSMAP 3005C Owner’s Manual... -
Page 53: Celestial Tab
flows throughout the day, including Flood, Slack, and Max Ebb times and strengths. GPSMAP 3005C Owner’s Manual Celestial Tab The Celestial tab shows celestial data for sun and moon rise and set, moon phase, and the approximate sky view location of the sun and moon. -
Page 54: Trip Tab
• Clear Trip—clears all trip data. • Clear Max Spd—resets the value in the Maximum Speed field to 0.00. • Clear Odometer—resets the value in the Odometer field to 0.00. • Clear All—resets the values in all fields. GPSMAP 3005C Owner’s Manual... -
Page 55: Weather Tab
Weather” section beginning on page information. NOTE: You must have a GDL30/GDL 30A Marine Weather/Audio Satellite Receiver installed and connected to your GPSMAP 3005C, and a subscription to XM WX Satellite Weather to use the XM Weather features. GPSMAP 3005C Owner’s Manual... -
Page 56: Routes Tab
You can add proximity alarms to up to 10 waypoints, with a maximum alarm radius of 99.99 nautical or statute miles or kilometers. Routes Tab The Routes tab contains a list of available routes. See Routes” beginning on page for more information about creating routes. “Creating and Using GPSMAP 3005C Owner’s Manual... -
Page 57: Tracks Tab
(the log currently being recorded). The active log stores up to approximately 10,000 track log points, based on the criteria specified in the Track settings. GPSMAP 3005C Owner’s Manual The following settings are available: • Record Mode—allows you to select one of three track recording options: •... -
Page 58: Dsc (Digital Selective Calling) Tab
• Delete All—deletes all saved track logs from memory. DSC (Digital Selective Calling) Tab Use the DSC tab to control and set up DSC features on the GPSMAP 3005C unit. DSC uses marine VHF radio and GPS technologies to transmit and receive location information. -
Page 59: Understanding Dsc Distress Calls
Understanding DSC Distress Calls With your GPSMAP 3005C properly connected to a VHF radio with DSC output, you can receive any DSC distress call within range. An alert message appears, and an alarm sounds (if enabled) when a distress call is received. The alarm sounds only for a distress call;... -
Page 60: Setting Up Dsc
If you receive a distress call or position report, you can quickly navigate to the caller using the NAV key. When the call is logged, press NAV, and select Go To <MMSI number> or Go To <Name>. GPSMAP 3005C Owner’s Manual... -
Page 61: Card Tab
3. Press the To Card soft key to save the selected items to the data card. 4. If transferring data from the card to the GPSMAP 3005C, press the Merge From Card soft key to combine the selected items with existing GPS data. -
Page 62: Messages Tab
ESSAGES Messages Tab The Messages tab shows a list of messages generated by the GPSMAP 3005C. Use the ROCKER to scroll through the messages. The date and time when each message occurred is shown at the bottom of the tab. -
Page 63: Alarms Tab
3. Change the mode to the setting you want, and press ENTER. 4. Repeat steps 1–3 to set additional alarms, and then press ENTER when finished. GPSMAP 3005C Owner’s Manual System Alarms Use the System sub tab to set alarms for the system clock, batteries, and GPS accuracy. -
Page 64: Nav (Navigation) Alarms
• Fish—sets an alarm to sound when the unit detects a fish of the specified symbols. *You must be receiving NMEA sonar data or using a GSD 20, GSD 21 or GSD 22 for the sonar alarms to function. GPSMAP 3005C Owner’s Manual... -
Page 65: System Tab
The following soft keys are available: • Factory Dflts—restores all settings to Garmin’s original setup values for all devices on the network. • System Info—shows the unit’s software, basemap version, and electronic serial number. - Page 66 WARNING: The Units sub tab settings affect how navigation information appears on the GPSMAP 3005C. If you are using a map or chart with your GPS, make sure the settings on the Units sub tab match that of the map or chart.
- Page 67 WARNING: If you select User Mag Var, you must periodically update the magnetic variation as your location changes. When using this setting, the GPSMAP 3005C unit does not automatically calculate and update the magnetic variation at your present location. Failure to update this setting can result in substantial differences between the information displayed on your unit and external references, such as a magnetic compass.
- Page 68 Comm (Communications) Sub Tab The Comm sub tab controls the input/output format used when connecting your GPSMAP 3005C to external NMEA devices or a personal computer. The unit supports two input/output ports. NOTE: See the GPSMAP 3005C & GPS17 Installation Instructions for more information on wiring and NMEA information.
- Page 69 NMEA Interface If you are going to use the GPSMAP 3005C with a NMEA device (such as a radio or autopilot), the unit needs to be set to input/output NMEA data. See the GPSMAP 3005C & GPS 17 Installation Instructions for information on wiring and NMEA data.
-
Page 70: Update Sub Tab
Network Tab The Network tab shows all devices connected to your GPSMAP 3005C and the Garmin Marine Network, and the status of each. You can assign a name or identifier to each device on your network. To check the status of a device: Use the ROCKER to highlight the device. -
Page 71: Pages Tab
Down soft key to move the page down in the list. 3. Repeat steps 1–2 to change the page sequence for additional pages. GPSMAP 3005C Owner’s Manual To add a page to the page sequence: 1. Press the Add Page soft key. -
Page 72: Map Tab
• NOAA—all maps are drawn using a symbol set similar to NOAA/NIMA. • International—all maps are drawn using a symbol set similar to the IALA symbol set. • Light Sectors—controls the drawing line sectors on the map. Select Off, Auto, or On. GPSMAP 3005C Owner’s Manual... - Page 73 • Defaults—restores map settings to factory defaults for all tabs. Press the Defaults soft key to restore original settings. GPSMAP 3005C Owner’s Manual Detail Sub Tab Use the Detail sub tab to control the amount of detail for charts, waypoints, active routes, Tide Stations, services, saved tracks, and track logs shown on the Map Page.
- Page 74 • Bearing Line—sets the maximum scale at which the feature appears on the screen and toggles the red/yellow line that continually points to the current navigation point. Select Off, All Ranges, Auto, or <30 ft to <800 nm. GPSMAP 3005C Owner’s Manual...
-
Page 75: Ais Sub Tab
NOTE: You must set your chartplotter communication to NMEA In/NMEA Out with a baud rate of 38,400 to receive AIS information. GPSMAP 3005C Owner’s Manual • AIS Vessels—sets the maximum zoom scale at which AIS vessels appear on-screen. Select Off, Auto, All Ranges, or <30 ft to <800 nm. - Page 76 5. Press the Chart Info soft key to view chart information. Press the Notes soft key to view chart notes. 6. To scroll through the notes, highlight the Notes fields, press ENTER, and use the ROCKER to scroll up, down, left, and right. 7. Press QUIT to exit. GPSMAP 3005C Owner’s Manual...
-
Page 77: Temp (Temperature) Tab
• Log Duration—sets how fast or slow the temperature log scrolls (the shorter the time duration, the faster the temperature log scrolls). Select a duration from 1 minute to 2.5 hours. GPSMAP 3005C Owner’s Manual > Sonar Tab The Sonar tab contains setup options for the Sonar Page. The Sonar Page appears only if you have the Sonar check box selected on the Main Menu—System tab. -
Page 78: Highway Tab
Weather or XM Audio check box is selected on the System tab and you have a GDL30/30A connected to your GPSMAP 3005C. NOTE: You must have a GDL30A connected to your GPSMAP 3005C and your stereo receiver and a subscription to XM Radio to use the XM Radio feature. -
Page 79: Using Favorites
3. Press the Start Scanning soft key. Each channel plays for five seconds and then advances to the next channel. 4. Press ENTER to stop scanning. GPSMAP 3005C Owner’s Manual To turn audio on or off: 1. On the Audio sub tab, highlight the Audio Output field, and press ENTER. -
Page 80: Using Sonar
GSD 20, GSD 21, or GSD 22 sounder module and then to the GPSMAP 3005C. The GPSMAP 3005C displays the information on the screen for you to see and interpret. The type of transducer and the settings that you choose determine how the information is displayed on the screen. -
Page 81: Understanding The Sonar Display
NOTE: If the GPSMAP 3005C is unable to track the bottom for any reason, the digits in the depth window flash on and off to alert you that the unit is not tracking the bottom. -
Page 82: Sonar Page
flasher. If a GSD 20, GSD 21, or GSD 22 sounder module is not attached, the Sonar Page appears only when the GPSMAP 3005C is in Simulator Mode or if the Sonar check box is selected on the System tab. -
Page 83: Configuring The Sonar Page
Press the Split Freq soft key to show two different frequencies. 2. Press QUIT to return to the Sonar Page. GPSMAP 3005C Owner’s Manual Using the Flasher If you prefer the appearance of flasher sonars, select the Flasher function on the Configuration window for the Sonar Page. -
Page 84: Using The Sonar Adjustment Menu
• Ultrascroll™/Scroll—adjusts the rate at which the Sonar Pages scroll from right to left. Ultrascroll™ (default) is used when you select a scroll rate from 90% to 100%. Auto automatically adjusts the scroll rate according to the boat’s speed. GPSMAP 3005C Owner’s Manual... -
Page 85: Using The Pointer On The Sonar Page
When using this setting, “BL” appears at the bottom of the screen. GPSMAP 3005C Owner’s Manual • Zoom View—available when you select a Zoom scale other than Off. You can use the Zoom View setting to change the viewing range of a zoomed display. -
Page 86: Marking An Underwater Waypoint
5. Press QUIT to resume scrolling. Sonar Tab When a GSD 20, GSD 21, or GSD 22 is connected to the GPSMAP 3005C, and either the Auto-Detect Services or Sonar check box is selected on the System tab, the Sonar tab appears on the Main Menu. -
Page 87: Graph Sub Tab
Calibration is required to ensure that the Water Speed shown on your unit is accurate. The unit automatically uses the GPS GPSMAP 3005C Owner’s Manual ground speed, if it is available, for comparison on the calibration. If a GPS ground speed is not available, use either your boat’s speedometer reading... -
Page 88: Water Temp Sub Tab
• Fish Symbols—sets how the Sonar Page interprets suspended targets and background information. If you select a fish symbol, the GPSMAP 3005C identifies some returns for you by replacing them with fish symbols (in large, medium, and small sizes based on the size of the sonar return). -
Page 89: Xm Wx Weather
GDL 30/GDL 30A. NOTE: You must have a GDL30 Marine Weather Satellite Receiver installed and connected to your GPSMAP 3005C, and a subscription to XM WX Weather to use the XM WX Weather features. When a GDL 30/GDL 30A Marine Weather Satellite Receiver is connected to the GPSMAP 3005C, and either the Auto-Dectect Services or Weather check box is selected on the System tab, you can view weather options on the Map Page. - Page 90 1. Select the weather preset you want to customize. 2. Select the tab you want to customize (Precipitation, Atmosphere, or Sea Surface). 3. Highlight the field you want to change, and press ENTER. 4. Select the range, and press ENTER again. GPSMAP 3005C Owner’s Manual...
-
Page 91: Weather Tab
It also shows the time at which the observation was made. GPSMAP 3005C Owner’s Manual To find weather conditions at other locations 1. Highlight the Nearest To field, and press ENTER. The Find Weather Information Page appears. -
Page 92: Appendix
Velocity: 0.05 meters/sec steady state WAAS Accuracy: Position: <3 meters (10 feet), 95% typical* Velocity: 0.05 meters/sec steady state Dynamics: 6gs Power source: 10-35 V DC Usage: 12 watts max. at 10 V DC Fuse: AGC-2 - 2.0 Amp GPSMAP 3005C Owner’s Manual... -
Page 93: Installing And Removing The Data Card
Installing and Removing the Data Card The GPSMAP 3005C uses optional Garmin BlueChart and MapSource data cards. By updating your GPSMAP 3005C software to version 3.0 or later, you can use optional preprogrammed BlueChart g2 data cards. Insert the data card in the card slot located on the front left of the unit. Data cards can be installed or removed at any time, whether the unit is on or off. -
Page 94: Satellite Information
SBAS system should be capable of providing your GPS unit with increased accuracy at any location in the world. Currently, enabling WAAS on your GPSMAP 3005C in regions that are not supported by ground stations might not improve accuracy, even when receiving signals from an SBAS satellite. -
Page 95: Waas Capability
GPS unit displays a Call List, Log, and a Directory to store incoming information received from another user’s DSC capable VHF/GPS combination. Basic wiring is required for the Garmin unit and VHF radio to send and receive NMEA data from each other. See the GPSMAP 3005C & GPS 17 Installation Instructions. -
Page 96: How Are Mmsi Assignments Obtained
Coast Guard when used in an emergency distress call. To obtain a Maritime Mobile Service Identity (MMSI) number, users must register their VHF radio with the FCC (Form 605). Garmin does not supply this number! -
Page 97: Loran Td System
Setup TD field, the active waypoint information reflects those changes. GPSMAP 3005C Owner’s Manual Because the GPSMAP 3005C unit does not rely on the LORAN signal for navigation, it can reference a different GRI chain or secondary stations and still navigate to the location stored in memory. -
Page 98: Caring For The Gpsmap 3005C
Cleaning the Screen The GPSMAP 3005C lens is coated with a special anti-reflective coating that is sensitive to skin oils, waxes, and abrasive cleaners. Cleaners containing ammonia, alcohol, abrasives, or anti-grease detergents will harm the anti-reflective coating. -
Page 99: Navigation Terms
Course—the course between the active from and to waypoints. Depth—the depth below the transducer. This field is active only if the GPSMAP 3005C is connected to a Garmin Sounder Module or if NMEA depth is available. Distance (Dist)—the distance from the current location to a destination. - Page 100 Voltage—the current voltage reading being received by unit. Water Speed—the speed through the water. This field is active only if the GPSMAP 3005C is receiving speed readings from a NMEA device or a Garmin Sounder Module. Water Temp—the water temperature. This field is active only if the GPSMAP 3005C is receiving temp readings from a NMEA device or a Garmin Sounder Module.
-
Page 101: Messages And Alarms
Messages and Alarms The GPSMAP 3005C uses an on-screen message system to notify you of events and alerts you to problems. Press QUIT to acknowledge the message. Accuracy Alarm—the GPS accuracy has fallen outside of the user-set value. Alarm Clock—the alarm clock has sounded. - Page 102 Sonar Failed, Unit Needs Repair—there is an internal problem with the unit. Contact your dealer or Garmin Product Support to have the unit serviced. Sonar Service Incompatible—the external sonar device you are connected to needs a software update.
-
Page 103: Optional Accessories
Marine Data Management Kit—allows you to archive data, plan routes, and stay on top of software updates for your GPSMAP 3005C using your PC. The software includes a marine updater application, which links you to the Garmin Web site for free software updates for your GPSMAP 3005C. This application works with the Garmin Marine Network, enabling you to update every component of your system. -
Page 104: Limited Warranty
This Garmin product is warranted to be free from defects in materials or workmanship for one year from the date of purchase. Within this period, Garmin will at its sole option repair or replace any components that fail in normal use. Such repairs or replacement will be made at no charge to the customer for parts or labor, provided that the customer shall be responsible for any transportation cost. -
Page 105: Fcc Compliance
FCC Compliance The GPSMAP 3005C complies with Part 15 of the FCC interference limits for Class B digital devices FOR HOME OR OFFICE USE. These limits are designed to provide more reasonable protection against harmful interference in a residential installation, and are more stringent than “outdoor”... -
Page 106: Weather Data Warranty
This information is provided “as is” and XM and Garmin disclaim any and all warranties, express and implied, with respect thereto or the transmission or reception thereof. XM and Garmin further do not warrant the accuracy, reliability, completeness or timeliness of the traffic and weather... -
Page 107: Index
Course Up 65 automatic backlight 57 create routes 23 waypoints 12 creating waypoints graphically 13 manually 14 GPSMAP 3005C Owner’s Manual DSC 50, 87 directory 52 DATA/CNFG Key 2 distress call 51, 88 data card log 51 installing 85 position report 51, 88... - Page 108 Nav alarms 56 map datums 59 Network tab 62 map outlines 64 NMEA 60 Map Page 33–36 NMEA interface 61 distance and bearing 36 NMEA output setup 61 options 36 north reference 59 ranges 35 MMSI GPSMAP 3005C Owner’s Manual...
- Page 109 QUIT Key 2 electronic 57 services 57 Setup tab 57 set position 6 shallow water alarm 56 GPSMAP 3005C Owner’s Manual simulator 57 strongest sonar returns 73 simulator mode 7 sun rise/set 45 setting up 7 surface clutter 73...
- Page 110 XM WX weather 81–83 Warning Page 5 customizing 81 waterimmersion 90 forecast 83 water speed 79, 92 water temperature alarm 56 waypoints 12–24 zoom 34, 40, 77 creating 13 deleting 18 editing 15 marking 12, 78 WAAS GPSMAP 3005C Owner’s Manual...
- Page 112 For the latest free software updates (excluding map data) throughout the life of your Garmin products, visit the Garmin Web site at www.garmin.com. © Copyright 2005, 2006 Garmin Ltd. or its subsidiaries Garmin International, Inc. 1200 East 151 Street, Olathe, Kansas 66062, U.S.A.