Table of Contents
Advertisement
Advertisement
Table of Contents

Related Manuals for Omega Excalibur AL-1000-E


Summary of Contents for Omega Excalibur AL-1000-E
- Page 1 OWNER'S MANUAL f o r A L - 1 0 0 0 - E...
- Page 2 This device complies with FCC Rules part 15. Operation is subject to the following two conditions, (1) This device may not cause harmful interference and, (2) This device must accept any interference that may be received, including interference that may cause undesired operation.
-
Page 3: Table Of Contents
This Booklet Contains Introduction to the Excalibur System ............... 4-5 Arming the System Using the Transmitter ............6-7 Automatic “Last Door Arming” ............... 7-8 System Armed, and should it Activate ............. 8-9 Disarming the System ..................9-11 Remote Panic Feature ................... 11-12 Using the Valet Switch ................. -
Page 4: Introduction To The Excalibur System
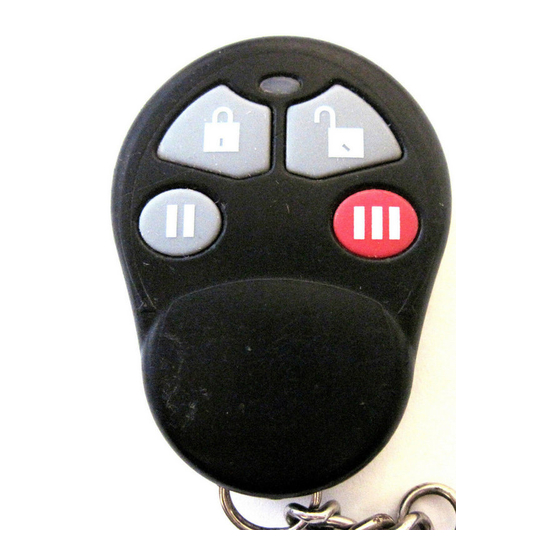
Introduction to the Excalibur Vehicle Security System Pressing the “lock/arm” and “unlock/disarm” buttons together activates the 3rd channel output. Pressing and releasing the “disarm/ unlock” button disarms the system Lights when Pressing and releasing the and unlocks the doors unless transmitting. - Page 5 Congratulations for your choice of a new Excalibur vehicle security and convenience system by Omega Research and Development. You will find that your new system will give you years of trouble- free convenience and protection. To learn how to operate your system, please take a few moments to become familiar with the following three principal user components: the Remote Transmitter, the Status Light and the Valet Switch.
-
Page 6: Arming The System Using The Transmitter
Using the Excalibur System Your Excalibur system is designed to deter theft of both your vehicle and its contents. “Arming” your system turns on its protection, disabling the vehicle’s starter and locking the doors. Once the system is Armed, any intrusion attempt will Activate it, sounding the electronic “Psyren” psycho siren and flashing the parking and interior lights to attract attention. -
Page 7: Automatic "Last Door Arming
security system is now fully armed, and is ready to respond if an intrusion attempt is detected. The Excalibur system’s separate “arm/lock” and “disarm/unlock” button design allows repetitive operation- if already armed, pressing the “arm/lock” button will simply rearm the system, and vice versa when pressing the “disarm/unlock”... -
Page 8: System Armed, And Should It Activate
chirp once, the parking and interior lights to flash once and the Status Light to start flashing rapidly. Thirty seconds later the siren will chirp again and the lights will flash again, the doors will lock (which is separately programmable) and the Status Light will slow to a steady flash, confirming that the security system is fully armed. -
Page 9: Disarming The System
If there is a protected entry still open or the impact sensor still in a violated state at the end of 30 seconds, the system will reactivate for two more 30 second cycles. In this case the system will stop after a total of 3 cycles and rearm automatically, and then ignore only the open entry or violated sensor. - Page 10 Disarming is confirmed by the siren chirping twice, the Status Light turning off, and the parking lights flashing twice, then with the interior lights illuminating for 30 seconds for approach illumination. The lights will turn off instantly if the ignition switch is turned "on" before the 30 seconds expires. If the Excalibur was activated and reset itself: The disarming confirmation will no longer be 2 siren chirps, and the parking lights flashing twice before staying with the interior lights.
-
Page 11: Remote Panic Feature
ignition key "on". Also, Automatic Rearming can be cancelled by the Safety Disarm/Storm Mode feature; if the system is disarmed while triggered, Automatic Rearming will not occur. Automatic Rearming is confirmed by a fast flashing Status Light after disarming, unless the system was triggered, in which case a Zone Violation code will flash instead. - Page 12 operations during Panic, and in association with the transmitter button used in it’s activation or deactivation: • Activating Panic with the “arm/lock” button will first lock the doors, arming the system and engaging the starter interrupt, preventing the engine from being started. •...
-
Page 13: Using The Valet Switch
Using the Valet Switch The Valet Switch has several functions: Placing your Excalibur security system into Valet Mode, which prevents it from arming. • • Should your transmitter be lost or become inoperable, the Valet Switch, and the ignition key, can be used to disarm the system with an Emergency Override. - Page 14 described on page 11, enter the vehicle (the system will most likely activate or already be activated to a triggered alarm condition. Using the ignition key, turn the vehicle’s ignition switch on, and within 5 seconds press and release the Valet Switch. The system will disarm. SecureCode: “SecureCode”...
-
Page 15: The Status Light
a failed attempt to achieve SecureCode, the ignition switch must be turned off, then on again before another attempt is made. Should two failed SecureCode attempts be made, the system will ignore any further presses of the Valet Switch for two minutes. In addition to Emergency Override, if any of the three anti-carjacking features are utilized, a correct customized SecureCode would also be required to turn off anti-carjacking once it has become fully activated. -
Page 16: Audible And Visual Indications
• 2 Flashes indicates that the system was triggered by the hood or trunk being opened. • 3 Flashes indicates that the system was triggered by a door being opened. • 4 Flashes indicates that the system was triggered by the sensor detecting a shock or impact to the vehicle. - Page 17 chirp indicates that the starter interrupt will engage and the doors will lock when the alarm becomes fully armed in 30 seconds. 2) One siren chirp, one light flash, & doors lock: The system has armed passively or actively from the transmitter.
-
Page 18: Auxiliary Sensor With Prewarning
Auxiliary Shock Sensor with Prewarning Your Excalibur vehicle security system includes an auxiliary impact sensor which greatly increases the effectiveness of your system. A light shock or impact to the vehicle will initiate Prewarning, while a heavier shock or impact will fully activate the security system. Other sensors are available, including a radar-technology sensor that can detect moving objects inside and outside the vehicle. -
Page 19: Anti-Carjacking Protection
The Excalibur also has a 3rd channel output which is similar to the 2nd channel, but with special operational design differences which make it ideal for use with an optional remote engine starting module. To operate it, press and hold the transmitter’s “arm/lock” or “disarm/unlock” buttons together for 1 second. -
Page 20: Transmitter Protection
Step 2 Turning the ignition back on. Step 3 Within 5 seconds, perform an Emergency Override using the Valet Switch. If the Secure Code has been customized, the correct number of Valet Switch presses must be made. The three types of Anti-Carjacking protection features are: Anti-Carjacking protection activated by the vehicle’s ignition has the process start every time the vehicle’s ignition is turned on. -
Page 21: Optional Backup Battery
The Omega dealer from which you purchased your vehicle security system can provide more details on the exact operation of the system when it is equipped with this option. -
Page 22: How To Program Transmitters
How to Program Transmitters The Excalibur comes with two pre-programmed transmitters, but as many as four may be used to operate the system. Each transmitter has its own unique and ever-changing digital “code”, which is programmed to operate the system by a special “learning” procedure. When adding transmitters to operate the security system, all previous transmitter codes are deleted, so all transmitters which are to operate the system must be programmed at the same time. -
Page 23: How To Program Features
How to Program Features The Excalibur has 25 programmable features, most of which allow the user to customize the system’s operation (several programmable features are installation-related). “Features Programming Mode” is the process for changing these features. The vehicle ignition key and the Valet Switch are used to enter the Programming Mode, then the transmitter is used to change features. -
Page 24: Features Programming Checklist
To Change a Feature: Step 5 After accessing the desired feature, within 10 seconds press and release either the transmitter’s “arm/lock” button or its “disarm/unlock” button. • Pressing the “arm/lock” button turns the feature ON; the siren will chirp once and the Status Light will turn on. -
Page 25: Programmable Features
The Programmable Features Feature #1 SecureCode (Factory Default Setting 1 Press) SecureCode is a unique patented feature which allows you to custom select the number of Valet Switch presses in two stages, instead of a single “1 press”, which would be required in order to perform an Emergency Override. - Page 26 Feature #2 Last Door Arming (Factory Default Setting Off) “Last Door Arming” has the system automatically arm itself every time you exit the vehicle (the complete operation is described on page 7). This feature turns that operation on or off. Feature #3 Automatic Rearming (Factory Default Setting Off) “Automatic Rearming”, described on page 10, prevents the system from becoming accidentally...
- Page 27 Feature #7 Doors Lock With Ignition On (Factory Default Setting On) This feature has the system automatically lock the vehicle’s doors every time the ignition key is turned on. An exception would be if feature #10 is turned on (“Open Door Bypass of Automatic Locking”), and a door is open when the ignition key is turned on.
- Page 28 orized Transmitter Alert, nor will it affect the chirps used in transmitter or features programming. Feature #12 Confirmation Chirps in Valet Mode (Factory Default Setting Off) While the system is in the Valet Mode, the transmitter will still remotely lock and unlock the vehicle's doors.
- Page 29 Feature #16 Double Unlock Pulse (Factory Default Setting OFF) This feature is for certain installation-related issues pertaining to the vehicle itself, and are provided for the installer’s use only. Some newer vehicles require a double pulse output wiring connection to remotely unlock the doors and/or to disarm a factory-equipped security system, which is what this feature provides.
- Page 30 Upper Left "arm/lock" Button = Upper Right "disarm/unlock" Button = lowest chirp volume (8mS); medium low chirp volume (12mS); While program- system responds with 1 chirp system responds with 2 chirps ming this feature, the buttons can be repeat- edly and sequentially Lower Right “...
- Page 31 Feature #21 Ignition Activated Anti-Carjacking Protection (Factory Default Setting Off) This form of Anti-Carjacking is initiated by the ignition key being turned on. The Anti-Carjacking protection, and the three ways to initiate it are described on pages 19-20. Feature #22 Door Activated Anti-Carjacking Protection (Factory Default Setting Off) This form of Anti-Carjacking is initiated by a door being opened.
-
Page 32: Features Programming Checklist
Features Programming Checklist This checklist helps when programming features. Before attempting feature programming, please first carefully read pages 23-24 to become familiar with the programming proce- dure, and features’ descriptions on pages 25-31. Mark each applicable box with "\" next to the feature to be changed before entering Features Programming Mode. - Page 33 SecureCode 1 & 0 (see page 25) Last Door Arming Automatic Rearming Automatic Starter Interrupt Doors Lock With Last Door Arming Doors Lock With Automatic Rearming Doors Lock With Ignition On Ignition Off Unlock #1 Ignition Off Unlock #2 Open Door Bypass of Ignition Locking Confirmation Chirps Confirmation Chirps in Valet Mode 30 or 60 Second Alarm Duration...
-
Page 34: The Optional Echo Transceiver / Controller
The OPTIONAL Omega ECHO Transceiver / Controller An exiting upgrade option to your Excalibur Echo Remote 2-Way is a 2-way remote “transceiver” controller, the Omega “III” Transceiver / Controller “II” Echo. The remote transceiver, in addition to oper- Button Button... - Page 35 • The digit readout is a clock, with AM and PM indication. This readout also shows how many transmitters/transceivers can operate the system. • The “DISARM” will also show “ARM”; this indicates the Armed or Disarmed status of the system. Neither icon is present when the system is in Valet Mode.
- Page 36 • The various lines at the upper rear of the vehicle graphic represent a unique Omega feature which allows the user to customize the vehicle type represented by the display. Options are: passenger car, pickup truck, and sport utility/van.
- Page 37 Otherwise, the Echo cannot receive the signal from the system. Programming the Omega Echo: The optional Omega Echo transceiver has several user-programmable features: Chirp or Mute The chirps may be turned off, and replaced with vibration. Vehicle Type Choices are a passenger car, pickup truck, or van/SUV.
- Page 38 3) Press and release the “:” button; each press of the button changes the vehicle from Passen- ger Car, then to Pickup Truck, and then to Van/SUV. When the desired type is flashing, press and release the “P” button; the Time’s “Hours” will flash, and may be set now. 4) Press and release the “:”...
- Page 39 point within the menu by simply not pressing any buttons for 12 seconds. The Echo chirps once when it exits programming mode. • If the Echo is configured for “MUTE” operation (vibrates instead chirping), then in programming it will not play the musical melodies. Instead, it vibrates when the remote start Melody and Stop Melody are accessed for programming.
- Page 40 COLOR BACK COVER from a separate file...