Table of Contents
Advertisement
Quick Links
Advertisement
Table of Contents

Related Manuals for TRENDnet TV-IP302PI


Summary of Contents for TRENDnet TV-IP302PI
- Page 1 Cover Page TRENDnet User’s Guide...
-
Page 2: Table Of Contents
EVENT CONFIGURATION ..................29 Factory Default ..................33 How to Access the IP camera via IP Installer ......... 34 How to setup/access the camera behind a Router ........ 35 Technical Specifications ................. 38 Troubleshooting..................40 © Copyright 2012 TRENDnet. All Rights Reserved. -
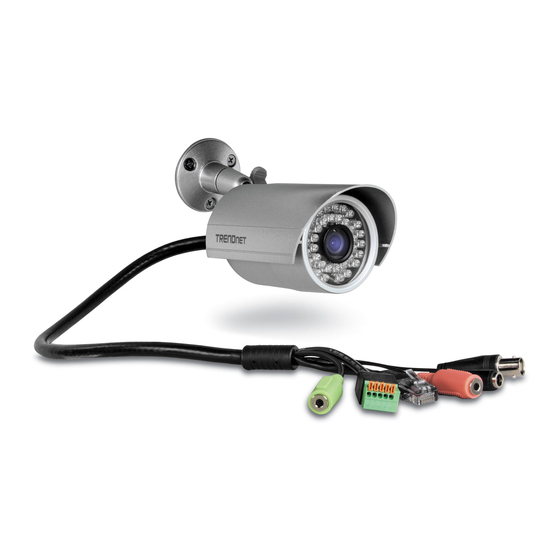
Page 3: Product Overview
Camera Stand: the mounting stand to hold the camera. Features The Outdoor Megapixel PoE Day / Night Internet Camera, model TV-IP302PI, provides powerful megapixel night vision in complete darkness for up to 15 meters (50 feet). This camera is outdoor ready with an IP66 weather rated housing. The compact aluminum enclosure, a mere 4 inches long (10 cm), comes with an adjustable sun visor. -
Page 4: Application Diagram
It's also used for IP camera reset. Please refer to Factory Default paragraph. Speaker Out: Connects an external audio device (such as the active speaker) to deliver sound via the camera. © Copyright 2013 TRENDnet. All Rights Reserved. -
Page 5: Installation
2. Once both notches are aligned with the shield, slide th4e shield forward. Installation Hardware Installation Shield Installation 1. Align the notches on the sides of the IP camera to the shield. 3. Adjust the IP camera to fit the shield. © Copyright 2013 TRENDnet. All Rights Reserved. -
Page 6: Camera Installation
The camera is designed featuring waterproof. However, you need to protect the connectors from water soak. For example, you can tape the junction points of the connectors while you connect the cables or purchase a weatherproof cable/power cord protector. © Copyright 2013 TRENDnet. All Rights Reserved. - Page 7 4. Connect a network cable to the camera’s network port and then to your router. ID. Click Next. If you are using PoE, please ensure the cable is connected to a PoE switch or PoE injector. © Copyright 2013 TRENDnet. All Rights Reserved.
- Page 8 Click Next. 10. Click “here” to access to the camera’s web page or click Next. It is recommended that you access the IP camera now if it was using a DHCP connection. © Copyright 2013 TRENDnet. All Rights Reserved.
-
Page 9: Configuration
Note: if you are initially access to the camera, you will be prompted to install a new plug-in for the camera. Permission request depends on the Internet security settings of your computer. Click Allow and Install to process. © Copyright 2013 TRENDnet. All Rights Reserved. - Page 10 "mute" in the live page. 2 video. (If the streaming 2 setting is closed on “AUDIO/VIDEO SETTING >> Video”, this option will not appear) Full Screen: Full-screen mode. © Copyright 2013 TRENDnet. All Rights Reserved.
-
Page 11: Configuring The Camera Setting
The slower of the Network is, the bigger value should be selected. The default value is null. To return to the live screen, please click the button. © Copyright 2013 TRENDnet. All Rights Reserved. -
Page 12: System
LED Indicator: Turn the LED light on or off by click the ON/OFF button. Language: There are 5 languages options. When changing the language, it will prompt dialogue box for confirmation. Click "Yes" to proceed. © Copyright 2013 TRENDnet. All Rights Reserved. - Page 13 Stream 1 Video: http://camera_ip_address:port/stream2 view.htm Synchronize with PC's time: In "Date" and "Time" column it shows your current PC time. Click "Apply" to make the IP camera time the same with PC time. Note © Copyright 2013 TRENDnet. All Rights Reserved.
-
Page 14: Network
Restore: Click "Browse..." to select the configure file from your computer modify the user information. Click “Remove” to remove the users from the then click Restore to restore all setting list. NETWORK System >> Tools © Copyright 2013 TRENDnet. All Rights Reserved. - Page 15 IPv6 is a newer numbering system that provides a much larger address pool than IPv4, which accounts for most of today’s Internet traffic. You can manually enter IPv6 address , enable DHCPv6 to get IPv6 address automatically. © Copyright 2013 TRENDnet. All Rights Reserved.
- Page 16 If this router has a WAN IP, this function allows the camera to do WAN access. In transmitting (Default: 5000, 9000) the address bar of browser, key in: "https:// (router WAN IP) : (external web port) /" to access the IP camera. © Copyright 2013 TRENDnet. All Rights Reserved.
- Page 17 If your PC supports LLTD, enable this function then you can check the connection status, properties, and device position(like IP address) of this IP Camera in the network map. In Windows Vista or Windows 7, you can find LLTD through the path: © Copyright 2013 TRENDnet. All Rights Reserved.
- Page 18 Select "Http" connection type and click "Remove". If a third-party to verify, please click “Content” and copy all the request content. dialog box pops up to ask you to confirm, click “Yes”. © Copyright 2013 TRENDnet. All Rights Reserved.
- Page 19 IP camera cannot modify any data of the camera. The community name can be any English characters and numbers, and must be shorter than 31 bits. © Copyright 2013 TRENDnet. All Rights Reserved.
- Page 20 Different from in SNMPv1 and v2c, the user have to create an account when using SNMPv3. In the account parameters, key in the security name and password you set in the camera to get accessing. © Copyright 2013 TRENDnet. All Rights Reserved.
- Page 21 IP address as 2 priority as example below. please adjust the Management Stream instead of Live Stream. © Copyright 2013 TRENDnet. All Rights Reserved.
- Page 22 LAN segment. Please check what version of the authenticator and authentication server support. This camera supports EAP-TLS method. Please enter ID, password issued by the CA, then upload related certificates. PPPoE © Copyright 2013 TRENDnet. All Rights Reserved.
- Page 23 (if need). If setting up IP schedule update too frequently, the IP may be blocked. In general, we suggest set schedule update to once a day (1440 minutes). After click "Apply" the setting. © Copyright 2013 TRENDnet. All Rights Reserved.
- Page 24 Receiver's Mail: Enter the mail address of the user who will receive the email. Use semicolon to separate each address. It can contain up to 64 characters in the column. Bcc Mail: Enter the mail address of the blind carbon copy receiver. © Copyright 2013 TRENDnet. All Rights Reserved.
- Page 25 A message box will tell you “OK!” if it works, and a test file will be Path: Enter the destination folder for uploading the images. For example, created in the location. /302PI. © Copyright 2013 TRENDnet. All Rights Reserved.
-
Page 26: Audio/Video Setting
TV-IP302PI TRENDnet User’s Guide Audio/Video Setting >> Image Setting AUDIO/VIDEO SETTING © Copyright 2013 TRENDnet. All Rights Reserved. - Page 27 * Sense-up options: 1/30, 1/15, 1/10, 1/5 choose "Light Sensor Mode", the image will be turned to black and white at night in order to keep clear. To set light sensor mode, appoint a lux standard of © Copyright 2013 TRENDnet. All Rights Reserved.
- Page 28 Video Format: H.264, MPEG4, or M-JPEG. RTSP Path: Set the RTSP output connecting route. You can use the RTSP address displaying beside the column to access this IP camera. Video Settings © Copyright 2013 TRENDnet. All Rights Reserved.
- Page 29 Video Quantitative: The quality parameter of VBR. You can choose from remote computer’s microphone to IP Camera’s external speaker. 1~10 compression rate. The higher the value is, the higher the image Two-Way Audio quality is. © Copyright 2013 TRENDnet. All Rights Reserved.
-
Page 30: Event Configuration
Click "Mic" check box to receive sound from IP Camera and click “Speaker” to talk to IP camera side. Please ensure both IP camera and the computer sides have the microphone and speaker installed to have this function work properly. Event Configuration >> Motion Detection © Copyright 2013 TRENDnet. All Rights Reserved. - Page 31 1 video format of Video Setting, this option can be enabled. Select this option to save several JPEG picture files, and the successive picture files cover a period of time according to the value you set in Record Time Setting. © Copyright 2013 TRENDnet. All Rights Reserved.
- Page 32 Select the snapshot saving way: E-mail, FTP, or Samba. Interval: The interval between two snapshots. File Name: Give the snapshot file name. The saved file will be named as: "(file name) - (saving date) - (saving time)" © Copyright 2013 TRENDnet. All Rights Reserved.
- Page 33 You can manually break off the output signal by clicking "OFF". Input Action: When the camera input alarm is triggered, it can trigger the relay out, or send the video to E-mail/ FTP/ SAMBA. © Copyright 2013 TRENDnet. All Rights Reserved.
-
Page 34: Factory Default
Event Configuration >> Logs Click "Logs" to see System Logs, Motion Detection Logs, GPIO Logs and All Logs. If you remove the power from IP camera, Motion Detection Logs will be cleared away. © Copyright 2013 TRENDnet. All Rights Reserved. -
Page 35: How To Access The Ip Camera Via Ip Installer
Default gateway, DNS 1, DNS 2 and Http Port. then press the ENTER key on your keyboard . 4. Click IPInstaller Folder and click IP Installer.exe 5. The main screen will pop up. Exit: Exit the IP Installer Utility. © Copyright 2013 TRENDnet. All Rights Reserved. -
Page 36: How To Setup/Access The Camera Behind A Router
4. Open another web browser and go to your Router’s Web Configuration How to setup/access the camera behind a Router page. (In the example, TRENDnet’s TEW-651BR Wireless N router is used) You can either setup the Dynamic DNS connection via camera itself or your home router. - Page 37 * Please refer to your router’s user’s manual for detail Virtual Server setting. Some router might use Port Forwarding or Special applications for this function. The setup steps should be very similar. 2. Login to your router’s web configuration page. © Copyright 2013 TRENDnet. All Rights Reserved.
- Page 38 Some router might use Port Forwarding or Special applications for this function. The setup steps should be very similar. 6. Open another web browser and enter your DDNS domain and camera’s port number. http://yourDomainName:PortNumber 7. The camera login page will appear. © Copyright 2013 TRENDnet. All Rights Reserved.
-
Page 39: Technical Specifications
Input: 100 ~ 24 0 V AC , 1 A, 50~60 Hz Standard Output: 12 V DC, 1 A external power adapter (for non-PoE installations) IEEE 802.3u Max consumption : 6.24 W IEEE 802.3af © Copyright 2013 TRENDnet. All Rights Reserved. -
Page 40: Camera Software
Trigger event (motion detection) Compatibility Send alert to email, FTP and / or Samba Real time s iOS and Android Management Setting Maximum 22 user accounts Supports remote management © Copyright 2013 TRENDnet. All Rights Reserved. -
Page 41: Troubleshooting
4. The image is blurry. How can I adjust the focus on the IP camera? the letter assigned to your CD-ROM Drive, and then press the ENTER key on your keyboard. The TV-IP302PI is designed to have a clear focus beyond 3 meters. The lens is not adjustable. Windows XP If the window does not appear automatically, click Start, click Run and type D:\autorun.exe where “D”... - Page 42 Remove the wire and plug in the network cable after the camera finishes booting. e. Run the Install Camera wizard from the CD-ROM to login to the camera. © Copyright 2013 TRENDnet. All Rights Reserved.
- Page 43 TRENDnet product to access to the GPL Code or LGPL Code. These codes are sent to TRENDnet for RMA service must have the RMA number marked on the outside of return distributed WITHOUT WARRANTY and are subject to the copyrights of the developers. TRENDnet packages and sent to TRENDnet prepaid, insured and packaged appropriately for safe shipment.