Haier HDY60M Owner's Manual
Clothes dryer
Hide thumbs
Also See for HDY60M:
- Owner & user manual (7 pages) ,
- Parts manual (15 pages) ,
- Parts manual (15 pages)
Advertisement
Advertisement
Table of Contents

Related Manuals for Haier HDY60M


Summary of Contents for Haier HDY60M
- Page 1 Start...
- Page 2 Read all instructions before using this dryer. 2 The interior of the dryer should be cleaned periodically by qualified service personnel. An excessive amount of lint build up in the interior of the dryer could result in inefficient drying and pose a possible fire hazard. The appliance must not be installed behind a lockable door, a sliding door or a door with a hinge on the opposite side to that of the tumble dryer in such a way that a full opening of the tumble dryer is restricted.
- Page 3 Do not dry unwashed items in the tumble dryer. 16 Fabric softeners, or similar products, should be used as specified by the fabric softener instructions. 17 To prevent fire, do not use heat to dry items containing plastic, foam rubber or similarly textured rubber-like materials, or items containing feathers or down.
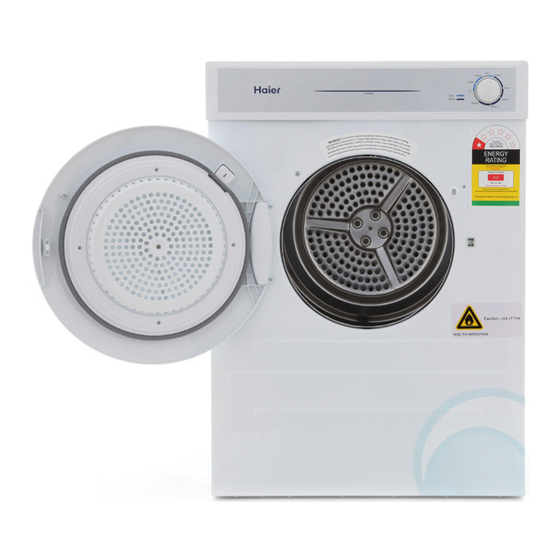
- Page 4 Start Program selector Control panel Start button Adjustable outlet Door grill and lint filter Back plate Power supply cord Air intake grill Model number and Serial number Read all instructions before using this dryer. This dryer has been designed for domestic use only. SAVE THESE INSTRUCTIONS.
- Page 5 Attention: 1.Before operation, clean off any dust and dirt inside the drum of the dryer with a damp towel 2.Clean off any debris on the lint filter and in the duct to increase the drying efficiency. Turning on power Before turning on the power of the dryer check whether the supply voltage is in accordance with the value indicated on the name plate.
-
Page 6: Laundry Loading
OPERATING INSTRUCTIONS 1. Power up Insert the power plug into an appropriate power outlet that is properly installed and grounded. Operating power supply: 220-240V~50Hz. 2. Laundry loading Open the door and load the laundry into the drum of the dryer. For a more energy efficient and better drying result, make sure the load has been spun dried. - Page 7 Start Please do not turn the timer knob to this gray area of the program cycle. Dryer timer: The timer will let you set the timer for up to 200 minutes to dry your clothes depending on the load of the clothes. This dryer has two program types.
-
Page 8: Cleaning/Maintenance
WARNING! Unplug the power cord prior to any cleaning Cleaning the surface Wipe off any dust or dirt. Note: Do not use excessive water,a damp cloth is fine. Do not use solvent. Do not use spray cleaners when cleaning the interior. Do not use harsh or abrasive cleaners. -
Page 9: Unpacking Dryer
UNPACKING YOUR DRYER Dimensions a=825 mm b=595 mm c=560 mm Weight=30 kg Remove the transport packaging (fig.1) and remove the dryer rack from the top packaging (fig.2). Remove the tape on the front (fig.3 and fig.4), the wall mounting kit attached to the drum with tape on the inside and the panel film, before starting the dryer. -
Page 10: Wall Mounting Instructions
WALL MOUNTING INSTRUCTIONS The dryer can be mounted on the wall in the inverted position only by following these instructions. Invert the dryer so that the control panel is at the bottom (see figure 3) this allows easier access to the controls. 1. - Page 11 WALL MOUNTING INSTRUCTIONS 3. Install the hooks to the dryer, in the inverted position, remove the 2 screws and 2 plastic plugs as indicated in Fig.1 . plastic plugs 4. Align the hooks as shown in Fig.2 and refit screws tightly. Install the spacers provided as Fig.2.
- Page 12 WALL MOUNTING INSTRUCTIONS 5. With assistance, mount dryer on wall brackets. See Fig. 3 6. A second control panel with inverted symbols is supplied. Peel the release paper from the back of inverted film then place new control panel film on the surface so that the writing is the correct way around.
-
Page 13: Rack Fitting
RACK FITTING INSTRUCTION DRYER FREE STANDING-UPRIGHT For ease of access, the rack is to be mounted near the dryer top. Firstly,hold the rack horizontally with the two end projections pointing upwards and away from yourself. Position the rack near the top of the dryer and place the end of the right rack projection into the right cabinet mounting hole (Fig.1). - Page 14 RACK FITTING INSTRUCTION RACK STORAGE - DRYER INVERTED. To hold the dryer rack out of the way when not in use, it will be necessary to attach the retaining clip to the base of your dryer. To do this, firstly remove the screw located 4 cm from the right corner of the inverted dryer ( Fig.3).
-
Page 15: Troubleshooting
The following must be confirmed before calling for service: Problem Possible Cause Is the dryer plugged in? Is the power on? Is the door closed properly? The dryer does not start Has a drying program been set? Has the Start button been pressed? Was the correct drying program set? Is the filter screen clean? The drying result is not... -
Page 16: Specifications
TYPE HDY60M ITEM 220-240)V~/50Hz Power supply Maximum operating current (A) Rated load (kg) Maximum power (W) 2100 825 x 560 x 595 Dimensions (HxDxW) mm Weight (kg) IPX 4 Waterproof degree...