Table of Contents
Advertisement
Available languages
Available languages
Air-Conditioners
INDOOR UNIT
PE-5, 6, 8, 10, 12, 16, 20 GAK
PEH-5, 6GAK
FOR USER
ДЛЯ ПОЛЬЗОВАТЕЛЯ
OPERATION MANUAL
For safe and correct use, please read this operation manual thoroughly before operating the air-conditioner unit.
РУКОВОДСТВО ПО ЭКСПЛУАТАЦИИ
В целях обеспечения безопасности и правильности эксплуатации перед установкой кондиционера следует внимательно прочитать
данное руководство по эксплуатации.
Advertisement
Chapters
Table of Contents

Related Manuals for Mitsubishi Electric PE-5


Summary of Contents for Mitsubishi Electric PE-5
-
Page 1: Operation Manual
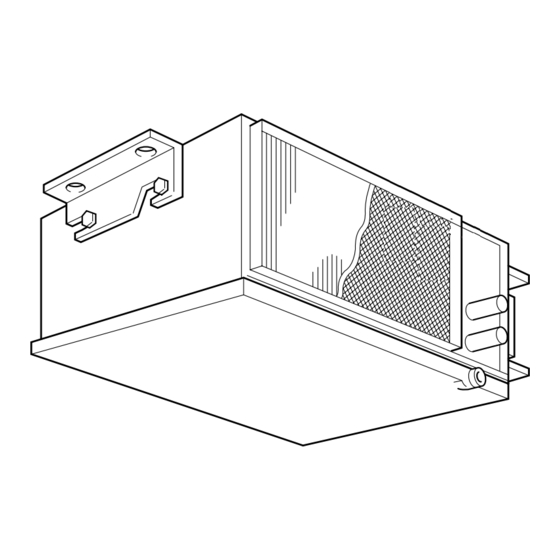
Air-Conditioners INDOOR UNIT PE-5, 6, 8, 10, 12, 16, 20 GAK PEH-5, 6GAK FOR USER ДЛЯ ПОЛЬЗОВАТЕЛЯ OPERATION MANUAL For safe and correct use, please read this operation manual thoroughly before operating the air-conditioner unit. РУКОВОДСТВО ПО ЭКСПЛУАТАЦИИ В целях обеспечения безопасности и правильности эксплуатации перед установкой кондиционера следует внимательно прочитать... - Page 2 [Fig. 2.0.1] [Fig. 2.0.2] A Air outlet A LCD remote controller B Air inlet C Air filter (optional part) [Fig. 5.0.1] A Air outlet C Air filter (optional part) B Air inlet D Air filter handle...
-
Page 3: Table Of Contents
• Make sure that there is a main power switch. • Use only accessories authorized by Mitsubishi Electric and ask your • Be sure to adhere to the unit’s voltage and fuse or circuit breaker ratings. dealer or an authorized company to install them. If accessories are in- Never use a piece of wire or a fuse with a higher rating than the one stalled improperly, water leakage, electric shock or fire may result. -
Page 4: During Operation
A LCD remote controller clean, refer to page 11.) • Air outlet: Blow the cooled air into the room. Model PE-5, 6, 8, 10, 12, 16, 20, PEH-5, 6 [Ceiling concealed type] [Fig. 2.0.1] (P.2) A Air outlet B Air inlet... -
Page 5: Operation
3. Operation • In case of using LCD remote controller, refer this operation manual or remote controller operation manual to operate the unit. Remote controller-Button TEMP. ON/OFF MENU ON/OFF FILTER BACK MONITOR/SET CHECK TEST Opening the door. PAR-21MAA CLOCK OPERATION CLEAR 0 Filter button (<Enter>... -
Page 6: Switching The Unit On/Off
3.3. Selecting a temperature TEMP. s To decrease the room temperature: button 3 to set the desired temperature. 1. Press The selected temperature C is displayed. • Each time you press the button, the temperature value decreases by 1 °C. ˚C s s s s s To increase the room temperature: ˚C... -
Page 7: Using The Timer
s How to Set the Weekly Timer Notes: • It can be set regardless of the operation of the indoor unit. 1. Be sure that you are at a standard control screen, and that the weekly timer • The day and time will not appear if clock use has been disabled at Func- indicator 1 is shown in the display. - Page 8 s How to Set the Simple Timer Note: Your new entries will be cancelled if you press the Mode (Return) button 2 2 2 2 2 Timer Setting before pressing the Filter button 4 4 4 4 4 . If you have set two or more different operations for exactly the same time, Action (On or Off) only the operation with the highest Operation No.
- Page 9 Examples When something other than the Auto Off Timer is displayed, set it to AUTO If ON and OFF times have both been set at the simple timer, operation and display OFF TIMER using the function selection of remote controller (see Installa- are as indicated below.
-
Page 10: Locking The Remote Controller Buttons (Operation Function Limit Controller)
3.7. Locking the remote controller buttons 3.8.2. Flashing Mode Indicator (Operation function limit controller) ■ If you wish, you can lock the remote controller buttons. You can use the Func- tion Selection of remote controller to select which type of lock to use. (For ˚C information about selecting the lock type, see Installation Manual). -
Page 11: The Smart Way To Use
4. The smart way to use Even minimal steps to care for your air conditioner can help make its use far Prevent intrusion of heat during air-cooling more effective in terms of air-conditioning effect, electricity charges, etc. • To prevent the intrusion of heat during cooling operation, provide a curtain or a Set the right room temperature blind on the window to block out direct sunlight. -
Page 12: During Operation
6. Troubleshooting ● The unit started even though the start/stop button was not pushed. Before you call out a repair man, check the following table to see whether there is a simple solution to your problem. • Is the timer on? Press the start/stop button to stop the unit. -
Page 13: Installation And Transferring Works, And Checking
7. Installation and transferring works, and checking Regarding place for installation Regarding transfer of installation Consult with your dealer for details on installation and transferring the installation. • When removing and reinstalling the air conditioner when you enlarge your home, remodel, or move, consult with your dealer in advance to ascertain the Caution: cost of the professional engineering work required for transferring the installa- Never install the air conditioner where there is a risk of leakage of flammable... - Page 14 TEMP. s s s s s s s s s s • • s s s s s • • • • • • • • • • •...
- Page 15 • • • • • • • • • • • • • • • • • • • • • • • • • • •...
- Page 16 • TEM . ON/OFF MENU ON/OFF FILTER BACK MONITOR/SET CHECK TEST O ERATION AR-21MAA CLOCK CLEAR • • • • TIME SUN MON TUE WED THU FRI SAT TIMER AFTER AFTER ERROR CODE FUNCTION FILTER WEEKLY SIMPLE ONLY1Hr. AUTO OFF •...
- Page 17 TEMP. s s s s s • SIMPLE TEMP. ON/OFF MENU ON/OFF FILTER • BACK MONITOR/SET CHECK TEST • PAR-21MAA CLOCK OPERATION CLEAR • • • ▼ • ■ • • TIME TEMP. ON/OFF MENU ON/OFF FILTER BACK MONITOR/SET CHECK TEST PAR-21MAA CLOCK...
- Page 18 s s s s s • • s s s s s → → → → IME SUN → → → → → • • • • • • • • • • • ··· • s s s s s •...
- Page 19 s s s s s 4 4 4 4 4 2 2 2 2 2 AFTER SIMPLE — — s s s s s TIMER WEEKLY • • • — s s s s s — TIME WEEKLY s s s s s TIME s s s s s WEEKLY...
- Page 20 AFTER 4 4 4 4 4 2 2 2 2 2 SIMPLE AFTER s s s s s SIMPLE TIMER FTER IMPLE UTO OFF • s s s s s AFTER ● SIMPLE AFTER SIMPLE AUTO OFF ● SIMPLE UTO OFF ■...
- Page 21 ■ ûC ûC TEMP. N/ FF ■ ■ TIME FUNCTION TEMP. ON/OFF MENU ON/OFF FILTER ûC ûC FILTER BACK MONITOR/SET CHECK TEST PAR-21MAA CLOCK OPERATION CLEAR TEMP. N/ FF ■ s s s s s ■ FUNCTION ERROR CODE • ON/OFF FUNCTION s s s s s...
- Page 22 • • • • • • • • • • • •...
- Page 23 ● • ● • • • • • ● • • ● • • ● • • ● • ● ● • • ● ● • • • ● • ● • ● • ● • • • • • •...
- Page 24 • • • • • • • • • • • • • • • • • • • — — — — — — — × ×...
-
Page 25: Õ §«√√-«- Ss ‡Æ◊ Ë Õ §«"¡ª≈Õ
„™â · µà Õ ÿ ª °√≥å ‡ √‘ ¡ ¢Õß Mitsubishi Electric ‡∑à “ π— È π ·≈–‡√’ ¬ °µ— « ·∑π®”Àπà “ ¬À√◊ Õ ∫√‘ … — ∑ ∑’ Ë ‰ ¥â √ — ∫ Õπÿ ≠ “µ... -
Page 26: À«À " Ss°"√„™Â Ss "Π
√’ ‚ ¡µ§Õπ‚∑√≈ LCD • ™à Õ ß≈¡ÕÕ°: ‡ªÉ “ ≈¡‡¬Á π ‡¢â “ ‰ª„πÀâ Õ ß √ÿ à π PE-5, 6, 8, 10, 12, 16, 20, PEH-5, 6 [·∫∫´à Õ π∫πÀ≈— ß §“] [Fig. 2.0.1] (P.2) ™à Õ ß≈¡ÕÕ°... -
Page 27: Â Ss "Π
3. °“√„™â ß “π • À“°„™â √ ’ ‚ ¡µ§Õπ‚∑√≈ LCD „Àâ ¥ Ÿ « ‘ ∏ ’ ° “√„™â ß “π®“°§Ÿ à ¡ ◊ Õ °“√„™â ‡ ≈à ¡ π’ È À √◊ Õ §Ÿ à ¡ ◊ Õ °“√„™â √ ’ ‚ ¡µ§Õπ‚∑√≈ ªÿ... -
Page 28: ªî ¥ /ªî ¥ ‡§√◊ Ë Õ Ss
3.3. °“√‡≈◊ Õ °Õÿ ≥ À¿Ÿ ¡ ‘ TEMP. ‡¡◊ Ë Õ µâ Õ ß°“√≈¥Õÿ ≥ À¿Ÿ ¡ ‘ À â Õ ß: 1. °¥ªÿ É ¡ ‡æ◊ Ë Õ µ— È ß Õÿ ≥ À¿Ÿ ¡ ‘ ∑ ’ Ë µ â Õ ß°“√ Õÿ... -
Page 29: Μ- È Ss ‡«≈"∑"Ss"Π
«‘ ∏ ’ ° “√µ— È ß ‡«≈“·∫∫ Weekly Timer «‘ ∏ ’ ° “√µ— È ß ‡«≈“·∫∫ Weekly Timer «‘ ∏ ’ ° “√µ— È ß ‡«≈“·∫∫ Weekly Timer «‘ ∏ ’ ° “√µ— È ß ‡«≈“·∫∫ Weekly Timer «‘... - Page 30 «‘ ∏ ’ ° “√µ— È ß ‡«≈“·∫∫ Simple Timer À¡“¬‡Àµÿ : 2 2 2 2 2 4 4 4 4 4 §à “ ∑’ Ë µ — È ß „À¡à ® –∂Ÿ ° ¬°‡≈‘ ° ∂â “ °¥ªÿ É ¡ ‡≈◊ Õ °‚À¡¥ (Return) °à...
- Page 31 1. „Àâ · πà „ ®«à “ §ÿ ≥ Õ¬Ÿ à „ πÀπâ “ ®Õ§«∫§ÿ ¡ ª°µ‘ ·≈– — ≠ ≈— ° …≥å Auto Off Timer ª√“°ØÕ¬Ÿ à ∫ πÀπâ “ ®Õ (∑’ Ë µ— « Õ¬à “ ß À“°µ— È ß ‡«≈“∑— È ß ON ·≈– OFF ‰«â „ π·∫∫ Simple Timer √“¬°“√·≈–Àπâ “ ®Õ®–ª√“°Ø¥— ß ∑’ Ë · ¥ß‰«â ¥ â “ π≈à “ ß À“°Àπâ...
-
Page 32: Á Õ §ªÿ É ¡ ∫Π√' ' ¡Μ§Õπ'∑√≈ (™Ÿ ¥ §«∫§Ÿ ¡ ‡Æ◊ Ë Õ ®"°- ¥ °"√„™Â Ss "Π)
3.7. °“√≈Á Õ §ªÿ É ¡ ∫π√’ ‚ ¡µ§Õπ‚∑√≈ (™ÿ ¥ §«∫§ÿ ¡ ‡æ◊ Ë Õ ®”°— ¥ °“√„™â ß “π) 3.8.2. — ≠ ≈— ° …≥å ‚ À¡¥°–æ√‘ ∫ ■ À“°µâ Õ ß°“√ §ÿ ≥ “¡“√∂≈Á Õ §ªÿ É ¡ ∫π√’ ‚ ¡µ§Õπ‚∑√≈‰¥â §ÿ ≥ “¡“√∂„™â Function Selection ∫π√’ ‚ ¡µ §Õπ‚∑√≈‡æ◊... -
Page 33:  Ss "Πõ¬À " Ss
4. °“√„™â ß “πÕ¬à “ ß™“≠©≈“¥ ¥â « ¬¢— È π µÕπ‡æ’ ¬ ߇≈Á ° πâ Õ ¬„π°“√¥Ÿ · ≈√— ° …“‡§√◊ Ë Õ ßª√— ∫ Õ“°“»¢Õߧÿ ≥ °Á “¡“√∂™à « ¬„Àâ „ ™â ß “π‰¥â Õ ¬à “ ß¡’ ªÑ... -
Page 34:  ‰ ¢ªí ≠ À
6. «‘ ∏ ’ ° “√·°â ‰ ¢ªí ≠ À“ ● °à Õ π‚∑√À“™à “ ß „Àâ µ √«® Õ∫µ“√“ßµà Õ ‰ªπ’ È ‡ æ◊ Ë Õ ¥Ÿ « à “ ¡’ ∑ “ß·°â ‰ ¢ªí ≠ À“¢— È π µâ π À√◊ Õ ‰¡à ‡§√◊... -
Page 35: Ss"Πµ' ¥ Μ- È Ss '¬°¬Â " ¬·≈-Μ√«® Õ∫‡§√◊ Ë Õ Ss
7. ß“πµ‘ ¥ µ— È ß ‚¬°¬â “ ¬·≈–µ√«® Õ∫‡§√◊ Ë Õ ß ‡°’ Ë ¬ «°— ∫ ∂“π∑’ Ë µ ‘ ¥ µ— È ß ‡°’ Ë ¬ «°— ∫ °“√‚¬°¬â “ ¬ ª√÷ ° …“µ— « ·∑π®”Àπà “ ¬ ”À√— ∫ √“¬≈–‡Õ’ ¬ ¥‡°’ Ë ¬ «°— ∫ °“√µ‘ ¥ µ— È ß ·≈–°“√‚¬°¬â “ ¬ •... - Page 36 TEMP.
-
Page 38: Temp. On/Off 1
TEMP. ON/OFF MENU ON/OFF FILTER BACK MONITOR/SET CHECK TEST PAR-21MAA CLOCK OPERATION CLEAR TIME SUN MON TUE WED THU FRI SAT TIMER AFTER AFTER ERROR CODE FUNCTION ˚F˚C FILTER ˚F˚C WEEKLY SIMPLE ONLY1Hr. AUTO OFF... -
Page 39: Menu On/Off Filter
TEMP. s s s s s ˚C ˚C SIMPLE TEMP. ON/OFF MENU ON/OFF FILTER BACK MONITOR/SET CHECK TEST PAR-21MAA CLOCK OPERATION CLEAR ▼ ■ TIME SUN ˚C ˚C TEMP. ON/OFF MENU ON/OFF FILTER BACK MONITOR/SET CHECK TEST OPERATION PAR-21MAA CLOCK CLEAR... - Page 40 s s s s s s s s s s TIME SUN → → → → → → → → s s s s s ˚C WEEKLY ■ ■ → → ⇔ ⇔ ⇔ ⇔ ⇔ ⇔ ⇔ ⇔ ⇔ ˚C WEEKLY TEMP.
- Page 41 s s s s s AFTER SIMPLE s s s s s TIMER ˚C WEEKLY s s s s s TIME SUN ˚C ˚C WEEKLY s s s s s TIME SUN ˚C ˚C WEEKLY s s s s s ■...
- Page 42 AFTER SIMPLE AFTER ˚C ˚C SIMPLE s s s s s SIMPLE TIMER AFTER AUTO OFF AFTER ˚C ˚C SIMPLE s s s s s ● AFTER SIMPLE ˚C ˚C ˚C ˚C AUTO OFF SIMPLE ● ■ ■ AUTO OFF s s s s s ●...
- Page 43 ■ ˚C ˚C TEMP. ON/OFF ■ ■ TIME SUN FUNCTION ˚C ˚C TEMP. ON/OFF MENU ON/OFF FILTER BACK MONITOR/SET ˚C CHECK TEST FILTER ˚C PAR-21MAA CLOCK OPERATION CLEAR TEMP. ON/OFF ■ ■ s s s s s ERROR CODE FUNCTION ˚C ˚C ON/OFF...
- Page 45 ● ● ● ● ● ● ● ● ● ● ● ● ● ●...
- Page 46 × ×...
- Page 49 h H «Ë ¨qIM «Ë VO d « ‰UL √ d « qI h d « ÊUJ h • ÆVO d « qI Ë VO d « ‰u qO UH vK ‰uB K lzU « dA « ¨q?I?M? « Ë√ ¡U?M? « …œU ≈ Ë√ p eM lO u bM ¡«uN « nOJ VO d? …œU ≈...
- Page 50 UN ö ≈Ë öJAL « ·UAJ « ● Æ·UI ≈Ø¡b — e « vK jGC « Âb W U …b u « √b q?N? q? „UM ÊU «–≈ U W dFL w U « ‰Ëb « s oI ¨W UOB « wMH ‰UB ô« q •...
- Page 51 «b ô« ‚ qC √ vK ‰uB(« w „b U Ê√ ≠UNM v œ_« b(« v ≠¡«uN « nOJ0 W UMF « «uD) sJ1 ¡«uN « b ¡UM √ …—« « ‰u œ lM Æp – dO Ë ¡U dNJ « „öN «Ë...
- Page 52 3.7. 3.8.2. iO u « l{Ë d R bF s rJ « …b Ë —« — “√ qH ©qOGA « nzU u …œËb …b Ë® ■ òWHO u « b b å «b « pMJL ÆX — «–≈ bF s rJ «...
-
Page 53: Back Monitor/Set Day Check Test
WK √ vK tD {« ¨X R*« qOGA « ·UI ≈ X u dO d ¬ ¡w ÷d bM AUTO OFF TIMER dE «® bF s rJ « …b Ë w b b « WHO Ë Â«b ÷d?F «Ë qOGA « ÊuJO ¨jO «... -
Page 54: Timer On
_« X uL « j { WI ∫WE ö 2 2 2 2 2 — “ vK jGC « q ©Ÿu —® l{u « — “ vK XDG{ «–≈ …b b'« ôU œù« ¡UG ≈ r O X uL « «œ«b ≈ 4 4 4 4 4 Æ... - Page 55 _« X uL « j { WI ∫ UE ö • X? u?L? « d? R ÷d s b Q Ë ¨WO UOI « rJ « W U w b «u « s b Q ÆWOK «b « …b u « qOGA s dEM « iG j C « sJL •...
- Page 56 3.3. TEMP. …—« « W —œ b b ∫W dG « …—« W —œ iH ÆW uKD*« …—« d(« W —œ j C — e « vK jG{« Æ W uKDL « …—« « W —œ ÷d r • ÆW u W —œ...
- Page 57 qOGA « • qO œ Ë√ qOGA « qO œ v ≈ l —« ¨ «– s rJ « …b Ë Â«b « W U w Æ…b u « qOGA bF s rJ « …b Ë qOGA — “≠bF s rJ «...
- Page 58 «– s rJ « …b Ë ©Æ W HB « • ÆW dG « w œd L « ¡«uN « aHM ∫¡«uN « ÃË PE-5, 6, 8, 10, 12, 16, 20, PEH-5, 6 “« dD « ›wH Ÿu ¤ [Fig. 2.0.1] (P.2) ©Í...
- Page 59 »uA Ë√ WOzU dN W b Ë√ Æbz« “ qL v ≈ j « fHM Èd √ …eN √ qO u Mitsubishi Electric • VK «Ë WD «u WB dL « UI KL « jI Âb « • Æw Oz— W U ÕU H œu Ë...
- Page 60 Air-Conditioners INDOOR UNIT PE-5, 6, 8, 10, 12, 16, 20 GAK PEH-5, 6GAK Âb ’U qOGA « qO œ Æ¡«uN « nOJ …b Ë qOGA q q UJ U «c qOGA « qO œ …¡« d v d ¨5 O B « «b ô«Ë...