Table of Contents
Advertisement
Quick Links
Download this manual
See also:
Owner's Manual
Advertisement
Table of Contents

Related Manuals for Tascam DR-60D


Summary of Contents for Tascam DR-60D
- Page 1 D01188720A DR-60D Linear PCM Recorder OWNER’S MANUAL...
-
Page 2: Important Safety Precautions
TO THE USER Declaration of Conformity This equipment has been tested and found to comply with the Model Number : DR-60D limits for a Class B digital device, pursuant to Part 15 of the FCC Trade Name : TASCAM Rules. These limits are designed to provide reasonable protection Responsible party: TEAC AMERICA, INC. -
Page 3: Important Safety Instructions
AC outlet that has a protective grounding when the apparatus has been damaged in any way, such as power-supply connection. cord or plug is damaged, liquid has been spilled or objects have fallen TASCAM DR-60D... -
Page 4: Safety Information
(e) The return and collection systems are available to the end users. For more detailed information about disposal of waste batteries and/or accumulators, please contact your city office, waste disposal service or the shop where you purchased them. TASCAM DR-60D... - Page 5 • Do not disassemble a battery. The acid inside the battery could harm skin and old batteries or different types of batteries together. The batteries or clothing. could rupture or leak, causing fire, injury or stains around them. 8 For China 产品有毒有害物质或元素的名称及含量 机种 : DR-60D 有毒有害物质或元素 铅 汞 镉 六价铬...
-
Page 6: Table Of Contents
Basic operation..................30 Setting the input types ..............44 3 – Preparation ..............32 Using phantom power ..............45 Powering the unit..................32 Using plug-in power ...............46 Power sources ...................32 Adjusting the input level ...............46 Using AA batteries ................32 Using the limiter ..................48 TASCAM DR-60D... - Page 7 Opening the quick menu ..............74 Delaying the start of recording (REC DELAY) .......60 Closing the quick menu ..............75 Self-timer function ................... 61 Deleting the selected file (Quick Delete) ........75 Using the auto tone function .............. 61 Dividing the selected file (DIVIDE) ............75 TASCAM DR-60D...
- Page 8 Setting footswitch operation ............89 Using the MS decoder ................80 Using the footswitch ..............90 Decoding the input sound as you record ......80 Remote control (TASCAM RC-10) ............90 Decoding the playback sound ...........81 Setting the wired remote control ..........90 MS decoder settings ...............81 Using the wired remote control ..........90...
-
Page 9: Quick Start Guide
In this chapter we will try recording and playback with the TASCAM Insert an SD card into the SD card slot on the right side of the DR-60D. We will also try using it connected to a digital single-lens unit. - Page 10 • appear. (See “Setting the date and time” on page 36.) When formatting, use a TASCAM PS-P515U AC adaptor (sold separately), supply the unit with USB bus power from a computer or be certain that the batteries have sufficient remaining charge.
- Page 11 Press the RECORD [0] button to start recording. The indicator If you have made several recordings, use the . or / button will light during recording. to select the file to play when playing back or stopped and the Home Screen is displayed. TASCAM DR-60D...
- Page 12 16. To monitor the camera audio input to this unit using headphones, turn monitoring on using the item on MONITOR screen. (See “Enabling monitoring” on page REC SETTING 40.) TASCAM DR-60D...
-
Page 13: Introduction
1 – Introduction Thank you very much for purchasing the TASCAM DR-60D Linear TRS mic/line inputs (1/L and 2/R) support +24dBU input when PCM Recoder. Please read this Owner’s Manual carefully in order to set to LINE • maximize your use of all the unit’s features. We hope that you will Stereo mini jack input supports mics that require plug-in power, enjoy using this recorder for many years to come. -
Page 14: Included Items
1 – Introduction • Delay function that eliminates time lags caused by differences in Please contact TASCAM if any of these items are missing or have the distances of two sets of inputs from the sound source been damaged during transportation. -
Page 15: Trademarks
Any data, including, but not limited to information, described • herein are intended only as illustrations of such data and/or TASCAM is a registered trademark of TEAC Corporation. information and not as the specifications for such data and/ • SDHC Logo is a trademark of SD-3C, LLC. -
Page 16: Precautions For Use
A list of SD cards that have been confirmed for use with this unit can If this unit is placed near a power amplifier or other device with be found on the TASCAM website (http://tascam.com/). Please check a large transformer, it could cause that device to hum. If this this site or contact TASCAM customer support. -
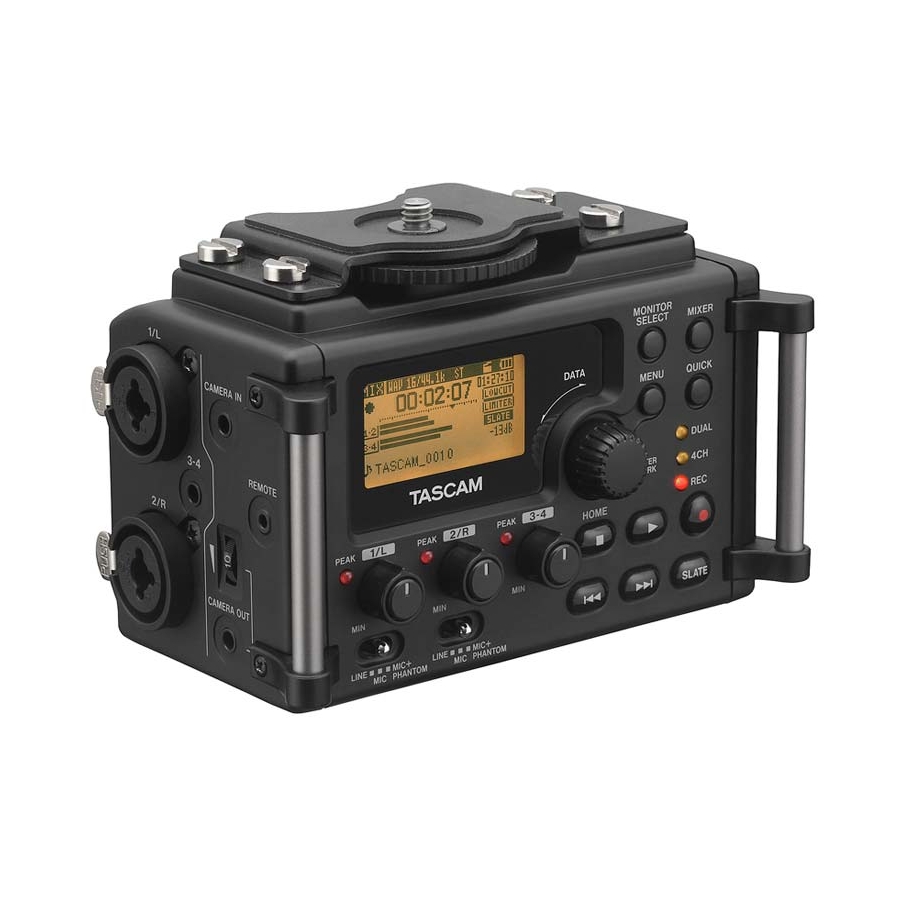
Page 17: Names And Functions Of Parts
3 DATA dial (ENTER/MARK) Turn to select items and change values on setting screens. Use also to change the playback position in a file. Push to confirm selections on setting screens and to answer “YES” to confirmation pop-up messages. TASCAM DR-60D... - Page 18 Use to adjust the input level from the 3/4 connector on the left This blinks when in recording standby and lights red when side of the unit. recording. The 3-4 PEAK indicator lights when the 3-4 input level is about to cause distortion. TASCAM DR-60D...
- Page 19 Press this button while pressing and holding the DATA dial to move to the next mark. On the Screen, press this button to move down a level. BROWSE If a file is selected, the file is loaded and the unit returns to the Home Screen and stops. TASCAM DR-60D...
-
Page 20: Left Side Panel
REMOTE connector (φ2.5mm TRS jack) TRS (Tip: HOT, Ring: COLD, Sleeve: GND) Connect a TASCAM RC-3F footswitch or TASCAM RC-10 wired remote control (both sold separately) here to enable remote starting and stopping of playback and other functions. (See “11 –... -
Page 21: Right Side Panel
OFF(Standby). (See “Turning the power on and off (putting it in standby)” on page 35) z HOLD switch Shift to the top end (in the direction of the arrow) to engage the hold function. All buttons are inoperative when hold is ON. TASCAM DR-60D... -
Page 22: Rear Panel
(See “9 – Connecting with a computer” on page 82.) Power can be supplied through the USB cable provided with the unit or an AC adaptor (sold separately: TASCAM PS-P515U). CAUTION Always connect the recorder directly to a computer. Do not use a USB hub. -
Page 23: Top Panel
Some tripods have different screw specifications that make direct connection impossible. Use a commercially-available adapter with such tripods. @ Video camera pin hole When using a tripod with a pin for video cameras, align this hole with the pin when attaching the unit to the tripod. TASCAM DR-60D... -
Page 24: Home Screen
5 Elapsed time Channel 1 sound input This shows the elapsed time (hours: minutes: seconds) of the Left channel of dual recording mode main file current file. Left channel of dual recording mode sub file Channel 2 sound input TASCAM DR-60D... - Page 25 In these cases, it shows the project name. Skipping forward w Remaining time Skipping backward This shows the remaining time (hours: minutes: seconds) of the current file. 8 Level meter These show the levels of the input playback signals. TASCAM DR-60D...
-
Page 26: Recording Screen
Left channel of dual recording mode main file Left channel of dual recording mode sub file Channel 2 sound input Right channel of dual recording mode main file Right channel of dual recording mode sub file Channel 3 sound input TASCAM DR-60D... - Page 27 This shows the number of recording channels in the file. ST or MONO 0 Recording level meters These show the levels of the input audio. The b mark at the –12dB position provides a guide when adjusting the input levels. TASCAM DR-60D...
-
Page 28: Menu Item List
SLATE button setting This shows the SLATE button setting (enable/disabled). (See “Adding slate tones” on page 62.) : SLATE button disabled : SLATE button enabled y Peak value in decibels (dB) Peak input level values are shown digitally. TASCAM DR-60D... -
Page 29: Using Menus
File name settings page 88 DATE/TIME Date and time settings page 36 Settings for the TASCAM RC-3F page 89, footswitch and TASCAM RC-10 Turn the DATA dial to select a menu item (highlighted), and REMOTE wired remote control (both sold... -
Page 30: Basic Operation
Use this to move the cursor (the highlighted area) to the right on the screen, and to open folders on the screen. BROWSE . button: Use this to move the cursor (the highlighted area) to the left on the screen, and to close folders on the screen. BROWSE TASCAM DR-60D... - Page 31 Record (0) button Opens the screen. REC MODE When the screen is open, returns to the Home Screen. REC MODE MIXER button Opens the screen. MIXER When the screen is open, returns to the Home Screen. MIXER TASCAM DR-60D...
-
Page 32: Preparation
Then, close the battery compartment cover. If you need to operate the unit for a long time, use a TASCAM PS-P515U AC adaptor or TASCAM BP-6AA external battery box (both sold separately) to power the unit. -
Page 33: Using An Ac Adaptor (Sold Separately)
AC adaptor. The DR-60D cannot detect the remaining battery charge of a CAUTION BP-6AA. If you use a BP-6AA to operate the DR-60D without batteries • Never use any adaptor other than the designated TASCAM in the recorder itself, the unit might stop operating suddenly if the PS-P515U AC adaptor (sold separately). -
Page 34: Using Usb Bus Power
Connect the unit to a PC using the attached USB cable as shown in this unit might not function when connected to the computer by the illustration. USB cable. In this case, use a TASCAM PS-P515U AC adaptor (sold separately) or batteries. •... -
Page 35: Turning The Power On And Off (Putting It In Standby)
(See “Setting the date and time” on page 36.) • The unit goes in standby mode if shut down when the unit is operating on AC power supplied through the TASCAM PS-P515U AC adaptor (sold separately), or bus power supplied from a USB port of a PC. -
Page 36: Resume Function
The required data are stored in the SD card. The resume function does not work if the card is exchanged or formatted. Turn the DATA dial to select , and press the DATA dial or OTHERS / button to open the . screen opens. OTHERS TASCAM DR-60D... -
Page 37: Inserting And Removing Sd Cards
The date and time setting can only be maintained for a few minutes if the battery power becomes low and the unit is not powered by a TASCAM PS-P515U AC adaptor (sold separately) or USB cable. When using batteries, replace them before they completely lose power. -
Page 38: Sd Card Write Protection Switches
USB. • SD cards that meet SD or SDHC standards can be used with this unit. • A list of SD cards that have been confirmed to work with this unit can be found on our website (http://tascam.com/). TASCAM DR-60D... -
Page 39: Preparing An Sd Card For Use
φ3.5mm stereo mini plug cables. If you want to record audio from this unit with a camera, connect the CAMERA OUT jack on the left side of this unit with the external mic input on the camera. TASCAM DR-60D... -
Page 40: Connecting Monitors And Headphones
, and press the DATA dial MONITOR or / button. Turn the DATA dial to turn monitoring of the input signal on or off. Options: (default value) When finished, press the stop (8) [HOME] button to return to the Home Screen. TASCAM DR-60D... -
Page 41: Selecting The Monitored Signal
Monitor the dual recording mode main file left CH1 Main channel. Monitor the dual recording mode sub file left CH1 Sub channel. Monitor the channel 2 input sound. Monitor the dual recording mode main file CH2 Main right channel. TASCAM DR-60D... -
Page 42: Recording
, and press the DATA dial or REC SETTING SAMPLE / button. Set the sampling frequency with the Turn the DATA dial to one of the following options. Options: (default value), 44 . 1k Press the DATA dial or . button to show settings. TASCAM DR-60D... -
Page 43: Preparing The Recording Inputs
The amount of recording time is shown on the right of the setting value (in parentheses). Stereo Microphones When finished making the setting, press the stop (8) [HOME] button to return to the Home Screen. TASCAM DR-60D... -
Page 44: Recording An External Device (Line In)
(See “Using phantom power” on page 45. ) Use the screen to set the voltage to +24V or +48V. (See SYSTEM “Setting the phantom power voltage” on page 86. ) TASCAM DR-60D... -
Page 45: Using Phantom Power
In this case, use a to turn phantom power on for the 1/L connector or 2/R connector TASCAM PS-P515U AC adaptor (sold separately). and supply phantom power (+24V or +48V) to the connected mic. -
Page 46: Using Plug-In Power
When using a mic to record, use headphones for monitoring. If you use speakers for monitoring, the sound output from the Ch1 INPUT SETTING screen speakers could be picked up by the mic, resulting in its unwanted recording or feedback noise. TASCAM DR-60D... - Page 47 PHONES jack. Use the PHONES jack volume control to adjust the monitoring level. Changing the monitoring volume does not affect the recorded sound. When finished making the setting, press the stop (8) [HOME] button to exit recording standby. TASCAM DR-60D...
-
Page 48: Using The Limiter
When set to , the limiter affects both LINK channels in the pair when either has excessive input. When finished making the setting, press the stop (8) [HOME] button to return to the Home Screen. TASCAM DR-60D... -
Page 49: Using The Low-Cut Filter
If you use speakers to monitor, the sound output from the files. speakers may also be recorded, causing a poor recording and even feedback. NOTE The low-cut function can be set and changed even during recording standby and when recording. TASCAM DR-60D... -
Page 50: Recording (Mono/Stereo Recording)
Use this mode to monitor when recording with a mid-side mic. MONITOR Use this also when playing back mid-side files that were recorded without decoding. 11. When finished making the setting, press the stop (8) [HOME] button to return to the Home Screen. TASCAM DR-60D... -
Page 51: Set Where To Save The File
1: Set with the item on the screen To start recording, press the record (0) button again. WORD FILE NAME 2: Recording file base number mono recording stereo recording TASCAM DR-60D... -
Page 52: Simultaneously Recording Two Files At Different Input Levels (Dual Rec)
DUAL ST Range: (default value: – 12dB -6dB Dual mono recording Dual stereo recording 11. Press the DATA dial or . button to select the other item. Press the DATA dial or . button to select the other item. TASCAM DR-60D... -
Page 53: Starting Dual Recording
, and press the DATA dial or DELAY / button. 17. Turn the DATA dial to set this value according to the distance of the mic connected to the channel. Range: (default value) to ± (in 1ms increments) 150ms TASCAM DR-60D... -
Page 54: Dual Recording File Names
CH2 MUTE Press the DATA dial or . button to select the other item. When using mid-side mics, turn the DATA dial to select , and press the DATA dial or / MODE 1 /2 MS MODE 3/4 button. TASCAM DR-60D... -
Page 55: Starting 4-Channel Recording
, and press the DATA dial or DELAY / button. Press the record (0) button again to start recording. 13. Turn the data dial to set the value according to the distance between mics. Range: (default value) to ± (in 1ms increments) 150ms TASCAM DR-60D... -
Page 56: File Names When Recording In 4-Channel
– 12dB – 24dB –48dB Press the DATA dial or . button to confirm the setting and return to item selection. Turn the DATA dial to select , and press the DATA END LEVEL dial or / button. TASCAM DR-60D... - Page 57 TRK INC: The unit pauses recording (resumes recording standby) when the input signal level falls below the for more than the time. END LEVEL END DELAY When the input signal level becomes higher than again, it starts recording to a START LEVEL new file. TASCAM DR-60D...
-
Page 58: Creating And Changeover To A New File During Continued
A new file cannot be created if the total number of files and has a unique name. folders would exceed 5000. NOTE Depending on the file format, the same maximum file size will have different recording lengths. TASCAM DR-60D... -
Page 59: Mark Function
Press the . or / button while pressing and holding the playing back the file using software or equipment that supports DATA dial during playback or when stopped. the BWF format. NOTE You cannot move to a mark in a different file. TASCAM DR-60D... -
Page 60: Recording The Moment Before Pushing Record (Pre Rec)
NOTE • If recording is started less than two seconds after entering record standby, the sound since entering recording standby will be recorded. • If you turn the pre-recording function on, turn the recording delay function off. TASCAM DR-60D... -
Page 61: Self-Timer Function
Press the record (0) or play (7) button. Recording will start after the set time period. NOTE • This function cannot be used when recording is paused in the middle of recording. • Self-timer function is not possible when using the AUTO REC function. TASCAM DR-60D... -
Page 62: Setting Auto Tone Length
Home Screen. D ISABLE ENABLE When finished making the setting, press the stop (8) [HOME] button to return to the Home Screen. NOTE To prevent accidental operation, the SLATE button will not function if pressed continuously. TASCAM DR-60D... -
Page 63: Recording Duration
The recording times shown above are not continuous recording times, but rather they are the total possible recording times for the SD/ SDHC card. If recorded in mono in WAV files, the maximum recording time will be double the figures above. For dual and 4-channel recording in WAV/BWF format, the recording times are about half those shown above. TASCAM DR-60D... -
Page 64: Working With Files And Folders (Browse Screen)
When a file or folder is selected, press the QUICK button to If you connect the DR-60D with a computer by USB, or mount open the quick menu pop-up window. the SD card on a computer using a card reader or other input,... -
Page 65: Icons On The Browse Screen
Press the DATA dial again or press the stop (8) [HOME] button This icon shows folders that do not contain subfolders. to return to the screen. BROWSE Open folder The contents of the folder marked with this icon currently appear on this screen. New folder Create a new folder. TASCAM DR-60D... -
Page 66: Folder Operations
Press the DATA dial to erase the files or press the stop (8) [HOME] button to cancel. NOTE You cannot erase read-only files and files that are not recognized by this unit. TASCAM DR-60D... -
Page 67: Creating A New Folder
NEW FOLDER does not exist in the second-level folders. A newly created folder becomes the current one, and new recorded files are saved in this folder. If the playback area has been set to FOLDER, this folder becomes the playback area. TASCAM DR-60D... -
Page 68: Playback
Turn the DATA dial to set the playback area. ALL FILES: Set the playback area as all files in the Music Folder on the SD card. FOLDER (default value): Set the playback area as all the files in the currently selected folder. TASCAM DR-60D... -
Page 69: Selecting A Folder For The Playback Area (1)
Screen is displayed. Use the . or / button to select a folder level, and Turn the DATA dial to select a folder. For an explanation of how to use the Browse Screen, see “Screen navigation” on page 64. TASCAM DR-60D... -
Page 70: Selecting A Folder For The Playback Area (2)
The 8 icon appears on the display when playback is stopped at the beginning of a file, and the 9 icon appears when playback is stopped in the middle of a file (paused). • To change files, press the . or / button as many times as necessary. TASCAM DR-60D... -
Page 71: Playback
The selected file is played once without repeating. The icon NOTE appears on the Home Screen. Press and hold the . or / button to accelerate the search 1 REPEAT: speed. The current file is played repeatedly. The icon appears on the Home Screen. TASCAM DR-60D... -
Page 72: Moving Back A Few Seconds For Replay (Jump-Back Playback)
Turn the DATA dial to set the jumpback time in seconds. Options: – (default 1 SEC . 1 0 SEC . 20 SEC . 30 SEC . value: 3sec When finished making the setting, press the stop (8) [HOME] button to return to the Home Screen. TASCAM DR-60D... -
Page 73: Quick Button Operations
EQ and mic input gain Pause Quick menu during playback on the Home Screen Level align, playback EQ and mic input Home Playback gain Screen Recording Standby/ Mic input gain Recording screen Operations for the selected file of folder BROWSE TASCAM DR-60D... -
Page 74: Opening The Quick Menu
(See “Setting mic input gain with the quick menu” (Quick Delete)” on page 75.) on page 78.) DIVIDE: The current file can be divided. (See “Dividing the selected file (DIVIDE)” on page 75.) Quick menu when recording or in recording standby TASCAM DR-60D... -
Page 75: Closing The Quick Menu
Screen. Push the stop (8) [HOME] button to cancel deletion and return to the Home Screen. NOTE If the currently selected file was recorded using dual-recording or four-channel recording, both files recorded at that time will be deleted. TASCAM DR-60D... - Page 76 TASCAM_0003aS12.wav (part before division point) TASCAM_0003aS34.wav (part before division point) TASCAM_0003bS12.wav (part after division point) TASCAM_0003bS34.wav (part after division point) • If the currently selected file was made using dual-recording or four-channel recording, both files recorded at that time will be divided. TASCAM DR-60D...
-
Page 77: Increasing The Perceived Overall Sound Pressure To Enhance Listenability (Level Alignment)
Turn the DATA dial to select LEVEL ALIGN When stopped During playback Press the DATA dial to open a pop-up menu where you can turn the level align function on or off. When stopped TASCAM DR-60D... -
Page 78: Using The Playback Equalizer
DATA dial to turn the equalizer on and return to the home screen (default value: OFF). When on, the icon appears on the Home Screen during playback. When off, the icon appears on the Home Screen during playback. TASCAM DR-60D... -
Page 79: Mixer
Use this MODE mode to monitor when recording with a mid-side mic. Use this also when playing back mid-side files that were recorded without decoding. 4-channel mode Turn the DATA dial to select the item you want to change. TASCAM DR-60D... -
Page 80: Using The Ms Decoder
CH1 /2 NOTE is selected on the screen, the item will REC MODE SOURCE not be shown and does not need to be set. MS MODE Is selected on the screen, set REC MODE MS MODE 1 /2 TASCAM DR-60D... -
Page 81: Decoding The Playback Sound
MIXER MS MODE Item Setting range Operation details WIDE 0–100 Adjusts the width of the sound Start playback to decode during playback. , mid is 100%. As the number increases, the amount of side signal increases. TASCAM DR-60D... -
Page 82: Connecting With A Computer
NOTE • Make sure that the SD card is inserted properly. Instead of using USB to connect the DR-60D and a computer, you can also conduct the same operations by removing the SD card NOTE from the DR-60D and connecting it directly to a computer that If the USB cable is connected to the unit when batteries has been has a built-in SD card slot or by using a card reader. -
Page 83: Transferring Files To A Computer
The DR-60D cannot recognize subfolders and audio files on the third level or below. • Since you can set the DR-60D to only play the contents of a specific folder, you can organize files into genres, artists or other categories as you like. -
Page 84: 10 - Settings And Information
Use the Screen to view various types of information INFORMATION FILE pages. about your DR-60D. Press the MENU button to open the screen. MENU Turn the DATA dial to select... -
Page 85: Card Information Page
10 – Settings and Information Card information page System information page page shows the status of the currently inserted page shows information about the DR-60D’s CARD (2/3) SYSTEM (3/3) SD card. system settings and firmware version. TOTAL MUSIC AUTO PWR SAVE Shows the number of playable files contained by the Music This shows the time set for the automatic power saving function. -
Page 86: System Settings And Formatting (System)
Options: (factory setting) +24V +48V Options: (automatic power saving is disabled, default NOTE value), 3min 5min 10min 30min Battery power will be consumed faster when set to +48V than when set to +24V. TASCAM DR-60D... -
Page 87: Restoring The Factory Settings
“MUSIC” and “UTILITY” folders as well as the “dr-1. Press the DATA dial button again to open a confirmation sys” file that is necessary to use the SD card with the DR-60D. pop-up window. Turn the DATA dial to select... -
Page 88: Setting The Format Of File Names
! # $ % & ' ( ) + , - . ; = @ [ ] ^ _ ` { } ~ Resetting the number (COUNT) , and press the DATA dial button to execute it. Select COUNT INIT The next file created after this will have the number “0001” after the characters set using the item. WORD TASCAM DR-60D... -
Page 89: 11 - Using The Remote Jack
11 – Using the REMOTE jack This unit has a REMOTE jack to which you can connect a TASCAM Turn the DATA dial to select , and press the DATA CONTROLLER RC-3F footswitch-type remote control or TASCAM RC-10 wired dial or / button. -
Page 90: Using The Footswitch
Press a pedal on the footswitch to operate the unit. The function of each pedal corresponds to the assignment shown on the REMOTE screen. Remote control (TASCAM RC-10) When finished making the setting, press the Stop (8) [HOME] button to return to the Home Screen. Using the wired remote control... -
Page 91: 12 - Messages
12 – Messages The following is a list of the popup messages that might appear on the DR-60D under certain conditions. Refer to this list if one of these popup messages appears and you want to check the meaning or determine a proper response. - Page 92 No SD card is in the unit. Install a recordable SD card. No PB File There is no file that can be played back. The file might be damaged. No Audio File DIVIDE cannot be executed because there is no audio file. TASCAM DR-60D...
- Page 93 Remote Rx batteries, disconnect the TASCAM PS-P515U AC adaptor (sold separately), and/or disconnect the USB cable for bus power supply. If the error message continues to appear frequently, please contact a TASCAM Customer Support (see System Err 50 the back cover for details).
-
Page 94: 13 - Troubleshooting
If you are having trouble with the operation of this unit, please try the following before seeking repair. If these measures do not solve the problem, please contact the store where you bought the unit, an authorized distributor or a TASCAM Customer Support (see the back cover for details). - Page 95 8 This unit’s files do not appear on the computer. • Confirm that the unit is connected to the computer using its USB port. • Confirm that USB hubs are not used. • Confirm that the unit is not recording or in recording standby mode. TASCAM DR-60D...
-
Page 96: 14 - Specifications
CAMERA OUT jack Input impedance: 2kΩ Connector: φ3.5mm (1/8”) stereo mini jack Phantom power: 48V±4V(10mA/CH) or 24V±4V(10mA/CH) Output impedance: 200 Ω Maximum input level: 0dBu Standard output level: −50 dBV Minimum input level: −72dBu Maximum output level: −30 dBV TASCAM DR-60D... -
Page 97: Control Input And Output
Computer compatibility Control input and output For the latest information on compatible operating systems, check the TASCAM website (http://tascam.com/). USB jack Windows Connector: USB Mini-B Type Format: USB 2.0 HIGH SPEED mass storage class... -
Page 98: Other Specifications
Four AA batteries (Alkaline or Ni-MH) not used) USB bus power supplied from a computer When using Ni-MH batteries (eneloop pro) AC adaptor (TASCAM PS-P515U, sold separately) Continuous External battery pack designed for this unit (TASCAM BP-6AA, sold Format operating time Note separately) (hours: minutes) -
Page 99: Dimensional Drawings
44.1kHz/16-bit WAV files not used) • Specifications and external appearance may be changed without notification to improve the product. NOTE When using phantom power, the continuous operating time will become shorter depending on the microphone used. TASCAM DR-60D... - Page 100 User registration Customers in the USA, please visit the TASCAM DR-60D website (http://tascam.com/) to register as a user online. TEAC CORPORATION Phone: +81-42-356-9143 http://tascam.jp/ 1-47 Ochiai, Tama-shi, Tokyo 206-8530 Japan TEAC AMERICA, INC. Phone: +1-323-726-0303 http://tascam.com/ 7733 Telegraph Road, Montebello, California 90640 USA TEAC MEXICO, S.A.