Table of Contents
Advertisement
Quick Links
Advertisement
Table of Contents

Related Manuals for Roland Classic Keyboard C-230


Summary of Contents for Roland Classic Keyboard C-230
- Page 1 Owner’s Manual...
- Page 2 For C.A. US ( Proposition 65 ) For the U.K. For EU Countries This product complies with the requirements of EMC Directive 2004/108/EC. For the USA For Canada...
- Page 3 The manual should be saved and kept on hand as a convenient reference. Copyright © 2009 ROLAND EUROPE All rights reserved. No part of this publication may be reproduced in any form without the written permission of ROLAND EUROPE Spa.
-
Page 4: Using The Unit Safely
......................your retailer, the nearest Roland Service Center, 008c or an authorized Roland distributor, as listed on • Be sure to use only the AC adaptor supplied with the “Information” page when: the unit. Also, make sure the line voltage at the •... - Page 5 • Before using the unit in a foreign country, consult ......................110b with your retailer, the nearest Roland Service • Whenever you suspect the possibility of lightning Center, or an authorized Roland distributor, as in your area, disconnect the AC adaptor from the listed on the “Information”...
-
Page 6: Important Notes
If you are can be the cause of malfunction, such as keys ceasing to unsure of the connection method, contact the nearest Roland produce sound. Service Center, or an authorized Roland distributor, as listed •... -
Page 7: Using Usb Memory
IMPORTANT NOTES Using USB Memory • When connecting USB memory, firmly insert it all the way in. • Do not touch the pins of the USB memory connector, or allow them to become dirty. • USB memory is made using high-precision electronic compo- nents, so please observe the following points when handling •... -
Page 8: Table Of Contents
Contents USING THE UNIT SAFELY...............4 IMPORTANT NOTES ..............6 Introduction ................10 About this owner’s manual........................10 Main features............................. 10 Panel Descriptions ..............11 Front Panel..............................11 Jack Panel..............................12 Getting Ready to Play..............13 Connect the AC adaptor.......................... 13 Turning the power on/off........................14 Using optional headphones ........................ - Page 9 Local On/Off setting ........................41 Using the V-LINK function ......................42 Sound lists .................43 MIDI Implementation Chart ............44 Specifications................45...
-
Page 10: Introduction
Introduction There’s also a Transpose function, which makes it easy to About this owner’s manual transpose the pitch for additional ways to vary your performance. When you’ve finished assembling the stand, please read the section No maintenance and easy pitch changes “Getting Ready to Play”... -
Page 11: Panel Descriptions
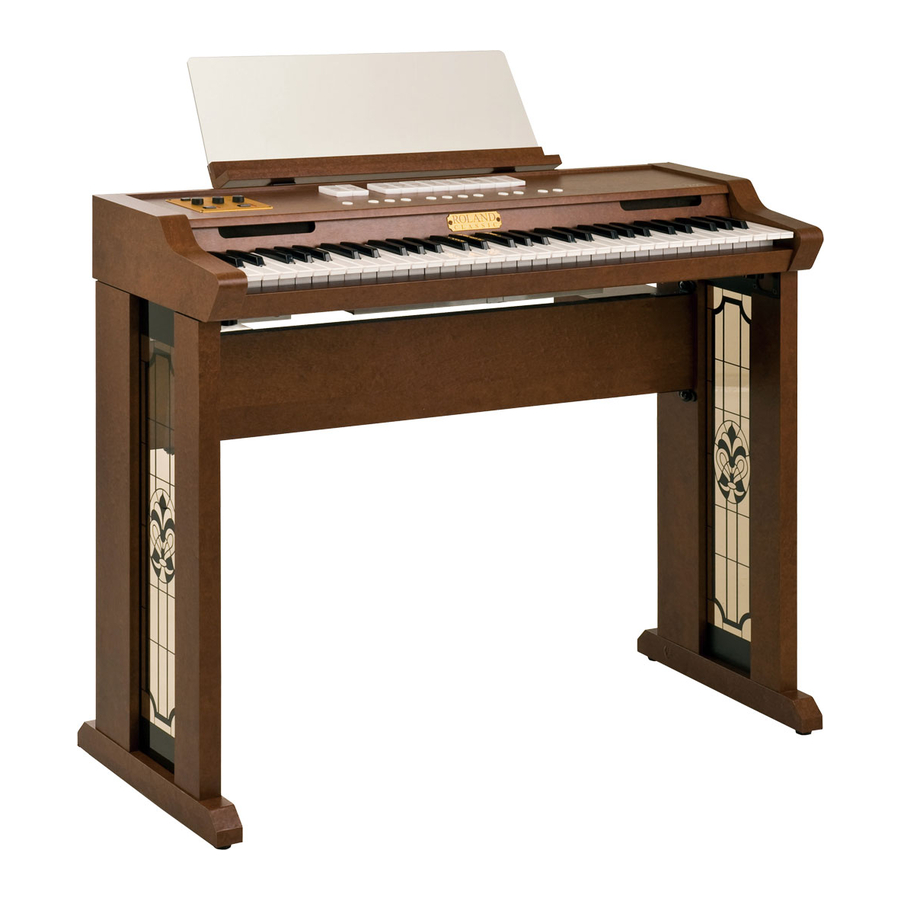
Panel Descriptions Front Panel [Power] Switch [Reverb] Knob This switch turns the This knob adjusts the depth of the power on/off. reverberation effect. [Satellite Volume] Knob [Volume] Knob This knob sets the level of the supplied satellite speakers. This knob adjusts the volume. [Pitch] Button/Indicators [Temperament] Button/ Indicators... -
Page 12: Jack Panel
PHONES jack This port is mainly intended for compact storage This jack allows you to con- devices, like a USB Flash memory (Roland nect a pair of headphones (sep- M-UF-series). You can use it to save the songs arately available). -
Page 13: Getting Ready To Play
(see figure) with an external ground. When the unit is grounded, a slight hum may occur, depending on the particulars of your installation. If you are unsure of the connection method, contact the nearest Roland Service Center, or an authorized Roland distributor, as listed on the “Information” page. Unsuitable places for connection •... -
Page 14: Turning The Power On/Off
Getting Ready to Play Turning the power on/off Always make sure to have the volume level turned down before switching on power. Even with the volume all the way down, you may still hear some sound when the power is switched on, but this is normal, and does not indicate a malfunction. Turning the power on Press the [Power] switch. -
Page 15: Using Optional Headphones
Getting Ready to Play Using optional headphones If you connect optional headphones, sound will no longer be produced from the C-230’s internal and satellite speakers. You will hear only the sound from the headphones. This lets you enjoy practicing at night or at other times when you might not wish to be heard by other people nearby. -
Page 16: Playing
Playing <Basic Operation> Adjusting the volume Turn the [Volume] knob to adjust the overall volume. Turning the knob clockwise will increase the volume, and turning it counterclockwise will decrease the volume. The [Volume] knob changes the level of both the internal and the satellite speakers (as well as the level in optional head- phones you may have connected). -
Page 17: Choosing A Sound
Playing <Basic Operation> Choosing a sound The C-230 provides four separate sound sections: Organ (ORGAN BASS + CLASSIC ORGAN), Harpsichord, Fortepiano and Others. Only one of the following sections can be used at any one time: Organ or Harpsichord or Fortepiano. The Others section can be combined with the organ section (allowing you to play several sounds simultaneously). -
Page 18: Playing A Harpsichord Sound
Playing <Basic Operation> By connecting an optional PK-5A MIDI pedal board to the C-230’s MIDI IN connector, you can play the bass organ part in polyphonic mode. In that case, the left half of the C-230’s no longer triggers the Organ Bass part. Playing a harpsichord sound Press the Harpsichord button for the sound that you want to play. -
Page 19: Playing Other Sounds (Others)
Playing <Basic Operation> Playing other sounds (Others) The C-230 contains 18 “Others” sounds that can be assigned to the [Celesta] and [Chime] buttons. By default, these buttons select the Celesta and Chime sounds respectively. The “Others” sounds can be played either separately or in combination with your current Organ selection. -
Page 20: Selecting A Classical Tuning (Pitch)
Playing <Basic Operation> Selecting a classical tuning (Pitch) If you’re playing the C-230 together with other instruments in an ensemble, you can adjust the pitch of the C-230 to match the other instruments if necessary. • You can adjust the C-230’s reference pitch by choosing one of three fixed settings: A= 440Hz (default), 415Hz (Baroque pitch) or 392Hz (Versailles pitch). -
Page 21: Additional Convenient Functionality
Additional Convenient Functionality <Advanced Operation> Listening to the demo songs The C-230 contains 22 pieces that allow you to audition its sounds. These pieces are called “demo songs”, because they demonstrate the C-230’s capabilities. The demo songs are divided over 4 banks (see the table on p. 22). While holding down the [Function] button, press the Demo playback will continue repeating all available [Demo] (PLAY/PAUSE) button. - Page 22 Additional Convenient Functionality <Advanced Operation> The four banks contain the following demo songs: Harpsichord button Bank 1 (8’ I) Bank 2 (8’ II) Bank 3 (4’) Bank 4 (Lute) Type (Organ songs) (Harpsichord songs) (Fortepiano I songs) (Fortepiano II/Celesta songs) J.S.
-
Page 23: Changing The Pitch Of The Keyboard (Transpose)
Additional Convenient Functionality <Advanced Operation> Changing the pitch of the keyboard (Transpose) You can transpose your playing without changing the position at which you play the keys. For example, if you’re playing a song in a difficult key signature that contains numerous sharps ( ) or flats ( ), you can transpose the pitch of the keyboard and play the piece in an easier key. -
Page 24: Matching The Pitch Of Another Instrument (Tuning)
Additional Convenient Functionality <Advanced Operation> Matching the pitch of another instrument (Tuning) If you’re playing the C-230 together with other instruments in an ensemble, you can adjust the pitch of the C-230 to match the other instruments if necessary. • You can adjust the reference pitch of the C-230 in the •... -
Page 25: Additional Functions For The Classic Organ Sounds
Additional Convenient Functionality <Advanced Operation> Additional functions for the Classic Organ sounds General procedure Before showing you how to use the C-230’s memories and TUTTI/CANCEL functions, here is an overview: Enter Function mode by holding down the [Function] button and pressing the [REC] button. Press one of the following buttons to select a memory or setting: Button Function... -
Page 26: Saving Your Organ Registration Memories
Additional Convenient Functionality <Advanced Operation> Saving your organ registration memories To save your own registration (ORGAN BASS, CLASSIC Press and hold the Harpsichord button that ORGAN and Others button), follow the instructions below. corresponds to the memory where you want to save your settings. -
Page 27: Configuring Your Own 'Tutti' Setting
Additional Convenient Functionality <Advanced Operation> Configuring your own ‘Tutti’ setting Even though “Tutti” means that all organ tilt tabs are used, the C-230 allows you to configure your own TUTTI function that activates the desired tilt tabs (but not necessarily all of them) when pressed. If you like, your own TUTTI registration can even select the desired ORGAN BASS, CLASSIC ORGAN and Others voices (see pages 28 and 29) and switch on the [Celesta] and/or [Chime] button. -
Page 28: Choosing Different Organ Voices And Setting Their Volume (Voice Palette)
Additional Convenient Functionality <Advanced Operation> Choosing different organ voices and setting their volume (Voice Palette) Choosing a different voice for a tilt Changing the volume of each tab (Voice Palette function) Palette voice The C-230 contains 4 different voices for each of the 2 You can also set the volume of the newly selected voice ORGAN BASS and the 9 CLASSIC ORGAN tilt tabs. -
Page 29: Choosing Different Others Sounds And Setting Their Volume
Additional Convenient Functionality <Advanced Operation> Choosing different Others sounds and setting their volume Selecting a different ‘Others’ sound You can also select different sounds while both the As stated above, the C-230 provides 9 different sounds [Celesta] and the [Chime] button light. for the [Celesta] and [Chime] buttons. -
Page 30: Saving Your Settings To The Global Area
Additional Convenient Functionality <Advanced Operation> Saving your settings to the Global area Some of the settings you make can be saved to the C-230’s Global area. The C-230 recalls those settings each time you switch it on. More specifically, the following can be saved to the Global area: Voice Palette, volume of each Palette, Others sounds, volume of each Others sound. -
Page 31: Layering Harpsichord Sounds
Additional Convenient Functionality <Advanced Operation> Layering harpsichord sounds The C-230 allows you to play up to three harpsichord sounds simultaneously, creating a richer sound. Simultaneously press the Harpsichord buttons for the You can’t layer a harpsichord sound with an ORGAN, sounds you want to layer, making their indicators light. -
Page 32: Using The C-230'S Internal Recorder
Additional Convenient Functionality <Advanced Operation> Using the C-230’s internal recorder The C-230 contains a “Song Recorder” function you can use to record your own performances that you can save (and play back) as many songs as the USB memory device connected to the USB MEMORY port will hold, for a maximum of 99 songs. The recorder not only memorizes the notes you play, but also the sounds you use (organ with or without “Others”, harpsichord or fortepiano). -
Page 33: Playing Back Your Recorded Song
Additional Convenient Functionality <Advanced Operation> Playing back your recorded song To listen to your new (or a previously recorded) song, proceed as follows: To temporarily stop playback, press [PLAY/PAUSE] Press the [PLAY/PAUSE] button (it lights) to start again (the button flashes). Press it again to resume playback. -
Page 34: Playing Back Songs On A Usb Memory Stick
Additional Convenient Functionality <Advanced Operation> Playing back songs on a USB memory stick You can play back the songs stored on a USB storage device connected to the C-230. Given the possibility to work with external USB storage devices, you might be tempted to copy Standard MIDI Files to that device (using your computer, for instance) and play them back using the C-230. -
Page 35: Loading The Factory Settings
Additional Convenient Functionality <Advanced Operation> Loading the factory settings If necessary, you can erase all settings you have saved inside the C-230 and instead load the settings the C-230 contained when you first bought it. While holding down the lower part of the [SUBBASS The following procedure will erase all settings you have 16] tilt tab, press the [Lute] button. -
Page 36: Playing Through External Speakers/Recording Your Performance Using An Audio Device
Additional Convenient Functionality <Advanced Operation> Playing through external speakers/Recording your performance using an audio device You can connect external speakers or a mixing console to the OUTPUT jacks for performance on stage, or connect a recorder to record your playing. Audio Recorder (Only one of these can be connected:... -
Page 37: Using An Optional Sustain Pedal
Additional Convenient Functionality <Advanced Operation> Using an optional sustain pedal An optional sustain pedal can be connected to the C-230’s SUSTAIN jack and used as the damper pedal of a piano. If you press the pedal while performing, the decay will extend even after you take your fingers off the keyboard. This function is only available when you select a harpsichord or fortepiano sound. -
Page 38: Listening To An External Device's Sound Through The C-230'S Speakers
Additional Convenient Functionality <Advanced Operation> Listening to an external device’s sound through the C-230’s speakers You can input the sound from a MP3 player or other audio device connected to the INPUT jacks, and hear it through the C-230’s speakers. To prevent malfunction and/or damage to speakers or To change the volume, make adjustments on your other devices, always turn down the volume, and turn... -
Page 39: Adjusting The Input Volume
Additional Convenient Functionality <Advanced Operation> Adjusting the input volume You can make adjustments on the C-230 to regulate the volume being input from your external audio device to the INPUT jacks. The volume may change abruptly when you adjust the volume of the input from an external device, so you should turn the C-230's [Volume] knob counterclockwise to lower the volume before you make this adjustment. -
Page 40: Connecting The C-230 With Midi Equipment
Additional Convenient Functionality <Advanced Operation> Connecting the C-230 with MIDI equipment You can use the MIDI OUT socket to connect external devices, like a sequencer, you want to control with your C-230. You can use the MIDI IN socket to connect external devices, like a sequencer. We suggest you connect an optional PK-5A MIDI pedalboard to the C-230’s MIDI IN socket to play the bass part in polyphonic mode. -
Page 41: Local On/Off Setting
Additional Convenient Functionality <Advanced Operation> Local On/Off setting If you’ve connected the C-230 to a MIDI sequencer, you should set the C-230 to the Local Off state. Most sequencers enable their Thru function, so that the notes that you play on the keyboard or that are played back by the recorder will reach the sound generator section by both routes (1) and (2) if the C-230 is in the Local On state, causing notes to be sounded in duplicate, or to be cut off unnaturally. -
Page 42: Using The V-Link Function
Additional Convenient Functionality <Advanced Operation> Using the V-LINK function V-LINK ( ) is a function that allows music and images to be performed together. By using MIDI to connect two or more V-LINK compatible devices, you can easily enjoy performing a wide range of visual effects that are linked to the expressive elements of a music performance. -
Page 43: Sound Lists
Sound lists Classic Organ voices VOICE 1 (default) VOICE 2 VOICE 3 VOICE 4 Principal 8 Open Diapason 8 Montre 8 Prinzipal 8 Gemshorn 8 Diapason 8 Geigen Diap Gambe 8 Gedackt 8 SpitzGeign 8 Fl. Harmonique 8 Stl.Gedackt Octava 4 Principal 4 Prestant 4 Fugara 4... -
Page 44: Midi Implementation Chart
MIDI Implementation Chart MIDI Implementation Chart [Classic Keyboard] Date: April 2009 Model: C-230 Version: 1.00 Function... Transmitted Recognized Remarks Basic Default 1, 12, 13, 14, 16 1, 12, 13, 14, 11 1= Harpsichord, & Fortepiano, Channel Changed 12= Classic Organ, 13= Others, 14= Organ Bass, 11= Reverb, 16= V-LINK Mode... -
Page 45: Specifications
Specifications C-230: Classic Keyboard Keyboard 61 keys <Sound Generator> Maximum Polyphony 128 voices 36 organ voices (9 tilt tabs x 4 voices) (see p. 43) 8 organ bass voices (2 tilt tabs x 4 voices) Tones 4 harpsichord sounds (8’I, 8’II, 4’, Lute) 2 fortepiano sounds (I, II) 18 other sounds (can be added to the organ voices) Effect... - Page 46 Information When you need repair service, call your nearest Roland Service Center or authorized Roland distributor in your country as shown below. PHILIPPINES CURACAO URUGUAY NORWAY JORDAN AFRICA G.A. Yupangco & Co. Inc. Zeelandia Music Center Inc. Todo Musica S.A.
- Page 47 For EU Countries For China...
- Page 48 602.00.0336.01 RES 717-09 C-230 E...