Table of Contents
Advertisement
Quick Links
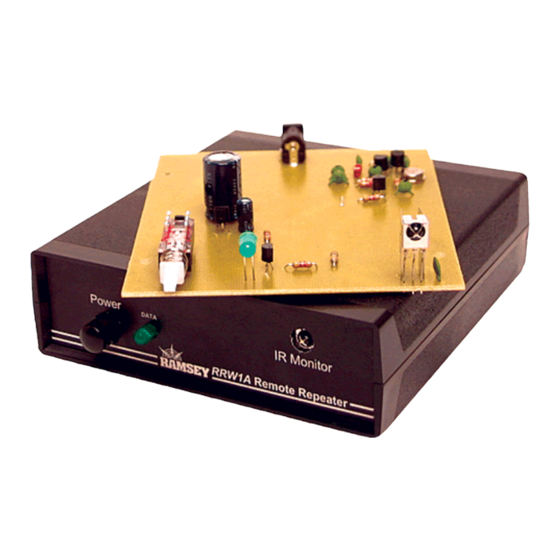
Ramsey Electronics Model No.
Have you ever been frustrated with the range of your remote
controls? Tired of having to bounce your IR remote off of
ceilings and walls? Do you want to run your system from
another room or floor? Here is the answer to your prayers!
Extend the range of your remote controls through walls, around
corners, and even from outdoors!
•
IR Receiver module with sensitive element can receive your
remote control's signal up to 36 feet away before re-broadcasting
it wirelessly!
•
The separate receiver (RRW1B) reconstitutes the radio signal
using a PIC micro-controller to restore noisy or weak signals and
then re-broadcasts the IR remote's signal to your components via
a wired high-efficiency IR LED.
•
Extend the range of your remote control to greater than 100 feet
wirelessly beyond the receive range of the IR sensor. Greater than
300 feet with a directional antenna pair (available separately).
•
Works with almost any remote control (38 kHz carrier), does not
need to be programmed.
•
Operate from 8V to 16V AC or DC. Use our AC125 wall adapters
for long operation.
•
LED indicator lets you know when you are receiving an IR signal
or not.
RRW1A • 1
RRW1A
Advertisement
Table of Contents

Related Manuals for Ramsey Electronics RRW1A


Summary of Contents for Ramsey Electronics RRW1A
- Page 1 Ramsey Electronics Model No. RRW1A Have you ever been frustrated with the range of your remote controls? Tired of having to bounce your IR remote off of ceilings and walls? Do you want to run your system from another room or floor? Here is the answer to your prayers!
- Page 2 Ramsey Electronics publication No. MRRW1A Rev 1.1 First printing: January 2002 MRW COPYRIGHT 2002 by Ramsey Electronics, Inc. 590 Fishers Station Drive, Victor, New York 14564. All rights reserved. No portion of this publication may be copied or duplicated without the written permission of Ramsey Electronics, Inc.
-
Page 3: Table Of Contents
Ramsey Publication No. MRRW1A Price $5.00 KIT ASSEMBLY AND INSTRUCTION MANUAL FOR RRW1A WIRELESS REMOTE REPEATER KIT (Transmitter) TABLE OF CONTENTS Introduction ..........4 Circuit Theory ........5 Learn As You Build .......7 Parts List ..........9 Assembly ..........10 Testing ..........14 Using the RRW1 Pair ......15 Schematic ..........16... -
Page 4: Introduction
(that is the Wife won’t let me!) just so the remote will work better. Instead I use the RRW1A in front of the couch someplace and have it relay the signal back to the RRW1B to control the equipment for me. - Page 5 RRW1 PAIR THEORY OF OPERATION The RRW1A (transmitter board) may look quite simple but there is actually quite a lot being done inside each one of the parts. Many individual compo- nents are packed inside of the IR receiver part (U2) itself; so many in fact that if it was built up with discrete components, it would never fit in this little kit case.
- Page 6 When the IR detector on the RRW1A (transmitter board) “sees” a 38 kHz IR signal, the output of the detector goes low (it is inverted). When there is no 38 kHz signal present the output idles high. On the output of the IR detector you won’t see the 38 kHz, just the data that the 38 kHz represents from your IR...
-
Page 7: Learn As You Build
(1). The part is then soldered securely to the board (2-4) and the remaining lead length is then clipped off (5). Notice how the solder joint looks on close up, clean and smooth with no holes or sharp points (6). RRW1A • 7... -
Page 8: Parts List
If a problem does occur, the manual will lead you through step by step in the troubleshooting guide until you find the problem and are able to correct it. RRW1A • 8... - Page 9 PARTS SUPPLIED WITH YOUR RRW1A (TRANSMITTER) KIT Capacitors 1 2.2 pF ceramic capacitor (marked 2.2) [C7] 1 8.2 pF ceramic capacitor (marked 8.2) [C8] 3 47 pF ceramic capacitors (marked 47) [C1,4,6] 1 0.001 uF ceramic capacitor (marked .001 or 102 or 1 nF) [C3] 1 0.01 uF ceramic capacitor (marked .01 or 103 or 10 nF) [C2]...
-
Page 10: Assembly
ASSEMBLY OF THE RRW1A Assembly of the RRW1A is straight forward but it does require some time and patience. To get our bearings, we will start by mounting the power jack and move on from there. It serves as a good reference point for the other parts. - Page 11 22. Install C5, a 0.1 uF ceramic capacitor (marked .1 or 104 or 100 nF). This bypass capacitor reduces any noise on the power supply line just before going into U1. We don’t want any noise here to give us false data pulses! RRW1A • 11...
- Page 12 30. Install S1, the power switch. Solder one pin and make sure the switch RRW1A • 12...
-
Page 13: Testing
433.42 MHz (AM mode), you can verify that the oscillator is working. Tune the radio for 433.42 MHz and turn on the RRW1A power switch (S1). Press a but- ton on the remote control and you should be able to hear the data stream be- ing transmitted from the RRW1A. - Page 14 If you are not lucky enough to have a radio that can receive 433.42 MHz, the next best way to check the RRW1A transmitter is by using an RRW1B re- ceiver. You just need to have faith that you have assembled everything cor-...
- Page 15 Your remote’s sig- nal can be picked up by the IR receiver (RRW1A) up to 36 feet away. It can then broadcast that signal with the included antenna more than 100 feet. Now run the IR LED emitter wire from the RRX1B as long as you like up to 300 feet or so (I’ve used up to 750 feet while testing!).
- Page 16 RRW1A • 16...
-
Page 17: Parts Layout Diagram
RRW1A PARTS LAYOUT DIAGRAM RRW1A • 17... -
Page 18: Troubleshooting
• AC supply = 6 to 12 VAC or DC supply = 8 to 16 VDC @ 100 mA (+ tip) • Current draw with a 12VDC source averages about 20 mA (RRW1A). Dimensions: • PCB size: 4.0” x 4.7”... -
Page 19: Warranty
But on rare occasions a sour component can slip through. All our kit parts carry the Ramsey Electronics Warranty that they are free from defects for a full ninety (90) days from the date of purchase. Defective parts will be replaced promptly at our expense. If you suspect any part to be defective, please mail it to our factory for testing and replacement. -
Page 20: Using The Rrw1 Pair
RRW1A REMOTE REPEATER KIT Quick Reference Page Guide Introduction ..........4 Theory of Operation ......5 Parts List ..........9 Assembly ..........10 Testing ..........14 Using the RRW1 Pair ......15 Schematic ..........16 Parts Layout ........17 Troubleshooting ........18 RRW1A Specifications ......18 Warranty ..........19 REQUIRED TOOLS •...