
Related Manuals for Pioneer DVR-A03-J


Summary of Contents for Pioneer DVR-A03-J
- Page 1 DVD-R/RW CD-R/RW WRITER LECTEUR DE DVD-R/RW, CD-R/RW DVR-A03 Operating Instructions Mode d’emploi...
- Page 3 Safety instructions ............... English ..................Français ..................
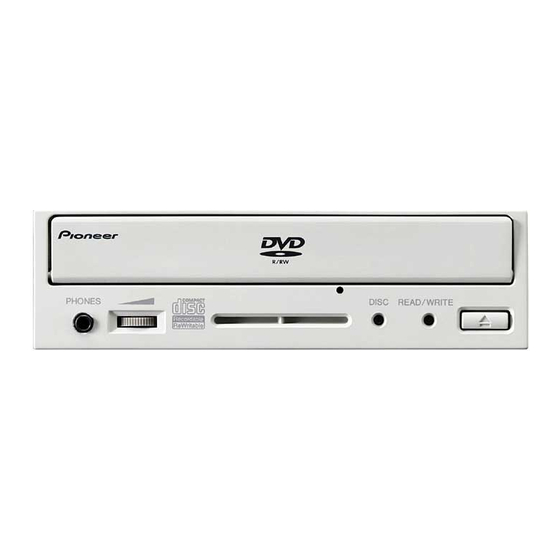
- Page 9 PHONES DISC READ/WRITE...
- Page 10 Pin 1 Pin 1 Pin 1 Pin 1 Pin 1...
- Page 12 Pin 1 DC INPUT +5 G G +12 “PIONEER DVD-RW DVR-103”...
- Page 16 •...
- Page 18 DANGER – VISIBLE AND INVISIBLE LASER RADIATION WHEN OPEN. AVOID DIRECT EXPOSURE TO BEAM.
- Page 19 (2) this device must accept any interference received, including interference that may cause un- desired operation. Product Name: DVD-R/RW CD-R/RW WRITER Model Number: DVR-A03-J Responsible Party Name: PIONEER ELECTRONICS (USA) INC. Address: 1925 E. DOMINGUEZ ST. LONG BEACH, CA 90810 U.S.A. Phone: (310) 952-2820...
-
Page 20: Important Notice
Thank you for buying this Pioneer product. Please read through these operating instructions so you will know how to operate your model properly. After you have finished reading the instructions, put them away in a safe place for future reference. -
Page 21: Safety Instructions
POWER SOURCES - Operate this product from the type of power source indicated on the marking label. If you are not sure of the type of power available, consult Authorized Pioneer Dealer. OVERLOADING - DO NOT overload wall outlets and extension cords. Doing so can result in fire or electric shock. -
Page 22: About Region Codes
FEATURES Write Speed CLV 1X and 2X at DVD-R CLV 1X at DVD-RW CLV 4X and 8X at CD-R CLV 4X at CD-RW Maximum Read Speed CAV 4X at DVD-ROM CAV 24X at CD-ROM Buffer Memory Size : 2Mbyte(Write), 512 KBytes (Read) IDE Data Transfer Mode : PIO Mode 4/Multi Word DMA Mode 2 Supports Video CD... -
Page 23: Front View
INTERFACE FRONT VIEW PHONES DISC READ/WRITE 1 Disc Loading Tray Open the loading tray by pressing the eject button, then place a CD or DVD disc into the slit with the label facing up. Press the eject button or push the front part of tray to load the tray with the disc. 2 Headphone Jack (PHONES) Stereo mini jack for head-phone. -
Page 24: Rear View
INTERFACE REAR VIEW Pin 1 Pin 1 Pin 1 Pin 1 Pin 1 9 Digital Audio Output This is a connector for output of digital audio signal. Name Function Ground. Digital Out Digital audio signal output. 0 Audio Output This is a connector for output of analog audio. This connector is compatible with `Molex 70553`, choose a suitable connection cable. -
Page 25: Installation
INSTALLATION 1 Turn off the power supply of the personal computer, and remove the cover or the front panel. 2 Remove the blank panel installed on the front of the 5.25 inch slot. 3 Install the fixing slide rails on the drive. (When slide rails are required, please contact your shop or the computer manufacturer.) 4 Insert the drive into the slot. - Page 26 CONNECTIONS Digital audio output Pin 1 Audio Cable IDE Interface cable Power cable DC INPUT +5 G G +12 Connect the power cable from the personal computer. At the time of connection, pay attention to the polarity of the cable. Connect the IDE interface cable.
-
Page 27: Specifications
Limited warranty x 1 DVD-R drive application manual x 1 Operating instructions x 1 NOTE: • Specifications and design subject to possible modifications without notice, due to improvements. Published by Pioneer Corporation. Copyright C 2001 Pioneer Corporation. All rights reserved. - Page 28 Nous vous remercions pour cet achat d’un produit Pioneer. Nous vous demandons de lire soigneusement ce mode d’emploi ; vous serez ainsi à même de faire fonctionner l’appareil correctement. Après avoir bien lu le mode d’emploi, le ranger dans un endroit sûr pour pouvoir s’y référer ultérieurement.
-
Page 29: Instructions De Securite
SOURCES D’ALIMENTATION - Utiliser ce produit avec le type d’alimentation indiqué sur l’étiquette de fabrication. En cas de doute à propos du type d’alimentation disponible, consulter un revendeur Pioneer agréé. SURCHARGE - NE PAS surcharger les prises murales et les rallonges pour ne pas entraîner d’incendie ou de secousse électrique. - Page 30 CARACTERISTIQUES Vitesse d’écriture Vitesse linéaire constante 1X et 2X pour DVD-R Vitesse linéaire constante 1X pour DVD-RW Vitesse linéaire constante 4X et 8X pour CD-R Vitesse linéaire constante 4X pour CD-RW Vitesse de lecture maximale Vitesse angulaire constante 4X pour DVD-ROM Vitesse angulaire constante 24X pour CD-ROM Taille de la mémoire tampon : 2 Mo (écriture), 512 Ko (lecture)
-
Page 31: Vue Avant
INTERFACE VUE AVANT PHONES DISC READ/WRITE 1 Tiroir de chargement du disque Ouvrir le tiroir de chargement en appuyant sur la touche d’éjection, puis placez un CD ou un DVD dans l’emplacement prévu avec l’étiquette tournée vers le haut. Appuyer sur la touche d’éjection ou sur la partie avant du tiroir pour charger le disque. -
Page 32: Sortie Audionumérique
INTERFACE VUE DE LA FACE ARRIERE Broche 1 Broche 1 Broche 1 Broche 1 Broche 1 9 Sortie audionumérique Il s’agit d’un connecteur pour la sortie des signaux audionumériques. Broche Fonction Mise à la masse. Digital Out Sortie audionumérique. 0 Sortie audio Connecteur pour sortie analogique audio. - Page 33 INSTALLATION 1 Mettre l’ordinateur personnel hors tension et retirer le capot ou la face avant. 2 Retirer la plaque masquant de la fente de 5,25 pouces. 3 Poser les glissières de fixation sur le lecteur. (S'adresser au magasin ou au fabricant de l’ordinateur lorsque des glissières sont nécessaires.) 4 Introduire le lecteur dans la fente.
- Page 34 RACCORDEMENT Sortie audionumérique Broche 1 Câble audio Câble d’interface IDE Cordon d’alimentation DC INPUT +5 G G +12 Connecter le cordon d’alimentation de l’ordinateur personnel. Respecter la polarité du cordon lors du raccordement. Connecter le câble d’interface IDE. Confirmer que la broche 1 du connecteur IDE du lecteur est bien connectée à...
-
Page 35: Fiche Technique
Manuel d'application de lecteur de DVD-R x 1 Mode d’emploi x 1 REMARQUE: • Les caractéristiques techniques et présentation de ce produit sont sujets à des changements sans préavis pour améliorations. Publication de Pioneer Corporation. C 2001 Pioneer Corporation. Tous droits de reproduction et de traduction réservés. - Page 36 E-mail : bsc_tsc@post.pioneer.co.jp http://www.pioneer.co.jp Published by Pioneer Corporation. Copyright © 2001 Pioneer Corporation. All rights reserved. <TSZZF/01I00000> <DRC1173-A>...