
Related Manuals for Pioneer VSX-815-S/-K


Summary of Contents for Pioneer VSX-815-S/-K
- Page 1 AUDIO/VIDEO MULTI-CHANNEL RECEIVER VSX-515 -S/-K VSX-815 -S/-K VSX-915 -S/-K Operating Instructions...
- Page 2 IMPORTANT CAUTION RISK OF ELECTRIC SHOCK DO NOT OPEN The lightning flash with arrowhead symbol, CAUTION: The exclamation point within an equilateral within an equilateral triangle, is intended to TO PREVENT THE RISK OF ELECTRIC triangle is intended to alert the user to the alert the user to the presence of uninsulated SHOCK, DO NOT REMOVE COVER (OR presence of important operating and...
-
Page 3: Table Of Contents
Listening to station presets ... . . 56 Operating other Pioneer components ..25 Changing the frequency step ... . . 56... - Page 4 Direct function ..... . . 59 SR+ Setup for Pioneer plasma displays . . . 77 Clearing all the remote control settings ..59 Controls for TVs.
-
Page 5: Before You Start
Before you start Chapter 1: Before you start Introduction to home theater Checking what’s in the box You are probably used to using stereo Please check that you've received the following equipment to listen to music, but may not be supplied accessories: used to home theater systems that give you •... -
Page 6: Installing The Receiver
Before you start Ventilation When installing this unit, make sure to leave space around the unit for ventilation to improve heat dispersal (at least 20 cm at the top). If not enough space is provided between Illustration shows the VSX-815/915 model the unit and walls or other equipment, heat will build up inside, interfering with performance Caution... -
Page 7: 02 5 Minute Guide
5 minute guide Chapter 2: 5 minute guide Listening to Surround Sound This receiver was designed with the easiest possible setup in mind, so with the following quick setup guide, you should have your system hooked up for surround sound in no time at all. In most cases, you can simply leave the receiver in the default settings. - Page 8 5 minute guide Connect your speakers. A complete setup of eight speakers (including the subwoofer) is shown here but everyone’s home setup will vary. Simply connect the speakers you have in the manner shown below. The receiver will work with just two stereo speakers (the front speakers in the diagram) but using at least three speakers is recommended, and a complete setup is best.
- Page 9 5 minute guide Make sure that the speaker cable you’re using Press QUICK SETUP on the front panel to specify your speaker setup, room size and is properly prepared with about 10 mm of listening position. insulator stripped from each wire, with the exposed wire strands twisted together (fig.
-
Page 10: Using The Quick Setup
5 minute guide • Check the table below to find the speaker setup that corresponds with your system. Using the Quick Setup You can use the Quick Setup to get your system up and running with just a few button presses. -
Page 11: Quick Surround Sound Setup
Quick surround sound setup Chapter 3: Quick surround sound setup Automatically setting up for INPUT RECEIVER SOURCE SELECT surround sound (MCACC) RECEIVER SOURCE INPUT SELECT The Auto Multi-Channel Acoustic Calibration (MCACC) setup measures the acoustic MULTI CONTROL DVD/LD TV / SAT DVR/VCR TV CONT characteristics of your listening area, taking... - Page 12 Quick surround sound setup If the receiver is off, press RECEIVER to • ERR SBch – Check the surround back turn the power on. speaker connections. • ERR SW – Make sure the subwoofer has If you have a subwoofer, turn it on. been switched on and volume on the Press RECEIVER on the remote control, subwoofer is turned up.
-
Page 13: Other Problems When Using The Auto Mcacc Setup
Quick surround sound setup • CHK SP – Check the size and number of speakers you’ve connected (see page 51 for more on this) • CHK DIST. – Check the distance of your speakers from the listening position (see page 53 for more on this) •... -
Page 14: Connecting Up
Connecting up Chapter 4: Connecting up Digital audio cables Making cable connections Commercially available coaxial digital audio cables or optical cables should be used to Make sure not to bend the cables over the top connect digital components to this receiver. of this unit (as shown in the illustration). - Page 15 Connecting up S-video cables VSX-815/915 model only S-video cables give you clearer picture reproduction than standard RCA video cables by sending separate signals for the luminance and color. Component video cables VSX-815/915 model only Use component video cables to get the best possible color reproduction of your video source.
-
Page 16: Connecting A Dvd Player And Tv
Connecting up Connecting a DVD player and TV This page shows you how to connect your DVD player and TV to the receiver. Connect a coaxial digital audio output on your DVD player to the DIGITAL COAX 1 DIGITAL AUDIO OUT (DVD/LD) input on this receiver. -
Page 17: Connecting The Multichannel Analog
Connecting up Connecting the multichannel analog Connect a set of audio/video outputs on the set-top box component to the TV/SAT outputs AUDIO and VIDEO inputs on this receiver. For DVD Audio and SACD playback, your DVD Use a stereo RCA phono cable for the audio player may have 5.1 channel analog outputs.In connection and a standard RCA video cable for this case, you can connect the multichannel... -
Page 18: Connecting Other Audio Components
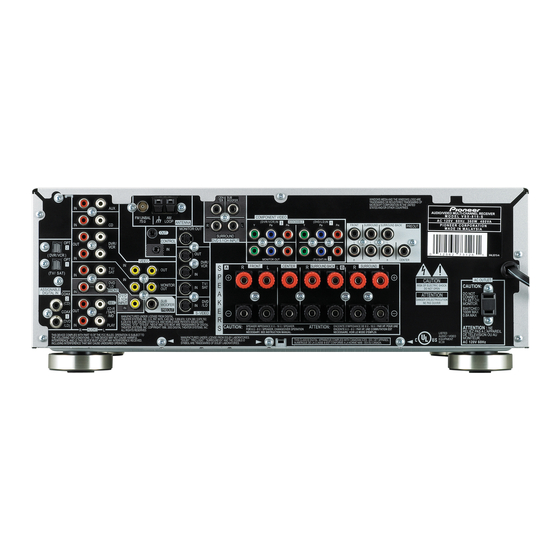
Connecting up This receiver* Connecting other audio components The number and kind of connections depends FM UNBAL DIGITAL OUT LOOP ANTENNA MONITOR OUT on the kind of component you’re connecting. Follow the steps below to connect a CD-R, MD, CONTROL DVR/ DAT, tape recorder or other audio component. -
Page 19: Connecting Other Video Components
Connecting up compatible player. However, the connected If your video component has a digital audio output, connect it to a digital input on PC, DVD player, set-top box, etc. must be able this receiver. to output WMA9 Pro format audio signals through a coaxial or optical digital output. -
Page 20: Using The Component Video Jacks
Connecting up Using the component video jacks Connecting to the front panel video terminal VSX-815/915 model only VSX-815/915 model only Component video should deliver superior picture quality when compared to composite Front video connections are accessed via the video. A further advantage (if your source and front panel using the VIDEO button. -
Page 21: Connecting Antennas
Connecting up Antenna snap connectors Connecting antennas Twist the exposed wire strands together and insert into the hole, then snap the connector Connect the AM loop antenna and the FM wire shut. antenna as shown below. To improve reception and sound quality, connect external antennas (see Using external antennas below). -
Page 22: Connecting The Speakers
Connecting up Connecting the speakers A complete setup of eight speakers (including the subwoofer) is shown here but everyone’s home setup will vary. Simply connect the speakers you have in the manner shown below. The receiver will work with just two stereo speakers (the front speakers in the diagram) but using at least three speakers is recommended, and a complete setup is best. -
Page 23: A And B Speaker Systems
Connecting up Hints on speaker placement Make sure that the speaker cable you’re using is properly prepared with about 10mm of Speakers are usually designed with a insulator stripped from each wire, with the particular placement in mind. Some are exposed wire strands twisted together (fig. - Page 24 Connecting up • To achieve the best possible surround The diagrams below show suggested surround sound, install your speakers as shown and surround back speaker orientation. The below. Be sure all speakers are installed first diagram (fig. A) shows orientation with one securely to prevent accidents and improve surround back speaker (or none) connected.
-
Page 25: Operating Other Pioneer Components
Connecting up Operating other Pioneer components VSX-815/915 model only Many Pioneer components have SR CONTROL jacks which can be used to link components together so that you can use just the remote sensor of one component. When you use a... -
Page 26: Controls And Displays
Controls and displays Chapter 5: Controls and displays Front panel Illustration below shows the VSX-815/915 model AUDIO/VIDEO MULTI-CHANNEL RECEIVER MULTI JOG ENTER ADVANCED ST/DIRECT SIGNAL DVD/LD TV/SAT DVR/VCR VIDEO CD-R/TAPE/MD TUNER STANDARD SURR /AUTO SURR SELECT MASTER LISTENING MODE VOLUME INPUT EXTENDED ACOUSTIC... - Page 27 Controls and displays LISTENING MODE buttons 16 EXTENDED MODE Selects the surround back channel mode STANDARD (page 41) or virtual surround back mode Press for Standard decoding and to switch (page 42). between the various Pro Logic IIx and 17 ACOUSTIC EQ Neo:6 options (page 36).
-
Page 28: Display
Controls and displays Display 8 9 10 40 125 250 4K13K 19 20 SIGNAL SELECT indicators 2 PRO LOGIC II x Lights to indicate the type of input signal: When the (STANDARD) Pro Logic II mode of the receiver is on, 2 PRO LOGIC II lights to AUTO indicate Pro Logic II decoding. -
Page 29: Remote Control (Vsx-815/915)
Controls and displays Lights when a broadcast is being received. Remote control (VSX-815/915) 11 Speaker indicators Lights to indicate the current speaker system, INPUT RECEIVER SOURCE A and/or B (VSX-815 – page 23, VSX-915– SELECT page 71). 12 Character display 13 Neo:6 When the (STANDARD) Neo:6 mode of the receiver is on, this lights to indicate Neo:6... - Page 30 Controls and displays MULTI CONTROL buttons Use to access the System Setup menu (see Press to select control of other components page 46). (see Controlling the rest of your system on CLASS page 64). Switches between the three banks Number buttons and other receiver/ (classes) of radio station presets (page 55).
- Page 31 Controls and displays Component control buttons HDD/DVD The main buttons ( , , etc.) are used to These buttons switch between the hard control a component after you have selected it disk and DVD controls for DVD/HDD using the MULTI CONTROL buttons. recorders.
- Page 32 Controls and displays EFFECT/CH SEL ERASE Press repeatedly to select a channel, then See Erasing one of the remote control use LEVEL +/– to adjust the level (see Tip button settings on page 66. on page 53). Also adjusts the level of the RESET Advanced Surround effects (page 37) as See Erasing all of the remote control presets...
-
Page 33: Remote Control (Vsx-515)
Controls and displays MULTI CONTROL buttons Press to select control of other components Remote control (VSX-515) (see Controlling the rest of your system on page 58). RECEIVER CONTROL buttons RECEIVER SOURCE INPUT SELECT STANDARD Press for Standard decoding and to switch MULTI CONTROL DVD/LD TV / SAT... - Page 34 Controls and displays MUTE T. EDIT Mutes the sound or restores the sound if it Press to memorize and name a station for has been muted (adjusting the volume also recall (page 55). restores the sound). GUIDE DIALOG E Displays the guides on a digital TV. Use to make dialog stand out when SUBTITLE watching TV or a movie (page 43).
-
Page 35: Operating Range Of Remote Control Unit
Controls and displays DISPLAY 13 TV CONTROL buttons Switches between named station presets These buttons are dedicated to control the TV assigned to the TV CONT button. Thus if you and radio frequencies (page 56). only have one TV to hook up to this system CLASS assign it to the TV CONT MULTI CONTROL Switches between the three banks... -
Page 36: Listening To Your System
Listening to your system Chapter 6: Listening to your system Important Listening in surround sound • Certain features explained in this section Using this receiver, you can listen to any will not be possible depending on the source in surround sound. However, the source (for example, PCM 88.2 / 96kHz, options available will depend on your speaker DTS 96kHz (24 bit) or WMA 9 Pro sources). -
Page 37: Using The Advanced Surround Effects
Listening to your system Using the Advanced surround effects • 2 Pro Logic IIx MUSIC – Up to 7.1 channel sound, especially suited to music The Advanced surround effects can be used for sources a variety of additional surround sound effects. Most Advanced Surround modes are designed •... -
Page 38: Dolby Pro Logic Iix Music Settings
Listening to your system • EXPANDED – This mode is especially With ‘ 2 Pro Logic IIx MUSIC’ mode active, press EFFECT/CH SEL repeatedly to designed to give sound depth to stereo sources, and lets you hear two-channel select ‘ C WIDTH’ , ‘ DIMEN.’ or ‘ PNRM’ . •... -
Page 39: Listening In Stereo
Listening to your system With Neo:6 MUSIC mode active, press EFFECT/CH SEL repeatedly to select C. Listening with Acoustic IMAGE. Calibration EQ Use the +/– buttons to adjust the • Default setting: OFF / ALL CH (after the setting. Auto MCACC Setup or EQ Auto Setting) Adjust the effect from 0 (all center channel You can listen to sources using the Acoustic sent to front right and left speakers) to 10... -
Page 40: Choosing The Input Signal
Listening to your system Choosing the input signal You need to hook up a component to both analog and digital inputs on the rear of the receiver to select between input signals. ADVANCED ST/DIRECT SIGNAL STANDARD SURR /AUTO SURR SELECT LISTENING MODE Press SIGNAL SELECT on the front panel to select the input signal corresponding to the... -
Page 41: Using The Surround Back Channel (Extended Mode)
Listening to your system INPUT EXTENDED ACOUSTIC FL DIMMER SPEAKERS MODE Using the surround back channel (Extended mode) TUNING TUNER QUICK SYSTEM BAND /STATION EDIT TONE SETUP SETUP RETURN • Default setting: EXT. ON MULTI JOG You can have the receiver automatically use 6.1 Illustration shows the VSX-815/915 front panel or 7.1 decoding for 6.1 encoded sources (for •... -
Page 42: Using The Virtual Surround Back Mode
Listening to your system The table indicates when you will hear the virtual surround back channel. Using the Virtual Surround Back mode (VirtualSB) • Press EXTENDED MODE (front panel) repeatedly to select a virtual surround back Selecting this mode allows you to hear a virtual channel option. -
Page 43: Using Loudness And Midnight Listening
Listening to your system Using Loudness and Midnight Using the tone controls listening Depending on what you are listening to, you may want to adjust the bass or treble using the The Loudness listening feature can be used to front panel tone control. get good bass and treble from music sources at low volume levels. -
Page 44: Playing Other Sources
Listening to your system VSX-515 model: Playing other sources DVD/LD DVD 5.1 TV/SAT INPUT SPEAKER EXTENDED ACOUSTIC FL DIMMER IMPEDANCE MODE INPUT RECEIVER SOURCE SELECT RECEIVER SOURCE INPUT SELECT MULTI CONTROL • Press DVD 5.1 on the front panel. DVD/LD TV / SAT DVR/VCR TV CONT... -
Page 45: Using The Sleep Timer
Listening to your system Using the sleep timer The sleep timer switches the receiver into standby after a specified amount of time so you can fall asleep without worrying about the receiver being left on all night. Use the remote control to set the sleep timer. -
Page 46: The System Setup Menu
The System Setup menu Chapter 7: The System Setup menu (cursor left/right) to select the setting you want to adjust then press ENTER . Making receiver settings from Press RETURN to confirm and exit the current the System Setup menu menu. -
Page 47: Manual Mcacc Speaker Setup
The System Setup menu Select ‘ SB. SYSTEM’ from the System • If you’re using a subwoofer, switch it on Setup menu. and turn up the volume to the middle See Making receiver settings from the System position. Setup menu above. Select ‘M MCACC’... -
Page 48: Fine Channel Level
The System Setup menu Fine Channel Level Fine Channel Distance • Default setting: 0dB (all channels) • Default setting: 3.0 m (all channels) You can achieve better surround sound by For proper sound depth and separation with properly adjusting the overall balance of your your system, it is necessary to add a slight bit speaker system. -
Page 49: Acoustic Calibration Eq
The System Setup menu • If you want to go back and adjust a • A. CH – All Channel Adjust is a ‘flat’ setting channel, simply use (cursor left/ where all the speakers are set individually right) to select it. so no special weighting is given to any one channel. - Page 50 The System Setup menu Setting the Acoustic Calibration EQ • The OVER!! indicator shows in the display if the frequency adjustment is too drastic manually and might distort. If this happens, bring the Before manually adjusting the Acoustic level down until OVER!! disappears from Calibration EQ, we recommend copying the A.
-
Page 51: Manual Speaker Setup
The System Setup menu Speaker setting Manual speaker setup Use this setting to specify your speaker configuration (size, number of speakers). It is a This receiver allows you to make detailed good idea to make sure that the settings made settings to optimize the surround sound in Automatically setting up for surround sound performance. -
Page 52: Crossover Network
The System Setup menu effectively. Select SMALL to send bass sounds best. If you’re having problems, the frequencies to the other speakers or easiest option is to route all the bass subwoofer. If you didn’t connect surround sounds to the subwoofer by selecting SMALL for the front speakers. -
Page 53: Speaker Distance
The System Setup menu Speaker Distance Confirm your selected setup option. The test tones will start after you press ENTER. For good sound depth and separation from your system, you need to specify the distance Adjust the level of each channel using the of your speakers from the listening position. -
Page 54: Using The Tuner
Using the tuner Chapter 8: Using the tuner Press TUNER to select the tuner. Listening to the radio Use the BAND button to change the band The following steps show you how to tune in to (FM or AM), if necessary. FM and AM radio broadcasts using the Each press switches the band between FM and automatic (search) and manual (step) tuning... -
Page 55: Saving Station Presets
Using the tuner Press the TUNER button to select the INPUT EXTENDED ACOUSTIC FL DIMMER SPEAKERS MODE tuner. Use the BAND button to change the band TUNING TUNER QUICK SYSTEM BAND /STATION EDIT TONE SETUP SETUP RETURN (FM or AM), if necessary. Each press switches the band between FM and MULTI JOG Illustrations show the VSX-815/915 front panel... -
Page 56: Naming Station Presets
Using the tuner Naming station presets Press ST +/– to select the station preset you want. For easier identification, you can name your • You can also use the number buttons on station presets. the remote control to recall the station Choose the station preset you want to preset. -
Page 57: Making Recordings
Making recordings Chapter 9: Making recordings Select the source you want to record. Use the MULTI CONTROL buttons (or INPUT Making an audio or a video SELECT). recording Select the input signal (if necessary). You can make an audio or a video recording Press SIGNAL SELECT to select the input from the built-in tuner, or from an audio or signal corresponding to the source component... -
Page 58: Controlling The Rest Of Your System (Vsx-515)
Controlling the rest of your system Chapter 10: Controlling the rest of your system VSX-515 model only Press the MULTI CONTROL button for the component you want to control. Setting the remote to control The LED lights. other components Use the number buttons to enter the Most components can be assigned to one of preset code. -
Page 59: Direct Function
Controlling the rest of your system Direct function Clearing all the remote control settings • Default setting: ON You can use the direct function feature to You can clear all presets and restore the control one component using the remote factory default settings. -
Page 60: Controls For Tvs
Controlling the rest of your system Controls for TVs This remote control can control components after entering the proper codes or teaching the receiver the commands (see Setting the remote to control other components on page 58 for more on this). Use the MULTI CONTROL buttons to select the component. •... -
Page 61: Controls For Other Components
Controlling the rest of your system Button(s) Function Components ENTER/ Use to enter a channel. Cable TV/Satellite TV/TV/ DISC & Select or adjust and navigate items on the menu screen. ENTER ENTER brings up the DTV menus. Press to select or adjust and navigate items on the menu Cable TV/Satellite TV/TV/ screen. - Page 62 Controlling the rest of your system Button (s) Function Components +10 button Selects tracks higher than 10. (For example, press +10 CD/MD/CD-R/VCR/LD then 3 to select track 13.) player ENTER/ Changes the search mode. DISC Chooses the disc. Multiple CD player Use as the ENTER button.
-
Page 63: Preset Code List
TV CONT JVC 613, 665 KENWOOD 804, 807 Manufacturer Code Manufacturer Code FUNAI 658 ONKYO 808, 809 TOSHIBA 001 PIONEER 229, 207, 231, 232 AIWA 660 SONY 801, 806 SONY 002 PANASONIC 226, 230 NEC 659 TEAC 805 PANASONIC 003... -
Page 64: Controlling The Rest Of Your System (Vsx-815/915)
1 • TV codes (for example, codes for TV, CATV, Satellite TV or DTV) can only be assigned to the TV/SAT or TV CONT button. • If you assign the TUNER function to another component, you will have to reassign it to the Pioneer preset code to use this receiver’s built-in tuner. -
Page 65: Programming Signals From Other Remote Controls
Controlling the rest of your system (cursor up/down) to select the Press the MULTI CONTROL button for the manufacturer’s name from the list then press component you want to control. ENTER. The LCD on the remote displays the component you want to control. (cursor up/down) to select the proper code from the list, then try using this (cursor left/right) to select... -
Page 66: Erasing One Of The Remote Control Button
Controlling the rest of your system (cursor left/right) to select Certain buttons represent operations that ERASE then press ENTER . cannot be learned from other remote controls. The buttons available are shown below: The LCD display flashes PRES KEY. Press and hold the button to be erased for two seconds. -
Page 67: Confirming Preset Codes
Controlling the rest of your system When direct function is on, any component you select (using the MULTI CONTROL buttons) will be selected by both the receiver and the remote control. When you turn direct function off, you can operate the remote control without affecting the receiver. -
Page 68: Controls For Tvs
Controlling the rest of your system Controls for TVs This remote control can control components after entering the proper codes or teaching the receiver the commands (see Setting the remote to control other components on page 64 for more on this). Use the MULTI CONTROL buttons to select the component •... -
Page 69: Controls For Other Components
Controlling the rest of your system Button(s) Function Components +10 button Use to add a decimal points when selecting TV channels. DTV ENTER/ Use to enter a channel. Cable TV/Satellite TV/TV/ DISC MENU Select different menus from the DTV functions. Select the menu screen. - Page 70 Controlling the rest of your system Button (s) Function Components REC STOP Stops recording. DVR player (SHIFT+ ) Number Directly access tracks on a program source. CD/MD/CD-R/VCR/LD buttons player Use the number buttons to navigate the on-screen display. DVD/DVR player +10 button Selects tracks higher than 10.
-
Page 71: Other Connections
Other connections Chapter 12: Other connections Select SB 2ND Z from the ‘ SB. SYSTEM’ Caution menu. See Surround back speaker setting on page 46 • Before making or changing the connections, to do this. switch off the power and disconnect the power cord from the power outlet. -
Page 72: Bi-Amping Your Front Speakers
Other connections • SP AB – Sound is output from speaker Select the SB BIAMP setting from the ‘ SB. SYSTEM’ menu. system A (up to 5 channels, depending on the source), the two speakers in speaker See Surround back speaker setting on page 46 system B, and the subwoofer. -
Page 73: Connecting Additional Amplifiers
(L (Single)) terminal only. • VSX-915 only – The sound you hear from the surround back terminals depends on the Surround back speaker setting on page 46. 2 This receiver is compatible with all Pioneer plasma displays from 2003 onward. -
Page 74: Using The Sr+ Mode With A Pioneer Plasma Display
• If you connect to a Pioneer plasma display using an SR+ cable, you will need to point the remote control at the plasma dis- play remote sensor to control the receiver. In this case, you won’t be able to control the receiver using the remote control if you switch the plasma display off. -
Page 75: Other Settings
Other Settings Chapter 13: Other Settings Select ‘DIG. IN’ from the ‘IN ASSIG.’ menu. The Input Assign menu Select the number of the digital input to You only need to make settings in the Input which you’ve connected your digital Assign menu if you didn’t hook up your digital component. -
Page 76: The Other Setup Menu
• SR+ (VSX-815/915 model only) – Specify how you want to control your Pioneer plasma Select the component that corresponds display (see SR+ Setup for Pioneer plasma with the one you connected to that input. -
Page 77: Lfe Attenuator Setup
See also Using this receiver with a Pioneer plasma display on page 73 and Using the SR+ mode with a Pioneer plasma display on page 74. Select ‘SR+’ from the OTHER setup menu. -
Page 78: Additional Information
Sometimes the trouble may lie in another component. Investigate the other components and electrical appliances being used. If the trouble cannot be rectified even after exercising the checks listed below, ask your nearest Pioneer authorized independent service company to carry out repair work. - Page 79 Additional information Problem Remedy Considerable noise in radio • Tune in the correct frequency. broadcasts. • Connect the antenna (refer to page 21). • Route any loose cables away from the antenna terminals and wires. • Fully extend the FM wire antenna, position for best reception, and secure to a wall.
- Page 80 • Avoid exposing the remote sensor on the front panel to direct light. • VSX-815/915 only – Unplug anything connected to the CONTROL IN jack and use remote normally (see Operating other Pioneer components on page 25). • Press FL DIMMER on the remote control repeatedly to return to the The display is dark or off.
-
Page 81: Resetting The Main Unit
Additional information Resetting the main unit Switching the speaker impedance Use this procedure to reset all the receiver’s settings to the factory default. Use the front We recommend using speakers of 8Ω with this panel controls to do this. system, but it is possible to switch the impedance setting if you plan to use speakers Switch the receiver into standby. -
Page 82: Specifications
Additional information Video Section Specifications • Input (Sensitivity/Impedance) DVR/VCR, DVD/LD, TV/SAT..1 Vp-p/75 Ω Amplifier section • Output (Level/Impedance) • Continuous power output (stereo) Ω DVR/VCR, MONITOR OUT..1 Vp-p/75 Front. -
Page 83: Power Cord Caution
VSX-515/815 ..... . . 300 W damaged, ask your nearest Pioneer authorized VSX-915......360 W service center or your dealer for a replacement. - Page 84 253 Alexandra Road, #04-01, Singapore 159936 TEL: 65-6472-7555 PIONEER ELECTRONICS AUSTRALIA PTY. LTD. 178-184 Boundary Road, Braeside, Victoria 3195, Australia, TEL: (03) 9586-6300 PIONEER ELECTRONICS DE MEXICO S.A. DE C.V. Blvd.Manuel Avila Camacho 138 10 piso Col.Lomas de Chapultepec, Mexico,D.F. 11000 TEL: 55-9178-4270 <05C00001>...