Table of Contents
Advertisement
Available languages
Available languages
Quick Links
Operator's
Manual
M
4-Cycle
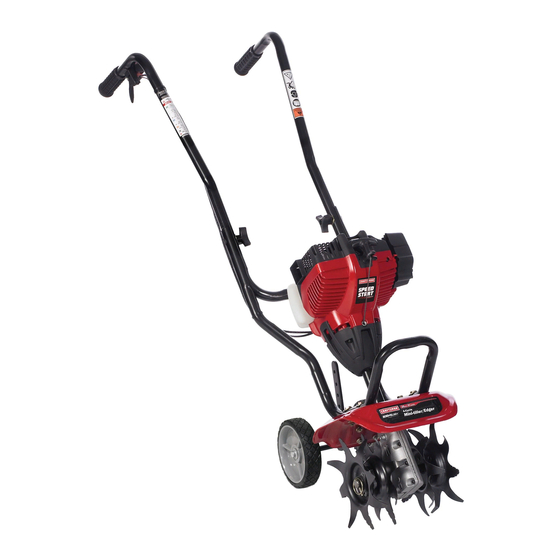
Cultivator
Model No. 316.299370
INCREDI.PULL
TM
UNBELIEVABLE
STARTING
E A S E
with
MAX
FIRE,_IGNITION
_
,, SAFETY
* ASSEMBLY
* OPERATION
* MAINTENANCE
* PARTS LIST
* ESPANOL, R 13
CAUTION:
Before
using
this
product,
read this manual
and
follow
all safety
rules
and
operating
instructions.
Sears Brands
Management
Corporation,
Hoffman
Estates,
IL 60179 U.S.A.
Visit our website:
www.craftsman.com
P/N 769=05318 P00
11/09
Advertisement
Table of Contents

Related Manuals for Craftsman INCREDI-PULL 316.299370


Summary of Contents for Craftsman INCREDI-PULL 316.299370
- Page 1 * MAINTENANCE * PARTS LIST * ESPANOL, R 13 CAUTION: Before using this product, read this manual follow all safety rules operating instructions. Sears Brands Management Corporation, Hoffman Estates, IL 60179 U.S.A. Visit our website: www.craftsman.com P/N 769=05318 P00 11/09...
-
Page 2: California Proposition
CALiFORNiA PROPOSiTiON 65 WARNING The purpose of safety symbols is to attract your attention to possible dangers. The safety symbols, and their explanations, deserve your careful attention and understanding. The safety warnings do not by themselves eliminate any danger. The instructions or warnings they give are not substitutes for proper accident prevention measures. -
Page 3: Safety & International
• Always hold t he unit with both hands when o perating. Keep afirm grip o nthe • To reduce fire hazard, keep the engine and muffler free f rom grass, leaves, handle. excessive grease orcarbon build u p. Keep hands, face, and feet atadistance from all m oving parts. - Page 4 If this Craftsman product fails due to a defect in material or workmanship within two years from the date of purchase, return it to any Sears store, Parts and Repair Service Center, or other Craftsman outlet in the United States for free repair (or replacement if repair proves impossible).
- Page 5 POSiTiONiNG Pour the entire bottle of oil into HANDLEBARS the oil fill hole (Fig. 5). Oil Fill Plug \ NOTE: Never add oil to the fuel Loosen the two knobs on the Handlebar Knob Bolt or fuel tank. inside of the handlebars (Fig. 1). With the unit upright, swing Wipe up any oil that may the handlebars...
- Page 6 i iwA°°,°o:o0eratethisunitonyinawe ventiatedoutdoorarea Carbon monox de exhaust fumes can be ethan a conf ned area. NOTE= This Unit Can Use a Plug-in Power Start or Power Bit Start Optional Accessory! starting position when pulling the starter rope (Fig. 10). To avoid serious Please refer to the Plug-In Power Start or Power Bit Start operator's ARNING: Avoid accidental starting.
-
Page 7: Maintenance Schedule
MAINTENANCE SCHEDULE If the oil level is not touching the inner most thread on the Oil Fill Plug oil fill hole, add a small or repairs with unit running. Always service and repair a cool unit. amount of oil to the oil fill hole ARNING: To prevent serious injury, never perform maintenance and recheck (Fig. -
Page 8: Idle Speed Adjustment
Apply enough clean SAE 30 Disconnect the spark plug wire. View of the Rear Engine Cover motor oil to lightly coat the Clean dirt from around the filter (Fig. 21). spark plug. Remove the spark Squeeze the filter to spread plug from the cylinder head by Screws and remove excess oil (Fig. -
Page 9: Maintenance
1-800-4-MY-HOME®, for more information and purchasing. You may SPARK ARRESTOR MAINTENANCE also go to www.craftsman.com. Remove the rear engine cover. See Rocker Arm Clearance. With a flat blade screwdriver Muffler Spark Arrestor or Torx T-20 bit and a T-25... - Page 10 PROBLEM SOLUTION Fill fuel tank with fuel Empty fuel tank PreSs primer bulb fully and Slowly i0 times Pdmer bulb wasr,t Piessed enough Old fuel Drain gas tank and add fresh fuel Fouled spark piug" Replace or clean the spark plug Plugged spark arrestor Clean or replace spark arrestor Air filter is plugged...
- Page 11 REPAIR PROTECTION AGREEMENTS Congratulations on making a smart purchase. Your new Craftsman <+product is designed and manufactured for years of dependable operation. But like all products, it may require repair from time to time. That's when having a Repair Protection Agreement can save you money and aggravation.
- Page 13 * FUNCIONAMIENTO * MANTENIMIENTO * LISTADO DE PIEZAS PRECAUCION: Lea el manual del operador y siga todas ias advertencias e instrucciones de seguridad. Sears Brands Management Corporation, Hoffman Estates, IL 60179 U.S.A. Visite nuestro sitio web: www.craftsman.com P/N 769=05318 PO0 11/09...
-
Page 14: Informacion De Seguridad
PROPOSICION 65 DE CALiFORNiA Toda la informaci6n, las ilustraciones y las especificaciones contenidas en este manual se basan en la informaci6n mAs reciente disponible en el momento de impresi6n del manual. Nos reservamos el derecho de hacer cambios cualquier momento sin aviso previo. Los simbolos de seguridad se utilizan para Ilamar su atenci6n sobre posibles peligros. - Page 15 • Use pantalones largos fuertes, botas, guantes y camisa de mangas largas. No Pare la unidad, apague el motor y desconecte la bujia para mantenimiento o use ropa holgada, joyas, pantalones cortos, sandalias, ni est6 descalzo. reparaci6n. AsegQrese el cabello pot encima del nivel de los hombros. Use solamente piezas y accesorios de reemplazo del fabricante del equipo •...
- Page 16 GARANTIA TOTAL DE CRAFTSMAN Si este producto de Craftsman falla debido a un defecto en el material o en la mane de obra dentro de un periodo de dos aSos a partir de la fecha de compra, devuelvalo a cualquier tienda o Centro de Servicio de Piezas y Reparaciones...
- Page 17 COLOCACION DEL MANUBRIO Verifique el aceite antes de cada uso y cAmbielo cuando sea necesario segQn se indica en la secci6n de Cambio del aceite. Afloje las dos perillas del Perillas dei lado interior del manubrio TIPO DE COMBUSTIBLE manubrio ..
- Page 18 ADVERTENOIA: Use esta unidad s61o en un Area exterior bien LAS INSTRUCCIONES SiGUIENTES EXPLICAN COMO ARRANCAR LA UNIDAD ser letales en un Area cerrada. ventilada. Los gases de escape de mon6xido de carbono pueden UTILIZANDO EL ACCESORIO DE ARRANQUE ELECTRICO. NOTA: ]Esta unidad puede utilizar un comienzo enchufable de la energia o un ADVERTENOIA:...
- Page 19 CONSEJOS PARA LA OPERACION COMO SACAR Y CAMBIAR LOS DIENTES Todos los dientes deben ser substituidos al mismo tiempo que usarAn uniformemente con use normal. Trabajo sobre un lade a la vez. ADVERTENOIA: nunca levante ni transporte la unida6 con el motor en marcha. Para evitar graves lesiones personales,...
-
Page 20: Mantenimiento
CAMBIO DEL ACEITE Aplique suficiente aceite limpio de motor SAE 30 para recubrir ligeramente el filtro cuando maneje la unidad. RECAUClON: Use guantes para evitar sufrir lesiones (Fig. 22). Apriete el filtro para esparcir En un motor nuevo, cambie el y retirar el exceso de aceite aceite despu6s de las 10 primeras (Fig. - Page 21 HUELGO DEL BRAZO OSClLANTE 11. Vuelva a colocar el cable de la bujia de encendido. 12. Vuelva a instalar la cubierta del motor. Verifique la alineaci6n de la cubierta antes de ajustar los tornillos. Ajuste los tornillos. accesorio de corte se haya detenido antes de apoyar la unidad CAMBIO DE LA BUJIA DE ENCENDIDO DVERTENClA:...
- Page 22 CARACTERJSTICAS ENCHUFABLES DEL COMIENZO DE LA ENERGJA Y Arranque el motor y d6jelo funcionar hasta que se ahogue. Esto asegura DEL COMIENZO DEL PEDACJTO DE ENERGJA que toda la gasolina se haya drenado del carburador. Deje enfriar el motor. Saque la bujia de encendido y coloque 5 gotas de Esta unidad se dise_a para ser comenzada con un comienzo enchufable aceite de motor de buena calidad en el cilindro.
- Page 23 ACCION CAUSA El tanque de C0mbustible estfi Vac[o Llene el tanque con combustible bien mezclado La bombilla de cebado no fue oprimida Io suficiente Optima la bombilla de cebado total de 10 veces Use el procedimiento de arranque El combustible es viejo o esta mal mezclado Drene el tanque de gasolina/Agregue mezcla de combustible...
- Page 24 DE GASTOS PARA REPARACIONES Felicidades pot haber hecho una compra inteligente. Su nuevo producto Craftsman esta disefiado y fabricado para que opere de manera confiable durante a_os. Pero como todos los productos, pudiera necesitar una reparaci6n cada cierto tiempo. Pot eso el tener un Convenio de Cobertura de Gastos para Reparaciones puede ahorrarle dinero y disgustos.
- Page 30 REPLACEMENT PARTS - MODEL 316.299370 4-CYCLE CU LTIVATOR Item Part No. Description 753-05246 Muffler Screw 753-05255 Spark Plug 753-05247 Insulator Gasket 753-05248 753-05249 Insulator Carburetor Gasket 753-05366 753-05440 Carburetor w/Pdmer 753-04030 Air Cleaner O-Ring 753-05507 Air Filter Mounting Screw 753-05835 Air Cleaner Cover Assembly (includes 27-32) 791-182657...
- Page 31 REPLACEMENT PARTS - MODEL 316.299370 4-CYCLE CULTIVATOR item Part Description 791-182675 Grip 753-06006 Switch Assembly 753-04003 Screw 753-04186 Wellnut 753-06007 Throttle Assembly 791-182882 Upper Handle 791-182677 Knob 791-182899 Bolt 791-182678 Washer 753-06009 Lower Handle Assembly 753-06012 Bolt 753-04052 Washer 753-04056 Lock Nut 753-04049 Cable Tie...
- Page 32 1-800-4-MY-HOME ® (1-800-469-4663) Call anytime, day or night (U.S.A. and Canada) www.craftsman.com www.craftsman.ca Our Home For repair of carry-in items like vacuums, lawn equipment, and electronics, call anytime for the location of your nearest Sears Parts &...