Table of Contents
Advertisement
Advertisement
Table of Contents

Related Manuals for Welbilt Baker's Select ABM2H22


Summary of Contents for Welbilt Baker's Select ABM2H22
- Page 1 BAKER'S SELECT MODEL ABM2H22 INSTRUCTION MANUAL WELBILT HOUSEHOLD USE ONLY...
- Page 2 IMPORTANTSAFEGUARDS WHEN USING ELECTRICAL APPLIANCES, BASIC SAFETY PRECAUTIONS SHOULD ALWAYS FOLLOWED, INCLUDING THE FOLLOWING: Read all instructions carefully. Do not touch hot surfaces. Use handles or knobs and a potholder. Do not close or clog the steam vent openings under any circumstances. To protect against electrical shock, do not immerse cord, plug, or any other part of this bread machine, in water or other liquid.
- Page 3 About Your Bread Machine The bread machine makes LARGE (1 1/2 lb.) and EXTRA LARGE (2 lb.) horizontal loaves of breads. Two-paddle horizontal bread pan makes traditional shaped bread. The bread machine has 33 settings. See Bread Machine Cycle Times, page 15. Special ULTRA FASTsetting allows you to complete the breadmaking process in 58 minutes.
- Page 4 BeforeYourFirstUse Enjoy using your Welbilt ® Bread Machine. Before your first use, please take a few minutes to read this Instruction Manual and keep it handy for reference. Please pay particular attention to the safety instructions we have provided for your protection.
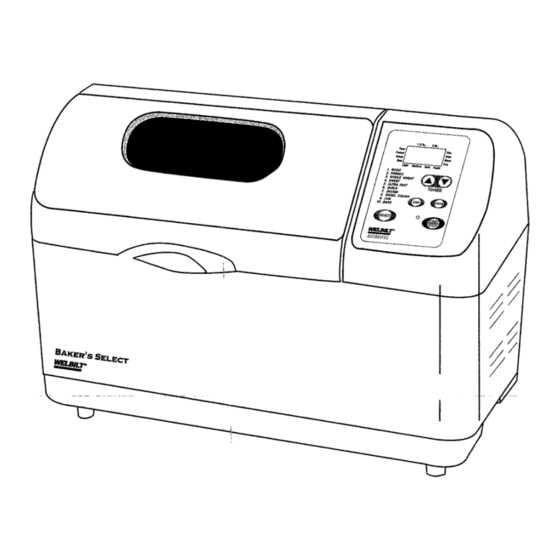
- Page 5 Know Your Bread Machine ABM2H22 MAKES 11/2AND 2 LB. HORIZONTAL LOAVES 1. Lid 2. Lid Handle 3. Large Viewing Window 4. Air Vents 5. Breadpan 6. Baking Chamber(not shown) 7. Control Panel 8. Cool-Touch Body 9. Power Cord with Plug 10.
- Page 6 ULTRA FAST TIMER & QUICK DOUGH & BAGEL DOUGH BAKE WELBILT _ NOTE: When using the touchpad controls, be sure to press the pad until you hear a beep. • Showsthe SELECT numberselected. Showsthe LOAF sizeselected. DISPLAY • WINDOW Showsthe CRUST COLOR selected.
- Page 7 Settin l Descriptions Follow this flow chart to make bread as easy as 1,2,3. 1. Press SELECT key to select the desired baking cycle. 2. Press COLOR key to select the crust color preferred. 3. Press LOAF key to select the desired bread size. 4.
- Page 8 Usethis settingfor makingjam from freshfruits. Donot doublerecipes or allowingredients to boilover the pan into the baking chamber. Should this happen,stop the machine immediately.Allow to cool and cleanthoroughly. BAKE This is a bake-only setting that does not mix. If you have baked a loaf of bread in your machine and would prefer a darker crust, usethe BAKEsetting to bakethe loaf for a longer period of time.
- Page 9 Usin l Y our B read Machine These are instructions for bread baking only-not dough, jam or bakecycles.The bread settings in this unit will combine ingredients, knead,and make bread from start to finish automatically.The DOUGH setting makes dough for a variety of recipesthat can be shaped and baked in an oven. To delay completion, the automatic TIMER may be programmed to make bread or dough while you are at work or asleep.
- Page 10 , Usin l Your Bread Machine Special Note: Placethe baking pan back into the unit If the baking pan is not installed in a slightly forward, angledposition. Push properly or firmly clicked into place, down and back on the pan until you hear it the kneading bladeswill not operate.
- Page 11 Usin l Y our Bread Machine Note: Press the LOAFbutton to choose the Select Loaf Size only for French, Basic, desired loaf size. When you press the Whole Wheat,Sweet, and Ultra Fastsettings. button, you will hear a beep, and the display window will show the size 1.5 |b.
- Page 12 Usin l Your Bread Machine The bread machine has a convenient viewing window so that you may watch the Warning: progress of the bread as it is mixed, kneaded,and baked. Occasionally,some To avoid damaging the bread moisture may form in the window during baking. You may lift the lid to look machine, do not put any object inside during mixing and kneading stages.
- Page 13 Using! TheTimer TO SET THE TIMER, FOLLOW THESE INSTRUCTIONS: First, follow steps 1 thru 8 in Using Your Bread Machine, pages 9-11. Note: The maximum length of delay is up to 12 hours and 58 minutes, depending on the selected setting. Note: Do not use the TIMER with recipes that call for perishable ingredients, such as eggs, fresh milk, sour cream, or cheese.
- Page 14 CareandCleanin l CAUTION: To prevent electrical shock, unplug the unit before cleaning. Allow the bread machine to cool before cleaning. Do not immerse or splash either the body or lid in any liquid as this may cause damage and/or electric shock. For best performance and maintenance, clean the bread machine after each use...
- Page 15 MENU COLOR LOAF Total Rest Knead i Rest Knead 2 Rise 1 Punch Rise 2 Shape Rise 3 Baking Keep Fruit & Setting Time Warm Nuts Light 1.5 LB. 3:18 25m50s 49m45s 53m 2:59 2 LB. 3:25 25m50s 15s 49m45s 60m 3:08 Medium 1.5 LB 3:18...