
Related Manuals for Pfaff Automatic 262


Summary of Contents for Pfaff Automatic 262
- Page 2 Follow these simple instructions and familiarize yourself with the exclusive automatic features of your machine. You will find sewing exciting on your easy-to-operate Pfaff-Automatic. If you have any sewing problems, please contact your Pfaff dealer. He will be glad to help you at any time. G. M. PFAFF AG...
-
Page 5: Fundamentals Of Machine Operation
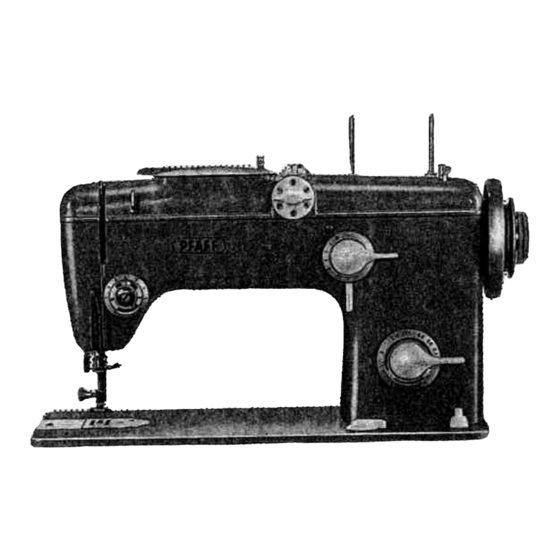
DR 084 Fundamentals of Machine Operation Make sure stop motion knob b is tightened before you begin sewing (clockwise as indicated by white If you want to turn balance wheel a by arrow). hand (although normally there is no need to do so), alwoys turn it toward you (counier.clockwise as shown by black arrow). - Page 7 R 8007 Lever B= I Dial C=O Dial A=O Set: • Lever E engages and disengages the Automatic mechanism. If you don’t need this mechanism for a longer period, set lever E at “0”. This setting is indicated on pages 32 to as follows: B=4;...
-
Page 8: Zigzag Sewing
R 7999 Zigzag Sewing Set: Dial C=O If you want to sew a few wide zigzag stitches while the machine is set for straight stitching (A on 0), merely press down the finger-tip control. When the lever is released, the mochine resumes straight stitching automatically. To sew longer zigzag seams, turn dial A to desired stitch width (indicated by numbers I to 4). - Page 9 ‘p...
- Page 11 Hold the blonce wheel and turn stop motion knob b all the way to the left (counter -clockwi se). Place spool of threod on right-han d spool pin. The bobbin thread should always be the some size as that used on the spooi, or a little finer. Pull thread from spool and lead it clockwise around thread retainer stud g, crossing the thread.
- Page 18 9109...
- Page 19 /32”...
- Page 20 R 8458 it is...
-
Page 21: Correct Tension Regulation
R 8004 Correct Regulation Tension Balanced tensions are essential for sewing. If your tension is correct, you will have perfect seams as sketched below (Ill). Sketch I The threads interlock on the underside of the fabric. — Ca use: Upper tension too loose or lower tension too tight. Sketch II The threads interlock on the surface of the fabric. -
Page 24: Dropping The Machine Feed
Dropping the Machine Feed The machine feed is dropped for darning with the aid of the vibrator, for hoop embroidery and button sewing. To lower feed below the needle plate, turn drop feed control v clock wise. Fabric will cease feeding. When control v is turned to the right as far as itwill go, feeding of the fabric resumes automatically when you startZsewing. - Page 30 1. Machine Skips Stitches Ca use: Remedy: Needle incorrectly inserted. Push needle up as far as it will go and be sure that the long groove faces toward you, and flat side of shank away from you. Wrong needle, The correct needle system is stamped an bed slide. (For ordinary sewing, use System 130R needles.) Needle bent.
- Page 32 Thread Jamming The new Pfaff rotary hook will not normally jam, even if the machine should be handled improperly. If thread should happen to jam in the raceway of the sewing hook, the power of the motor in most instances will be sufficient to overcome hard working of the mechanism.
- Page 35 ‘...
- Page 36 44088 — Overcasting Edges Lever B= Dial C=O Lever E=O Machine Setting: Dial A=2 to 4 ‘ ‘ Overcasting prevents frayed edges. Use a long, wide zigzag stitch and sew edge with the needle taking one stitch into the fabric and the other over its edge. You may over cast edges after fabric is cut and before the pieces are oined.
- Page 37 —...
- Page 42 — ‘...
- Page 43 44088 1? 7138 ‘4 1_li/s Hemstitching is very simple (see sketch). Sew first row on the left of the area to be hemstitc hed. Stop machine when needle is in fabric on the right. Lift sewing foot, turn fabric in the direction of arrow, and lower foot again. Sew second row, as shown in sketch, guiding material parallel to first row so that needle penetrate s needle holes of previous zigzag stitches as it descends on the right4 If you ore making more than two lines of hemstiic hing, alternote ly leave needle in fabric on the left and...
- Page 44 Hemming dresses and skirts by hand is a laborious task. You can do it easily on your Pfaff on medium and heavy fabrics. Use zigzag foot No. 44088 with blindstitch guide No. 46669, which you can buy at your Pfaff store. Attach the guide so that its vertical flange goes through the sewing foot slot.
- Page 45 8046 Sewing Buttonholes Machine Setting: Dial A=1 Lever 8= i. Dial C=0 Lever E=0 Stitch Length: Darning Thread: No.50 Filler Thread: cotton (pearl thread) Attach buttanhole foot No. 54300 and set slide on buttonhole gauge to buttonhole length desired. The buttonhole is the right length when beginning of first seam reaches red end of slide indicator (see arrow).
- Page 46 4 Release lever F. Trim filler cord at end of first stitch Begin row. Sew second row and stop about 4 to 6 stitches p In from end of first row. 5 Press lever F down. Make second tack, as instructed above.
- Page 47 51951 Button Sewing Don’t be afraid to sew on buttons, hooks, eyes or rings with your Pfaff. Attach all-purpose sewing foot No. 51991 or button sewing foot No. 46120, which can be obtained from your Pfaff dealer, and drop machine feed.
- Page 52 Increase the bobbin thread tension slightly for cording. Pfaff recommends you fill your cording so it keeps its shape in the laundry. Filler cord thickness depends on cording size you want. To sew filled cording, use the two cording plates with cord ducts.
- Page 55 —...
- Page 56 • • • • • •...