
Related Manuals for Pfaff creative 1472


Summary of Contents for Pfaff creative 1472
- Page 1 • • —. Printed in West Germany Heidetberger Reprographie A Grosch GmbH 6904 Eppelheim. Seestratte 72 Subject to alterations in design N, 3027n HR erigt 9j93...
- Page 3 — — —-...
- Page 4 1 1 1 ‘- — ‘...
- Page 5 -‘ ----- _ ‘ —...
- Page 6 — Application Description For fancy seams, ornaments, borders and 73-80 Embroidery stitch embroideries. programs For table linen, napkins, bed linen, etc. Scalloping edge decoration For cross-stitch embroidery in childrens wear, Cross stitch blouses, covers, etc. programs For hem-stitching in table linen, bed linen. Hem-stitching blouses, cloths, etc.
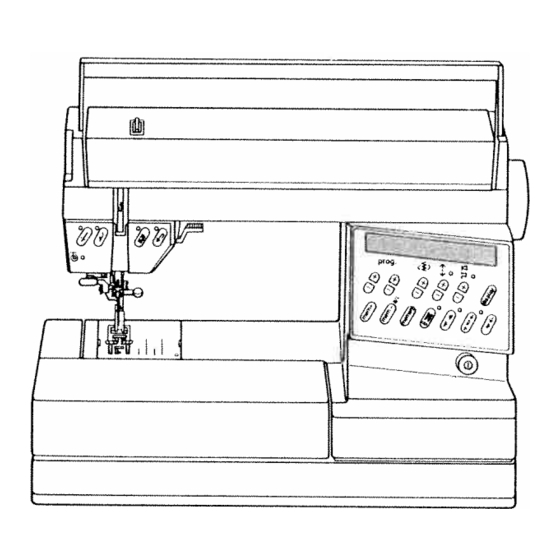
- Page 7 Electrical connection Pull the power lead out of the foot Lift off the cover and fold down the control carrying handle. Compartment A is for storing the foot control, mains lead and instruction book Plug the foot control lead into connec hon socket 31 and place the foot con trol on the ground.
- Page 8 Place the bobbin on winder 25 and Bobbin winding: turn it so that pin A engages in slot B. Take hold of the work support and swing it to the left. Open free arm cover 33 Disengaging the sewing action: Hold the balance wheel and turn release disc 4 as shown by the arrow Switch off main switch 9.
- Page 9 Winding through the needle Winding from a second spool: Only with metal sewing foot! Swing Swing bobbin winder thread guide 44 bobbin winder thread guide 44 to the to the front Pull the thread into guide front 40, into bobbin winder tension A and Raise sewing foot.
- Page 10 Inserting the bobbin: insert bobbin so Inserting the bobbin case: switch off that the thread unwinds as shown (A), main Switch 9, lift latch A and push the pull thread through slot (B) and out of bobbin case fully onto pin B Cutout C opening (C>...
- Page 11 1’...
- Page 14 Switch on main switch 9, have material cover needle hole (see illustration B) and lower the sewing foot onto it by pressing presser bar lifter 17 down wards. Position A of lever 17 is for darning. Needle thread tension 39 setting mark Important! In order to obtain good sewing results...
- Page 15 Raising the presser bar lifter: Important! When you have finished a seam the needle must be fully raised. Then raise presser bar lifter 17. When the main switch is pressed to switch the machine on, the sewing lamp lights up When the machine is switched off by pressing the main switch, removing the mains plug or by power failure, the...
- Page 16 full full will 19 is 78—91. will wilt Twin 16 M —...
- Page 17 Stitch length and pattern length setting: LI IITrIi I ITT[ rTJL;l I I lIT Keys 7 have two functions: 1. Selection of stitch length for pro grams in which display A does not -1’ 1<3 light up. The stitch length ranges from 0 to 6 mm, For some of the programs the stitch length is limi ted.
- Page 18 Checking a program combination by Storing program combinations: Balance, or correction of reverse running it through the display: stitches When more than 4 programs or more The creative computer contains 16 M The balance control is used for correc than 11 letters or numbers are stored, memories, MO to M 15 A maximum of ting pattern or program combinations the program can be run through dis...
- Page 19 Liiiii ——--::-—--Th\ I17JjTT rn i iii [T1I LI II I Repeating Pattern mirroring: program combinations: Press “pattern mirror key 28.” Display p,os prog _L-o Key 30 “memory/repeat” has three D lights up. The selected program is functions: sewn in reverse Programs can also be Returning a program combination entered mirror imaged into a combina &o...
- Page 20 “c— O4OO Setting the pattern start: Recommended sewing modes: For every program from 00 to 99, and Key 26 “pattern start” has three func for letters and figures the machine will tions: indicate recommended sewing modes 1. Push “pattern start key 26. A pat with regard to dual feed, needle thread tern in progress is returned to the tension and sewing feet.
- Page 21 Take hold of the work support and support and swing it out to the left. The work support can be lifted out (A). Open its lid and take out accessory box C. Underneath the box is an accessory compartment B. Illustration shows how to arrange sewing feet, needles and bobbins in the accessory box.
- Page 22 Cleaning and oiling Changing the fuse • Pull out the mains Disconnect the mains plug Turn fuse plug. Tilt the needle plate up at the back (A) holder A left by a quarter turn with a and remove it (B). Clean the teed dog screwdriver, release it and take it out, and the parts in the sewing hook area Pull out fuse B Insert a new fuse in the...
- Page 23 -—— — — — ————— ------— — —-- —_—_.--— --———— -—-——— — -—— -—-——.— —--———...
- Page 25 Stretch triple straight stitch prog 0405 Program 04 is stretch triple straight stitch at 1 5 (> prog( mm to 45 mm 7’-oo Program 05: is stretch triple straight stitch sf3 to 6 mm (Fig 4). Both programs can be sewn in dif O&&...
- Page 26 Top-stitch seams sewn with two needle threads progfZ Stitch length: 6.0 mm Needle: Top-stitch seams Thread: sewing thread Change of needle position Change of needle position If you cannot find a suitable buttonhole thread for Buttonhole thread as needle thread with straight stitch with zigzag stitch specific sewing work, try using two needle...
- Page 27 4€ imitation lap seam sewn with the ordinary sewing foot. prog 3—S Place the two pieces of fabric one on top of the other with their face sides, and sew them together about one centimetre from the edge Neaten the raw edge.
- Page 28 Binding edges with Binding edges with the hemmer the roll hemmer ___-I prna prrg Hemmer foot Roll hemmer (special accessory) Hemming secures the fabric edge against fraying Use the roll hemmer foot for hemming nylon. tn and produces a neat and durable edge. cot and chiffon.
- Page 29 (cpecial accessory) prog prog ° Shoioq loot Stitch length 3 to Stitch length 3—4 mm Bobbin thread: elastic thread, (wind tension- How to insert the shirring foot free on bobbin) Insert the shrrinq foot with its rear pin in groove Needle thread: sewing thread “A”...
- Page 30 ‘\A/VV\AiV\JV\/VVVVVVJV’ r’ ‘. ‘I ‘c’ f ‘ii / ‘f ‘‘ ‘./ ‘‘ ,\/\,t ,.!c ‘‘IN Stretch triple elastic-stitch Overcasting raw edges with the Serging Lycrastitch zigzag-stitch with overlock foot For materials which contract during serging use prog prog the overlock foot. ‘‘- 3—5 3—S...
- Page 32 West GerrnarW Printed Hrdntbn,ge r RnptOWPh ie A GtnsCP Giiblt e 72 6904 Eppettteiif l. Ssestra Uesigfl ubest tci atteratlOt N. 30276 HR engl 6/93...
- Page 33 To obtain a many different materials. good looking seam we recommend inserting a The Pfaff Creative 1472 offers a selection of diffe lightly tensioned wool thread in it (Fig 1) rent elastic closing and serging seams from which you can easily select the corresponding seam for all stretchable materials.
- Page 34 =‘1 -._.
- Page 35 mliii 7’ — — Itli Blind stitch Binding edges with non-woven tape prog —3 Fold the previoucty overcast raw edge over to form a hem of the desired wirtth and baste about Fold ready made bias binding lengthwise 05 cm from the fahric edge Place the fabric shape-precs Push the folded binding over the...
- Page 36 Stitch over the damaged slightly overlap the erie before it (Fig 1). spot at the required length, then press the “reverse’ key. The length of the darning seam is now memorized in the computer. The Pfaff Crea tive then automatically...
- Page 37 —- —...
- Page 38 —V Zippers for ladies’ slacks prog prog 00,01 00,01 .“ Stitch length 2.5—3.0 mm Stitch length. 25—30 mm Koy: Needle down Key: needle down • Snap the zipper foot in at the right. There are different kinds of zippers: joined or split Iron the fly edge Baste the closed zipper under zippers and special ones for trousers or slacks neath the pressed right-hand fly edge so that its...
- Page 39 IuI I prog 287O O (fully automatic) (semi-auto matic) preg Wilh “balance” keys 5 the left buttonhole seam —3+ If you wish to determine the second bartack in a length can be adapted to the ught one programme d buttonhole , press “tie off/button Sew a sample buttonhole first.
- Page 40 — “+“ “—“,...
- Page 41 WPT ihiI POf22 8>7 prog Linen buttonhole, prog. 90, Changing the buttonhole width Adapting the buttonhole length programmable A garment may consist of different numbers of For every type of fabric, the corresponding but fabric plies, e g. the buttonhole strip may consist tonhole width can be determined up to 55 mm Determining your own buttonhole length and of three plies and the collar stand of six-owing to...
- Page 42 — (111 IT Ii’ I 1?1zT I ii]) p,og <> & Determining the second bartack Stretch buttonhole Adapting the buttonhole seam (fully automatic) lengths with the balance keys (semi automatic) prog With “balance” keys 5 the left buttonhole seam If you wish to determine the second bartack in a length can be adapted to the right one fully automatic buttonhole, press “tie off/button Sew a sample buttonhole first.
- Page 43 ““F: 77[E TTJ TJ tLTT i1ThTT IIL. ‘!iTJ ‘° ° prog prog “‘&& Adapting the buttonhole length Stretch buttonhole, prog. 91 Changing the buttonhole width programmable A garment may consist of different numbers of For every type of fabric, the corresponding but fabric plies, e g the buttonhole strip may consist tonhole width can be determined up to 55 mm.
- Page 44 Various buttonhole bartacks Eyelet buttonholes can be sewn with three ddfe rent bartack designs. Round buttonhole with wedge tack Programm 92a This bartack design is very suitable for buttonholes in trousers and casual wear Round buttonhole with lengthwise tack Programm 92b This tack design we recommend for buttonholes...
- Page 45 llllllllIlliiiU tlllIUljI prOq ‘ .l1llll ‘‘/lt \ \lllllllIlllllllllllllllllllIlll \lllllltItltttt tfttt (fully automatic) (semi automatic) Ifs buttonhole does not turn out well, cancel it by ping ‘ pressing “pattern start” key 26 and sew it again A garment may consist of different numbers of If you wish to determine the bartack in a pro 92a, b.c -3-4-...
- Page 46 Eyelet ouuonnoie witn gimp Buttonho’e with gimp thread thread In the case of elastic. rnafei ala, it pocarhie that the buttonholes estend 1 herefor a, tile hutton Srr,tabfr’ ltrieads’ head yarn Ho 8 or thick hole strip should he reinforced wit e I in op sewing thread material ri order to retain the shape nf the button...
- Page 47 it is (Fig. 3). (Fig. 1) If it is — • • (Fig 2). the needle enters the right hole of make position.
- Page 48 Cording sewn with gimp thread prog o’nq Needle: Double needle Lift the needle plate off and pass the gimp thread through the round hole “A”. After that re insert the needle plate Notch ‘B” is the entry groove (Fig 1) Place the roll of gimp thread in front of the machi no Place the beginninq of the gimp thread together...
- Page 49 Appliqué work For this, two worksteps are required First workstep Second workstep Sew over the raw edges of the appliqué with par prog row, dense zigzag (purl) stitches (Fig 31 To make the edge of the appliqué more promi nerd, insert a filler cord in the Sean, Ready made fabric appliqubs can he applied Stitch width 05 mm...
- Page 50 uiIting prog OA,4 Edge quido 5eams st’tchect on articles filled with cotton wool r some other soft padding have a very erominent dfect For this purpose, hatting. foam plastic or annel is placed between the to ply and a light ;eight bottom ply (Fig 3) o keep the fahric plies and the padding in place, iaste them together with rows of long bnsting...
- Page 51 -:“ Inserting lace Attaching lace For this work, two wnrksteps required For this work, two worksteps are required First workstep First workstep prog prog —3+ —3+ Second workstep Stitch width: 5 0 mm Stitch length: 1 5 mm prog Second workstep I KK prog First workstep...
- Page 52 Fourth workstep: flowers other garments with embroidery motifs made on • Select program 39. • Program: 62 your Pfaff Creative. • Sew the programmed stitch pattern along • Stitch width: 4.5 mm both sides of the centre motif. The second side Transfer the pattern onto the face side of the •...
- Page 53 I” —...
- Page 54 •‘ _•_ Flower Butterfly prog Two worksteps are required for this: prog First workstep (wings) 14 16 06 62 63 ping Stitch /riqtli 1 5 mm Mark out the pattern of the flower on th tahrir, 28 pattern program 16 mirrn in 2—3 ttic...
- Page 55 1iUiiII1tmI1iHflUUnh1Ii1 ,44*44•4 Hem-stitching with wing needle Hem stitching prog As the iflust rations show, hemtitchinq can be used in different ways, both as an edge reinforce 97 98 went and as a fancy effect on table linen or cloth ng articles Thread: e,nbroidering/darning thread Needle: wing needle “Ladder”...
- Page 56 • ,*, •, • Linen embroidery Eyelet embroidery with the Third workstep: leaves Plain embroidery on linen is a widely known and eyeletting plate (special accessory) popular ornamentation The patterns illustrated • Program. 80 can be made on your Pt aft Creative in a very short •...
- Page 57 ‘1-’ 7’, ms• ‘ Sewing monograms with Ring of flowers The i5ustratiop at the right shows a pretty ring of the embroidery foot flowers For this type of embroidery is very irn portmt to guide the emhroiderv hoop evenly and prog steadily.
- Page 58 Programming the computer with embroidery stitches and monograms Lengthen ing a pattern at the Compiling various programs same stitch density from 00 to 99 Fancy stitch programs can be varied in length at • The Creativo computer has 16 M memor the same stitch density when the display at key 5+ trom M 0 to M 15 lights up The pattern length selector is set be-...
- Page 59 (> ]‘, <> •1 (Fig 4) 1-Is...
- Page 60 loon All programs and program combinations can be altered to any length or width and entered in the computer Changing the stitch length Before the last program entry for a fancy pattern the stitch length has to he deteimined (using key 7) (Fig 2) This change of stitch length also determines the length of stitches in the programs entered before...
- Page 61 I I LiT I Ti prog prop <- 000& 2-’ Changing the Checking the stored stitch width programs The stitch width can he changed before each pro It you wish to check the stored program and you gram entry (using key 8) have entered more than tour patterns, twelve let ters or figures push key 6 display”...
- Page 62 ,;:Y’-’ ‘.S’r .“ •• Border 2 consists of the Ornamental borders Second workstep, met lIe motif following programs: • Select program 45 give free rein to your creativity hy r’omhi 62, 62 (6 mm) and 00 Sew the pattern at sewing-foot width along tI nina various patterns The ornamental horders First workstep fancy seam sewn before...
- Page 63 ;a:’, -?‘ ca5-r -s-’ ,,,, Pattern variations made with Sewing fancy seams with the programmed reverse the twin needle optional straight stitches prog You will find numerous ways of expressing your Optional 3- 5 creative talent by varying or rearranging the reverse straight-stitch patterns programs 02 Veedle twin needle.
- Page 65 N’ I’ [imii i riTmim TTI1TJ ITFI ii prog ,i,o &&7& o,on ‘13 Sewing block letters ThA Sewing script capital letters Example: J 0 U R N A L • Before programming, select a free M-memory Example: • Push”mem+” key 48 •...
- Page 66 A spacing can be selected for every block capital ‘o • Push “mem+” key48 or outline letter. Three or four spacing characters PFAFF-CREA TI YE • At key. “Prog” 22 (left, minus) select :dA are input, depending on the size of spacing /40/ (Fig.
- Page 67 Sewing texts Correcting program entries If you wish to divide a text into several lines, select If you have missed out a letter or figure or entered a tree M-rnemory for each line and enter the text a wrong one, you can correct the entry Cancel After the last program entry, press the single pat the individual entries back up to the mistake using tern key Insert a spacing after each word (page...
- Page 68 ®/ &&1& Correcting characters with the balance key Sometimes, letters or words may shift, depending on the fabric used. This can be corrected with the balance key (Fig. 2) Words or texts can only be corrected together. The letter or figure last entered is corrected towards plus or minus with key 5 and entered with “mem+”...
- Page 70 Suggest Ions (not described) -s-s’. >1 >1 JLLJ Arrow Sewing direction Sewing direction For the pattern Fig. 2, for example, the following Arrow Cross-stitches Beginning of sewing (needle penet Point Beginning nt sewing (needle penetra combinations are stored: Point Three worksteps are required. tion) ion) prog...
- Page 71 70, 71, 70i, 71, 72 70, 71, 71i 4 x 71 I x 71 2 x 71 +“ will 3 x 71 Call off...
- Page 72 lw-I Border 4 consists following programs 70. 71. 71, Fourth workstep (edge) First workstep (centre mold) • Select a tree M memory • Mark the centre-line on the material • Push mern+ key 48. • Select program 71 • Enter programs and sew along the marked line 1 x 70 Second workstep...
- Page 73 Sewing direction Arrow Sewing direction (M3 to MlO) Beginning of seam (needle ‘= penetration) • Select the next free M-memory. M3• Select the next free M-memory M6• Select the next free M-memory. Motifs with cross stitches • Push”mem+” key • Push “pattern start” key. •...
- Page 74 NeecJIe Needle chart Using the adequate needle guarantees better processing of the material. JSuitabIe for Stitch length Stitch width Needle System & No. Fabric weight: Fabric weight: Fabric weight: spacing heavy medium light 2.5 mm 1.6mm 1iui-wide 130/705 H-ZWI Needle size: Needle size: Needle size: cording...
- Page 75 Fault finding Remedy- Cause Cause: Remedy: 1. Machine skips stitches 5. Machine feeds irregularly or not at all Push needle up as far as it will go, its flat Needle not inserted correctly. P—. Lint has accumulated between tooth Remove needle plate and remove lint with shank side facing rear.
- Page 77 Index Sewing instructions Darning tears Alphabet, outline Lace, inserting and sewing on Serging seams Alphabet and numbers, programming 131—140 Darring, elastic slitch Lap-felling Serging with zigzag stitch and overlock foot 62 Appliquéing Darning, automatic Leather seams Sewing with twin-needle 73, 74, 75 Darning, straight-stitch wool Letters and numbers in different sizes Shell edging...
- Page 85 <I ‘ ‘-“-‘ ‘-‘‘ — ‘-‘ — ‘—‘ — — ‘-“-‘ — ‘., — ‘ ‘...
- Page 86 ‘ ‘ ‘ ‘ ‘-‘...
- Page 87 Description Application inmm Light buttonhole For sewing buttonholes in blouses, shirts 7.0 to 16 mm and linen. ‘ Light buttonhole For sewing buttonholes in bed linen. 7.0 to 44 mm Stretch buttonhole For buttonholes in stretch fabrics (jersey, etc.) Eyelet buttonhole For buttonholes in jeans, trousers with wedge tack and sportswear,...
- Page 90 Max.width Description Application in mm 30-69 73-80 Embroidery stitch For fancy seams, ornaments, borders and 84-89 programs embroideries. Scalloping For table linen, napkins, bed linen, etc. 60,61 ,63 edge decoration 70’72 Cross stitch For cross-stitch embroidery in children’s wear, 81 -83 programs blouses, covers, etc.
- Page 91 Electrical connection Lift off the cover and fold down the carrying handle. Compartment A is for storing the foot control, mains lead and instruction book. irn portent! nser two I at,tenes I a t.ed !n rertr cti’ sri hni I, pages 3. however, without turnino on the machine, .p*.
- Page 95 Winding from a second spool: Swing bobbin winder thread guide 44 to the front. Pull the thread into guide 40, into bobbin winder tension A and around finger B. Now pass the thread to bobbin winder 25 and wind it a few times clockwise around the bobbin.
- Page 96 Winding through the needle Only with metal sewing foot! Swing bobbin winder thread guide 44 to the front. Raise sewing foot. Switch on the dual feed. Set needle at top position. Place bobbin on bobbin winder 25. Disen gage sewing action. Pull the needle thread under the sewing foot to the right and through guide 44 (into open ing A and around finger B, see illustra...
- Page 97 Inserting the bobbin: insert bobbin so that the thread unwinds as shown (A), pull thread through slot (B) and out of opening (C). Checking the bobbin thread tension: with a brief, sharp upward movement of your hand the bobbin must slip downwards (turn screw D to the left for weaker tension and to the right for stronger tension).
- Page 99 Threading Switch off main switch 9. Set needle at top position. Raise sewing foot. Pull the thread as shown by the arrow into groove A, to the left past guide C, from below into slot B, into takeup lever 41, back to slot B and into the right-hand guide on the needle holder.
- Page 100 Swing threader to front against needle and hold it there. Place thread in hook E from below. Swing threader to rear, releasing thread at same time, and when the threader has moved upwards, pull the thread fully through the needle eye.
- Page 103 The exclusive Pfaff solution ist built-in dual feed, a walking foot that simul taneously feeds the fabric from above as the feed dog moves it from below.
- Page 104 Swing work support 11 against the machine arm. —-- Switch off main switch 9. Now place the material under the sewing foot. To place extra thick materials below the presser foot, raise presser bar lifter 17 higher and hold until fabric is in correct sewing position.
- Page 105 Switch on main switch 9, have material cover needle hole (see illustration B) and lower the sewing foot onto it by pressing presser bar lifter 17 down wards. Position A of lever 17 is for darning. Press the pedal. The harder you press, the faster the Creative sews.
- Page 107 Raising the presser bar lifter: When you have finished a seam the needle must be fully raised, Then raise presser bar lifter 17. Removing the work from the machine and cutting the threads: Remove the material to the rear and pull the threads in sewing direction into thread cutter 37 in order to cut them.
- Page 108 Important! When the main switch is pressed to switch the machine on, the sewing lamp lights up. When the machine is switched off by pressing the main switch, removing the mains plug or by power failure, the program memory in the computer saved by a battery back-up.
- Page 109 Electronic bobbin thread monitoring: Electronic actual speed selection: Bobbin thread monitor 14 flashes Press key 16 for slow sewing. Display before bobbin thread runs out, It goes B lights up. The machine sews at half out again when the full bobbin is speed.
- Page 110 The controls of the Creative comput The computer of the Creative contains three different alphabets and two sets Keys for balance and pattern of numerals, punctuation marks and 99 programs. The programs are illus length trated in the table with their seam Key for program sequence and recommended sewing modes types and setting numbers or symbols...
- Page 111 ___________ _______ prog 0_i’m 0_/‘m_0_i’m iTh__i’m Program selection: When the Creative is switched on, pro gram -00- appears in display 21. Enter the required number in program dis play 21 using programming keys 22. The alphabet and number symbols are selected with the left keys, while let ters and numbers are selected with the right keys.
- Page 112 I I I I 1 I I I I __ __ __ \...
- Page 113 ______________________________ ii i ‘ii;i III i ri Balance, or correction of reverse stitches The balance control is used for correc- prog ting pattern- or program combinations which are sewn with a slight shift owing to influences by the type of material or working method used.
- Page 114 Checking a program combination by Storing program combinations: running It through the display: When more than 4 programs or more The creative computer contains 16 M memories, MO to M 15. A maximum of than 11 letters or numbers are stored, the program can be run through dis 484 programs can be stored in the play 21 from right to left by pressing...
- Page 115 _______ __ _______ __ _______ _______ _______ _______ prog ,9,ç ‘...
- Page 116 •1’ prog...
- Page 117 ‘‘o o Recommended sewing modes: Setting the pattern start: For every program from 00 to 99, and for letters and figures the machine will Key 26 “pattern start” has three func indicate recommended sewing modes tions: with regard to dual feed, needle thread Push pattern start”...
- Page 120 E is...
- Page 122 (A).
- Page 123 Cleaning and oiling • Pull out the mains plug. Tilt the needle plate up at the back (A) and remove it (B). Clean the feed dog and the parts in the sewing hook area with a soft brush. Clean the bobbin thread monitor as instructe d on page 157.
- Page 131 ‘— —...
- Page 133 prog — ‘- — prog 11 is...
- Page 134 prog 6.0 mm Stitch length: Needle: sewing thread Thread: If you cannot find a suitable buttonhole thread for Buttonhole thread as needle thread using two needle specific sewing work, threads together. Place one thread to the right, prog and the other to the left of disc “C”, (see page 96) and Insert both threads In the needle eye.
- Page 135 • The needle must always be in the highest posi Through adjustm ent of the needle (needle posi tion. tion), certain sewing work can be carried out easier. For example , if you wish to stitch at a nar row margin such as on collars or when inserting e.g.
- Page 136 -‘----...
- Page 138 •...
- Page 141 “-...
- Page 146 Overcas ting raw edges with the Serging with overlock foot zigzag-s titch For materials which contract during serging use the overlock foot. 3—5 prog -...- as required Stitch-width: 3—5 Sewing thread: embroidery, darning, or sewing thread as required Stitch-width: The stored zigzag-stitch is suitable for serging of Serge the raw edge with the required zigzag light materials.
- Page 148 (for underwe ar) prog Cut off the stretched elastic tape close to the edge. Gather the fabric to the waist size using straight stitch. Push the part prepared in this way between the elastic tape and pin it firmly. Stitch it on using elastic stitches.
- Page 152 prog 3—5 Honeycomb stitch is especially suitable as a means of securing hems on stretchable lining materials. Fold the hem double up to the hem edge and overcast with honeycomb stitch (Fig.1). (T-shirt seam) prog KK2-3 Needle: double needle, 4 mm distance For a 2 cm hem, turn over and baste about 2.5cm of material.
- Page 157 11111 —...
- Page 159 Darning with wool prog 1013a 2—3 — Feed dog: lowered Presser bar lifter: in darning position (see page 74) Embroidery and darning thread Sewing thread: Draw the wool thread through the needle hole of the darning foot and into the thread guide (Fig. 1). Place the wool thread under the darning foot.
- Page 163 —...
- Page 164 prog —1 —2 “+“...
- Page 166 ‘1 — —1 “+“...
- Page 167 Ic,lSl IJ2I1 I [Lk1 prog ‘-o Determining the second bartack (semi-automatic) If you wish to determine the second bartack in a programmed buttonhole, press ‘tie-off/button hole” key 19 (Fig. 2). A dash flashes in display 21 (Fig. 3) at the right of program 90. The machine now sews slowly just before the end of the second seam.
- Page 168 prog will “+“ “—“,...
- Page 169 prog Adapting the buttonhole length A garment may consist of different numbers of fabric plies, e. g. the buttonhole strip may consist of three plies and the collar stand of six owing to — the folded seam edge. In this case it is necessary to program the buttonhole for varying numbers of fabric plies in order to maintain the same button hole length as on the three-ply buttonhole strip.
- Page 170 “—“,...
- Page 171 ii hi t:’’ !5:j’i 1’l prog .J_o &&&&& Determining the second bartack (semi-automatic) If you wish to determine the second bartack in a fully automatic buttonhole, press “tie-off/button hole” key 19 (Fig. 6). A dash flashes in display 21 (Fig. 5) at the right of program 91. The machine now sews slowly just before the and of the second seam.
- Page 172 “÷“ “—“,...
- Page 173 —...
- Page 178 —...
- Page 179 — —...
- Page 181 —...
- Page 192 f4• Border 1 consists of the following programs: Centre motif: 64 Side motif: 39 First workstep: centre motif • Select program 64. • Sew the programmed stitch pattern. Second workstep: side motifs • Select program 39. • Sew the programmed stitch pattern along both sides of the centre motif.
- Page 194 Fancy seams in leather prog —3+ Optional Thread: embroidering/darning thread Needle: 130/705 H-LR, size 80 Since leather is a pliable material, an underlay of double-folded paper or light non-woven material (e. g. vylene) should always be used. Do not set the stitches too close, because leather splits easily and cracks in leather show up on the fini shed work.
- Page 198 Hem-stitching with wing needle prog 9798 —3+ Thread: embroidering/darning thread Needle: wing needle For this work, four threads are drawn, five threads are left in, then a further four threads drawn. Over- sew the five threads left in the fabric using pro gram 97 or 98 (Figs.
- Page 200 —...
- Page 204 — —...
- Page 205 —...
- Page 209 —“...
- Page 218 AfiCL2EE&HLL — 3L51UEI3 I fl...
- Page 226 — —...
- Page 228 —...
- Page 232 — — — —...
- Page 238 —...
- Page 239 +“ +“ +“...
- Page 242 130/705 H-SUK jersey fabrics, Quiana and Simplex. ball point 70,110 Stretch-fabric needle developed Medium 130/705 H-PS especially for Pfaff. Particularly suitable ball point 75, 90 for delicate stretch and knitted fabrics. Wide-meshed corsetry, Lycra, Simplex Heavy 130/705 H-SKF and Lastex.
- Page 243 — — — — — — —...
- Page 245 Cause: Remedy: 5. Machine feeds irregularly or not at all Lint has accumulated between tooth Remove needle plate and remove lint with rows of feed dog. a soft brush. Feed dog lowered. (Slide control is at Push slide control to the left. right).
- Page 246 €...
- Page 248 — — — — — —...
- Page 252 G. M. PFAFF Aktiengesellschaft Werk Karisruhe-DurlaCh Gritznerstraf3e 11 7500 Karlsruhe 41 Printed in West Germany Heidelberger Reprographie A. Grosch GmbH 6904 Eppelheim Seestral3e 72 Subject to alterations in design. Nr. 30276 HR engl. 6/93...