Table of Contents
Advertisement
Quick Links
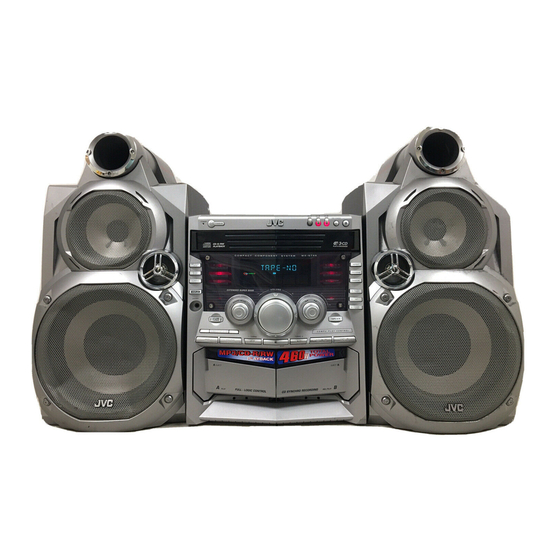
COMPACT COMPONENT
SYSTEM
CA.MXGT88
CA.MXGA77
CA-MXGT88
CA-MXGA77
_c3D
_OO_
_
_e.o-s
DmlTAL AUDIO
Dmn'_L
AUDIO
INSTRUCTIONS
For Customer Use:
Enter below the Model No. and Serial
No, which are located either on the rear,
bottom or side of the cabinet, Retain this
information for future reference.
Model No.
Serial No.
LVT1010-003B
[B]
Advertisement
Table of Contents

Related Manuals for JVC CA-MXGT88


Summary of Contents for JVC CA-MXGT88
- Page 1 COMPACT COMPONENT SYSTEM CA.MXGT88 CA.MXGA77 CA-MXGT88 CA-MXGA77 _c3D _OO_ _e.o-s DmlTAL AUDIO Dmn'_L AUDIO INSTRUCTIONS For Customer Use: Enter below the Model No. and Serial No, which are located either on the rear, bottom or side of the cabinet, Retain this information for future reference.
- Page 2 Warnings, Cautions and Others IMPORTANT FOR LASER PRODUCTS IMPORTANT for the U.K. REPRODUCTION OF LABELS DO NOT cut off the mains plug from this equipment. If the plug fitted is not suitable for the power points in your home or the _i' CLASSIFICATION LABEL, PLACED ON EXTERIOR SURFACE cable is too short to reach a power point, then obtain an appro- priate safety approved extension tead or consult your dealer.
- Page 3 SAFETY INSTRUCTIONS "SOME DOS AND DON'TS ON THE SAFE USE OF EQUIPMENT" This equipment has been designed and manufactured to meet international safety standards but, like any electrical equipment, care must be taken if you are to obtain the best results and safety is to be assured. Do read the operating instructions before you attempt to use the equipment.
- Page 4 Introduction We would like to thank you for purchasing one of our JVC products. Before operating this unit, read this manual carefully and thoroughly obtain the best possible performance from your unit, and retain this manual for future reference. AboutThis Manual Powersources •...
-
Page 5: Table Of Contents
Contents Location of the Buttons and Controls ....... Front Panel ..............Remote Control ............Getting Started ............Unpacking ..............Putting the Batteries into the Remote Control ... 6 Connecting Antennas ..........Connecting Speakers ..........Connecting Other Equipment ........Canceling the Display Demonstration ....... -
Page 6: Locationof The Buttonsand Controls
Locationof the Buttonsand Controls Become familiar with the buttons and controls on your unit. FrontPanel \\\\\\\i DDDDDDDDDDD... - Page 7 Continued DisplayWindow GROUP TRACK NEWS INFO ILN. ILN: ILN ILN:ILN mmmmmmmmmmm nmmnmnmmmnm mmmmmmmmmnm mmmmmmnmmmm nmnmmmnmmmm mmmmmmmmmmm mmmmmmmmmmm mmmmmmmmmmm mmmmmmmmmmm mmmmmmmmmmm mmmmmmmmmmm mmmmmmmmmmm mmmmmmmmmmm mmmmmmmmmmm mmmmmmmmmmm mmnmmmmmmmm mmmmmmmmmmm mmmmmmmmmmm mmmmmmmmmmm mmmmmmmmmmm mmmmmmmmmmm mmmmmmmmmmm mmmmmmmmmmm mmmmmmmmmmm mmmmmmmmmmm mmmmmmmmmmm mmmmmmmmmmm mmmmmmmmmmm mmmmmmmmmmm mmmmmmmmmmm mmmmmmmmmmm mmmmmmmmmmm mmmmmmmmmmm...
-
Page 8: Remotecontrol
RemoteControl Remote Control BEEP ON/OFF button (i 1) SLEEP button (28) SLEEP Number buttons (12, 18) SOUND TURBO button (10) VOLUME + button (10) la_/-qla (reverse search/last rewind) button (12, 17 - 19, 21, 22) SUBWOOFER LEVEL -button (10) AUX button (9) Pressing this button also turns on the unit. -
Page 9: Gettingstarted
GettingStarted Oont,nued Unpacking Connecting Antennas FMantenna After unpacking, check to be sure that you have all the following items. The number in the parentheses indicates the quantity of the pieces supplied. FM antenna (supplied) • AM (MW) loop antenna(l) • FM antenna •... -
Page 10: Connecting Speakers
Connecting Speakers AM (MW) antenna Vinyl-covered wire Speaker cord Black Speaker (not supplied) (blue/black) _ cord (red/black) Blue Black Speaker cord Speaker cord (blue/black) (red/black) From right From right AM (MW) loop antenn_ main subwoofer's (supplied) speaker's terminals terminals From left From left Press and hold the clamp... -
Page 11: Connecting Otherequipment
Connecting OtherEquipment NOW you are ready to plug in the unit and other connected equipment. You can connect audio equipment--used only as a playback device. Cancelingthe DisplayDemonstration is on. • DO NOT plug in any equipment until all • DO NOT connect any equipment while the power When connecting the AC power cord into a wall outlet, the connections are complete. -
Page 12: Commonoperations
CommonOperations TurningOn or Offthe Power 2 Turn the 1_141/I,,-I,,-I control to adjust the hour, then press SET. To turn on the unit, press Oil so that the STANDBY lamp goes off, pn, 'EP n,,, U IJ_1 I _1 The minute digits start flashing on the To turn off the unit (on standby), press O/I... -
Page 13: Adjustingthe Volume
Continued Adjustingthe Volume Reinforcing the BassSound You can adjust the volume level only while the unit is turned This function only affects the playback sound, not your recording, This function only affects the playback sound, not your Press SUBWOOFER LEVEL + to g-,_-@? .. -
Page 14: Selectingthe Soundmodes
Selectingthe SoundModes When using the remote control, press SOUND MODE to select the sound mode. This function only affects the playback sound, not your • Each time you press the button, the sound recording. modes change as follows: i--" D.CLUB _ HALL --_-STADIUM "-_- ROCK --I I {°a°°°°L°B/ You can select one of the 6 preset sound modes (3 surround... -
Page 15: Listeningto The Radio
Listeningto the Radio Tuningin to a Station--Auto Search On the unit ONLY: 1 Tune in to the station you want to preset (in this example, of FM 87.50). The unit automatically turns on and tunes Press FM/AM. • See "Tuning in to a Station--Auto Search,"... -
Page 16: Receiving Fm Stations With Rds
Receivin FM Stationswith RDS Searching forPrograms byPTYCodes (PTY RDS (Radio Data System) allows FM stations to send an additional signal along with their regular program signals. Search) For example, the stations send their station names, as well as information about what type of program they broadcast, such One of the advantages of RDS is that you can locate a... -
Page 17: Switching Temporarily Lo A Program Type Of Your Choice
SwitchingTemporarilyto a ProgramTypeof YourChoice The Enhanced Other Networks function allows the unit to If there is no station broadcasting the program have selected switch temporarily to a broadcast program of your choice (NEWS or INFO) from a different station. The unit continues tuning in to the current station. -
Page 18: Playing Back Cds
Pla, LoadingCDs This unit has been designed to playback the following CDs: • Audio CD • CD-R (CD-Recordable) Press • CD-RW (CD-ReWritable) The unit on and the automatically turns • MP3 disc (MP3 files recorded on a CD-R or CD-RW)* carrousel comes out, 2 Place one or two discs... - Page 19 Continued • Each time you press the button, the indication on the • When the MP3 playback mode is the TRACK mode display changes as follows: (See also page 19.) Current track title scrolls. ALLDISC_I [ S(: i*-_1 (initial setting) * See page 21.
-
Page 20: Basiccdoperations
BasicCDOperations One Discplay When 2 or 3 CDs are loaded on the disc trays, you can select one particular disc to be played back. While playing a CD, you can do the following operations. On the unit ONLY: ToexchangeCDsduringplaybackof another Press DISC CHANGE to change the CD and the DISC CHANGE... - Page 21 Continued Togo to anothertrack directlyusingthe number For MP3 disc: buttons When the MP3 playback mode is the TRACK mode For Audio CD: (See also page 19.) C!D C!3 Ci3 Pressing lhe number button(s) before or Turn lhe 1_*,9/1_1_1 c ontrol before or during during play afiows you l_)start playing playback,...
-
Page 22: Changing The Mp3 Playbackmode
Changing the MP3 PlaybackMode Turning On orOfftheResumePlayfor MP3 Disc For MP3 disc, this unit can store the number of the track that When playing an MP3 disc, you can choose the playback mode oftbe MP3 disc as follows: you have stopped playback. By pressing CD ,111, you can start playback again from the beginning of the same track_ •... -
Page 23: Programming The Playingorderofthe Tracks
Continued Programming the PlayingOrderofthe Tracks 5 Program other tracks you want. mProgram Play • To program 1racks from the same disc, repeat step 4. • To program 1racks from a different disc, repeat steps 3 You can arrange the order in which the tracks play before you and 4. -
Page 24: Playing At Random Random Play
Playingat Random--Random Play RepeatingTracksor CDs--Repeat Play The tracks of the selected CD will play at random. You can have all the CDs, the program or the individual track • To use Random play, you have to cancel the Program play. currently playing repeat as many times as you like. -
Page 25: Playing Back Tapes
Playnng BackTapes PlayingBacka Tape To stop during play, press II. To operate the other deck, press TAPE A/B (or A/B on the remote control), then TAPE I_. Press __ EJECT for the deck you want to use. To fast-forward the tape, press _ (or _t/1_1_ on the remote control). -
Page 26: Recording
Recording IMPORTANT: Recordinga Tapeon Deck B • It should be noted that it may be unlawful to re-record pre-recorded tapes, records, or discs without On the unit ONLY: consent of the owner of copyright in the sound or video recording, broadcast or cable program and in any... -
Page 27: Dubbing Tapes
Dubbing Tapes CDSynchronized Recording You can easily record a CD onto a tape. On the unit ONLY: • This function does not work for MP3 discs. When recording an MP3 disc onto a tape, see "Recording a Tape Press TAPE I_, then I1. on Deck B"... -
Page 28: Usingthe Timers
Usingthe Timers On the unit ONLY: There are three timers available--Daily Timer, Recording Timer, and Sleep Timer. Press CLOCK/TIMER Before using the timers, you need to set the clock built in the repeatedly until "DAILY" unit. (See "Selting the Clock" on page 9.) appears on the display. - Page 29 Continued 5 Turn the I-il.,(l/i,..tl,-I control to select To turn on or off Daily Timer after its setting is done the source to play, then press SET. Press CLOCK/TIMER repeatedly • Each time you tam the 14141/i..t_l c ontrol, until "DAILY" appears on the display. the source changes as follows: To turn off the Daily Timer, press TUNER FM'_"_TUNER...
-
Page 30: Usingrecordingtimer
UsingRecordingTimer CLOCK/TIMER again. Press "ON TIME" appears for 2 seconds, then the unit enters on-time setting mode. With Recording Timer, you can make a tape of a radio broadcast automatically. You can set the timer whether unit is on or off. HowRecordingTimer actuallyworks The unit automatically turns on, tunes in to the specified... -
Page 31: Usingsleeptimer
Timer Priority Toturn onor off RecordingTimer after its setting is done Since each timer can be set separately, you may wonder what Press CLOCK/TIMER repeatedly happens if the setting for these timers overlaps. until "REC" appears on the display. Here are some examples. To turn off the Recording Timer, •... -
Page 32: Maintenance
Maintenance To get the best performance of 1he unit, keep your discs, tapes, and mechanism clean, Handlingcassettetapes Cleaningthe unit • Stains on the unit • If the tape is loose in its cassette, take tip the slack by inserting a pencil in one of Should be wiped off with a soft cloth. -
Page 33: Additionalinformation
AdditionalInformation Description of the PTYcodes: NEWS: News. WEATHER: Weather reports and forecasts. FINANCE: Stock Market reports, commerce, trading etc. AFFAIRS: Topical program expanding or enlarging upon the news -- debate, or analysis. CHILDREN: Programs targeted al a young audience. INFO: Program the purpose of which... -
Page 34: Troubleshooting
Troubleshooting If you are having a problem with your unit, check this list for a possible solution before calling for service, If you cannot solve the problem from the hints given here, or the unit has been physically damaged, call a qualified person, such as your dealer, for service. -
Page 35: Specifications
Specifications Design and specifications subject to change without notice. CA-MXGA77 CA-MXGT88 Amplifier section Amplifier section Output Power Output Power SUBWOOFERS SUBWOOFERS 100 W per channel, rain. RMS, driven 80 W per channel, min. RMS, driven into 6 _ at 63 l+z with no more than into 6 _ at 63 Hz with no more than 10% total harmonic distortion. - Page 36 VICTOR COMPANY OF JAPAN, LiMiTED © 2003 VICTOR COMPANY OF JAPAN, MMITED 0203TMMMDWSAM...