Advertisement
Quick Links
OWNER'S MANUAL
GUIDE D'UTILISATION • MANUALDEL USUARIO
WARNING:
CLEANERASSEMBLYMAY INCLUDESMALL PARTS.SMALL PARTS CAN
PRESENTA CHOKINGHAZARD.
When using an electrical appliance, basic precautions should always be
followed, includingthe following:
• READALL INSTRUCTIONS BEFOREUSINGTHIS APPLIANCE.
* ALWAYSFOLLOWTHESESAFETYINSTRUCTIONS.
* SEESEPARATEMANUALPERTAININGTO BATTERYAND CHARGING
OPERATION.
* DO NOTLEAVEVACUUM CLEANER UNATTENDED.
* WARNING:FULLYASSEMBLEVACUUM CLEANERBEFOREOPERATING.
* WARNING: T HIS PRODUCT CONTAINS CHEMICALS KNOWNTO THESTATEOF
CALIFORNIA TO CAUSECANCER, B IRTHDEFECTS OR REPRODUCTIVE HARM.
WASH HANDS AFTER USING,
• Donotusetheunit, store,or chargebatteryoutdoors or on wet surfaces. D onotallowto getwet.
• Donotallowto be usedas a toy.Close attenlJon i s necessary w henusedbyor nearchildren.
• Useonlyasdescribed in this manual. Useonlymanufacturer's r ecommended a ttachments.
• Donotusechargerwith damaged cordor plug.If vacuumor chargeris notworkingasit should,
hasbeendropped, damaged, l eft outdoors, or dropped intowater,returnitto a service centerfor
inspection. CalltheExclusive Hoover P latinum ColleclJon
TM
Member Services Line1.877.MYPLTNM
(1.877.697.5866) Mon.-Fri. 8 am-5pmEST (USA & Canada) or visitwww.hoover.com forthe
nearest s ervice center.
• Donotpullor carrybychargercord,usecordas a handle, c losea dooroncord,or pull cordaround
sharpedgesor comers. D onotrunappliance overcord.Keepcordawayfrom heatedsurfaces.
• Donotunplug chargerby pulling on cord.To unplug charger, g raspthe plug,notthecord.
** Donothandle charger(including chargerplugandterminals), b attery, o r appliance with wet hands.
Keephair,looseclothing, f ingers,andall partsof bodyawayfromopenings andmovingparts.
Donotpickup anything that isburningor smoking, s uchascigarettes, matches or hotashes.
Donotusethevacuumcleanerwithoutfilterand dirtcupin place.
• Useextracarewhencleaning on stairs.
• Donotuseto pick upflammable or combustible liquidssuchasgasoline, o r usein areaswhere
theymaybe present.
• Leaks from batterycellscanoccurunderextreme conditions. I f anyliquidgetsonthe skin
washquicklywith soapandwater.If anyliquidgetsintotheeyes,do notrubeyes,immediately
flushthem with cleanwaterconlJnuously for a minimumof 15 minutes. S eekmedical a ttention
immediately.
• Useonlythe charger ( Hoover P art#BH50005) s upplied bythe manufacturer to recharge.
• Storethevacuumcleanerindoors. P utthevacuumcleaner a wayafteruseto prevent t ripping
accidents.
• Useonlybattery(Hoover Part# BH50000) suppliedbymanufacturer to operate this product.
• Always turn off andremove batterybeforeconneclJng o r disconnecting o plJonal motorized power
brush,or beforeservicing.
• Donotdispose of batteryin a fireor trashcompactor. Seebatterydisposal sectionat endofthis
manual f ordirections.
• Donotputanyobjectintoopenings. D onotusewithanyopening blocked; k eepfreeof dust,lint,
hair,and anything that may reduce air flow.
• Donotincinerate the charger, b attery, o r appliance evenif it is severely damaged. T hebatteries can
explode in a fire.
4
5
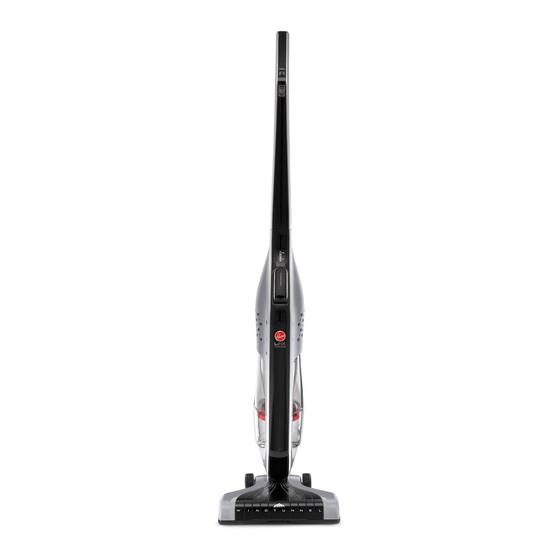
'_ FRONT
1. On/Off Switch(O=OFF,
8
7
9
12
0
DJkT cuP AND ihLTEP_ BACK
Z
FilterCap
11. Handle
I=Suction ON,
II =Suction and Brush ON)
2. Fuel Gauge
3. Battery Cavity
4. Dirt Cup
5. Large Debris Opening
6. Bottom Nozzle Cover
8.
Filter(inside filter cap)
12. Dirt Cup Release
9.
Baffle Tube
Button
10. Bottom Empty
13. Carry Handle
Release Button
14. Nozzle Release
Button
11
(underneath
nozzle)
If you need assistance:
Visit our website at
hoovencom
Click on the "Customer Service" link to find the service outlet nearest you OR Call
1-800-
944-9200
for an automated referral of authorized service outlet locations (U.S. only) OR Call the Exclusive Hoover Platinum
Collection
TM
Member Services Line 1.877.MYPLTNM
(1.877.697.5866),
Mon-Fri 8am-5pm EST.For assistance in
French or Spanish, call
1.800.263.6376,
Mon-Fri 8am-7pm EST.
Charge batteiy fully before
first use. NOTE: See batteiy
and charging manual for bat-
te_y charging instructions. Use
only manufacturer's supplied
or recommended battery and
charger.
Insert charged batteiy into bat-
teiy cav@ until latch is locked
into place. NOTE: Be sure
to turn switch to off position
marked "0".
Hold down nozzle with foot
and tilt back to reclining posi-
tion.
To turn vacuum on, roll button
forward.
PUSH DIAL
O-OFF
I - Suction ON
II - Suction and BrushroJJ ON
To remove and charge batteq/,
pull on release lever located on
end of batteiy and pull out gen-
tly. Return switch to off position.
Dirt Cup & Filter Removal & Replacement
IMPORTANT: For best results, clean after each use.
REGULAR MAINTENANCE: Each time the dirt cup is emptied, the filter should be cleaned
(Filter will be discolored after use. This will not affect the filter's performance.)
Dirt Cup Removal and Cleaning
To Remove dirt cup, depress
the dirt cup release button
Push door closed until latch clicks.
located on the top of the dirt
cup and tip away from the
body of the unit.
Filter Removal and Cleaning
Press dirt cup emp_ button over trash can to release debris.
Pull out filter cap. Pull out filter and brush clean. Rinse under cold water
as needed.
Dirt Cup and Filter Replacement
WARNING:
Always dry filter
for 24 hours before replacing.
WARNING:
Do not use deter-
gent
or
hot water
to clean
filter.
REPLACEMENT
Insert filter cap into dirt cup.
Insert filter into filter cap with
micrdayer
side facing in.
Baffle Tube Removal and Replacement
Place bottom of dirt cup onto
housing and pivot
into place
until dirt cup
release
button
locks.
REMOVAL
Hold dirt cup right side up and
press bottom release button to
open trap door.
Turn baffle tube counter clock-
wise until it stops. Pull out baffle
tube, hold over trash can and
shake free debris.
Belt and Brushroll Replacement
REPLACEMENT
To replace
baffle
tube, insert
back into dirt cup, align slots
and twist clockwise
till
tube
locks in place.
WARNING:
Remove batteq/before
self/icing.
Turn vacuum nozzle over. Remove screws indicated
by arrows on
bottom nozzle plate. Lift plate off nozzle bottom to access brush, belt
and nozzle.
After replacement turn brushroJJ making sure belt turns freely.
Return nozzle plate and screws.
Battery Fuel Gauge: Battery Capacity Indicator Information
All three LEDSwill momentarily light when the product's power switch is turned on. Then the
Battery Fuel Gauge will indicate the pack's remaining capacity as noted below.
NOTE: Unit and lights will turn off when battery is fully discharged.
3 LEDs lit
Remaining battery capacity > 75%
2 LEDs lit
Remaining battery capacity > 50%
1 LED lit
Remaining battery capacity > 25%
1 LED blinking
Remaining battery capacity < 25%
Battery Disposal
WARNING: R ISKOF EXPLOSION OR
EXPOSURE TOTOXIC MATERIAL
@
CAUTION:
The battery used in thisdevice may presenta riskof fire or chemical
burn if mistreated.Do not disassemble,heat above manufacturer's maximum
temperaturelimit (60°C/140°F), or incinerate.Replacebattery with HOOVER ®
battery Part# BH50000 only. Use of anotherbattery may .present a riskof fire
or explosion.Disposeof used battery promptly.Keep away from children.Do not
disassembleanddo not dispose of in fire.
Do not attemptto disassemble the battery or removeany componentprojecting
from the batteryterminals. T he battery and chargerhave no userserviceableparts.
Fireor injurymay result.Priorto disposal,protectexposed terminalswith heavy
insulating tape to preventshorting.
Service
ANY SERVICING SHOULD BE DONE BY AN
AUTHORIZED SERVICEREPRESENTATIVE
Call The Exclusive Hoover Platinum Collection
TM
Member Services
Line 1.877.MYPLTNM (1.877.697.5866)
USA & Canada
In the event that further assistance is required, see your Yellow Pages for an authorized HOOVER ® Dealer
or visit www.hoover.com.
Costs of any transportation
to and from any place of repair are to be paid by
the owner. The service parts used in this unit are easily replaced and readily available from an authorized
HOOVER e Dealer or retailer. Always identify your product by the model number and manufacturing code
when requesting information or ordering replacement parts. (The model number appears behind the dirt
cup of the product.)
If a minor problem develops,
it usually can be remedied
quite easily when the cause is identified
by
using the checklist below.
PROBLEM
Productdoes not turnon
Productturnsoff whib
in use
Productdoes not pick
up dirt
Brushroll will notturn
POSSIBLE R EASON
POSSIBLE S OLUTION
,-o_
]
_y
....
2. Battery isnot insertedproperly.
2. Make sure battery is fullyseated in battery cavity.
4. Battery istoo hot.
1. Battery isfully discharged.
3. Internalcomponent damage.
2. Filtermay be dirty.
4. Airpath may be dogged.
1. Brushrdlmay havean obstruction.
4. Removebattery and let cool for 30 minutes,replace battery and retry or
replace with second cha_ged battery.
1. Removeand charge battery or replace with second charged battery.
3. Call for service: Exclusve HooverPlatinumCdlection
TM
Member Services
Line 1.87ZMYPLTNM (1.87Z69Z5866).
2. Clean and/or wash flter.
4. Make surethe battery isremoved and the productisoff. Removenozzle by
pressingthe nozzle release buttonand pdling fne nozzle in a dowT_ward
moron.Removeany debrisclogged in the nozzle airpath. Reassemble
nozzle to the product.
1. Make surefne battery isremoved and the p_oductisturned ofr. Remove
nozzle by pressingthe nozzle release buttonand pdling fne nozzle in
a downward motion.Removeany debrisdogged in the nozzle airpath.
Reassemble nozzle to the product.
&Make surethe battery isremoved and the ploduct is o_.Removenozzle cover
replace with recommendedbelt and replace nozzle cover.
]i_o _ _xd
Y_tT
69
Special SiX Year Limited Warranty for Hoover@ LiNX
TM
Cordless Stick Vac
(Domestic
Use)
WHATTHISWARRANTY COVE RS
When usedand maintained innormalhousehold useand inaccoldancewttntneOwneFsManual,you HooverLiNXCordless
T M
productiswairanfed
against o riginaldefectsin matel:dand workmanship f or a Full s x yearsfromdate of pwchaseJtne "Warrantypel:od"). DudngtheWarranty Pel:od, H ooverwill
prayde laborand parts, a t nocostto you, to conedany suchdefectin products p urchased intheUnted Slates, U .S.Mihar¥ Exchange and Canada.
HOW TO MAKEA WARRANTY CLAIM
If thisproductisnotas warlanted,take or sendthe productto eithera HooverSalesand SelviceCenter or HooverAuthoFzed Warrant/Servce Dealeralong
wttnproof of purchase. Foran automated r_[erlalto authol:zed selviceoutlets inthe U.SA.,phone: 1-800-944-9200OR,/st Hooveronlineatwww.hoave{:com.
Foraddttonalassistance or informatbnconcerning thiswarrantyor theavailability of warlan_/serviceoutlets, phoneTheExclu;r,/e HooverPlatnum Collecton
TM
Member ServcesLne,Phone L87Z69Z5866, Mor'-Fri8am-5pmEST. In Canada,contactHoover Canada, 100 St_owger B lvd.Brockvlle,ONT K6B 5]9,
Phone:l.87Z69Z5866, Mon-Fri 8 am-5pm ESI_ For assistance in French o r Spanish, call 1.800.263.6376, Monfri 8am-TpmESI_
WHATTHIS WARRANTY DOESNOTCOVER
This Warrantydoesnotcoverhately charger) _ ltel; o r brusFuolL This warrantydoesnotcover:use of theproductina comme{dal operaton (such as maid, j anitol:d
and equipment r _ntalse{Vces), impropermaintenance o f the product, d amagedue to misuse, acts of God, nature, v andalism or otheractsbeyond thecontrolof
Hoover)owne/sactsor omissions, useoutside thecountry inwhchtheproductwasin_allypulchased and resales oFtheproductby theoriginal o wner: T his warranty
doesnotcover pickup, dellvel¥transportation or house calls. Howevel;if you mailyourproductto a HooverSales and Service Centerforwarrantyservce,cost
of shippingwill be paid oneway. NOTE:SeeBattel¥and Chaigermanualforwarrantyinformaton on theseproducts. Thiswairan_/doesnotapply to products
pulchased outsde theUntedStates, i ncludingtsterritories a nd possessions, a U.S.Mihal¥ Exchange and Canada.
OTHER IMPORTANTTERMS
This Warlan_/isnot#ansferable a nd may notbeassgned.This Warranty shallbe governed and consl_ued u nderthelawsof thestateof Oho. TheWarrantyPel:od
will notbeextendedby any replacement or repairperlormed underthisWarranty.
THISWARRANTYISTHE EXCLUSIVE WARRANTY AND REMEDY.ALLOTHERWARRANTIES, EXPRESSED
OR IMPLIED, I NCLUDING WARRANTIES O F
MERCHANTABILITY
OR FITNESS FORPARTICULAR
PURPOSE, AREDISCLAIMED. I N NO EVENT WILLHOOVERBELIABLE F ORANY SPECIAL, INDIRECT,
INODENTIAL ORCONSENQUENTIAL D AMAGES OF ANY KIND ORNATURE TOOWNER ORANY PARTY C LAIMING THROUGH OWNER,WHETHER
BASEDIN CONTRACT, NEGLIGENCE, TORT OR STRICT P RODUCTS L IABLILTY ORARISINGFROMANY CAUSE WHATSOEVER. Somestates do notallow
theexdusonof consequenfal damages, s o theaboveexclusion may notapply to you. This wairan_/gves you speci_ r:ghts; you may alsohaveothersthatvarY.
flora state to state.
CETASPIRMEUR A ETE CON!_U POURUSAGEDOMESTIQUE SEULEMENT.
AVERTISSEMENT :
L'ASSEMBLAGE
DEL'APPAREIL
COMPREND
DES PETITES PIJ:CES.
CES DERNIJ:RES
PRESENTENT
UNDANGER D'ETOUFFEMENT.
Pendant I'utilisation d'un appareil electrique,
toujours prendre des precautions
elementaires,
notamment:
• LIRE TOUTES LES INSTRUCTIONS
AVANT I )'UTILISER CET APPAREIL.
• TOUJOURS
_IVRE CES CONSIGNES
DESECURITE.
• POUR CONNAITRE
LES INSTRUCTIONS
RELATIVES._
LACHARGE DE_ PILE, CONSULTER
LEGUIDE D 'UTILISATION
DELAPILE ETDUCHARGEUR
(GUIDE S EPARE).
• NEPAS LAISSER L'ASPIRATEUR
SAN,S S URVEILLANCE.
• AVERTISSEMENT:
ASSEMBLER
ENTIEREMENT
L'ASPIRATEUR
AVANT D EL'UTILISER.
• MISE E NGARDE: CEPRODUIT CONTENT DES SUBSTANCES
CHIMIQUES
RECONNUES
PAR L',ETAT DELACALIFORNIE,COMME
CAUSANT
LECANCER, DES ANOMALIES
CONGENITALES
OUDES PROBLEMES
DEREPRODUCTION.
SE LA VER LES MAINS APRES A VOIR UTILISE LEPRODUIT
• Nepas utiliser I'appareil, ranger lechargeur ourecharger
lapile a I'ext_rieur
ousurune surface m ouill_e.
Garder ausec.
Nepas permetlre que I'appareil salt u tilis_ c omme u njouet, letre p articulierement
vigilant Iorsque I'appareil est u tilis_
par desenfants oua proximite d'enfants.
Utili ,ser cetappareil uniquement
delafaoon d ecrite dans ceguide. Utiliser uniquement
lesaccessoires
recommandes
parte fabdquant.
Nepas utiliser lechargeur silafiche oulecordon s ont e ndommafles.
Sil aspirateur
oulechargeur fonctionne
mal, s 'il
est t omb_ oua_t_en_lommafl_
oulai_ &I'ext_deur,
ous'ilest t omb_ dans I'eau, il dolt _ tre apport_ &unCentre de
service p oury _treinspect& Veuillez aBoeler leService exclusif d'assistance
t_l%honique
aux membres dela.gamme
Platinum C ollectionMC
au1877MYPLTNM
(1877697-5866),
dulundi auvendredi de8 h&17h(HNE, aux Efats-Unis
etauCanada)
ouvisiter lewww.hoover.com
pour c onnaftre lecentre d eservice l eplus proche.
Nepas tirer s urlecordon d uchargeur niutiliser lecordon d uchargeur pour transporter
I'appareil, utiliser lecordon
comme u ne poiflnee f ermer une porte surlecordon o utirerlecordon a utour decoins o ud'aretes vives. Nepas faire
passer I'appareirsur
lecordon. Garder lecordon e loigne detoute surface chauffee.
Nepas tirer s urlecordon p our d _brancher
lecharfleur. Saisir lafiche etnon lecordon p our d @ancher lechargeur.
Nep, as,man!puler
le,chargeur (ycompri,s la!iche et.les b arnes) I.a pile ouI',appareil
av, eclesmains m ouillees..
.
uareer _es c neveux, _es v etements
amp_es,
_es a oigts e ttoute autre p attie aucorps & oonne a istance aes ouvertures
et
despieces mobiles deI'appareil.
Nepas utiliser Iaspirateur pour r amasser
toute matiere qui d _gage delafum_e ouquibn)le, comme d es cigarettes,
des allumettes oudes cendres chaudes.
-_
Advertisement

Related Manuals for Hoover Linx Platinum collection


Summary of Contents for Hoover Linx Platinum collection
- Page 1 Line 1.877.MYPLTNM (1.877.697.5866) USA & Canada Dirt Cup Removal and Cleaning In the event that further assistance is required, see your Yellow Pages for an authorized HOOVER ® Dealer or visit www.hoover.com. Costs of any transportation to and from any place of repair are to be paid by the owner.
- Page 2 REGULAR: Cada vez que vacie el dep6sito para polvo, debe limpiar el filtro con un au Service exclusif d 'assistanoe t @l@honique auxmembres de la gammePlatinum Collection ` `'<: de Hoover,au 1 877 692"5866, dulun auven de 8 h_ 17 h(HNE)Au...