Table of Contents
Advertisement
Advertisement
Table of Contents

Related Manuals for Eton Elite E100


Summary of Contents for Eton Elite E100
- Page 1 E100 AM/FM/Shortwave Radio OWNER’S MANUAL...
-
Page 3: Do You Need Help
E100 OWNER’S MANUAL DO YOU NEED HELP? We want you to thoroughly enjoy the use of your E100 radio. If you need help while learning its operation, please contact us, using the methods below. Monday-Friday, 8:30 a.m. - 4:00 p.m., North American Pacific Time. -
Page 4: Table Of Contents
TABLE OF CONTENTS INTRODUCTION... FEATURES... DIAGRAMS... GETTING STARTED... • WHAT THE E100 INCLUDES... • INSTALLING BATTERIES... • SELECTING AND USING AN AC ADAPTOR... • SIGNAL STRENGTH AND BATTERY STRENGTH INDICATOR... BASIC RADIO OPERATION... • IMPORTANT INITIAL SET-UP... • TURNING THE E100 ON AND OFF... •... -
Page 5: Introduction
E100 OWNER’S MANUAL 1 INTRODUCTION Thank you for purchasing the E100 AM/FM/Shortwave Radio. This radio has been designed and manufactured to high quality standards, and will provide reliable operation for many years. Please carefully read the Owner’s Manual in order to take advantage of the many interesting features of the E100. -
Page 6: Features
2 FEATURES MAJOR FEATURES OF THE E100 • SHORTWAVE: 1711 - 29.995 KHz • FM 87.0 - 108.0MHz; MW 520 - 1710 • Manual and Auto-Scan Tuning • Direct Keypad Frequency Entry • Manual/Auto Scan to scan the preset stations •... -
Page 7: Diagrams
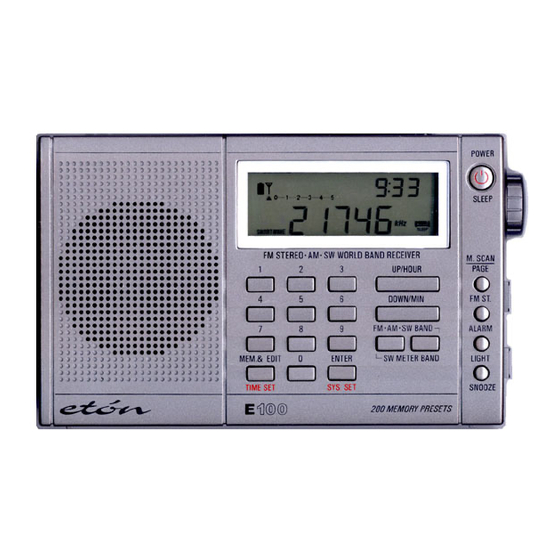
3 DIAGRAMS FRONT Memory & Edit/Time Set Numeric Keypad LEFT SIDE Hand Carry Belt ANT. GAIN H/M/L DC Jack Earphone Socket Reset Button E100 OWNER’S MANUAL Telescopic Antenna LCD Display POWER/SLEEP Fine Tuning Control Up/Hour Down/Min. Memory Scan/Page Button FM ST. Alarm Button Light Snooze Button FM-MW-SW Band Button... - Page 8 3 DIAGRAMS continued RADIO OFF DISPLAY Battery Symbol Antenna Symbol Alarm AM/PM Indicator 1-5 Scale Clock Digits Time AM/PM Indicator Triangle Pointer MEMORY DISPLAY Refers only to the display’s upper right corner. Memory Display Delete Indicator MEMORY DISPLAY Refers only to the display’s upper right corner. RADIO ON DISPLAY Battery Symbol Antenna Symbol...
-
Page 9: Getting Started
E100 OWNER’S MANUAL 4 GETTING STARTED WHAT THE E100 INCLUDES • Earbud style earphones • Batteries • Carrying pouch Note: In the instructions below, numbers in parenthesis ( ), refer to the diagrams. INSTALLING BATTERIES Install 2 AA alkaline batteries into the battery compartment (25), observing the battery polarity diagram on the back of the radio. -
Page 10: Basic Radio Operation
5 BASIC RADIO OPERATION IMPORTANT INITIAL SET-UP 1. Assure that the radio is unlocked, using the LOCK switch (24) on right side of the radio by pushing it down, to the OFF position. This switch can be used to lock the radio when it is not in use or when traveling. -
Page 11: Volume And Tone Controls
5 BASIC RADIO OPERATION continued VOLUME AND TONE CONTROLS • The volume control (23), labeled VOLUME, is located on the right side of the radio. To change the volume, rotate the volume control knob. • The tone control (22), on the right side of the radio is labeled LOW/HIGH. -
Page 12: Tuning In Stations
5 BASIC RADIO OPERATION continued TUNING IN STATIONS Four Ways to Tune in Stations Below, four ways to tune stations are described. They are Regular Tuning, Auto-scan Tuning, Direct Frequency Entry and Fine Tuning. 1. REGULAR TUNING (also called manual tuning) Quick, short presses of the Up/Hour-Down/Min. -
Page 13: Clock And Alarm Features
5 BASIC RADIO OPERATION continued 5.975 MHz), use the method described previously. 1. Press/release the ‘Enter’ (13) button. 2. Enter the frequency using the numeric keypad. 3. Press/release the ‘Enter’ button again. 4. FINE TUNING The FINE TUNING control (4) is located on the right side of the radio. - Page 14 6 CLOCK AND ALARM FEATURES continued twice or just wait until the clock digits stop flashing. SETTING THE ALARM Set the alarm with the instructions below. Note that the alarm must be activated to function. After setting the alarm time, be sure to read the next section titled ACTIVATING AND DEACTIVATING THE ALARM.
-
Page 15: Working With Memory
6 CLOCK AND ALARM FEATURES continued symbol (31) appears flashing in the display. While it is flashing, press/ release the SNOOZE/LIGHT button (10). The radio will turn off and then turn on again in 10 minutes. This process can be repeated 3 times. - Page 16 7 WORKING WITH MEMORY continued 2. Tune to the desired station. 3. Press/release the Mem.&Edit button (15). Note that the memory number digits (38) flash in the upper right corner of the display. The memory page number, P#, also appears, but does not flash.
- Page 17 7 WORKING WITH MEMORY continued Down/Min. buttons (5,6). You will see the memory page change with each press. When the page of your choice is reached, stop pressing. 3. When finished, either press/release the M.Scan/Page button, or wait about 3 seconds, causing the memory page to be entered. The clock (34) will reappear in the display’s upper right corner.
- Page 18 7 WORKING WITH MEMORY continued Memory Auto-Scan Memory Auto-scan enables scanning through the memories within the selected memory page. Each filled memory is accessed for about 5 seconds, after which the scan move on to the next used memory automatically, staying on it for about 5 seconds. This continues indefinitely on the selected page until deliberately stopped.
- Page 19 7 WORKING WITH MEMORY continued 5. Press/release the Mem.&Edit button (15). 6. Within 5 seconds use the numeric keypad to enter the memory number that you wish to store the station into. 7. Within 5 seconds press/release the Mem.&Edit button. DELETING A FREQUENCY STORED IN MEMORY 1.
-
Page 20: System Set Codes And The System Set Code Table
7 WORKING WITH MEMORY continued page having 25 memories, for a total of 200 memories. You can change this set-up. The number of memory pages can be set to your choice of 4, 5, 8 or 20. This changes the number of frequencies stored per page, but in all cases, 200 total frequencies can be stored. - Page 21 8 SYSTEM SET CODES AND THE SYSTEM SET CODE TABLE continued CODE DESCRIPTION Normal AAA battery to be used Set the FM frequency range to 76-108MHz (Japan) Set the FM frequency range to 87-108MHz (N. America; Western Europe) CHANGING SYSTEM SET CODES To enter a system code of your choice, use the procedure below.
- Page 22 E100 OWNER’S MANUAL 8 SYSTEM SET CODES AND THE SYSTEM SET CODE TABLE continued 3. Within 5 seconds, enter 12 with the numeric keypad, then immediately press/release the button labeled ENTER. ‘12H’ briefly appears in the display. DEFAULT FACTORY SYSTEM SET CODES When shipped from the factory, the radio’s System Set Code Table is set up as follows.
-
Page 23: Other E100 Information
E100 OWNER’S MANUAL 9 OTHER E100 INFORMATION USING THE LIGHT A quick, short press/release of the SNOOZE/LIGHT button (10), located at the top of the radio, will turn on the display light, shining from the right side of the display, for about 10 seconds. A longer, 5 second press/release of the button will cause it to stay on indefi- nitely (note that this will greatly decrease battery life). -
Page 24: Troubleshooting
9 OTHER E100 INFORMATION continued PREVENTING BATTERY ACID LEAKAGE To avoid battery acid leakage, only use high quality alkaline or rechargeable nickel-metal-hydride batteries. Never intermix old with new, or different brands or types of batteries. If the batteries leak, don’t throw them away and immediately contact the manufacturer of the batteries. - Page 25 10 TROUBLESHOOTING continued CLOCK SHOWS IN DISPLAY, BUT RADIO WILL NOT TURN ON There are two possibilities: dead batteries or the LOCK switch is ON. SHUTS OFF ABRUPTLY WHILE PLAYING DURING BATTERY USE This is caused by depleted batteries. Replace them. SHUTS OFF ABRUPTLY WHILE BEING MOVED DURING AC ADAPTOR USE This is caused by a broken wire or loose connection in the AC adaptor...
-
Page 26: Listening To Shortwave Stations
10 TROUBLESHOOTING continued A STATION CAUSES SEVERE AUDIO DISTORTION, BUT SEEMS TO BE VERY STRONG IN SIGNAL STRENGTH This is probably a strong, local station, very close to your location. Be- cause of its close proximity to you, its signal is too strong. To reduce signal strengths, place the ANTENNA GAIN switch into the M or L position. - Page 27 11 LISTENING TO SHORTWAVE STATIONS continued • Around sunset and sunrise, both the day and night bands may be good, sometimes exceptionally good. Listening at these times can often be quite rewarding. • Signal strengths are often stronger when holding the radio in your hands and being very close to a window.
- Page 28 11 LISTENING TO SHORTWAVE STATIONS continued right corner. AUTO-SCAN TUNING WHILE IN SHORTWAVE In shortwave, auto-scan tuning only auto-scans in the shortwave frequency ranges noted in the Band Chart below. To tune shortwave frequencies that are in-between these ranges, or outside of these ranges, use one of the other tuning methods, e.g.
- Page 29 E100 OWNER’S MANUAL 11 LISTENING TO SHORTWAVE STATIONS continued PUBLICATIONS THAT PROVIDE MORE DETAILED SHORTWAVE INFORMATION There are two excellent publication that provide very detailed short- wave information, including a listing of all world-wide shortwave stations, their specific frequencies, broadcast times and target areas. These publications are listed below and are available from major bookstores and at online booksellers.
-
Page 30: Shortwave Listening Guide
E100 OWNER’S MANUAL 12 SHORTWAVE LISTENING GUIDE UNDERSTANDING SHORTWAVE BANDS: THE KEY TO ENJOYING YOUR SHORTWAVE RADIO Introduction Now that you have a shortwave radio, no doubt you’ll want to hear worldwide stations right away. If you’re new to shortwave, please take some time to learn the basics outlined below. - Page 31 E100 OWNER’S MANUAL 12 SHORTWAVE LISTENING GUIDE continued shown here. Look at your radio’s tuning scale or digital display (or owner’s manual) to determine which frequency designation it uses in shortwave. Most radios use the abbreviations KHz and MHz. On some shortwave radios these frequencies will look like 15100 KHz, 15105 KHz or 15110 KHz, but on other radios they might look like this: 15.1 MHz, 15.105 MHz or 15.11 MHz.
- Page 32 12 SHORTWAVE LISTENING GUIDE continued BAND MEGAHERTZ (MHz) 120 m 2.300-2.500 MHz 90 m 3.20-3.40 MHz 75 m 3.90-4.00 MHz 60 m 4.750-5.060 MHz 49 m 5.950-6.20 MHz 41 m 7.10-7.60 MHz 31 m 9.20-9.90 MHz 25 m 11.600-12.200 MHz 22 m 13.570-13.870 MHz 19 m...
- Page 33 E100 OWNER’S MANUAL 12 SHORTWAVE LISTENING GUIDE continued Consult your owner’s manual for instruction on how to access the bands on your radio or call Etón Corporation if it’s not clear to you. SUNSET AND SUNRISE – OFTEN THE VERY BEST TIME TO LISTEN We are often asked whether there is a truly best time for listening to shortwave, when signals are strongest and clearest.
- Page 34 12 SHORTWAVE LISTENING GUIDE continued BANDS CHARACTERISTICS Results vary. Worth trying. Sometimes extremely good around sunrise and sunset. Similar to 19m. The best overall daytime band. May also be good at night in the summer months. Sometimes extremely good around sunrise and sunset. Some- times good at night in the summer.
- Page 35 12 SHORTWAVE LISTENING GUIDE continued EVENING/NIGHT LISTENING This is the best time to listen, because the broadcasters are deliber- ately transmitting to North America. These bands may be extremely good around sunset and sunrise too. Best night bands are shown in BOLD print in the table below.
-
Page 36: Warranty Registration
13 Warranty Registration To ensure full warranty coverage or product updates, registration of your Etón or Grundig product should be complete as soon as possible after purchase or receipt. To register your radio, please select one of the following methods: 1) Register by visiting our website at http://www.etoncorp.com... -
Page 37: Limited Warranty To The Original Customer
E100 OWNER’S MANUAL 14 LIMITED WARRANTY TO THE ORIGINAL CUSTOMER This Etón or Grundig brand product, as supplied and distributed by Etón Corporation (Etón) is warranted by Etón against manufacturing defects in material and workmanship for the following limited warranty period: One (1) year parts and labor This limited warranty begins on the original date of purchase, and is valid only on products purchased through an authorized Etón retailer... - Page 38 E100 OWNER’S MANUAL 14 LIMITED WARRANTY TO THE ORIGINAL CUSTOMER supplied by Etón; accidents, misuse, abuse, neglect, misapplication, fire, water, lightning, or other acts of nature; incorrect line volt- age, fluctuations or surges; damage caused by improper or faulty installation (including batteries, which may create an acid leak with irreversible circuit damage);...
-
Page 39: Service Information
15 SERVICE INFORMATION SERVICE YOUR ETÓN OR GRUNDIG PRODUCT To obtain service for your Etón or Grundig product we recommend first contacting an Etón service representative at 800-872-2228 US, 800-637-1648 Canada or (650) 903-3866 for problem determina- tion and trouble-shooting. Many of the common questions can be resolved quickly over the phone. - Page 40 E100 OWNER’S MANUAL...
- Page 41 Etón Corporation Corporate Headquarters 1015 Corporation Way Palo Alto, California 94303 USA tel +1 650-903-3866 tel +1 800-872-2228 fax +1 650-903-3867 Etón Europe/Lextronix Germany Rosenstrasse 2 D-10178 Berlin, Germany tel +49 [0]30 243102142 Etón Canada 1 Yonge Street, Suite 1801 Toronto, Ontario M5E 1W7 Canada tel +1 416-214-6885 v.