Sharp HT-DV40H Operation Manual
Dvd cinema
Hide thumbs
Also See for HT-DV40H:
- Quick start manual (2 pages) ,
- Operation manual (81 pages) ,
- Service manual (160 pages)
Table of Contents
Advertisement
Quick Links
DVD CINEMA
MODEL
HT-DV40H
HT-DV50H
OPERATION MANUAL
Note:
This product is not compatible with MTP and AAC file systems.
Thank you for purchasing this SHARP product. To obtain the best
performance from this product, please read this manual carefully. It
will guide you in operating your SHARP product.
This manual contains two different home cinema systems, and may not
be available in all countries.
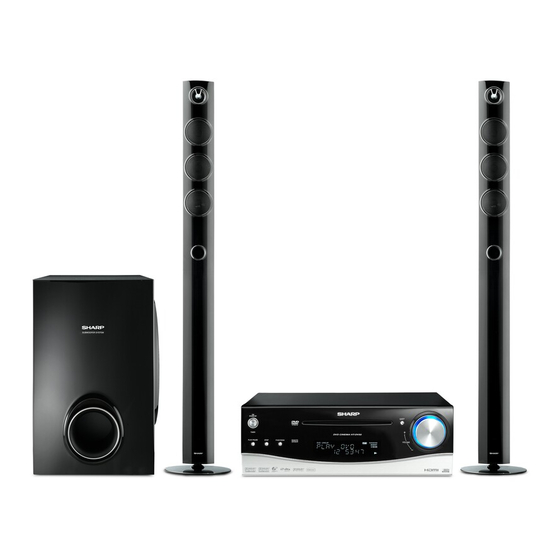
HT-DV40H DVD Cinema consisting of HT-DV40H (main .unit),
CP-DV40H (speaker) and CP-SW40H (subwoofer system).
HT-DV50H DVD Cinema consisting of HT-DV50H (main unit),
CP-DV50H (speaker) and CP-SW40H (subwoofer system).
MODEL : HT-DV40H
SPEAKERS : CP-DV40H
SUBWOOFER : CP-SW40H
MODEL : HT-DV50H
SPEAKERS : CP-DV50H
SUBWOOFER : CP-SW40H
Advertisement
Table of Contents

Related Manuals for Sharp HT-DV40H


Summary of Contents for Sharp HT-DV40H
-
Page 1: Operation Manual
Thank you for purchasing this SHARP product. To obtain the best performance from this product, please read this manual carefully. It will guide you in operating your SHARP product. This manual contains two different home cinema systems, and may not be available in all countries. - Page 2 Recording and playback of any material may require consent, which This product incorporates copyright protection technology that is SHARP is unable to give. Please refer particularly to the provisons of protected by method claims of certain U.S. patents and other...
- Page 3 Special Note HT-DV40H HT-DV50H Supply of this product does not convey a license nor imply any right to distribute content created with this product in revenue-generating broadcast systems (terrestrial, satellite, cable and/or other distribu- tion channels), revenue-generating streaming applications (via Internet, intranets and/or other networks), other revenue-generating content distribution systems (pay-audio or audio-on-demand appli- Cleaning cloth...
-
Page 4: Table Of Contents
HT-DV40H Contents HT-DV50H Page Page General Information To play in the desired order (programmed play) ... 43 To play repeatedly (repeat play) ......44 Precautions . -
Page 5: Precautions
10 cm (4") specified is dangerous and may result in a fire or other type of accident causing damage. SHARP will not be held responsible for Do not place subwoofer system on the same surface as main unit any damage resulting from use of this unit with a voltage other than that which is specified. -
Page 6: Controls And Indicators
HT-DV40H Controls and indicators HT-DV50H Front panel Reference page 1. CD Compartment ....... . . 36 2. - Page 7 HT-DV40H HT-DV50H Display Reference page 4 5 6 7 8 9 10 11 1. Chapter Indicator ....... . . 44 2.
- Page 8 HT-DV40H Controls and indicators (continued) HT-DV50H Speaker system (CP-DV40H) CP-DV40H 1. Tweeter 2. Woofers 3. Bass Reflex Duct 4. Speaker Terminals Speaker grilles are removable: Make sure nothing comes into contact LEFT with the speaker diaphragms when you remove the speaker grilles. Speaker system (CP-DV50H) CP-DV50H 1.
-
Page 9: Remote Control
HT-DV40H HT-DV50H Remote control Reference page 1. Remote Control Transmitter ......22 2. DVD Direct Button ....... . 40 3. -
Page 10: Controls And Indicators
20. Demo Button ........19 Some models of SHARP TV may not be operable. -
Page 11: Description Of Discs
HT-DV40H Description of discs HT-DV50H Types of playable discs (*1): Playability depends on recording device or disc condition The DVD player can play back discs bearing any of the following (special disc, scratches, dirt or dirt on pick up). marks: (*2): The DVD-R/DVD-RW/CD-R/CD-RW may not be played back properly depending on the recording equipment or the disc. -
Page 12: Description Of Discs
HT-DV40H Description of discs (continued) HT-DV50H Discs that cannot be played Icons used on DVD discs Check the icons on the DVD case before playing your discs. DVDs without the region DVD+R number on the back of the unit. DVD+RW Display Description DVDs with SECAM... -
Page 13: System Installation
HT-DV40H System installation HT-DV50H Magnetically shielded speakers HT-DV40H The speakers can be placed beside or near the TV as they are magnetically shielded. However, uneven colours may appear on the Installation image: screen depending on the type of TV. CP-DV40H speakers If colour variation occurs: (left and right) -
Page 14: System Connections
HT-DV40H System connections HT-DV50H Make sure to unplug the AC power lead before making any connections. HT-DV40H Left speaker FM aerial Right speaker Left speaker RIGHT LEFT To a wall socket Subwoofer Purple... - Page 15 HT-DV40H HT-DV50H HT-DV50H Left speaker Right speaker Left speaker FM aerial To a wall socket Subwoofer Purple...
- Page 16 Stand hole installation. Driving screws SHARP designed the speakers so you may hang them on the wall. Use proper screws (not supplied). See below for size and type. 3.2 mm (1/8") 3 Connect the other end to the main unit.
- Page 17 HT-DV40H HT-DV50H Installing the speakers Horizontal position : Fix the pattern paper and fix two screws into the wall with a distance of Align the deco back cover to the hole on the speaker. 160 mm (6-5/16") in between. Fix them securely with the flush screw. Vertical position : Fix the pattern paper and screws into the wall.
- Page 18 HT-DV40H System connections (continued) HT-DV50H CP-DV50H 4 Connect the wire without insulation tube to the speakers minus (-) terminal, and the wire with red insulation tube to the speakers 1 Route the speaker wire through a stand hole and attach the bottom cabinet to stand.
- Page 19 HT-DV40H HT-DV50H Subwoofer External FM aerial Use an external FM aerial if you require better reception. 1 Connect the wire without insulation tube to the SUBWOOFER Consult your dealer. minus (-) terminal, and the wire with purple insulation tube to the SUBWOOFER plus (+) terminal.
-
Page 20: Connecting To A Conventional Tv/Monitor
HT-DV40H Connecting to a conventional TV/monitor HT-DV50H Notes: Caution: Change the TV input in accordance with the connected socket. Turn off all other equipment before making connections. Do not connect other equipment between the TV and this unit. If they are connected via a VCR, pictures may be distorted. If your TV has different indications for the component video inputs If the TV/monitor has video input, connect it to (Y, CB and CR or Y, B-Y and P-Y), connect sockets with its... -
Page 21: Audio Connection To Other Equipment
HT-DV40H Audio connection to other equipment HT-DV50H You can hear the sound of other equipment via this product. Connect Connection for the digital tuner sound (or other the DVD player, VCR or digital tuner to a TV directly to receive the optical digital equipment such as an MD player) images (refer to the operation manual of each equipment). -
Page 22: Remote Control
HT-DV40H Remote control HT-DV50H Battery installation Notes concerning use: Replace the batteries if the operating distance is reduced or if the 1 Open the battery cover. operation becomes erratic. Purchase 2 “AA” size batteries 2 Insert the supplied batteries according to the direction (UM/SUM-3, R6, HP-7 or similar). -
Page 23: Changing The Set Up Menu
Turn on the TV. Set the TV to the correct input, eg. “AV1”, “VIDEO”, etc. Turn on the unit by pressing the ON/STAND-BY button. The SHARP startup screen appears. Note: Startup screen will be displayed when both S-Video cable and SCART cable are connected to the TV. - Page 24 HT-DV40H Changing the set up menu (continued) HT-DV50H Set up menu Selectable parameters (* indicates default setting) Description SYSTEM TV SYSTEM NTSC Select the correct colour system (TV standard). PAL* (for details, see page 28) SET UP AUTO VIDEO S-VIDEO Select “S-VIDEO or SCART or COMP.
- Page 25 CHINESE GERMAN ITALIAN DivX [R] REGISTRATION SHARP provide you the DivX registration code that CODE allows you to rent and purchase videos using the DivX service. Please go to www.divx.com/vod for * * * * * * * * more information.
- Page 26 HT-DV40H Changing the set up menu (continued) HT-DV50H Set up menu Selectable parameters (* indicates default setting) Description VIDEO BRIGHTNESS To adjust TV screen brightness level. SET UP CONTRAST To adjust TV screen contrast level. To adjust TV screen hue level.
- Page 27 HT-DV40H HT-DV50H Set up menu Selectable parameters (* indicates default setting) Description SATURATION To adjust TV screen saturation level. HDMI OUTPUT 480P/576P To select HDMI resolution. 720P* 1080 I DIGITAL DYNAMIC Dynamic Range Control can be set from OFF to FULL. SET UP RANGE FULL...
- Page 28 HT-DV40H Changing the set up menu (continued) HT-DV50H TV display setting Refer pages 23 - 27 “Changing the set up menu” and follow the changing steps provided. Indicator Setting DVD disc type Unit setting 4:3 PS When playing a wide image (16:9) NTSC NTSC disc, the left and right sides of the...
- Page 29 HT-DV40H HT-DV50H Rating setting Password setting Select “SYSTEM SET UP” on the Set up menu screen (see From the set up menu, select “SYSTEM SET UP”, “PASSWORD” steps 1 - 6 on page 23). and choose “----- ”. Before setting “RATING”, ensure password is unlocked “...
-
Page 30: General Control
HT-DV40H General control HT-DV50H Volume auto fade-in If you turn off and on the main unit with volume set to 34 or higher, the volume starts at 20 and fades in to the last set level. If you turn off and on the main unit with the volume level set to less than 34, the volume starts at the last level volume setting. -
Page 31: Setting The Clock (Remote Control Only)
Setting the clock (Remote Control only) HT-DV40H HT-DV50H Press the button to adjust the hour and then press the MEMORY/DIMMER button. Press the button once to advance the time by 1 hour. Hold it down to advance continuously. Press the button to adjust the minutes and then press the MEMORY/DIMMER button. -
Page 32: Enjoying Surround Sound (Sound Mode)
HT-DV40H Enjoying surround sound (sound mode) HT-DV50H Preset sound modes and sound image Voice of narration comes out from the centre; you can hear cheers and feel You can enjoy normal stereo sounds. the atmosphere in the theatre with a wide sound field like 5.1ch. - Page 33 HT-DV40H HT-DV50H Preset sound mode Dolby Virtual Speaker (DVS) sound mode Select any of the 8 preset modes already set to the optimal sound The Dolby Virtual Speaker (DVS) creates virtual surround sound quality levels. comparable to the 5.1ch sound produced by the 2.1ch speaker. Select a desired sound mode by pressing the SHIFT and SOUND When setting DVS to “ON”...
- Page 34 HT-DV40H Enjoying surround sound (sound mode) (continued) HT-DV50H Audistry sound mode Enjoy a variety of sounds by each or any combination of the 4 The Dolby Virtual Speaker creates multichannel-like modes. sound effects. Press the SHIFT and desired mode button simultaneously. Press it again to cancel.
- Page 35 HT-DV40H HT-DV50H Notes: When setting each mode of Audistry to “ON”, the preset sound SOUND SPACE mode setting is cancelled. (Sound stage expansion) When setting the SOUND SPACE or MONO TO STEREO mode to “ON”, the DVS setting is also cancelled. (It is not cancelled even The 4 speakers create spacious stereo sounds.
-
Page 36: Playing A Disc
Playback 2”, etc. accordingly. Press the ON/STAND-BY button to turn the power on. “SHARP” startup screen appears on the TV screen. NO DISC Press the DVD/CD button on the remote control. Insert the disc into the disc slot, label side up. -
Page 37: Various Disc Functions
HT-DV40H HT-DV50H Various disc functions Playback will begin from track 1. After the last track on the disc is played, the unit will stop Function Main Remote Operation automatically. unit control To remove the disc: In the stop mode, press the button. -
Page 38: To Resume Playback After Stopping (Resume Play)
HT-DV40H Playing a disc (continued) HT-DV50H To interrupt playback To resume playback after stopping Press the (DVD/CD ) button. (resume play) To resume playback from the same point, press the (DVD/CD You can resume playback from the point playback is stopped. ) button. -
Page 39: Basic Operation
HT-DV40H Basic operation HT-DV50H Fast forward/Fast reverse (search) You can search the desired point as you play the disc. Whilst a disc is playing, press and hold the button. The scanning speed will change as follows at each press of the button. -
Page 40: To Start Playback From The Desired Point (Direct Play)
HT-DV40H Basic operation (continued) HT-DV50H To start playback from the desired point (direct To play by specifying time (time search): You can play back from the desired point by specifying the time. play) Press DIRECT button. To select and play the desired title and chapter: startup Input desired time here Whilst in the stop or playback mode, press the DIRECT... -
Page 41: Useful Operation
HT-DV40H Useful operation HT-DV50H Slow motion play You can slow down the playback speed. Whilst a disc is playing, press the SLOW button repeatedly to select the desired speed. The speed changes as follows: SF 1/2 SF 1/2 SF 1/3 SF 1/4 SF 1/5 SF 1/6... -
Page 42: To Change The Angle
HT-DV40H Useful operation (continued) HT-DV50H To change the angle To play the contents between the specified points repeatedly (A-B repeat) You can change the angle of view when playing a DVD disc that contains scenes recorded from multiple angle. When “ ”... -
Page 43: To Play In The Desired Order (Programmed Play)
HT-DV40H HT-DV50H To play in the desired order (programmed play) Select “PLAY” at the PROGRAM menu by pressing button and press ENTER button on remote control to start play. You can play back the desired tracks in a specific order. Maximum of 16 tracks can be programmed. -
Page 44: To Play Repeatedly (Repeat Play)
HT-DV40H Useful operation (continued) HT-DV50H To play repeatedly (repeat play) To change the display on TV screen You can display or hide the operation indicators on the TV screen. Whilst a disc is playing, press the ON SCREEN button. (The display You can play a chapter (track) or a title repeatedly by specifying it is changed at each press.) during playback. -
Page 45: To Change The Subtitle Language
HT-DV40H HT-DV50H MP3/WMA: To change the subtitle language Title, Artist and Album name is displayed if it is recorded on the disc. You can change the subtitle language or hide subtitles during Display content can be changed by pressing the CLEAR/ playback. -
Page 46: Listening To A Cd Or Mp3/Wma Disc
HT-DV40H Listening to a CD or MP3/WMA disc HT-DV50H This system can play back a standard CD, CD-R/RW in the CD format The following playback functions are the same as DVD and CD-R/RW with MP3 or WMA files, but cannot record on them. operations. -
Page 47: Advanced Cd Or Mp3/Wma Disc Playback
HT-DV40H Advanced CD or MP3/WMA disc playback HT-DV50H To play in random order (random play) Use the Direct Search buttons on the remote control to select the desired track whilst playing The tracks on the disc play back can be played in random order or in the stop mode. -
Page 48: Divx And Jpeg Disc Operation
HT-DV40H DivX and JPEG disc operation HT-DV50H Page Playback on the DivX and JPEG menu screen Playing a disc ........36 - 38 To locate the beginning of a chapter track (skip) . -
Page 49: Zoom Function
HT-DV40H HT-DV50H Zoom function Rotating a picture During playback, press the ZOOM button. During playback, press the button. Each press of the ZOOM button cycles through the zoom The image rotates as below: setting as follows: button : 90° rotation in a clockwise direction. NORMAL PLAY (ZOOM : OFF) ZOOM 2 ZOOM 3... -
Page 50: Playback On Usb Memory Device
HT-DV40H Playback on USB memory device To remove USB memory device HT-DV50H Playback on USB memory device To remove USB memory device Press the button. You can play USB recorded in JPEG, MP3 and WMA formats. Disconnect USB memory device from the USB terminal. The following functions are the same as DVD or CD operations: Page To locate the beginning of a chapter track (skip) . -
Page 51: Advanced Usb Playback
HT-DV50H Notes: Repeat play (REMOTE CONTROL ONLY) SHARP will not be held liable for the loss of data whilst the USB Repeat play can play single track and all track sequence memory device is connected to the audio system. continuously. -
Page 52: Listening To The Radio
HT-DV40H Listening to the radio Advanced USB playback (continued) HT-DV50H To cancel random playback, press again the SHIFT and RANDOM buttons, so that the random indicator will disappear. Notes: If you press the button during random play, you can move to the track selected next by the random operation. In random play, the unit will select and play tracks automatically. - Page 53 HT-DV40H HT-DV50H Notes: Within 30 seconds, press the MEMORY/DIMMER button to When radio interference occurs, auto scan tuning may stop store that station in memory. automatically at that point. Auto scan tuning will skip weak signal stations. To stop the auto tuning, press the TUNING ( ) button again.
-
Page 54: Using The Radio Data System (Rds)
HT-DV40H Using the Radio Data System (RDS) HT-DV50H RDS is a broadcasting service which a growing number of FM Information provided by RDS stations provide. These FM stations send additional signals Each time the RDS DISP button is pressed, the display will along with their regular programme signals. - Page 55 HT-DV40H HT-DV50H Using the Auto Station Programme Memory To stop the ASPM operation before it is complete: Press the SHIFT and RDS ASPM button whilst it is scanning (ASPM) for stations. Whilst in the ASPM operation mode, the tuner will automatically The stations which are already stored in memory will be kept there.
- Page 56 HT-DV40H Using the Radio Data System (RDS) (continued) HT-DV50H Notes: To recall stations in memory The same station name can be stored in different channels. To specify programmed types and select stations (PTY search): In a certain area or during certain time periods, the station names You can search a station by specifying the programme type (news, may temporarily be different.
- Page 57 HT-DV40H HT-DV50H Notes: Descriptions of the PTY (Programme Type) codes, TP (Traffic If the display has stopped flashing, start again from step 2. If the Programme) and TA (Traffic Announcement). unit finds a desired programme type, the corresponding channel You can search for and receive the following PTY, TP and TA number will flash for about 4 seconds, and then the station name signals.
- Page 58 HT-DV40H Using the Radio Data System (RDS) (continued) HT-DV50H LIGHT M Classical music for general, rather than specialist COUNTRY Songs which originate from, or continue the musical appreciation. Examples of music in this category tradition American Southern State are instrumental music, and vocal or choral works. characterised by a straightforward melody and narrative story line.
-
Page 59: Timer And Sleep Operation (Remote Control Only)
Timer and sleep operation (Remote Control only) HT-DV40H HT-DV50H Timer playback: The unit turns on and plays the desired source (DVD/CD, USB, TUNER, OPTICAL 1, OPTICAL 2, AUX IN, SCART) at a preset time. This unit has 2 types of timer: ONCE TIMER and DAILY TIMER. Once timer: Once timer play works for one time only at a preset time. - Page 60 HT-DV40H Timer and sleep operation (Remote Control only) (continued) HT-DV50H Within 10 seconds, press the button to select Adjust the volume using the VOLUME control, and then “ONCE SET” or “DAILY SET”, and press the MEMORY/ press the MEMORY/DIMMER button. DIMMER button.
- Page 61 HT-DV40H HT-DV50H Note: Sleep operation When performing timer playback using another unit connected to the The radio, discs and USB can all be turned off automatically. USB terminal/OPTICAL 1/OPTICAL 2/AUX IN/SCART sockets, select USB or OPTICAL 1 or OPTICAL 2 or AUX or SCART in step 8. Play back the desired sound source.
-
Page 62: Headphone Connection
HT-DV40H Headphone connection Timer and sleep operation (Remote HT-DV50H Control only) (continued) To cancel the sleep operation: Press the ON/STAND-BY button whilst “SLEEP” is indicated. To cancel the sleep operation without setting the unit to the stand-by mode, proceed as follows. 1 Whilst “SLEEP”... -
Page 63: Troubleshooting Chart
Symptom Possible cause If something is wrong with this product, check the following before calling your authorised SHARP dealer or service centre. Even though a disc is Is the disc loaded upside down? loaded, “No Disc” is Is the disc very dirty? displayed. - Page 64 HT-DV40H Troubleshooting chart (continued) HT-DV50H Condensation Sudden temperature changes, storage or operation in an extremely Symptom Possible cause humid environment may cause condensation inside the cabinet (CD Device cannot be Is there any MP3/WMA file available? pickup, etc.) or on the transmitter on the remote control. detected.
-
Page 65: Maintenance
Should the same message Caution: appear, contact your authorised SHARP dealer or service centre. Do not use chemicals for cleaning (petrol, paint thinner, etc.). It may damage the cabinet finish. -
Page 66: Specifications
HT-DV40H Specifications HT-DV50H As part of our policy of continuous improvement, SHARP reserves the right to make design and specification changes for product improvement without prior notice. The performance specification USB host Complies with USB 1.1/2.0 (Full Speed) figures indicated are nominal values of production units. There may interface Mass Storage Class. - Page 67 HT-DV40H HT-DV50H DVD player CP-DV50H Speaker Type 2-way type speaker system Signal system PAL/NTSC colour 2.5 cm (1") tweeter Supported disc DVD (with the same region number at the 6.5 cm (2-1/2") woofer (x 3) types back of the unit), audio CD, CD-R, CD-RW, JPEG, DivX (version 3 ~ 6) Maximum input 150 W...
- Page 68 TINSEA226AWZZ 07M R AS 1...